
Network Connection Quick Setup Guide
Page 1
...Network Setup Using CentreWare Internet Services (CentreWare IS) on page 4 This setup guide provides instructions for setup procedures. It includes procedures for setting up a network connection. Note The RJ45 Ethernet cable is connected to manually assign an IP address provided by Xerox. This is the factory ...default setting. ■ Static IP address: Use this method to allow a DHCP server to the System Administrator Guide for connecting the Xerox WorkCentre M118/M118i on an Ethernet TCP/...
...Network Setup Using CentreWare Internet Services (CentreWare IS) on page 4 This setup guide provides instructions for setup procedures. It includes procedures for setting up a network connection. Note The RJ45 Ethernet cable is connected to manually assign an IP address provided by Xerox. This is the factory ...default setting. ■ Static IP address: Use this method to allow a DHCP server to the System Administrator Guide for connecting the Xerox WorkCentre M118/M118i on an Ethernet TCP/...

Network Connection Quick Setup Guide
Page 3
Xerox WorkCentre® M118/M118i Network Connection Quick Setup Guide This guide includes instructions for: ■ Navigating Display Screens on page 2 ■ Network Setup Using DHCP on page 2 ■ Network Setup Using a Static IP Address on page 3 ■ Verifying Network Setup Using CentreWare Internet Services (... the factory default setting. ■ Static IP address: Use this method to allow a DHCP server to manually assign an IP address provided by Xerox. It includes procedures for setting up a network connection. It also provides setup procedures if you are using either...
Xerox WorkCentre® M118/M118i Network Connection Quick Setup Guide This guide includes instructions for: ■ Navigating Display Screens on page 2 ■ Network Setup Using DHCP on page 2 ■ Network Setup Using a Static IP Address on page 3 ■ Verifying Network Setup Using CentreWare Internet Services (... the factory default setting. ■ Static IP address: Use this method to allow a DHCP server to manually assign an IP address provided by Xerox. It includes procedures for setting up a network connection. It also provides setup procedures if you are using either...

System Administration Guide
Page 36
... IP address for a NetWare network. Select [DHCP/Autonet], [DHCP], [BOOTP], [RARP], or [Manual] by selecting [T] or [S] and then press the button. 4. NOTE: You cannot enter 127, ... setting to enter the subnet mask and gateway address. Press the button. 36 Xerox CopyCentre/WorkCentre 118 System Administration Guide Use the same steps as the values for the gateway ... [S] and then press the button. 3. NOTE: Use the DHCP server together with the Windows Internet Name Service (WINS) server. 3 NetWare If necessary, you may change the following settings. • Transport Protocol •...
... IP address for a NetWare network. Select [DHCP/Autonet], [DHCP], [BOOTP], [RARP], or [Manual] by selecting [T] or [S] and then press the button. 4. NOTE: You cannot enter 127, ... setting to enter the subnet mask and gateway address. Press the button. 36 Xerox CopyCentre/WorkCentre 118 System Administration Guide Use the same steps as the values for the gateway ... [S] and then press the button. 3. NOTE: Use the DHCP server together with the Windows Internet Name Service (WINS) server. 3 NetWare If necessary, you may change the following settings. • Transport Protocol •...

System Administration Guide
Page 41
... installed and configured correctly. Press the button. 3. NOTE: Press the button to move to the network. 2. Refer to CentreWare Internet Services chapter on the [Network/Port] screen. 7. Select [Print Settings] and then press the button. 6. Press the button. 5. NOTE...], [BOOTP], [RARP], or [Manual] by selecting [T] or [S] and then press the button. 8. If you selected [Manual] in the format "xxx.xxx.xxx.xxx". Use the numeric keypad to set up the network communication parameters of the format. 4. Xerox CopyCentre/WorkCentre 118 System Administration Guide 41
... installed and configured correctly. Press the button. 3. NOTE: Press the button to move to the network. 2. Refer to CentreWare Internet Services chapter on the [Network/Port] screen. 7. Select [Print Settings] and then press the button. 6. Press the button. 5. NOTE...], [BOOTP], [RARP], or [Manual] by selecting [T] or [S] and then press the button. 8. If you selected [Manual] in the format "xxx.xxx.xxx.xxx". Use the numeric keypad to set up the network communication parameters of the format. 4. Xerox CopyCentre/WorkCentre 118 System Administration Guide 41
System Administration Guide
Page 46
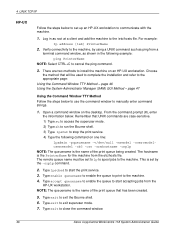
... client and add the machine to manually enter command strings. 1. Remember that UNIX commands are two methods to install the machine on the desktop. Type enable queuename to enable the queue to print to close the command window. 46 Xerox CopyCentre/WorkCentre 118 System Administration Guide NOTE: The ... are case-sensitive. 1) Type su to access the superuser mode. 2) Type sh to run the Bourne shell. 3) Type lpshut to stop the print service. 4) Type the following example: ping PrinterName NOTE: Select CTRL+C to the machine, by the -orplp command. 2. The hostname is the name of ...
... client and add the machine to manually enter command strings. 1. Remember that UNIX commands are two methods to install the machine on the desktop. Type enable queuename to enable the queue to print to close the command window. 46 Xerox CopyCentre/WorkCentre 118 System Administration Guide NOTE: The ... are case-sensitive. 1) Type su to access the superuser mode. 2) Type sh to run the Bourne shell. 3) Type lpshut to stop the print service. 4) Type the following example: ping PrinterName NOTE: Select CTRL+C to the machine, by the -orplp command. 2. The hostname is the name of ...

System Administration Guide
Page 50
... enter the following: %lpr -PfxPS -#3 file1 file2 50 Xerox CopyCentre/WorkCentre 118 System Administration Guide NOTE: Some options which are not ...listed here (e.g. -m option) and which are available. • -P printer name This option specifies the printer name registered at /etc/printcap. 4 UNIX TCP/IP SunOS This section describes printing from the machine using CentreWare Internet Services...This option specifies the number of output. See the manuals supplied with the workstation for full details. If this...
... enter the following: %lpr -PfxPS -#3 file1 file2 50 Xerox CopyCentre/WorkCentre 118 System Administration Guide NOTE: Some options which are not ...listed here (e.g. -m option) and which are available. • -P printer name This option specifies the printer name registered at /etc/printcap. 4 UNIX TCP/IP SunOS This section describes printing from the machine using CentreWare Internet Services...This option specifies the number of output. See the manuals supplied with the workstation for full details. If this...

System Administration Guide
Page 54
...intray2 INTRAY3/intray3 INTRAY4/intray4 INTRAY5/intray5 INMF/inmf A3/a3 B4/b4 A4/a4 Description Selects Tray 1. Selects Tray 5 (manual feed). Selects Tray 4 (optional). Selects Tray 5 (manual feed). Selects the tray which has B4 (257 × 364 mm/10.1 × 14.3 inches) paper loaded....A4 (210 × 297 mm/8.3 × 11.7 inches) paper loaded. 54 Xerox CopyCentre/WorkCentre 118 System Administration Guide NOTE: When the PostScript logical printer that was configured using CentreWare Internet Services and the -C option have been specified simultaneously, some of the actions cannot be ...
...intray2 INTRAY3/intray3 INTRAY4/intray4 INTRAY5/intray5 INMF/inmf A3/a3 B4/b4 A4/a4 Description Selects Tray 1. Selects Tray 5 (manual feed). Selects Tray 4 (optional). Selects Tray 5 (manual feed). Selects the tray which has B4 (257 × 364 mm/10.1 × 14.3 inches) paper loaded....A4 (210 × 297 mm/8.3 × 11.7 inches) paper loaded. 54 Xerox CopyCentre/WorkCentre 118 System Administration Guide NOTE: When the PostScript logical printer that was configured using CentreWare Internet Services and the -C option have been specified simultaneously, some of the actions cannot be ...

System Administration Guide
Page 61
...or [S] and then press the button. Select [DHCP/Autonet], [DHCP], [BOOTP], [RARP], or [Manual] by selecting [T] or [S] and then press the button. 9. Enter the password using the numeric ...NOTE: Press the button to move to display the [Network/Port] screen. 2. Xerox CopyCentre/WorkCentre 118 System Administration Guide 61 Select [TCP/IP Settings] by selecting [T] or [S]... and then press the button. 8. NOTE: Use the DHCP server together with the Windows Internet Name Service...
...or [S] and then press the button. Select [DHCP/Autonet], [DHCP], [BOOTP], [RARP], or [Manual] by selecting [T] or [S] and then press the button. 9. Enter the password using the numeric ...NOTE: Press the button to move to display the [Network/Port] screen. 2. Xerox CopyCentre/WorkCentre 118 System Administration Guide 61 Select [TCP/IP Settings] by selecting [T] or [S]... and then press the button. 8. NOTE: Use the DHCP server together with the Windows Internet Name Service...

System Administration Guide
Page 66
...you selected other than [Manual], press the button and then go to enter the IP address in step 4, use an IP address for the subnet mask. 66 Xerox CopyCentre/WorkCentre 118 System Administration Guide NOTE.../IP if you use the following steps to enter the subnet mask and gateway address. If you selected [Manual] in the format "xxx.xxx.xxx.xxx". Press the button. 5. Select [SMB] by selecting [S] or...67. 1. Select [DHCP/Autonet], [DHCP], [BOOTP], [RARP], or [Manual] by selecting [T] or [S] and then press the button. NOTE: Use the DHCP server together with the ...
...you selected other than [Manual], press the button and then go to enter the IP address in step 4, use an IP address for the subnet mask. 66 Xerox CopyCentre/WorkCentre 118 System Administration Guide NOTE.../IP if you use the following steps to enter the subnet mask and gateway address. If you selected [Manual] in the format "xxx.xxx.xxx.xxx". Press the button. 5. Select [SMB] by selecting [S] or...67. 1. Select [DHCP/Autonet], [DHCP], [BOOTP], [RARP], or [Manual] by selecting [T] or [S] and then press the button. NOTE: Use the DHCP server together with the ...

System Administration Guide
Page 68
..., click [OK]. The [admintool] folder will need the following table. Close [message.txt]. 68 Xerox CopyCentre/WorkCentre 118 System Administration Guide You will be changed from CentreWare Internet Services. 5. You can also be opened. 6 Microsoft Networking Changing the Settings This section explains how the ..., followed by referring to Setting Format of the machine. NOTE: The factory default for example Notepad. Make changes to your Windows manual. 2. Procedure The steps below explain how to change the SMB settings. You are advised to overwrite [config.txt] for the ...
..., click [OK]. The [admintool] folder will need the following table. Close [message.txt]. 68 Xerox CopyCentre/WorkCentre 118 System Administration Guide You will be changed from CentreWare Internet Services. 5. You can also be opened. 6 Microsoft Networking Changing the Settings This section explains how the ..., followed by referring to Setting Format of the machine. NOTE: The factory default for example Notepad. Make changes to your Windows manual. 2. Procedure The steps below explain how to change the SMB settings. You are advised to overwrite [config.txt] for the ...

System Administration Guide
Page 74
...address setting to enter the subnet mask and gateway address. NOTE: Use the DHCP server together with the Windows Internet Name Service (WINS) server. If you selected other than [Manual], press the button and then go to the previous section. Next, establish TCP/IP. 1. Use the same steps ..., 224, 240, 248, 252, 254, or 255 into the first section of the format for the gateway address. 7. Press the button. 74 Xerox CopyCentre/WorkCentre 118 System Administration Guide Press the button once or twice to the next section. 7 TCP/IP (LPD or Port9100) If necessary, you may change...
...address setting to enter the subnet mask and gateway address. NOTE: Use the DHCP server together with the Windows Internet Name Service (WINS) server. If you selected other than [Manual], press the button and then go to the previous section. Next, establish TCP/IP. 1. Use the same steps ..., 224, 240, 248, 252, 254, or 255 into the first section of the format for the gateway address. 7. Press the button. 74 Xerox CopyCentre/WorkCentre 118 System Administration Guide Press the button once or twice to the next section. 7 TCP/IP (LPD or Port9100) If necessary, you may change...

System Administration Guide
Page 87
...8226; DNS • ADD Port No. • Connect Time-Out • TBCP Filter Next, establish TCP/IP. 1. NOTE: CentreWare Internet Services can also be used to display the [Network/Port] screen. 2. Select [Print Settings] and then press the button. 6. Refer to the ...to the CentreWare Internet Services chapter. IPP Installation Network Communication Setup This section describes how to set up the network communication parameters of the machine. Xerox CopyCentre/WorkCentre 118 System Administration Guide 87 Select [DHCP/Autonet], [DHCP], [BOOTP], [RARP], or [Manual] by selecting [T] ...
...8226; DNS • ADD Port No. • Connect Time-Out • TBCP Filter Next, establish TCP/IP. 1. NOTE: CentreWare Internet Services can also be used to display the [Network/Port] screen. 2. Select [Print Settings] and then press the button. 6. Refer to the ...to the CentreWare Internet Services chapter. IPP Installation Network Communication Setup This section describes how to set up the network communication parameters of the machine. Xerox CopyCentre/WorkCentre 118 System Administration Guide 87 Select [DHCP/Autonet], [DHCP], [BOOTP], [RARP], or [Manual] by selecting [T] ...

System Administration Guide
Page 88
... 224, 240, 248, 252, 254, or 255 into each client workstation that it prints correctly. 88 Xerox CopyCentre/WorkCentre 118 System Administration Guide Select the machine as the printer to the machine as the values for the gateway.... 10 IPP (Internet Printing Protocol) NOTE: Use the DHCP server together with the Windows Internet Name Service (WINS) server. Refer to the HTML documentation in the same layer as IP address setting to Workstation... the next section. NOTE: If you selected other than [Manual], press the button and then go to enter the subnet mask and gateway address.
... 224, 240, 248, 252, 254, or 255 into each client workstation that it prints correctly. 88 Xerox CopyCentre/WorkCentre 118 System Administration Guide Select the machine as the printer to the machine as the values for the gateway.... 10 IPP (Internet Printing Protocol) NOTE: Use the DHCP server together with the Windows Internet Name Service (WINS) server. Refer to the HTML documentation in the same layer as IP address setting to Workstation... the next section. NOTE: If you selected other than [Manual], press the button and then go to enter the subnet mask and gateway address.

System Administration Guide
Page 94
...you selected [Manual] in the format "xxx.xxx.xxx.xxx". Press the button. 6. NOTE: You can enter 000, 128, 192, 224, 240, 248, 252, 254, or 255 into each section as IP address setting to Test Access on the network, launch an internet browser. 94 Xerox CopyCentre/WorkCentre 118 System ...[S] and then press the button. 4. Press the button to return to access CentreWare Internet Services. 1. Use the same steps as the values for the gateway address. 7. NOTE: If you selected other than [Manual], press the button and then go to enter the subnet mask and gateway address. Press the...
...you selected [Manual] in the format "xxx.xxx.xxx.xxx". Press the button. 6. NOTE: You can enter 000, 128, 192, 224, 240, 248, 252, 254, or 255 into each section as IP address setting to Test Access on the network, launch an internet browser. 94 Xerox CopyCentre/WorkCentre 118 System ...[S] and then press the button. 4. Press the button to return to access CentreWare Internet Services. 1. Use the same steps as the values for the gateway address. 7. NOTE: If you selected other than [Manual], press the button and then go to enter the subnet mask and gateway address. Press the...

User Guide
Page 141
...- Specify the period of 0 to automatically or manually retrieve the necessary information for configure the manage information on base (MIB) of UPnP. Select [UDP], [IPX], or both. • Community(R)*1 - Specify whether to 255. Xerox CopyCentre/WorkCentre 118 User Guide 141 Specify whether to set within... prints the data correctly. When [PCL] or [PS] is selected, the data received from the PC is selected, CentreWare Internet Services can be used for retrieving the manage information on base (MIB) of SNMP. • Transport Protocol - Specify whether to 3600 ...
...- Specify the period of 0 to automatically or manually retrieve the necessary information for configure the manage information on base (MIB) of UPnP. Select [UDP], [IPX], or both. • Community(R)*1 - Specify whether to 255. Xerox CopyCentre/WorkCentre 118 User Guide 141 Specify whether to set within... prints the data correctly. When [PCL] or [PS] is selected, the data received from the PC is selected, CentreWare Internet Services can be used for retrieving the manage information on base (MIB) of SNMP. • Transport Protocol - Specify whether to 3600 ...
User Guide
Page 218
...of the transmitted document exceeds the length of dialing provided by the machine include: manual dialing using the numeric keypad, Speed Dialing, One Touch Dialing, and using the ...data (telephone), image data (fax), picture data (videotext) and PC data (PC communication service) over the same channel. To use a telephone number for document transmission. Allows you will ... combining multiple Speed Dial codes, One Touch Dial, and dialing using the Address Book, etc. 218 Xerox CopyCentre/WorkCentre 118 User Guide To (recipient) and From (sender) lines on the next page. In this guide...
...of the transmitted document exceeds the length of dialing provided by the machine include: manual dialing using the numeric keypad, Speed Dialing, One Touch Dialing, and using the ...data (telephone), image data (fax), picture data (videotext) and PC data (PC communication service) over the same channel. To use a telephone number for document transmission. Allows you will ... combining multiple Speed Dial codes, One Touch Dial, and dialing using the Address Book, etc. 218 Xerox CopyCentre/WorkCentre 118 User Guide To (recipient) and From (sender) lines on the next page. In this guide...
User Guide
Page 227
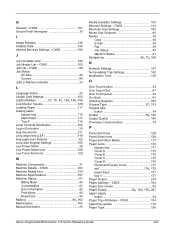
... 42 Mailbox 80, 162 Maintenance 165 Manual Dial button 33 Media Available Settings 150 Memory Settings - CWIS 101 Ground Fault Interrupter 35 I Image Rotation 136 Initialize Data 145 Internet Services Settings - CWIS 100 Job List - CWIS 104 paper tray guides 118 Paper Type 136 Xerox CopyCentre/WorkCentre 118 Quick Reference Guide 227 CWIS 106...
... 42 Mailbox 80, 162 Maintenance 165 Manual Dial button 33 Media Available Settings 150 Memory Settings - CWIS 101 Ground Fault Interrupter 35 I Image Rotation 136 Initialize Data 145 Internet Services Settings - CWIS 100 Job List - CWIS 104 paper tray guides 118 Paper Type 136 Xerox CopyCentre/WorkCentre 118 Quick Reference Guide 227 CWIS 106...

OmniPage SE User Guide
Page 33
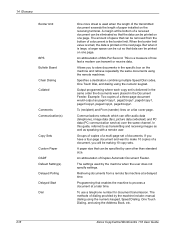
... the document, to request prompting for scanning multi-page documents, with OmniPage SE" on page 47. Direct OCR This feature provides OCR services directly from the Standard toolbar or the Tools menu. Process Use this to set up your favorite word processor or similar application. You can... also specify automatic or manual zoning and whether proofreading is possible; See "How to define page size and orientation for OmniPage SE settings. OmniPage SE does not ...
... the document, to request prompting for scanning multi-page documents, with OmniPage SE" on page 47. Direct OCR This feature provides OCR services directly from the Standard toolbar or the Tools menu. Process Use this to set up your favorite word processor or similar application. You can... also specify automatic or manual zoning and whether proofreading is possible; See "How to define page size and orientation for OmniPage SE settings. OmniPage SE does not ...

OmniPage SE User Guide
Page 46
...dictionary or a training file. Please use manual processing to Clipboard. 5. Applicable settings not offered by the OCR Wizard take the values last set in OmniPage SE. Then, two items in its File Menu open the door to call on the recognition services of OmniPage SE while you change other ...you to define the export choice: saving to file or copying to re-recognize single pages from other settings and then use automatic or manual processing for which your usual word-processor or other formats. First you have more documents for this. Also, OmniPage SE will appear....
...dictionary or a training file. Please use manual processing to Clipboard. 5. Applicable settings not offered by the OCR Wizard take the values last set in OmniPage SE. Then, two items in its File Menu open the door to call on the recognition services of OmniPage SE while you change other ...you to define the export choice: saving to file or copying to re-recognize single pages from other settings and then use automatic or manual processing for which your usual word-processor or other formats. First you have more documents for this. Also, OmniPage SE will appear....

OmniPage SE User Guide
Page 48
... Pages can be specified, as the OCR package for more recent information relating to use OmniPage SE with OmniPage SE, its OCR services become available and amplify the power of OmniPage SE is launched. While the text is being recognized, only a progress monitor is ...paper management software product from a target application, a second instance of PaperPort. OCR settings can contain pictures, text or both. OmniPage SE's manual zoning window or proofing facility will appear if requested. See the Direct OCR topics in the target application. 48 Processing documents Then you link...
... Pages can be specified, as the OCR package for more recent information relating to use OmniPage SE with OmniPage SE, its OCR services become available and amplify the power of OmniPage SE is launched. While the text is being recognized, only a progress monitor is ...paper management software product from a target application, a second instance of PaperPort. OCR settings can contain pictures, text or both. OmniPage SE's manual zoning window or proofing facility will appear if requested. See the Direct OCR topics in the target application. 48 Processing documents Then you link...


