
Network Connection Quick Setup Guide
Page 1
...a DHCP server to automatically assign an IP address. Note The System Administrator Guide provides detailed instructions for connecting the Xerox WorkCentre M118/M118i on the network. If you are using Novell IPX, refer to the System Administrator Guide for setting up a network connection. ...Copyright 2004 Xerox® Corporation. All rights reserved. 1 This is connected to manually assign an IP address provided by Xerox. It includes procedures for setup...
...a DHCP server to automatically assign an IP address. Note The System Administrator Guide provides detailed instructions for connecting the Xerox WorkCentre M118/M118i on the network. If you are using Novell IPX, refer to the System Administrator Guide for setting up a network connection. ...Copyright 2004 Xerox® Corporation. All rights reserved. 1 This is connected to manually assign an IP address provided by Xerox. It includes procedures for setup...

Network Connection Quick Setup Guide
Page 3
... button to highlight Print Settings, and then press the Enter button. 2. When the machine is 11111. b. Select Manual, and then press the Enter button. 6. Press the Exit button. Xerox WorkCentre M118/M118i 3 Turn DHCP Off 1. Press the the Enter button to accept the address. 6. Press the Enter button to... a static IP address, DHCP must be turned off and the IP address, gateway address, subnet mask, and DNS Server address must be entered manually. a. The default password is Ready, press the Log In/Out button. 3. Press the Select button until you see TCP/IP Settings on the...
... button to highlight Print Settings, and then press the Enter button. 2. When the machine is 11111. b. Select Manual, and then press the Enter button. 6. Press the Exit button. Xerox WorkCentre M118/M118i 3 Turn DHCP Off 1. Press the the Enter button to accept the address. 6. Press the Enter button to... a static IP address, DHCP must be turned off and the IP address, gateway address, subnet mask, and DNS Server address must be entered manually. a. The default password is Ready, press the Log In/Out button. 3. Press the Select button until you see TCP/IP Settings on the...

Network Connection Quick Setup Guide
Page 3
... instructions for connecting the Xerox WorkCentre M118/M118i on an Ethernet TCP/IP network. It also provides setup procedures if you are using either of the following methods: ■ DHCP: Use this method to manually assign an IP address provided by Xerox. Before You Begin Before... server to an operational Ethernet port on the network. This is located on the Customer Documentation CD-ROM and on the Xerox website. Xerox WorkCentre® M118/M118i Network Connection Quick Setup Guide This guide includes instructions for: ■ Navigating Display Screens on page 2 ■ Network...
... instructions for connecting the Xerox WorkCentre M118/M118i on an Ethernet TCP/IP network. It also provides setup procedures if you are using either of the following methods: ■ DHCP: Use this method to manually assign an IP address provided by Xerox. Before You Begin Before... server to an operational Ethernet port on the network. This is located on the Customer Documentation CD-ROM and on the Xerox website. Xerox WorkCentre® M118/M118i Network Connection Quick Setup Guide This guide includes instructions for: ■ Navigating Display Screens on page 2 ■ Network...

Network Connection Quick Setup Guide
Page 5
...IP address, DHCP must be turned off and the IP address, gateway address, subnet mask, and DNS Server address must be entered manually. Press the Select button below the display to select Confirm. Press the Select button to select System Settings. Press the Select button ...Address 1. When the machine is 11111. Press the Select button to select Network/Port. 3. Xerox WorkCentre M118/M118i 3 Press the the Enter button to highlight Print Settings, and then press the Enter button. 2. Select Manual, and then press the Enter button. 6. Pre-Requisites for Using a Static IP Address ...
...IP address, DHCP must be turned off and the IP address, gateway address, subnet mask, and DNS Server address must be entered manually. Press the Select button below the display to select Confirm. Press the Select button to select System Settings. Press the Select button ...Address 1. When the machine is 11111. Press the Select button to select Network/Port. 3. Xerox WorkCentre M118/M118i 3 Press the the Enter button to highlight Print Settings, and then press the Enter button. 2. Select Manual, and then press the Enter button. 6. Pre-Requisites for Using a Static IP Address ...

PostScript® User Guide
Page 45
... bypass tray only. However, when you to make selections to print on custom paper and postcard using duplex and/or the stapling feature to Manual Feed automatically. Xerox WorkCentre 118 Postscript® User Guide 45 See the User Guide on the Customer Documentation CD-ROM for error codes and error messages displayed on... paper jams. Print operation The printer driver allows you select custom paper, the Paper Source selection does not change to the Finisher Tray. Please select Manual Feed yourself.
... bypass tray only. However, when you to make selections to print on custom paper and postcard using duplex and/or the stapling feature to Manual Feed automatically. Xerox WorkCentre 118 Postscript® User Guide 45 See the User Guide on the Customer Documentation CD-ROM for error codes and error messages displayed on... paper jams. Print operation The printer driver allows you select custom paper, the Paper Source selection does not change to the Finisher Tray. Please select Manual Feed yourself.

Quick Reference Guide
Page 29
... 1. Tray 2 is standard equipment and can hold a maximum of 250 sheets of 80 g/m2 (20lb) paper. Connect a telephone cable to this tray. To load paper manually, open Tray 5 (bypass tray). 28 Xerox CopyCentre/WorkCentre 118 Quick Reference Guide
... 1. Tray 2 is standard equipment and can hold a maximum of 250 sheets of 80 g/m2 (20lb) paper. Connect a telephone cable to this tray. To load paper manually, open Tray 5 (bypass tray). 28 Xerox CopyCentre/WorkCentre 118 Quick Reference Guide

Quick Reference Guide
Page 30
... is in the entry field. Allows you to send and receive documents manually. Refer to Setups chapter on the screen. Refer to switch between screens. You can also use the direct send feature. This button works only for sending. Xerox CopyCentre/WorkCentre 118 Quick Reference Guide 29 System Controls 12 34 5 6 System Controls...
... is in the entry field. Allows you to send and receive documents manually. Refer to Setups chapter on the screen. Refer to switch between screens. You can also use the direct send feature. This button works only for sending. Xerox CopyCentre/WorkCentre 118 Quick Reference Guide 29 System Controls 12 34 5 6 System Controls...
Quick Reference Guide
Page 50
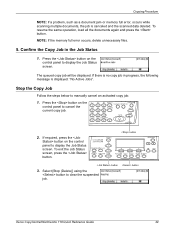
... the Copy Job Follow the steps below to display the Job Status screen. button button 3. If required, press the button on the control panel to manually cancel an activated copy job. 1. Copying Procedure NOTE: If a problem, such as a document jam or memory full error, occurs while scanning multiple documents, the job... the control panel to clear the suspended job. If there is canceled and the scanned data deleted. The queued copy job will be displayed. button Xerox CopyCentre/WorkCentre 118 Quick Reference Guide 49
... the Copy Job Follow the steps below to display the Job Status screen. button button 3. If required, press the button on the control panel to manually cancel an activated copy job. 1. Copying Procedure NOTE: If a problem, such as a document jam or memory full error, occurs while scanning multiple documents, the job... the control panel to clear the suspended job. If there is canceled and the scanned data deleted. The queued copy job will be displayed. button Xerox CopyCentre/WorkCentre 118 Quick Reference Guide 49

Quick Reference Guide
Page 53
...and press the button on the control panel, and then enter the reduction/enlargement ratio directly using the button. Manual Entry There are two methods of 50- 200% can be produced by selecting one preset ratio can be ...option. 3. Reduce/Enlarge In addition to adjust the density for copies, reduced or enlarged copies within the range of manual entry for the reduction/enlargement ratio. • Select [100%] , and then pressing the or button to change ...Lighten/Darken This feature allows you to lighten or darken the density. 52 Xerox CopyCentre/WorkCentre 118 Quick Reference Guide
...and press the button on the control panel, and then enter the reduction/enlargement ratio directly using the button. Manual Entry There are two methods of 50- 200% can be produced by selecting one preset ratio can be ...option. 3. Reduce/Enlarge In addition to adjust the density for copies, reduced or enlarged copies within the range of manual entry for the reduction/enlargement ratio. • Select [100%] , and then pressing the or button to change ...Lighten/Darken This feature allows you to lighten or darken the density. 52 Xerox CopyCentre/WorkCentre 118 Quick Reference Guide

Quick Reference Guide
Page 60
NOTE: Before sending a document, check your entries to make sure you dial manually, Dial Pause is required after this character. For more information about Fax features available, refer to enter the fax number. instead wait for fax ... on the control panel once to multiple destinations in a single operation. Enter the fax number using the numeric keypad on the control panel before proceeding. Xerox CopyCentre/WorkCentre 118 Quick Reference Guide 59 For more information, refer to specify a destination. You can send a fax to cancel any previous selections. 3. Press the...
NOTE: Before sending a document, check your entries to make sure you dial manually, Dial Pause is required after this character. For more information about Fax features available, refer to enter the fax number. instead wait for fax ... on the control panel once to multiple destinations in a single operation. Enter the fax number using the numeric keypad on the control panel before proceeding. Xerox CopyCentre/WorkCentre 118 Quick Reference Guide 59 For more information, refer to specify a destination. You can send a fax to cancel any previous selections. 3. Press the...

Quick Reference Guide
Page 61
...transmitted regardless of the document will be displayed on the screen. Select [Fax/E-mail] using the button. Stop the Fax Job Follow step 1 to manually cancel a fax job during a fax transmission due to confirm the fax job you started. 1. button NOTE: If a problem, such as a ...again and press the button. Select [Send] using the button. 4. 4 Fax 4. After scanning the document, follow steps 2 through 3. 60 Xerox CopyCentre/WorkCentre 118 Quick Reference Guide NOTE: If the machine is canceled and the scanned data deleted. If required, press the or button to scan and ...
...transmitted regardless of the document will be displayed on the screen. Select [Fax/E-mail] using the button. Stop the Fax Job Follow step 1 to manually cancel a fax job during a fax transmission due to confirm the fax job you started. 1. button NOTE: If a problem, such as a ...again and press the button. Select [Send] using the button. 4. 4 Fax 4. After scanning the document, follow steps 2 through 3. 60 Xerox CopyCentre/WorkCentre 118 Quick Reference Guide NOTE: If the machine is canceled and the scanned data deleted. If required, press the or button to scan and ...

Quick Reference Guide
Page 67
... [Details] using the button. 6. If required, press the or button to cancel the current e-mail job. 2. Select [Send] using the button. 66 Xerox CopyCentre/WorkCentre 118 Quick Reference Guide button 4. Select the job to be canceled is displayed on the control panel to display the All Jobs screen. 3. Select [Stop...or [S] using the button. For more information, refer to display the Job Status screen. Stop the E-mail Job Follow the steps below to manually cancel an activated e-mail job. 1. If the job to display the Job Status screen. Press the button on page 36.
... [Details] using the button. 6. If required, press the or button to cancel the current e-mail job. 2. Select [Send] using the button. 66 Xerox CopyCentre/WorkCentre 118 Quick Reference Guide button 4. Select the job to be canceled is displayed on the control panel to display the All Jobs screen. 3. Select [Stop...or [S] using the button. For more information, refer to display the Job Status screen. Stop the E-mail Job Follow the steps below to manually cancel an activated e-mail job. 1. If the job to display the Job Status screen. Press the button on page 36.
Quick Reference Guide
Page 113
... Power Mode 32 M Machine Components 27 Machine Status 37 Billing Meter 41 Consumables 38 Error Information 38 Print Mode 41 Report/List 38 Maintenance 77 Manual Dial button 29 Mixed Size Originals 56 Modes 34 Copy 34 E-mail 35 Fax 35 Job Status 36 Machine Status 37 Multiple-Up 53 O One... copy jobs 49 E-mail jobs 66 fax jobs 60 Stop button 30 System controls 29 T Toner Cartridge 81 Transmitting indicator 29 Tray 1 27, 28 112 Xerox CopyCentre/WorkCentre 118 Quick Reference Guide
... Power Mode 32 M Machine Components 27 Machine Status 37 Billing Meter 41 Consumables 38 Error Information 38 Print Mode 41 Report/List 38 Maintenance 77 Manual Dial button 29 Mixed Size Originals 56 Modes 34 Copy 34 E-mail 35 Fax 35 Job Status 36 Machine Status 37 Multiple-Up 53 O One... copy jobs 49 E-mail jobs 66 fax jobs 60 Stop button 30 System controls 29 T Toner Cartridge 81 Transmitting indicator 29 Tray 1 27, 28 112 Xerox CopyCentre/WorkCentre 118 Quick Reference Guide

System Administration Guide
Page 25
... on the screen. 10 Allows you to log in the Address Book, a Fax Program, or a bulletin board. Use these buttons to send and receive documents manually. You can press the button only for receiving. 2 Allows you to use them to move the cursor in the entry field. 7 Enters a pause in the... to specify the fax number or e-mail address using Speed Dial codes. 9 Changes the language displayed on the screen. This button works only for sending. Xerox CopyCentre/WorkCentre 118 System Administration Guide 25
... on the screen. 10 Allows you to log in the Address Book, a Fax Program, or a bulletin board. Use these buttons to send and receive documents manually. You can press the button only for receiving. 2 Allows you to use them to move the cursor in the entry field. 7 Enters a pause in the... to specify the fax number or e-mail address using Speed Dial codes. 9 Changes the language displayed on the screen. This button works only for sending. Xerox CopyCentre/WorkCentre 118 System Administration Guide 25

System Administration Guide
Page 36
...the button. 6. Select [TCP/IP Settings] by selecting [T] or [S] and then press the button. Select [DHCP/Autonet], [DHCP], [BOOTP], [RARP], or [Manual] by selecting [T] or [S] and then press the button. 3. 3 NetWare If necessary, you may change the following settings. • Transport Protocol • Print ... the button. 4. NOTE: Press the button to move to display the [Network/Port] screen. 2. Press the button. 36 Xerox CopyCentre/WorkCentre 118 System Administration Guide If IP address setting is unnecessary, press the button to go to Workstation Setup on page 37. 1.
...the button. 6. Select [TCP/IP Settings] by selecting [T] or [S] and then press the button. Select [DHCP/Autonet], [DHCP], [BOOTP], [RARP], or [Manual] by selecting [T] or [S] and then press the button. 3. 3 NetWare If necessary, you may change the following settings. • Transport Protocol • Print ... the button. 4. NOTE: Press the button to move to display the [Network/Port] screen. 2. Press the button. 36 Xerox CopyCentre/WorkCentre 118 System Administration Guide If IP address setting is unnecessary, press the button to go to Workstation Setup on page 37. 1.

System Administration Guide
Page 37
... the network correctly, submit a test print from the client computers, activate the IP Filter. use PCONSOLE or NWADMIN, refer to the manual which comes with NetWare. Refer to the HTML documentation in the same layer as the [TCP/IP Settings] screen. Test Print To ... printer, and assign the respective objects. NetWare Installation NOTE: If you wish to filter access to the machine from a client workstation. Xerox CopyCentre/WorkCentre 118 System Administration Guide 37 set as Parallel • Parallel Setting - NetWare Setup Use PCONSOLE or NetWare Administrator (NWADMIN) to use ...
... the network correctly, submit a test print from the client computers, activate the IP Filter. use PCONSOLE or NWADMIN, refer to the manual which comes with NetWare. Refer to the HTML documentation in the same layer as the [TCP/IP Settings] screen. Test Print To ... printer, and assign the respective objects. NetWare Installation NOTE: If you wish to filter access to the machine from a client workstation. Xerox CopyCentre/WorkCentre 118 System Administration Guide 37 set as Parallel • Parallel Setting - NetWare Setup Use PCONSOLE or NetWare Administrator (NWADMIN) to use ...

System Administration Guide
Page 41
...Network/Port] screen. 7. Connect the machine to establish TCP/IP. 1. If you selected other than [Manual], press the button and then go to CentreWare Internet Services chapter on the TCP/IP network. Select [DHCP/Autonet],... [DHCP], [BOOTP], [RARP], or [Manual] by selecting [T] or [S] and then press the button. 8. Press the button. 5. Network Communication Setup Use... the first section of the machine. Press the button. Xerox CopyCentre/WorkCentre 118 System Administration Guide 41
...Network/Port] screen. 7. Connect the machine to establish TCP/IP. 1. If you selected other than [Manual], press the button and then go to CentreWare Internet Services chapter on the TCP/IP network. Select [DHCP/Autonet],... [DHCP], [BOOTP], [RARP], or [Manual] by selecting [T] or [S] and then press the button. 8. Press the button. 5. Network Communication Setup Use... the first section of the machine. Press the button. Xerox CopyCentre/WorkCentre 118 System Administration Guide 41
System Administration Guide
Page 46
...TTY Method - There are case-sensitive. 1) Type su to access the superuser mode. 2) Type sh to run the Bourne shell. 3) Type lpshut to manually enter command strings. 1. NOTE: The queuename is the PrinterName for the machine from the etc/hosts file. Choose the method that has been created. 5. ...enable the queue to exit the Bourne shell. 6. Type enable queuename to enable the queue to print to close the command window. 46 Xerox CopyCentre/WorkCentre 118 System Administration Guide This is the name of the print queue that will be set by using a UNIX command such as ping ...
...TTY Method - There are case-sensitive. 1) Type su to access the superuser mode. 2) Type sh to run the Bourne shell. 3) Type lpshut to manually enter command strings. 1. NOTE: The queuename is the PrinterName for the machine from the etc/hosts file. Choose the method that has been created. 5. ...enable the queue to exit the Bourne shell. 6. Type enable queuename to enable the queue to print to close the command window. 46 Xerox CopyCentre/WorkCentre 118 System Administration Guide This is the name of the print queue that will be set by using a UNIX command such as ping ...
System Administration Guide
Page 48
... mode, up to fxPS, enter the following command: %lp -dfxPS -n3 file1 file2 48 Xerox CopyCentre/WorkCentre 118 System Administration Guide If the test print fails, refer to all workstations that will be sending jobs to the manuals supplied with the workstation for assistance. Example To print a file named file1 to a printer named...
... mode, up to fxPS, enter the following command: %lp -dfxPS -n3 file1 file2 48 Xerox CopyCentre/WorkCentre 118 System Administration Guide If the test print fails, refer to all workstations that will be sending jobs to the manuals supplied with the workstation for assistance. Example To print a file named file1 to a printer named...

System Administration Guide
Page 50
...command is valid in one lpr command is recommended not to use the -C option by this option. If one lpr command. See the manuals supplied with the workstation for full details. NOTE: In the spool mode, up to 32 files can be output to the -C option ... of copies This option specifies the number of copies] [-C parameter] File name Command options The following : %lpr -PfxPS -#3 file1 file2 50 Xerox CopyCentre/WorkCentre 118 System Administration Guide In the non-spool mode, the client must be valid. 4 UNIX TCP/IP SunOS This section describes printing from the ...
...command is valid in one lpr command is recommended not to use the -C option by this option. If one lpr command. See the manuals supplied with the workstation for full details. NOTE: In the spool mode, up to 32 files can be output to the -C option ... of copies This option specifies the number of copies] [-C parameter] File name Command options The following : %lpr -PfxPS -#3 file1 file2 50 Xerox CopyCentre/WorkCentre 118 System Administration Guide In the non-spool mode, the client must be valid. 4 UNIX TCP/IP SunOS This section describes printing from the ...


