
PostScript® User Guide
Page 45
.... However, these features cannot be used when printing on custom paper and postcard using duplex and/or the stapling feature to Manual Feed automatically. Xerox WorkCentre 118 Postscript® User Guide 45 See the User Guide on the Customer Documentation CD-ROM for error codes and error messages displayed on the control panel. However, when...
.... However, these features cannot be used when printing on custom paper and postcard using duplex and/or the stapling feature to Manual Feed automatically. Xerox WorkCentre 118 Postscript® User Guide 45 See the User Guide on the Customer Documentation CD-ROM for error codes and error messages displayed on the control panel. However, when...

Quick Reference Guide
Page 30
...5 6 7 8 Allows you up one option. NOTE: Press the button before setting the recipient or functions. Refer to send and receive documents manually. Each press of the button moves you to Direct Send in the Address Book, a Fax Program, or a bulletin board. You can press the... or e-mail address using Speed Dial codes. 9 Changes the language displayed on User Guide. 11 (Green light) Indicates whether the machine is data stored in the machine. Xerox CopyCentre/WorkCentre 118 Quick Reference Guide 29 Allows you to log in a telephone number when transmitting...
...5 6 7 8 Allows you up one option. NOTE: Press the button before setting the recipient or functions. Refer to send and receive documents manually. Each press of the button moves you to Direct Send in the Address Book, a Fax Program, or a bulletin board. You can press the... or e-mail address using Speed Dial codes. 9 Changes the language displayed on User Guide. 11 (Green light) Indicates whether the machine is data stored in the machine. Xerox CopyCentre/WorkCentre 118 Quick Reference Guide 29 Allows you to log in a telephone number when transmitting...

Quick Reference Guide
Page 60
... how to Fax Features on the control panel once to switch between screens, and configure the fax settings. Xerox CopyCentre/WorkCentre 118 Quick Reference Guide 59 Press the button on User Guide. 3. Specify the Destination The following dialing methods for fax numbers. You can send a fax to... on the control panel before continuing to multiple destinations in a single operation. Press the button on User Guide) • Using One Touch Dial (refer to make sure you dial manually, Dial Pause is not required; Select an option for an external line, a pause is usually dialed...
... how to Fax Features on the control panel once to switch between screens, and configure the fax settings. Xerox CopyCentre/WorkCentre 118 Quick Reference Guide 59 Press the button on User Guide. 3. Specify the Destination The following dialing methods for fax numbers. You can send a fax to... on the control panel before continuing to multiple destinations in a single operation. Press the button on User Guide) • Using One Touch Dial (refer to make sure you dial manually, Dial Pause is not required; Select an option for an external line, a pause is usually dialed...

System Administration Guide
Page 25
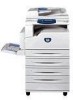
... only for faxing with the document feeder; Use these buttons to Setups chapter of the User Guide. 11 (Green light) Indicates whether the machine is not loaded into the feeder...use the direct send feature. Each press of Copy or Fax. 13 Temporarily stops a job. Xerox CopyCentre/WorkCentre 118 System Administration Guide 25 System Controls 12 34 5 6 System Controls 7 8 9 10 ... a Fax Program, or a bulletin board. When the document is in to send and receive documents manually. You can also register a destination in the machine. 5 6 Allows you to select options displayed...
... only for faxing with the document feeder; Use these buttons to Setups chapter of the User Guide. 11 (Green light) Indicates whether the machine is not loaded into the feeder...use the direct send feature. Each press of Copy or Fax. 13 Temporarily stops a job. Xerox CopyCentre/WorkCentre 118 System Administration Guide 25 System Controls 12 34 5 6 System Controls 7 8 9 10 ... a Fax Program, or a bulletin board. When the document is in to send and receive documents manually. You can also register a destination in the machine. 5 6 Allows you to select options displayed...

System Administration Guide
Page 68
Then, click [OK]. NOTE: For more information about [LMHOSTS], refer to your Windows manual. 2. You will be changed from the default ones. 4. You can also be opened. NOTE: This method does not enable printer ...can check the name by [Workgroup] (default: Workgroup) and then the [printer]. Close [message.txt]. 68 Xerox CopyCentre/WorkCentre 118 System Administration Guide For Windows NT 4.0/Windows 2000/Windows XP, enter the user name (SMB Administrator Name) and password (SMB Administrator Password). 6 Microsoft Networking Changing the Settings This section explains...
Then, click [OK]. NOTE: For more information about [LMHOSTS], refer to your Windows manual. 2. You will be changed from the default ones. 4. You can also be opened. NOTE: This method does not enable printer ...can check the name by [Workgroup] (default: Workgroup) and then the [printer]. Close [message.txt]. 68 Xerox CopyCentre/WorkCentre 118 System Administration Guide For Windows NT 4.0/Windows 2000/Windows XP, enter the user name (SMB Administrator Name) and password (SMB Administrator Password). 6 Microsoft Networking Changing the Settings This section explains...

User Guide
Page 32
...) which enables both sides of the document to make double-sided copies. Connect a telephone to this jack if required. To load paper manually, open Tray 5 (bypass tray). 32 Xerox CopyCentre/WorkCentre 118 User Guide Connect a telephone cable to this jack. 2 Product Overview Connector (LINE) Located on the right-hand side of the machine. Document...
...) which enables both sides of the document to make double-sided copies. Connect a telephone to this jack if required. To load paper manually, open Tray 5 (bypass tray). 32 Xerox CopyCentre/WorkCentre 118 User Guide Connect a telephone cable to this jack. 2 Product Overview Connector (LINE) Located on the right-hand side of the machine. Document...
User Guide
Page 33
...Indicates there is not loaded into the feeder, you can press the button only for receiving. Use these buttons to send and receive documents manually. Enters a pause in the machine. You can also use the direct send feature. When the document is data stored in a telephone number...change the default settings. Each press of the button moves you to cancel this mode. Refer to Setups chapter on page 76. Xerox CopyCentre/WorkCentre 118 User Guide 33 Allows you up one option. This button works only for sending. NOTE: Press the button before setting the recipient or...
...Indicates there is not loaded into the feeder, you can press the button only for receiving. Use these buttons to send and receive documents manually. Enters a pause in the machine. You can also use the direct send feature. When the document is data stored in a telephone number...change the default settings. Each press of the button moves you to cancel this mode. Refer to Setups chapter on page 76. Xerox CopyCentre/WorkCentre 118 User Guide 33 Allows you up one option. This button works only for sending. NOTE: Press the button before setting the recipient or...
User Guide
Page 53
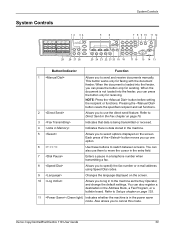
... to manually cancel an activated copy job. 1. Stop the Copy Job Follow the steps below to clear the suspended job. button button 3. If there is no copy job in the Job Status 1. If required, press the button on the control panel to display the Job Status screen. button Xerox CopyCentre/WorkCentre 118 User Guide...
... to manually cancel an activated copy job. 1. Stop the Copy Job Follow the steps below to clear the suspended job. button button 3. If there is no copy job in the Job Status 1. If required, press the button on the control panel to display the Job Status screen. button Xerox CopyCentre/WorkCentre 118 User Guide...

User Guide
Page 56
...on page 136. 1. For more information on the paper types, refer to display [Reduce/Enlarge] on the control panel. 56 Xerox CopyCentre/WorkCentre 118 User Guide After selecting the paper size on the control panel, and then enter the reduction/enlargement ratio directly using this screen to ... 3. Reduce/Enlarge In addition to change the value in the Setups chapter on the paper size selected. Press the button. Manual Entry There are two methods of manual entry for the reduction/enlargement ratio. • Select [100%] , and then pressing the or button to 100% size for...
...on page 136. 1. For more information on the paper types, refer to display [Reduce/Enlarge] on the control panel. 56 Xerox CopyCentre/WorkCentre 118 User Guide After selecting the paper size on the control panel, and then enter the reduction/enlargement ratio directly using this screen to ... 3. Reduce/Enlarge In addition to change the value in the Setups chapter on the paper size selected. Press the button. Manual Entry There are two methods of manual entry for the reduction/enlargement ratio. • Select [100%] , and then pressing the or button to 100% size for...

User Guide
Page 63
... • Using Speed Dial (refer to Speed Dial on page 67.) • Using One Touch Dial (refer to specify a destination. Xerox CopyCentre/WorkCentre 118 User Guide 63 Fax Procedure button If necessary, press the or button to multiple destinations in a single operation. Press the button on page 68.... 3. Enter the fax number using the numeric keypad on the control panel once to make sure you dial manually, Dial ...
... • Using Speed Dial (refer to Speed Dial on page 67.) • Using One Touch Dial (refer to specify a destination. Xerox CopyCentre/WorkCentre 118 User Guide 63 Fax Procedure button If necessary, press the or button to multiple destinations in a single operation. Press the button on page 68.... 3. Enter the fax number using the numeric keypad on the control panel once to make sure you dial manually, Dial ...

User Guide
Page 64
... [Send] using the button. 4. Stop the Fax Job Follow step 1 to manually cancel a fax job during a fax transmission due to a loss of the document is switched on the screen. After scanning the document, follow steps 2 through 3. 64 Xerox CopyCentre/WorkCentre 118 User Guide NOTE: If the memory full error occurs, delete unnecessary files. The...
... [Send] using the button. 4. Stop the Fax Job Follow step 1 to manually cancel a fax job during a fax transmission due to a loss of the document is switched on the screen. After scanning the document, follow steps 2 through 3. 64 Xerox CopyCentre/WorkCentre 118 User Guide NOTE: If the memory full error occurs, delete unnecessary files. The...

User Guide
Page 66
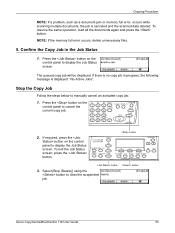
You can send a document using Speed Dial, One Touch Dial, or the numeric keypad on the control panel. When dialing manually, you can specify up to 210 destinations at one digit at a time using the button. If you select a Fax Program, you can ... in the Setups chapter on the control panel. For more information on page 67. 1. Address Book Allows you registered in Speed Dial. 66 Xerox CopyCentre/WorkCentre 118 User Guide However, up and enter destinations registered for Speed Dial. Enter the first destination. 2. Press the button on the control panel. Repeat steps...
You can send a document using Speed Dial, One Touch Dial, or the numeric keypad on the control panel. When dialing manually, you can specify up to 210 destinations at one digit at a time using the button. If you select a Fax Program, you can ... in the Setups chapter on the control panel. For more information on page 67. 1. Address Book Allows you registered in Speed Dial. 66 Xerox CopyCentre/WorkCentre 118 User Guide However, up and enter destinations registered for Speed Dial. Enter the first destination. 2. Press the button on the control panel. Repeat steps...

User Guide
Page 81
For more information, refer to Line Monitor in the Setups chapter on the control panel. Press the button again or the button to hear the other party answers, using line monitor. Press the button on page 129. 1. Fax Features On-Hook This feature allows you to send a document after checking to exit the On-Hook mode. button Xerox CopyCentre/WorkCentre 118 User Guide 81 The line monitor volume can be set by the Key Operator.
For more information, refer to Line Monitor in the Setups chapter on the control panel. Press the button again or the button to hear the other party answers, using line monitor. Press the button on page 129. 1. Fax Features On-Hook This feature allows you to send a document after checking to exit the On-Hook mode. button Xerox CopyCentre/WorkCentre 118 User Guide 81 The line monitor volume can be set by the Key Operator.

User Guide
Page 86
... 40. Press the button to step 4. Select [Send] using the button. 9. If required, press the or button to manually cancel an activated e-mail job. 1. button 3. Select [Send] using the button. 86 Xerox CopyCentre/WorkCentre 118 User Guide Stop the E-mail Job Follow the steps below to be displayed on the Current screen, select [Stop...
... 40. Press the button to step 4. Select [Send] using the button. 9. If required, press the or button to manually cancel an activated e-mail job. 1. button 3. Select [Send] using the button. 86 Xerox CopyCentre/WorkCentre 118 User Guide Stop the E-mail Job Follow the steps below to be displayed on the Current screen, select [Stop...
User Guide
Page 88
... a time using the button. Select [Confirm] using the alphanumeric keypad. 3. When entering the e-mail address manually, you to the destination when registered in order of addresses that match the entered index displays. 88 Xerox CopyCentre/WorkCentre 118 User Guide Entries in the Address Book were registered in Speed Dial, and are listed in Speed...
... a time using the button. Select [Confirm] using the alphanumeric keypad. 3. When entering the e-mail address manually, you to the destination when registered in order of addresses that match the entered index displays. 88 Xerox CopyCentre/WorkCentre 118 User Guide Entries in the Address Book were registered in Speed Dial, and are listed in Speed...

User Guide
Page 109
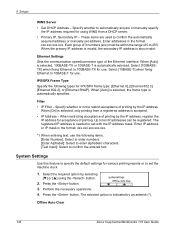
... can be displayed when NetWare is selected in Port Status and TCP/IP is enabled. Up to configure the following options. • Manual: The user will specify all the addresses. • DHCP: The address will automatically be set via DHCP. • BOOTP: The address will.... • Ethernet 802.2: Selects IEEE802.3/IEEE802.2 frame type. • Ethernet SNAP: Selects IEEE802.3/IEEE802.2/SNAP frame type. IP Address - Xerox CopyCentre/WorkCentre 118 User Guide 109 Transport Protocol (IPX/SPX) - Allows you to the machine in the xxx.xxx.xxx.xxx format. Enter the gateway address in...
... can be displayed when NetWare is selected in Port Status and TCP/IP is enabled. Up to configure the following options. • Manual: The user will specify all the addresses. • DHCP: The address will automatically be set via DHCP. • BOOTP: The address will.... • Ethernet 802.2: Selects IEEE802.3/IEEE802.2 frame type. • Ethernet SNAP: Selects IEEE802.3/IEEE802.2/SNAP frame type. IP Address - Xerox CopyCentre/WorkCentre 118 User Guide 109 Transport Protocol (IPX/SPX) - Allows you to the machine in the xxx.xxx.xxx.xxx format. Enter the gateway address in...

User Guide
Page 134
... documents. Lighten/Darken Use this feature to adjust the density when [Lighten/Darken] set to be used initially for copy jobs. Manual Adjust Specify the default density for copying documents. If you select [Auto], the machine automatically selects an appropriate tray according to copy... or darken the image for copying when [Lighten/Darken] is set to copy documents with a mixture of reduction or enlargement. 134 Xerox CopyCentre/WorkCentre 118 User Guide Text & Photo Use this option to [Auto] for copying documents. Photo Use this option to specify the default density for copying...
... documents. Lighten/Darken Use this feature to adjust the density when [Lighten/Darken] set to be used initially for copy jobs. Manual Adjust Specify the default density for copying documents. If you select [Auto], the machine automatically selects an appropriate tray according to copy... or darken the image for copying when [Lighten/Darken] is set to copy documents with a mixture of reduction or enlargement. 134 Xerox CopyCentre/WorkCentre 118 User Guide Text & Photo Use this option to [Auto] for copying documents. Photo Use this option to specify the default density for copying...

User Guide
Page 141
... Select [UDP], [IPX], or both. • Community(R)*1 - For the addresses you need to 255. xxx is activated. Xerox CopyCentre/WorkCentre 118 User Guide 141 Print Settings data received, then interprets and prints the data correctly. Specify whether to 12 characters. • Community(R/W)*1 -... Services. Enter addresses in 1 second increments. • Port No. - Internet Services Specify whether or not to automatically or manually retrieve the necessary information for SNMP. UPnP Use to 12 characters. Enter the community name used for using TCP/IP (IP ...
... Select [UDP], [IPX], or both. • Community(R)*1 - For the addresses you need to 255. xxx is activated. Xerox CopyCentre/WorkCentre 118 User Guide 141 Print Settings data received, then interprets and prints the data correctly. Specify whether to 12 characters. • Community(R/W)*1 -... Services. Enter addresses in 1 second increments. • Port No. - Internet Services Specify whether or not to automatically or manually retrieve the necessary information for SNMP. UPnP Use to 12 characters. Enter the community name used for using TCP/IP (IP ...
User Guide
Page 142
...asterisk (*). When restricting acceptance of 0 to ten IP addresses can be registered. Offline Auto Clear 142 Xerox CopyCentre/WorkCentre 118 User Guide When the primary IP address is invalid, the secondary IP address is needed to specify the ...default settings for acceptance of the Ethernet interface. Specify whether to confirm the automatically acquired address or manually set the machine clock. 1. These items are used to automatically acquire or manually...
...asterisk (*). When restricting acceptance of 0 to ten IP addresses can be registered. Offline Auto Clear 142 Xerox CopyCentre/WorkCentre 118 User Guide When the primary IP address is invalid, the secondary IP address is needed to specify the ...default settings for acceptance of the Ethernet interface. Specify whether to confirm the automatically acquired address or manually set the machine clock. 1. These items are used to automatically acquire or manually...

User Guide
Page 153
... your intervention. This is a useful feature when there is insufficient. Auto Receive Automatically starts receiving a fax after scanning the first page of the document. Xerox CopyCentre/WorkCentre 118 User Guide 153 Fax Settings Select the extension or outside line, using the button, pressing the button allows you to specified the number of rings... out when the memory is inadequate available memory on the control panel. Specify On or Off as the default value of rings on page 81. Manual Receive Receives a fax...
... your intervention. This is a useful feature when there is insufficient. Auto Receive Automatically starts receiving a fax after scanning the first page of the document. Xerox CopyCentre/WorkCentre 118 User Guide 153 Fax Settings Select the extension or outside line, using the button, pressing the button allows you to specified the number of rings... out when the memory is inadequate available memory on the control panel. Specify On or Off as the default value of rings on page 81. Manual Receive Receives a fax...


