
Quick Reference Guide
Page 72
... feed (LEF) Tray 5 (Bypass Tray) Tray 5 (bypass tray) allows you . Specify the paper size and type to accommodate larger sized paper. NOTE: To reduce unnecessary fuser and paper jams, it is important that excessively bending or folder the paper might cause paper jams. NOTE: When making copies or printing on the... feed or long edge feed. Note, however, that the programmed paper size and type is facing toward you to feed the opposite side of paper. Xerox CopyCentre/WorkCentre 118 Quick Reference Guide 71
... feed (LEF) Tray 5 (Bypass Tray) Tray 5 (bypass tray) allows you . Specify the paper size and type to accommodate larger sized paper. NOTE: To reduce unnecessary fuser and paper jams, it is important that excessively bending or folder the paper might cause paper jams. NOTE: When making copies or printing on the... feed or long edge feed. Note, however, that the programmed paper size and type is facing toward you to feed the opposite side of paper. Xerox CopyCentre/WorkCentre 118 Quick Reference Guide 71

Quick Reference Guide
Page 76
...Xerox CopyCentre/WorkCentre 118 Quick Reference Guide 75 Paper Type Tray 1 Tray 2, 3, 4 Tray 5 (Bypass Tray) Duplex Kit Plain O O O O Transparency X O O X Label X O O X Lightweight X O O X Heavyweight 1 (90-169 g/m2) X O O X Heavyweight 2 (170-216 g/m2) X O O X O: Available X: Not available • When using Arjo Wiggins Conqueror High Speed Laser... Laid CON90F (64010283), the paper type is set to high temperature in the fuser unit when it sets toner on the operating environment, certain types of the fuser unit when printing....
...Xerox CopyCentre/WorkCentre 118 Quick Reference Guide 75 Paper Type Tray 1 Tray 2, 3, 4 Tray 5 (Bypass Tray) Duplex Kit Plain O O O O Transparency X O O X Label X O O X Lightweight X O O X Heavyweight 1 (90-169 g/m2) X O O X Heavyweight 2 (170-216 g/m2) X O O X O: Available X: Not available • When using Arjo Wiggins Conqueror High Speed Laser... Laid CON90F (64010283), the paper type is set to high temperature in the fuser unit when it sets toner on the operating environment, certain types of the fuser unit when printing....

Quick Reference Guide
Page 86
... page 89 Paper Jams in Trays 1, 2, 3, and 4 (2-4 are left in the following the message on the screen. page 89 Paper Jams in Cover A - page 90 Xerox CopyCentre/WorkCentre 118 Quick Reference Guide 85 If a paper jam message is displayed again, paper is stuck in a hidden area or wrapped around the... fuser unit or rollers, do not remove it . NOTE: When removing jammed paper, make sure that none remain inside the machine, the machine stops, ...
... page 89 Paper Jams in Trays 1, 2, 3, and 4 (2-4 are left in the following the message on the screen. page 89 Paper Jams in Cover A - page 90 Xerox CopyCentre/WorkCentre 118 Quick Reference Guide 85 If a paper jam message is displayed again, paper is stuck in a hidden area or wrapped around the... fuser unit or rollers, do not remove it . NOTE: When removing jammed paper, make sure that none remain inside the machine, the machine stops, ...

Quick Reference Guide
Page 87
...green levers A1 and A2. Check the guidelines below to reduce the potential for a variety of the fuser unit. 86 Xerox CopyCentre/WorkCentre 118 Quick Reference Guide Open Tray 5 (bypass tray) if necessary, and then open the fuser unit cover. 3. Follow the messages on a flat surface. • The orientation of the media in...the maximum fill line in the tray to make sure the paper tray is not overloaded. • Do not use media that is inside the fuser unit, lower the green lever A2 in the direction of the arrow to open Cover A while lifting up the release lever. 2. If the ...
...green levers A1 and A2. Check the guidelines below to reduce the potential for a variety of the fuser unit. 86 Xerox CopyCentre/WorkCentre 118 Quick Reference Guide Open Tray 5 (bypass tray) if necessary, and then open the fuser unit cover. 3. Follow the messages on a flat surface. • The orientation of the media in...the maximum fill line in the tray to make sure the paper tray is not overloaded. • Do not use media that is inside the fuser unit, lower the green lever A2 in the direction of the arrow to open Cover A while lifting up the release lever. 2. If the ...

Quick Reference Guide
Page 88
...necessary, and then open the fuser unit cover. 3. Green Lever A2 1. If the jammed paper is inside the fuser unit, lower the green lever A2 in the direction of the arrow to open Cover A while lifting up the release lever. 2. Paper Jams Xerox CopyCentre/WorkCentre 118 Quick Reference Guide 87... 4. If the jammed paper is found in the fuser unit, carefully remove it may be hot. 4. Pull out the paper from the machine while holding...
...necessary, and then open the fuser unit cover. 3. Green Lever A2 1. If the jammed paper is inside the fuser unit, lower the green lever A2 in the direction of the arrow to open Cover A while lifting up the release lever. 2. Paper Jams Xerox CopyCentre/WorkCentre 118 Quick Reference Guide 87... 4. If the jammed paper is found in the fuser unit, carefully remove it may be hot. 4. Pull out the paper from the machine while holding...

User Guide
Page 119
... stack of the machine. Tray 5 (bypass tray) can be loaded either short edge feed or long edge feed. Xerox CopyCentre/WorkCentre 118 User Guide 119 Tray 5 (bypass tray) is required. NOTE: To reduce unnecessary fuser and paper jams, it is important that the flaps are face up to select paper size and type...
... stack of the machine. Tray 5 (bypass tray) can be loaded either short edge feed or long edge feed. Xerox CopyCentre/WorkCentre 118 User Guide 119 Tray 5 (bypass tray) is required. NOTE: To reduce unnecessary fuser and paper jams, it is important that the flaps are face up to select paper size and type...

User Guide
Page 123
Xerox CopyCentre/WorkCentre 118 User Guide 123 If loading the paper SEF, the paper may not feed correctly, and print quality may be affected. • Depending on the ... Kit Plain O O O O Transparency X O O X Label X O O X Lightweight X O O X Heavyweight 1 (90-169 g/m2) X O O X Heavyweight 2 (170-216 g/m2) X O O X O: Available X: Not available • When using Arjo Wiggins Conqueror High Speed Laser Laid CON90F (64010283), the paper type is set to high temperature in the fuser unit when it sets toner on the operating environment, certain types of the...
Xerox CopyCentre/WorkCentre 118 User Guide 123 If loading the paper SEF, the paper may not feed correctly, and print quality may be affected. • Depending on the ... Kit Plain O O O O Transparency X O O X Label X O O X Lightweight X O O X Heavyweight 1 (90-169 g/m2) X O O X Heavyweight 2 (170-216 g/m2) X O O X O: Available X: Not available • When using Arjo Wiggins Conqueror High Speed Laser Laid CON90F (64010283), the paper type is set to high temperature in the fuser unit when it sets toner on the operating environment, certain types of the...
User Guide
Page 172
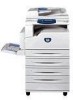
...Cover A Document Exit Cover D (Optional) D Tray 5 (Bypass Tray) Cover B Cover C A C B Exit Tray 1 Tray 2 (Optional) Tray 3 (Optional) Tray 4 (Optional) 172 Xerox CopyCentre/WorkCentre 118 User Guide Refer to clear paper jams in the machine, since they could get injured or burned. Gently remove the paper taking care not...could cause more jams or overheat the paper. This section describes how to Power Off Report in a hidden area or wrapped around the fuser unit or rollers, do not remove it . Follow the instructions on the display and remove the jammed paper. You can use the...
...Cover A Document Exit Cover D (Optional) D Tray 5 (Bypass Tray) Cover B Cover C A C B Exit Tray 1 Tray 2 (Optional) Tray 3 (Optional) Tray 4 (Optional) 172 Xerox CopyCentre/WorkCentre 118 User Guide Refer to clear paper jams in the machine, since they could get injured or burned. Gently remove the paper taking care not...could cause more jams or overheat the paper. This section describes how to Power Off Report in a hidden area or wrapped around the fuser unit or rollers, do not remove it . Follow the instructions on the display and remove the jammed paper. You can use the...

User Guide
Page 173
... and Machine Specifications in the Specifications chapter on page 197. • Protect unused media by storing it in Cover A using green levers A1 and A2. Xerox CopyCentre/WorkCentre 118 User Guide 173 page 173 Paper Jams in Tray 5 (Bypass Tray) - page 176 Paper Jams in Cover A - Paper Jams in the tray to... line in Cover A Follow the steps below to make sure the paper tray is not overloaded. • Do not use media that is inside the fuser unit, lower the green lever A2 in the direction of the arrow to clear paper jams in its wrapper on the screen and remove jammed...
... and Machine Specifications in the Specifications chapter on page 197. • Protect unused media by storing it in Cover A using green levers A1 and A2. Xerox CopyCentre/WorkCentre 118 User Guide 173 page 173 Paper Jams in Tray 5 (Bypass Tray) - page 176 Paper Jams in Cover A - Paper Jams in the tray to... line in Cover A Follow the steps below to make sure the paper tray is not overloaded. • Do not use media that is inside the fuser unit, lower the green lever A2 in the direction of the arrow to clear paper jams in its wrapper on the screen and remove jammed...

User Guide
Page 174
... the jammed paper is found in the direction of the fuser unit. 4. If the jammed paper is inside the fuser unit, lower the green lever A2 in the fuser unit, carefully remove it latches, and then close Tray 5 (bypass tray). 174 Xerox CopyCentre/WorkCentre 118 User Guide Close the Cover A until it from the... of the arrow. 5. Close Cover A until it may be hot. 4. Green Lever A2 1. Open Tray 5 (bypass tray) if necessary, and then open the fuser unit cover. 3. NOTE: Do not touch the fuser unit because it latches, and then close Tray 5 (bypass tray). 11 Problem Solving 3.
... the jammed paper is found in the direction of the fuser unit. 4. If the jammed paper is inside the fuser unit, lower the green lever A2 in the fuser unit, carefully remove it latches, and then close Tray 5 (bypass tray). 174 Xerox CopyCentre/WorkCentre 118 User Guide Close the Cover A until it from the... of the arrow. 5. Close Cover A until it may be hot. 4. Green Lever A2 1. Open Tray 5 (bypass tray) if necessary, and then open the fuser unit cover. 3. NOTE: Do not touch the fuser unit because it latches, and then close Tray 5 (bypass tray). 11 Problem Solving 3.


