C118/M118/M118i Control Panel Navigation Guide
Page 1
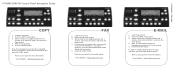
... Press the START button. Refer to user guide for more information. Press the FAX mode button. 3. Load the document. 2. PART No: 701P43617 C118/M118/M118i Control Panel Navigation Guide COPY 1. Press the COPY mode button. 3. Enter a copy quantity. 5. Select a feature by toggling between the 3 screens, ...on the control panel to user guide for more information. Refer to user guide for more information. http://www.xerox.com Press the START button. Xerox Website - Fix the problem then reload all the documents and press the START button. To send to multiple ...
... Press the START button. Refer to user guide for more information. Press the FAX mode button. 3. Load the document. 2. PART No: 701P43617 C118/M118/M118i Control Panel Navigation Guide COPY 1. Press the COPY mode button. 3. Enter a copy quantity. 5. Select a feature by toggling between the 3 screens, ...on the control panel to user guide for more information. Refer to user guide for more information. http://www.xerox.com Press the START button. Xerox Website - Fix the problem then reload all the documents and press the START button. To send to multiple ...

Network Connection Quick Setup Guide
Page 1
... you are using either of the following methods: ■ DHCP: Use this method to an operational Ethernet port on an Ethernet TCP/IP network. Xerox WorkCentre® M118/M118i Network Connection Quick Setup Guide 701P42575 This guide includes instructions for: ■ Navigating Display Screens on page 2 ■ Network Setup Using DHCP on page...Static IP Address on page 3 ■ Verifying Network Setup Using CentreWare Internet Services (CentreWare IS) on page 4 This setup guide provides instructions for connecting the Xerox WorkCentre M118/M118i on the network. All rights reserved. 1
... you are using either of the following methods: ■ DHCP: Use this method to an operational Ethernet port on an Ethernet TCP/IP network. Xerox WorkCentre® M118/M118i Network Connection Quick Setup Guide 701P42575 This guide includes instructions for: ■ Navigating Display Screens on page 2 ■ Network Setup Using DHCP on page...Static IP Address on page 3 ■ Verifying Network Setup Using CentreWare Internet Services (CentreWare IS) on page 4 This setup guide provides instructions for connecting the Xerox WorkCentre M118/M118i on the network. All rights reserved. 1

Network Connection Quick Setup Guide
Page 2
...: 1. c. Press the Select button until you see System Settings on the display. 4. Note If the IP address starts with the DHCP server for your network. Xerox WorkCentre M118/M118i 2 A DHCP server delivers an IP address as well as other configuration settings to print the System Settings List. 3. To set up , it automatically uses DHCP...
...: 1. c. Press the Select button until you see System Settings on the display. 4. Note If the IP address starts with the DHCP server for your network. Xerox WorkCentre M118/M118i 2 A DHCP server delivers an IP address as well as other configuration settings to print the System Settings List. 3. To set up , it automatically uses DHCP...

Network Connection Quick Setup Guide
Page 3
.... 3. Press the the Enter button to obtain its network configuration. Select Manual, and then press the Enter button. 6. Press the Enter button to select Confirm. Xerox WorkCentre M118/M118i 3 Press the Select button to accept the address. 6. b. Set the IP Address 1. If there is an incorrect IP address in the field, press the Clear...
.... 3. Press the the Enter button to obtain its network configuration. Select Manual, and then press the Enter button. 6. Press the Enter button to select Confirm. Xerox WorkCentre M118/M118i 3 Press the Select button to accept the address. 6. b. Set the IP Address 1. If there is an incorrect IP address in the field, press the Clear...
Network Connection Quick Setup Guide
Page 4
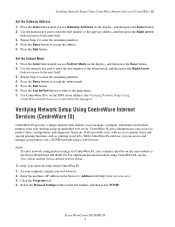
... subnet mask, and then press the Right Arrow button to move to the next field. 3. It also provides users with access to the main menu. 7. Xerox WorkCentre M118/M118i 4 Press the Log In/Out button to return to printer status and special printing functions such as the...
... subnet mask, and then press the Right Arrow button to move to the next field. 3. It also provides users with access to the main menu. 7. Xerox WorkCentre M118/M118i 4 Press the Log In/Out button to return to printer status and special printing functions such as the...

Network Connection Quick Setup Guide
Page 5
If you are using a static IP address, enter the DNS server address in the Connect to [ip address] dialog box, and then click the OK button. ■ Default user ID: admin ■ Default password: x-admin. Enter the default user ID and password in the DNS Address 1 field, and then click the Apply New Settings button at the bottom of the page. 6. The user ID and password should be changed after network setup is complete. Xerox WorkCentre M118/M118i 5 Verifying Network Setup Using CentreWare Internet Services (CentreWare IS) 5.
If you are using a static IP address, enter the DNS server address in the Connect to [ip address] dialog box, and then click the OK button. ■ Default user ID: admin ■ Default password: x-admin. Enter the default user ID and password in the DNS Address 1 field, and then click the Apply New Settings button at the bottom of the page. 6. The user ID and password should be changed after network setup is complete. Xerox WorkCentre M118/M118i 5 Verifying Network Setup Using CentreWare Internet Services (CentreWare IS) 5.

Network Connection Quick Setup Guide
Page 3
...; DHCP: Use this method to an operational Ethernet port on the Xerox website. Copyright © 2005, 2004 Xerox Corporation. All rights reserved. 1 It includes procedures for connecting the Xerox WorkCentre M118/M118i on an Ethernet TCP/IP network. This is located on the Customer... supplied by the network administrator. Note The RJ45 Ethernet cable is connected to manually assign an IP address provided by Xerox. Xerox WorkCentre® M118/M118i Network Connection Quick Setup Guide This guide includes instructions for: ■ Navigating Display Screens on page 2 ■ Network...
...; DHCP: Use this method to an operational Ethernet port on the Xerox website. Copyright © 2005, 2004 Xerox Corporation. All rights reserved. 1 It includes procedures for connecting the Xerox WorkCentre M118/M118i on an Ethernet TCP/IP network. This is located on the Customer... supplied by the network administrator. Note The RJ45 Ethernet cable is connected to manually assign an IP address provided by Xerox. Xerox WorkCentre® M118/M118i Network Connection Quick Setup Guide This guide includes instructions for: ■ Navigating Display Screens on page 2 ■ Network...

Network Connection Quick Setup Guide
Page 4
... button below the display to the previous display screen. e. Use the Exit button to return to highlight Report/List, and then press the Enter button. Xerox WorkCentre M118/M118i 2 Network Setup Using DHCP When the machine starts up the network connection using DHCP: 1. Turn on the display and to select items on the machine...
... button below the display to the previous display screen. e. Use the Exit button to return to highlight Report/List, and then press the Enter button. Xerox WorkCentre M118/M118i 2 Network Setup Using DHCP When the machine starts up the network connection using DHCP: 1. Turn on the display and to select items on the machine...

Network Connection Quick Setup Guide
Page 5
... begin, obtain the following information from your network administrator: IP Address: Gateway Address: Subnet Mask: DNS Server Address: Connecting the Machine Using a Static IP Address 1. Xerox WorkCentre M118/M118i 3 When the machine is 11111. Use the numeric keypad to select System Settings. Press the the Enter button to select Confirm. Press the Exit button...
... begin, obtain the following information from your network administrator: IP Address: Gateway Address: Subnet Mask: DNS Server Address: Connecting the Machine Using a Static IP Address 1. Xerox WorkCentre M118/M118i 3 When the machine is 11111. Use the numeric keypad to select System Settings. Press the the Enter button to select Confirm. Press the Exit button...

Network Connection Quick Setup Guide
Page 6
... a server name for the machine (instead of the IP address, and then press the Right Arrow button to move to set the DNS server address. Xerox WorkCentre M118/M118i 4 If there is an incorrect IP address in the field, press the Clear button to the next field. 4. Network Setup Using a Static IP Address Set...
... a server name for the machine (instead of the IP address, and then press the Right Arrow button to move to set the DNS server address. Xerox WorkCentre M118/M118i 4 If there is an incorrect IP address in the field, press the Clear button to the next field. 4. Network Setup Using a Static IP Address Set...

Network Connection Quick Setup Guide
Page 7
... printers from your desktop using an embedded web server. If you to printer status and special printing functions such as the Xerox WorkCentre M118/M118i. Verifying Network Setup Using CentreWare Internet Services (IS) Verifying Network Setup Using CentreWare Internet Services (IS) CentreWare IS provides ... in the DNS Address 1 field, and then click the Apply New Settings button at the bottom of the page. 6. Xerox WorkCentre M118/M118i 5 Note To enter network configuration settings via CentreWare IS, your network setup using CentreWare IS: 1. Select the Protocol Settings folder...
... printers from your desktop using an embedded web server. If you to printer status and special printing functions such as the Xerox WorkCentre M118/M118i. Verifying Network Setup Using CentreWare Internet Services (IS) Verifying Network Setup Using CentreWare Internet Services (IS) CentreWare IS provides ... in the DNS Address 1 field, and then click the Apply New Settings button at the bottom of the page. 6. Xerox WorkCentre M118/M118i 5 Note To enter network configuration settings via CentreWare IS, your network setup using CentreWare IS: 1. Select the Protocol Settings folder...


