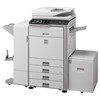
MX-5001N Staple - Sharp
MX-5001N Staple
Related Manual Pages


Similar Questions


Set Staple Option From Computer When Printing From Computer To Copier
Can we set the staple option when printing from computer to printer- we can do it when copying on th...
Can we set the staple option when printing from computer to printer- we can do it when copying on th...
(Posted by support45706 11 years ago)

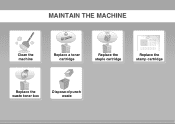
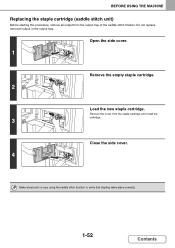
How Do You Change The Staples In A Mx-5001n Copy Machine?
(Posted by JDrayton 11 years ago)

Related Terms
The following terms were also used when searching for MX-5001N Staple - Sharp:- sharp mx 5001n
- sharp mx-5001n
- sharp mx 5001n driver
- mx-5001n review
- sharp mx-5001n driver
- sharp mx 5001n mac
- mx 5001n sharp
- sharp mx-5001n pcl6 driver
- sharp mx-5001n review
- mx 5001n driver download
- mx 5001n reviews
- mx-5001n driver
- mx-5001n toner
- sharp mx 5001n toner
- mx 5001n 64 bit driver
- mx 5001n black developer
- mx 5001n black toner
- mx 5001n color
- mx 5001n copier fuser unit
- mx 5001n copier paper jam
- mx 5001n copier price
- mx 5001n default password
- mx 5001n developer
- mx 5001n driver mac
- mx 5001n driver sharp
- mx 5001n driver windows 7
- mx 5001n driver windows 8
- mx 5001n drivers windows 7
- mx 5001n email address
- mx 5001n error codes
- mx 5001n fax
- mx 5001n fax driver
- mx 5001n line across middle of page
- mx 5001n mac
- mx 5001n mac driver
- mx 5001n maintenance code dk
- mx 5001n maintenance code fk3
- mx 5001n maintenance code vc
- mx 5001n manual pdf
- mx 5001n misfeed
- mx 5001n misfeed message won't clear
- mx 5001n offline
- mx 5001n parts
- mx 5001n parts manual
- mx 5001n password
- mx 5001n pcl 5 driver
- mx 5001n pcl6
- mx 5001n printer driver download
- mx 5001n printer how to
- mx 5001n printer manual
- mx 5001n scan to folder
- mx 5001n scanning instructions
- mx 5001n selected servers not found
- mx 5001n shows offline
- mx 5001n staple cartridge
- mx 5001n staples
- mx 5001n stop print job
- mx 5001n supplies
- mx 5001n toner
- mx 5001n user manual
- mx 5001n waste toner
- mx 5001n windows 2003 drivers
- mx-5001n 2-sided image scanning
- mx-5001n 2-sided scanning
- mx-5001n 64 bit driver
- mx-5001n admin password
- mx-5001n administrator password
- mx-5001n black-toner
- mx-5001n ce-00
- mx-5001n copier
- mx-5001n cost
- mx-5001n default admin password
- mx-5001n default administrator password
- mx-5001n default login
- mx-5001n developer
- mx-5001n download
- mx-5001n driver for mac
- mx-5001n driver mac
- mx-5001n driver mac os x
- mx-5001n driver win 7
- mx-5001n driver windows 10
- mx-5001n driver windows 7
- mx-5001n driver windows 8
- mx-5001n error code c4-02
- mx-5001n fax driver
- mx-5001n fk3
- mx-5001n fuser unit
- mx-5001n fuser web cleaning kit
- mx-5001n mac driver
- mx-5001n mac drivers
- mx-5001n manual pdf
- mx-5001n offline
- mx-5001n operation guide
- mx-5001n pcl 6
- mx-5001n pcl6 manual
- mx-5001n ppd
- mx-5001n price
- mx-5001n printer
- mx-5001n ps
- mx-5001n ps driver
- mx-5001n scan to email
- mx-5001n scan to folder
- mx-5001n sharp
- mx-5001n sharp driver
- mx-5001n staple
- mx-5001n staple not enabled
- mx-5001n user manual
- mx-5001n waste toner
- mx-5001n windows 8 driver
- mx5001n
- mx5001n black toner
- mx5001n code
- mx5001n copier
- mx5001n developer
- mx5001n drivers
- mx5001n email address
- mx5001n imaging units
- mx5001n mac
- mx5001n mac driver
- mx5001n manual
- mx5001n page count
- mx5001n price
- mx5001n printer adding staples
- mx5001n sharp
- mx5001n staples
- mx5001n user guide
- mx5001n waste toner
- mx5001n windows 7
- sharp copier mx 5001n
- sharp mx 5001n 64 bit driver
- sharp mx 5001n admin password
- sharp mx 5001n black toner
- sharp mx 5001n color
- sharp mx 5001n copier fuser unit
- sharp mx 5001n copier price
- sharp mx 5001n cost
- sharp mx 5001n driver for windows 7
- sharp mx 5001n driver for windows xp
- sharp mx 5001n driver mac
- sharp mx 5001n driver windows 7
- sharp mx 5001n driver windows 8
- sharp mx 5001n drivers
- sharp mx 5001n error codes
- sharp mx 5001n fax
- sharp mx 5001n fax driver
- sharp mx 5001n fuser unit
- sharp mx 5001n maintenance code dk
- sharp mx 5001n maintenance code fk3
- sharp mx 5001n maintenance code vc
- sharp mx 5001n manual pdf
- sharp mx 5001n misfeed
- sharp mx 5001n parts
- sharp mx 5001n parts manual
- sharp mx 5001n pcl6 driver
- sharp mx 5001n pcl6 drivers
- sharp mx 5001n price
- sharp mx 5001n pricing
- sharp mx 5001n printer driver
- sharp mx 5001n printer how to
- sharp mx 5001n ratings
- sharp mx 5001n reviews
- sharp mx 5001n scan to folder
- sharp mx 5001n selected servers not found
- sharp mx 5001n shows offline
- sharp mx 5001n staples
- sharp mx 5001n stop print job
- sharp mx 5001n troubleshooting
- sharp mx 5001n user guide
- sharp mx 5001n windows 2003 drivers
- sharp mx-5001n admin password
- sharp mx-5001n administrator password
- sharp mx-5001n copier
- sharp mx-5001n default admin password
- sharp mx-5001n default administrator password
- sharp mx-5001n driver download
- sharp mx-5001n driver download for windows 10
- sharp mx-5001n driver for mac
- sharp mx-5001n driver mac
- sharp mx-5001n driver mac os x
- sharp mx-5001n driver windows 8
- sharp mx-5001n drivers
- sharp mx-5001n ip address
- sharp mx-5001n mac
- sharp mx-5001n mac driver
- sharp mx-5001n mac drivers
- sharp mx-5001n manual
- sharp mx-5001n manual pdf
- sharp mx-5001n pcl 6
- sharp mx-5001n pcl6 drivers
- sharp mx-5001n pcl6 manual
- sharp mx-5001n ppd
- sharp mx-5001n printer driver
- sharp mx-5001n printer scan os x 10.9
- sharp mx-5001n ps
- sharp mx-5001n ps driver
- sharp mx-5001n reviews
- sharp mx-5001n scan to email
- sharp mx-5001n scan to folder
- sharp mx-5001n software
- sharp mx-5001n specifications
- sharp mx-5001n staple cartridge
- sharp mx-5001n staples
- sharp mx-5001n supplies
- sharp mx-5001n toner
- sharp mx-5001n troubleshooting
- sharp mx-5001n user manual
- sharp mx-5001n waste toner
- sharp mx-5001n windows 8 driver
- sharp mx5001n copier
- sharp mx5001n driver
- sharp mx5001n drivers
- sharp mx5001n mac driver
- sharp mx5001n manual
- sharp mx5001n pcl6 driver
- sharp mx5001n printer
- sharp mx5001n user manual