MX 5001N Staples - Sharp
MX 5001N Staples
Related Manual Pages


Similar Questions


Set Staple Option From Computer When Printing From Computer To Copier
Can we set the staple option when printing from computer to printer- we can do it when copying on th...
Can we set the staple option when printing from computer to printer- we can do it when copying on th...
(Posted by support45706 11 years ago)

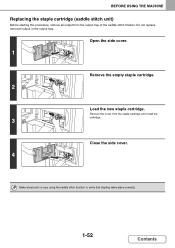
How Do You Change The Staples In A Mx-5001n Copy Machine?
(Posted by JDrayton 12 years ago)
