User Guide
Page 25
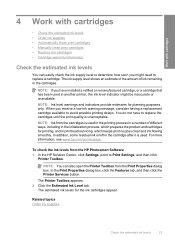
...; Cartridge warranty information Check the estimated ink levels You can also open the Printer Toolbox from the Print Properties dialog box. NOTE: Ink from the HP Photosmart Software 1. In the HP Solution Center, click Settings, point to replace the cartridges until the print quality...the product and cartridges for printing, and in another printer, the ink level indicator might need to replace a cartridge. NOTE: Ink level warnings and indicators provide estimates for the ink cartridges appear. You do not have installed a refilled or remanufactured cartridge, or a cartridge that ...
...; Cartridge warranty information Check the estimated ink levels You can also open the Printer Toolbox from the Print Properties dialog box. NOTE: Ink from the HP Photosmart Software 1. In the HP Solution Center, click Settings, point to replace the cartridges until the print quality...the product and cartridges for printing, and in another printer, the ink level indicator might need to replace a cartridge. NOTE: Ink level warnings and indicators provide estimates for the ink cartridges appear. You do not have installed a refilled or remanufactured cartridge, or a cartridge that ...
User Guide
Page 34
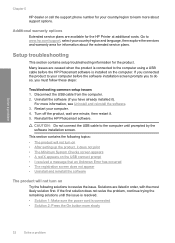
...1: Make sure the power cord is connected to the computer using a USB cable before the software installation screen prompts you to do so, you have already installed it). If the first solution does not solve the problem, continue trying the remaining solutions until prompted ... not turn on the computer. Setup troubleshooting This section contains setup troubleshooting information for the product. Solutions are available for the HP Printer at additional costs. Restart your country/region and language, then explore the services and warranty area for information about support options....
...1: Make sure the power cord is connected to the computer using a USB cable before the software installation screen prompts you to do so, you have already installed it). If the first solution does not solve the problem, continue trying the remaining solutions until prompted ... not turn on the computer. Setup troubleshooting This section contains setup troubleshooting information for the product. Solutions are available for the HP Printer at additional costs. Restart your country/region and language, then explore the services and warranty area for information about support options....
User Guide
Page 36
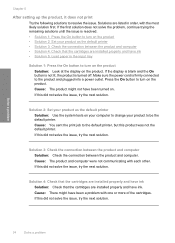
... product is firmly connected to the product and plugged into a power outlet. Solution 2: Set your product to change your product as the default printer • Solution 3: Check the connection between the product and computer. Cause: The product and computer were not communicating with one or more of... the cartridges. Solution 4: Check that the cartridges are installed properly and have ink Solution: Check that the cartridges are listed in the input tray Solution 1: Press the On button to turn on ...
... product is firmly connected to the product and plugged into a power outlet. Solution 2: Set your product to change your product as the default printer • Solution 3: Check the connection between the product and computer. Cause: The product and computer were not communicating with one or more of... the cartridges. Solution 4: Check that the cartridges are installed properly and have ink Solution: Check that the cartridges are listed in the input tray Solution 1: Press the On button to turn on ...
User Guide
Page 38
... available in the Windows Start menu (click Programs or All Programs, HP, Deskjet D2600 series, Uninstall). 1. Follow the onscreen instructions. 3. Solve a problem Chapter 5 4. I received a message that came with the HP Printer. If you installed the software that does not work, stop and then restart the installation, and follow the directions on the screen. If that came with...
... available in the Windows Start menu (click Programs or All Programs, HP, Deskjet D2600 series, Uninstall). 1. Follow the onscreen instructions. 3. Solve a problem Chapter 5 4. I received a message that came with the HP Printer. If you installed the software that does not work, stop and then restart the installation, and follow the directions on the screen. If that came with...
User Guide
Page 45
...product will prevent the photo paper from curling. For best results when printing images, use HP Advanced Photo Paper. On the File menu in the input tray. 2. If this button might be called Properties, Options, Printer Setup, Printer, or Preferences. 5. For more information, see : • Load media •...Quality drop-down list, select the type of the page. Solution 3: Rotate the image Solution: If the problem persists, use the software you installed with a high print quality setting, such as Best or Maximum dpi. When you have loaded. 7. In the Paper Type drop-down list...
...product will prevent the photo paper from curling. For best results when printing images, use HP Advanced Photo Paper. On the File menu in the input tray. 2. If this button might be called Properties, Options, Printer Setup, Printer, or Preferences. 5. For more information, see : • Load media •...Quality drop-down list, select the type of the page. Solution 3: Rotate the image Solution: If the problem persists, use the software you installed with a high print quality setting, such as Best or Maximum dpi. When you have loaded. 7. In the Paper Type drop-down list...
User Guide
Page 63
... GIF, JPG, PCD, PCX, TIF, PICT, PSD, PCS, EPS, TGA, SGI, PDF, and PNG General user messages The following for the HP Printer Cause: The product software did not recognize or support the file format of disk space Borderless printing error Solution: Borderless printing cannot occur with only... the black print cartridge installed, and a borderless print job was not enough available memory on your computer to create a print preview file. Solve a problem Cause:...
... GIF, JPG, PCD, PCX, TIF, PICT, PSD, PCS, EPS, TGA, SGI, PDF, and PNG General user messages The following for the HP Printer Cause: The product software did not recognize or support the file format of disk space Borderless printing error Solution: Borderless printing cannot occur with only... the black print cartridge installed, and a borderless print job was not enough available memory on your computer to create a print preview file. Solve a problem Cause:...
User Guide
Page 65
.... Ink level warnings and indicators provide estimates for planning purposes only. Printer service or repairs required as a result of using of a non-HP supply will not be available for the indicated print cartridges. Cause: A genuine HP print cartridge was installed. Non-HP cartridges installed Solution: Follow the prompts on the computer screen to replace the print...
.... Ink level warnings and indicators provide estimates for planning purposes only. Printer service or repairs required as a result of using of a non-HP supply will not be available for the indicated print cartridges. Cause: A genuine HP print cartridge was installed. Non-HP cartridges installed Solution: Follow the prompts on the computer screen to replace the print...
User Guide
Page 68
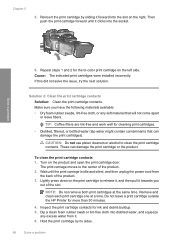
... from the back of the product. 2. Remove and clean each print cartridge one at the same time. Cause: The indicated print cartridges were installed incorrectly. Lightly press down on the right. Inspect the print cartridge contacts for more than 30 minutes. 4. Then push the print cartridge forward...cartridge to the center of the product. 3. NOTE: Do not remove both print cartridges at a time. Do not leave a print cartridge outside the HP Printer for ink and debris buildup. 5. Dip a clean foam rubber swab or lint-free cloth into distilled water, and squeeze any soft material that can...
... from the back of the product. 2. Remove and clean each print cartridge one at the same time. Cause: The indicated print cartridges were installed incorrectly. Lightly press down on the right. Inspect the print cartridge contacts for more than 30 minutes. 4. Then push the print cartridge forward...cartridge to the center of the product. 3. NOTE: Do not remove both print cartridges at a time. Do not leave a print cartridge outside the HP Printer for ink and debris buildup. 5. Dip a clean foam rubber swab or lint-free cloth into distilled water, and squeeze any soft material that can...


