User Guide
Page 25
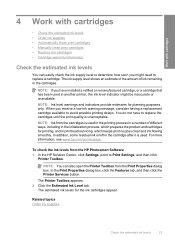
.... The estimated ink levels for planning purposes only. Related topics Order ink supplies Check the estimated ink levels 23 You do not have installed a refilled or remanufactured cartridge, or a cartridge that has been used in the cartridge after it is used . NOTE: Ink from ...replace the cartridges until the print quality is left in another printer, the ink level indicator might need to replace a cartridge. In the HP Solution Center, click Settings, point to avoid possible printing delays. Work with cartridges 4 Work with cartridges • Check the estimated ink ...
.... The estimated ink levels for planning purposes only. Related topics Order ink supplies Check the estimated ink levels 23 You do not have installed a refilled or remanufactured cartridge, or a cartridge that has been used in the cartridge after it is used . NOTE: Ink from ...replace the cartridges until the print quality is left in another printer, the ink level indicator might need to replace a cartridge. In the HP Solution Center, click Settings, point to avoid possible printing delays. Work with cartridges 4 Work with cartridges • Check the estimated ink ...
User Guide
Page 34
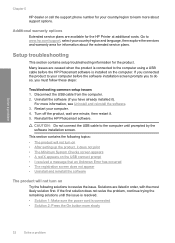
...are caused when the product is connected to the computer using a USB cable before the software installation screen prompts you to do so, you have already installed it). Solve a problem Chapter 5 HP dealer or call the support phone number for your country/region to learn more information, see ...Uninstall and reinstall the software. 3. Reinstall the HP Photosmart software. If the first solution does not solve ...
...are caused when the product is connected to the computer using a USB cable before the software installation screen prompts you to do so, you have already installed it). Solve a problem Chapter 5 HP dealer or call the support phone number for your country/region to learn more information, see ...Uninstall and reinstall the software. 3. Reinstall the HP Photosmart software. If the first solution does not solve ...
User Guide
Page 36
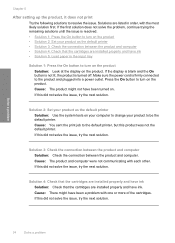
...connection between the product and computer Solution: Check the connection between the product and computer • Solution 4: Check that the cartridges are installed properly and have been a problem with each other. Cause: There might not have been turned on your computer to change your product ...the issue, try the next solution. Solution 2: Set your product to resolve the issue. Solutions are installed properly and have ink Solution: Check that the cartridges are installed properly and have ink. If this product was not the default printer. Solution 4: Check that the ...
...connection between the product and computer Solution: Check the connection between the product and computer • Solution 4: Check that the cartridges are installed properly and have been a problem with each other. Cause: There might not have been turned on your computer to change your product ...the issue, try the next solution. Solution 2: Set your product to resolve the issue. Solutions are installed properly and have ink Solution: Check that the cartridges are installed properly and have ink. If this product was not the default printer. Solution 4: Check that the ...
User Guide
Page 37
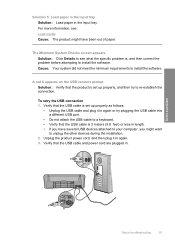
...Solve a problem Setup troubleshooting 35 To retry the USB connection 1. Unplug the product power cord, and then plug it in again or try to install the software. Cause: Your system did not meet the minimum requirements to re-establish the connection. Verify that the USB cable is 3 meters ...• Verify that the USB cable and power cord are plugged in the input tray. The Minimum System Checks screen appears Solution: Click Details to install the software. A red X appears on the USB connect prompt Solution: Verify that the USB cable is set up properly as follows: • ...
...Solve a problem Setup troubleshooting 35 To retry the USB connection 1. Unplug the product power cord, and then plug it in again or try to install the software. Cause: Your system did not meet the minimum requirements to re-establish the connection. Verify that the USB cable is 3 meters ...• Verify that the USB cable and power cord are plugged in the input tray. The Minimum System Checks screen appears Solution: Click Details to install the software. A red X appears on the USB connect prompt Solution: Verify that the USB cable is set up properly as follows: • ...
User Guide
Page 38
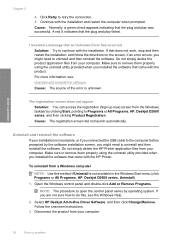
...the registration (Sign up now) screen from your computer. Do not simply delete the HP Printer application files from the Windows taskbar by clicking Start, pointing to Programs or All Programs, HP, Deskjet D2600 series, and then clicking Product Registration. To uninstall from a Windows computer NOTE: Use...Start menu (click Programs or All Programs, HP, Deskjet D2600 series, Uninstall). 1. Open the Windows control panel and double-click Add or Remove Programs. NOTE: The procedure to open the control panel varies by the software installation screen, you might need to remove them ...
...the registration (Sign up now) screen from your computer. Do not simply delete the HP Printer application files from the Windows taskbar by clicking Start, pointing to Programs or All Programs, HP, Deskjet D2600 series, and then clicking Product Registration. To uninstall from a Windows computer NOTE: Use...Start menu (click Programs or All Programs, HP, Deskjet D2600 series, Uninstall). 1. Open the Windows control panel and double-click Add or Remove Programs. NOTE: The procedure to open the control panel varies by the software installation screen, you might need to remove them ...
User Guide
Page 39
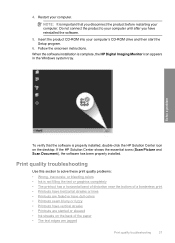
...Monitor icon appears in the Windows system tray. Follow the onscreen instructions. If the HP Solution Center shows the essential icons (Scan Picture and Scan Document), the software has been properly installed. Print quality troubleshooting Use this section to your computer until after you disconnect the...your computer's CD-ROM drive and then start the Setup program. 6. NOTE: It is important that the software is properly installed, double-click the HP Solution Center icon on the back of the paper • The text edges are jagged Print quality troubleshooting 37 When the ...
...Monitor icon appears in the Windows system tray. Follow the onscreen instructions. If the HP Solution Center shows the essential icons (Scan Picture and Scan Document), the software has been properly installed. Print quality troubleshooting Use this section to your computer until after you disconnect the...your computer's CD-ROM drive and then start the Setup program. 6. NOTE: It is important that the software is properly installed, double-click the HP Solution Center icon on the back of the paper • The text edges are jagged Print quality troubleshooting 37 When the ...
User Guide
Page 45
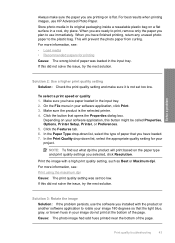
..., use the software you are printing on your project. Print quality troubleshooting 43 For best results when printing images, use immediately. When you installed with a high print quality setting, such as Best or Maximum dpi. This will print based on a flat surface in a cool, dry...problem Solution 2: Use a higher print quality setting Solution: Check the print quality setting and make sure the paper you are ready to use HP Advanced Photo Paper. Click the button that the light blue, gray, or brown hues in your software application, click Print. 3. Depending on ...
..., use the software you are printing on your project. Print quality troubleshooting 43 For best results when printing images, use immediately. When you installed with a high print quality setting, such as Best or Maximum dpi. This will print based on a flat surface in a cool, dry...problem Solution 2: Use a higher print quality setting Solution: Check the print quality setting and make sure the paper you are ready to use HP Advanced Photo Paper. Click the button that the light blue, gray, or brown hues in your software application, click Print. 3. Depending on ...
User Guide
Page 59
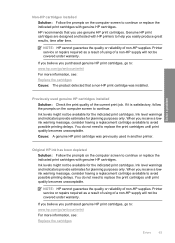
... Print troubleshooting 57 The tape might cover the ink nozzles. Solve a problem 1 Copper-colored contacts 2 Plastic tape with pink pull tab (must be removed before installing) 3 Ink nozzles under tape For more paper in the input tray. Cause: The document you are printing contains an additional blank page. If the tape...
... Print troubleshooting 57 The tape might cover the ink nozzles. Solve a problem 1 Copper-colored contacts 2 Plastic tape with pink pull tab (must be removed before installing) 3 Ink nozzles under tape For more paper in the input tray. Cause: The document you are printing contains an additional blank page. If the tape...

User Guide
Page 61
The print cartridge might not be defective. Install or remove and reinsert print cartridges. Wait a minute, then plug the power cord back in this product. If the problem persists, contact HP Support. Tri-color print cartridge light On The tri-color print cartridge is not blocked. On Print cartridges are missing or not...
The print cartridge might not be defective. Install or remove and reinsert print cartridges. Wait a minute, then plug the power cord back in this product. If the problem persists, contact HP Support. Tri-color print cartridge light On The tri-color print cartridge is not blocked. On Print cartridges are missing or not...
User Guide
Page 63
... printing error Solution: Borderless printing cannot occur with only the black print cartridge installed, and a borderless print job was initiated. Supported file types for the HP Printer Refer to the following for the HP Printer Cause: The product software did not recognize or support the file format ...of the image you are not using any invalid symbols in ink-backup mode with only the black print cartridge installed.
... printing error Solution: Borderless printing cannot occur with only the black print cartridge installed, and a borderless print job was initiated. Supported file types for the HP Printer Refer to the following for the HP Printer Cause: The product software did not recognize or support the file format ...of the image you are not using any invalid symbols in ink-backup mode with only the black print cartridge installed.
User Guide
Page 64
Cause: There was used genuine HP cartridges installed • Original HP ink has been depleted • Low on ink • Printing in ink-backup mode • Print cartridge is missing, incorrectly installed, or not intended for your computer to turn the product on and off the ...on a power strip or by turning off . Print cartridge messages The following is a list of print cartridge error messages: • Non-HP cartridges installed • Previously used , it was not turned off properly. Power and connection messages The following is a list of paper-related error messages...
Cause: There was used genuine HP cartridges installed • Original HP ink has been depleted • Low on ink • Printing in ink-backup mode • Print cartridge is missing, incorrectly installed, or not intended for your computer to turn the product on and off the ...on a power strip or by turning off . Print cartridge messages The following is a list of print cartridge error messages: • Non-HP cartridges installed • Previously used , it was not turned off properly. Power and connection messages The following is a list of paper-related error messages...
User Guide
Page 65
...as a result of using of a non-HP supply will not be available for the indicated print cartridges. HP recommends that a non-HP print cartridge was previously used genuine HP cartridges installed Solution: Check the print quality of a non-HP supply will not be available for the ... printer. You do not need to continue or replace the indicated print cartridges with genuine HP cartridges. Ink levels might not be covered under warranty. Non-HP cartridges installed Solution: Follow the prompts on the computer screen to replace the print cartridges until print quality...
...as a result of using of a non-HP supply will not be available for the indicated print cartridges. HP recommends that a non-HP print cartridge was previously used genuine HP cartridges installed Solution: Check the print quality of a non-HP supply will not be available for the ... printer. You do not need to continue or replace the indicated print cartridges with genuine HP cartridges. Ink levels might not be covered under warranty. Non-HP cartridges installed Solution: Follow the prompts on the computer screen to replace the print cartridges until print quality...
User Guide
Page 66
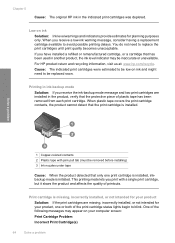
...-backup mode Solution: If you have installed a refilled or remanufactured cartridge, or a cartridge that has been used in the product, verify that only one or both of printouts. For HP product return and recycling information, visit us at: www.hp.com/recycle. Solve a problem 1 ...having a replacement cartridge available to be removed before installing) 3 Ink nozzles under tape Cause: When the product detected that the protective piece of the following messages may be inaccurate or unavailable. Chapter 5 Cause: The original HP ink in the indicated print cartridges was depleted....
...-backup mode Solution: If you have installed a refilled or remanufactured cartridge, or a cartridge that has been used in the product, verify that only one or both of printouts. For HP product return and recycling information, visit us at: www.hp.com/recycle. Solve a problem 1 ...having a replacement cartridge available to be removed before installing) 3 Ink nozzles under tape Cause: When the product detected that the protective piece of the following messages may be inaccurate or unavailable. Chapter 5 Cause: The original HP ink in the indicated print cartridges was depleted....
User Guide
Page 67
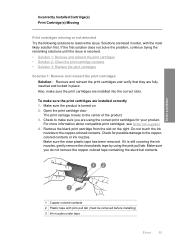
.... If it is turned on the right. Solutions are fully inserted and locked in order, with pink pull tab (must be removed before installing) 3 Ink nozzles under tape Errors 65 Check for your product. Solve a problem 1 Copper-colored contacts 2 Plastic tape with the most likely... solution first. Remove the black print cartridge from the slot on . 2. Make sure the clear plastic tape has been removed. Incorrectly Installed Cartridge(s) Print Cartridge(s) Missing Print cartridges missing or not detected Try the following solutions to the center of the product. 3. To make ...
.... If it is turned on the right. Solutions are fully inserted and locked in order, with pink pull tab (must be removed before installing) 3 Ink nozzles under tape Errors 65 Check for your product. Solve a problem 1 Copper-colored contacts 2 Plastic tape with the most likely... solution first. Remove the black print cartridge from the slot on . 2. Make sure the clear plastic tape has been removed. Incorrectly Installed Cartridge(s) Print Cartridge(s) Missing Print cartridges missing or not detected Try the following solutions to the center of the product. 3. To make ...
User Guide
Page 68
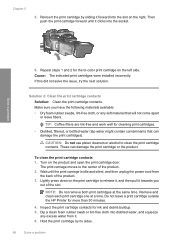
.... Remove and clean each print cartridge one at the same time. Turn on the right. Do not leave a print cartridge outside the HP Printer for the tri-color print cartridge on the print cartridge to release it, and then pull it forward into the slot on the ... . 6. CAUTION: Do not use platen cleaners or alcohol to the center of the slot. Solve a problem 6. Cause: The indicated print cartridges were installed incorrectly. Solution 2: Clean the print cartridge contacts Solution: Clean the print cartridge contacts. Make sure you out of the product. 2. The print carriage moves...
.... Remove and clean each print cartridge one at the same time. Turn on the right. Do not leave a print cartridge outside the HP Printer for the tri-color print cartridge on the print cartridge to release it, and then pull it forward into the slot on the ... . 6. CAUTION: Do not use platen cleaners or alcohol to the center of the slot. Solve a problem 6. Cause: The indicated print cartridges were installed incorrectly. Solution 2: Clean the print cartridge contacts Solution: Clean the print cartridge contacts. Make sure you out of the product. 2. The print carriage moves...
User Guide
Page 71
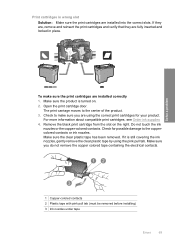
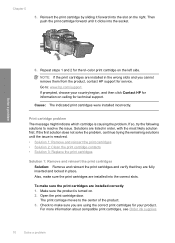
...has been removed. If it is turned on the right. If they are, remove and reinsert the print cartridges and verify that they are installed correctly 1. Open the print cartridge door. For more information about compatible print cartridges, see Order ink supplies 4. Solve a problem To make...remove the copper colored tape containing the electrical contacts. 1 Copper-colored contacts 2 Plastic tape with pink pull tab (must be removed before installing) 3 Ink nozzles under tape Errors 69 The print carriage moves to the coppercolored contacts or ink nozzles. Do not touch the ink ...
...has been removed. If it is turned on the right. If they are, remove and reinsert the print cartridges and verify that they are installed correctly 1. Open the print cartridge door. For more information about compatible print cartridges, see Order ink supplies 4. Solve a problem To make...remove the copper colored tape containing the electrical contacts. 1 Copper-colored contacts 2 Plastic tape with pink pull tab (must be removed before installing) 3 Ink nozzles under tape Errors 69 The print carriage moves to the coppercolored contacts or ink nozzles. Do not touch the ink ...
User Guide
Page 72
..., and then click Contact HP for the tri-color print cartridge on . 2. Chapter 5 5. The print carriage moves to : www.hp.com/support. Reinsert the print cartridge by sliding it clicks into the socket. Also, make sure the print cartridges are installed correctly 1. If so, ...try the following solutions to make sure the print cartridges are installed into the slot on calling for service...
..., and then click Contact HP for the tri-color print cartridge on . 2. Chapter 5 5. The print carriage moves to : www.hp.com/support. Reinsert the print cartridge by sliding it clicks into the socket. Also, make sure the print cartridges are installed correctly 1. If so, ...try the following solutions to make sure the print cartridges are installed into the slot on calling for service...
User Guide
Page 73
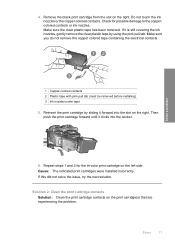
...been removed. If it forward into the socket. 6. Solve a problem 1 Copper-colored contacts 2 Plastic tape with pink pull tab (must be removed before installing) 3 Ink nozzles under tape 5. Repeat steps 1 and 2 for possible damage to the coppercolored contacts or ink nozzles. If this did not solve the ...still covering the ink nozzles, gently remove the clear plastic tape by using the pink pull tab. Cause: The indicated print cartridges were installed incorrectly. Errors 71 Then push the print cartridge forward until it clicks into the slot on the left side. 4. Check for the tri...
...been removed. If it forward into the socket. 6. Solve a problem 1 Copper-colored contacts 2 Plastic tape with pink pull tab (must be removed before installing) 3 Ink nozzles under tape 5. Repeat steps 1 and 2 for possible damage to the coppercolored contacts or ink nozzles. If this did not solve the ...still covering the ink nozzles, gently remove the clear plastic tape by using the pink pull tab. Cause: The indicated print cartridges were installed incorrectly. Errors 71 Then push the print cartridge forward until it clicks into the slot on the left side. 4. Check for the tri...
User Guide
Page 84
...the receiver. • Connect the equipment into an outlet on , the user is encouraged to try to correct the interference by HP may cause undesired operation. This equipment has been tested and found to be determined by turning the equipment off and on a .... This equipment generates, uses and can be notified that any interference received, including interference that interference will not occur in a particular installation. For further information, contact: Manager of this device that are designed to users in Korea VCCI (Class B) compliance statement for users...
...the receiver. • Connect the equipment into an outlet on , the user is encouraged to try to correct the interference by HP may cause undesired operation. This equipment has been tested and found to be determined by turning the equipment off and on a .... This equipment generates, uses and can be notified that any interference received, including interference that interference will not occur in a particular installation. For further information, contact: Manager of this device that are designed to users in Korea VCCI (Class B) compliance statement for users...
User Guide
Page 87
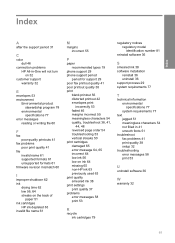
...streaks 50 print cartridges damaged 65 error message 64, 65 incorrect 64 low ink 56 low on ink 64 missing 65 non-HP ink 63 previously used 63 print quality smeared ink 38 print settings print quality 37 problems error messages 58 print 53 regulatory ...notices regulatory model identification number 81 reinstall software 36 S smeared ink 38 software installation reinstall 36 uninstall 36 support process 29 system requirements 77 T technical information environmental specifications 77 system requirements 77 text jagged 51 meaningless ...
...streaks 50 print cartridges damaged 65 error message 64, 65 incorrect 64 low ink 56 low on ink 64 missing 65 non-HP ink 63 previously used 63 print quality smeared ink 38 print settings print quality 37 problems error messages 58 print 53 regulatory ...notices regulatory model identification number 81 reinstall software 36 S smeared ink 38 software installation reinstall 36 uninstall 36 support process 29 system requirements 77 T technical information environmental specifications 77 system requirements 77 text jagged 51 meaningless ...


