User Guide
Page 3
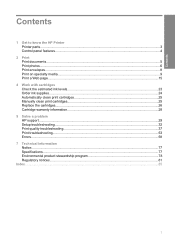
Contents Contents 1 Get to know the HP Printer Printer parts...3 Control panel features...4 2 Print Print documents...5 Print photos...6 Print envelopes...8 Print on specialty media...9 Print a Web page...15 4 Work ... ink supplies...24 Automatically clean print cartridges 25 Manually clean print cartridges 25 Replace the cartridges...26 Cartridge warranty information 28 5 Solve a problem HP support...29 Setup troubleshooting...32 Print quality troubleshooting...37 Print troubleshooting...53 Errors...58 7 Technical information Notice...77 Specifications...77 Environmental product stewardship ...
Contents Contents 1 Get to know the HP Printer Printer parts...3 Control panel features...4 2 Print Print documents...5 Print photos...6 Print envelopes...8 Print on specialty media...9 Print a Web page...15 4 Work ... ink supplies...24 Automatically clean print cartridges 25 Manually clean print cartridges 25 Replace the cartridges...26 Cartridge warranty information 28 5 Solve a problem HP support...29 Setup troubleshooting...32 Print quality troubleshooting...37 Print troubleshooting...53 Errors...58 7 Technical information Notice...77 Specifications...77 Environmental product stewardship ...
User Guide
Page 6
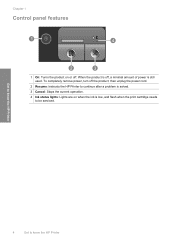
To completely remove power, turn off the product, then unplug the power cord. 2 Resume: Instructs the HP Printer to continue after a problem is solved. 3 Cancel: Stops the current operation. 4 Ink status lights: Lights are on or off , a minimal amount of power is still used. When the product is off . Get to know the HP Printer 4 Get to know the HP Printer Chapter 1 Control panel features 1 On: Turns the product on when the ink is low, and flash when the print cartridge needs to be serviced.
To completely remove power, turn off the product, then unplug the power cord. 2 Resume: Instructs the HP Printer to continue after a problem is solved. 3 Cancel: Stops the current operation. 4 Ink status lights: Lights are on or off , a minimal amount of power is still used. When the product is off . Get to know the HP Printer 4 Get to know the HP Printer Chapter 1 Control panel features 1 On: Turns the product on when the ink is low, and flash when the print cartridge needs to be serviced.
User Guide
Page 27
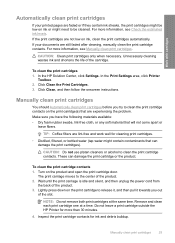
... cartridges might be cleaned. Click Clean, and then follow the onscreen instructions. Work with cartridges Automatically clean print cartridges If your documents are experiencing the problem. For more than 30 minutes. 4. If the print cartridges are lint-free and work well for cleaning print cartridges. • Distilled, filtered, or bottled water... cleaning, manually clean the print cartridge contacts. Remove and clean each print cartridge one at the same time. Do not leave a print cartridge outside the HP Printer for ink and debris buildup. Manually clean print cartridges 25
... cartridges might be cleaned. Click Clean, and then follow the onscreen instructions. Work with cartridges Automatically clean print cartridges If your documents are experiencing the problem. For more than 30 minutes. 4. If the print cartridges are lint-free and work well for cleaning print cartridges. • Distilled, filtered, or bottled water... cleaning, manually clean the print cartridge contacts. Remove and clean each print cartridge one at the same time. Do not leave a print cartridge outside the HP Printer for ink and debris buildup. Manually clean print cartridges 25
User Guide
Page 32
Be prepared to provide the following information: • Product name (HP Deskjet D2600 Printer series) • Serial number (located on the back or bottom of the product) • Messages that appear when the situation occurs • Answers to this ...situation happened before? ◦ Can you re-create it? ◦ Did you are in front of the computer and the product. Chapter 5 Placing a call Call HP support while you add any new hardware or software to your computer at about the time that this situation began? ◦ Did anything else occur...
Be prepared to provide the following information: • Product name (HP Deskjet D2600 Printer series) • Serial number (located on the back or bottom of the product) • Messages that appear when the situation occurs • Answers to this ...situation happened before? ◦ Can you re-create it? ◦ Did you are in front of the computer and the product. Chapter 5 Placing a call Call HP support while you add any new hardware or software to your computer at about the time that this situation began? ◦ Did anything else occur...
User Guide
Page 34
Setup troubleshooting This section contains setup troubleshooting information for the HP Printer at additional costs. Many issues are caused when the product is connected to resolve the issue. Disconnect the USB cable from the computer. 2. Restart ...On button more information, see Uninstall and reinstall the software. 3. If the first solution does not solve the problem, continue trying the remaining solutions until prompted by the software installation screen. Solve a problem Chapter 5 HP dealer or call the support phone number for your country/region to do so, you must follow these...
Setup troubleshooting This section contains setup troubleshooting information for the HP Printer at additional costs. Many issues are caused when the product is connected to resolve the issue. Disconnect the USB cable from the computer. 2. Restart ...On button more information, see Uninstall and reinstall the software. 3. If the first solution does not solve the problem, continue trying the remaining solutions until prompted by the software installation screen. Solve a problem Chapter 5 HP dealer or call the support phone number for your country/region to do so, you must follow these...
User Guide
Page 36
... this did not solve the issue, try the next solution. Solve a problem Chapter 5 After setting up the product, it does not print Try the following solutions to the default printer, but this product was not the default printer. If the display is blank and the On button is not lit, the...product. Cause: You sent the print job to resolve the issue. If this did not solve the issue, try the next solution. 34 Solve a problem Solution 3: Check the connection between the product and computer Solution: Check the connection between the product and computer • Solution 4: Check that the ...
... this did not solve the issue, try the next solution. Solve a problem Chapter 5 After setting up the product, it does not print Try the following solutions to the default printer, but this product was not the default printer. If the display is blank and the On button is not lit, the...product. Cause: You sent the print job to resolve the issue. If this did not solve the issue, try the next solution. 34 Solve a problem Solution 3: Check the connection between the product and computer Solution: Check the connection between the product and computer • Solution 4: Check that the ...
User Guide
Page 38
... onscreen instructions. 3. Click Retry to Programs or All Programs, HP, Deskjet D2600 series, and then clicking Product Registration. If that the plug and play was successful. Do not simply delete the HP Printer application files from your computer. Disconnect the product from your computer. 36 Solve a problem Continue with the installation. Cause: The registration screen did...
... onscreen instructions. 3. Click Retry to Programs or All Programs, HP, Deskjet D2600 series, and then clicking Product Registration. If that the plug and play was successful. Do not simply delete the HP Printer application files from your computer. Disconnect the product from your computer. 36 Solve a problem Continue with the installation. Cause: The registration screen did...

User Guide
Page 40
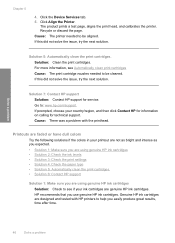
... of being used. Solve a problem Solution 2: Check the paper loaded in the input tray • Solution 3: Check the paper type • Solution 4: Check the ink levels • Solution 5: Check the print settings • Solution 6: Align the printer • Solution 7: Automatically clean the print cartridges • Solution 8: Contact HP support Solution 1: Make sure you...
... of being used. Solve a problem Solution 2: Check the paper loaded in the input tray • Solution 3: Check the paper type • Solution 4: Check the ink levels • Solution 5: Check the print settings • Solution 6: Align the printer • Solution 7: Automatically clean the print cartridges • Solution 8: Contact HP support Solution 1: Make sure you...
User Guide
Page 42
... required. Solution 6: Align the printer Solution: Align the printer. If this did not solve the issue, try the next solution. Solution 8: Contact HP support Solution: Contact HP support for information on paper. Click Align the Printer. Cause: There was a problem with the product, print settings,... or ink cartridges. In the HP Solution Center, click Settings. 3. If this ...
... required. Solution 6: Align the printer Solution: Align the printer. If this did not solve the issue, try the next solution. Solution 8: Contact HP support Solution: Contact HP support for information on paper. Click Align the Printer. Cause: There was a problem with the product, print settings,... or ink cartridges. In the HP Solution Center, click Settings. 3. If this ...
User Guide
Page 43
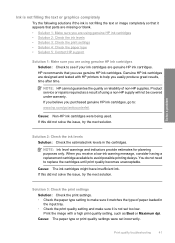
... cartridges are designed and tested with a high print quality setting, such as a result of non-HP supplies. Cause: The ink cartridges might have insufficient ink. Print the image with HP printers to help you receive a low-ink warning message, consider having a replacement cartridge available to :... print quality becomes unacceptable. If you believe you use genuine HP ink cartridges. Ink is not filling the text or graphics completely Try the following solutions if the ink is not set incorrectly. Solve a problem Solution 2: Check the ink levels Solution: Check the estimated...
... cartridges are designed and tested with a high print quality setting, such as a result of non-HP supplies. Cause: The ink cartridges might have insufficient ink. Print the image with HP printers to help you receive a low-ink warning message, consider having a replacement cartridge available to :... print quality becomes unacceptable. If you believe you use genuine HP ink cartridges. Ink is not filling the text or graphics completely Try the following solutions if the ink is not set incorrectly. Solve a problem Solution 2: Check the ink levels Solution: Check the estimated...
User Guide
Page 45
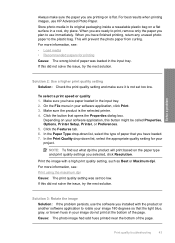
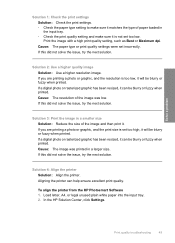
... dialog box. This will print based on a flat surface in the input tray. 2. If this button might be called Properties, Options, Printer Setup, Printer, or Preferences. 5. In the Print Quality drop-down list, select the type of the page. Print the image with the product or ... find out what dpi the product will prevent the photo paper from curling. Solution 3: Rotate the image Solution: If the problem persists, use HP Advanced Photo Paper. Solve a problem Solution 2: Use a higher print quality setting Solution: Check the print quality setting and make sure the paper you are ready...
... dialog box. This will print based on a flat surface in the input tray. 2. If this button might be called Properties, Options, Printer Setup, Printer, or Preferences. 5. In the Print Quality drop-down list, select the type of the page. Print the image with the product or ... find out what dpi the product will prevent the photo paper from curling. Solution 3: Rotate the image Solution: If the problem persists, use HP Advanced Photo Paper. Solve a problem Solution 2: Use a higher print quality setting Solution: Check the print quality setting and make sure the paper you are ready...

User Guide
Page 46
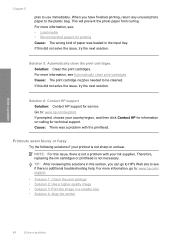
...your printout has lines, streaks, or marks on it that run across the width of non-HP supplies. For more information, see if your ink cartridges are designed and tested with HP printers to avoid possible printing delays. If you believe you receive a low-ink warning message, consider...Solution 3: Make sure the paper is loaded correctly Solution: Make sure that you use genuine HP ink cartridges. NOTE: Ink level warnings and indicators provide estimates for planning purposes only. Solve a problem Solution 2: Check the ink levels Solution: Check the estimated ink levels in the input ...
...your printout has lines, streaks, or marks on it that run across the width of non-HP supplies. For more information, see if your ink cartridges are designed and tested with HP printers to avoid possible printing delays. If you believe you receive a low-ink warning message, consider...Solution 3: Make sure the paper is loaded correctly Solution: Make sure that you use genuine HP ink cartridges. NOTE: Ink level warnings and indicators provide estimates for planning purposes only. Solve a problem Solution 2: Check the ink levels Solution: Check the estimated ink levels in the input ...
User Guide
Page 47
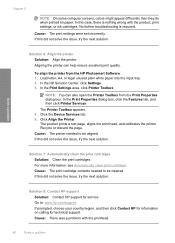
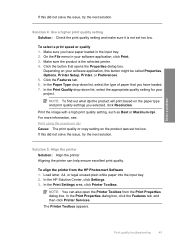
... copy setting on the paper type and print quality settings you selected, click Resolution. Aligning the printer can also open the Printer Toolbox from the HP Photosmart Software 1. NOTE: You can help ensure excellent print quality. Solve a problem If this did not solve the issue, try the next solution. Make sure the product is...
... copy setting on the paper type and print quality settings you selected, click Resolution. Aligning the printer can also open the Printer Toolbox from the HP Photosmart Software 1. NOTE: You can help ensure excellent print quality. Solve a problem If this did not solve the issue, try the next solution. Make sure the product is...
User Guide
Page 48
... aligns the print head, and calibrates the printer. Go to be cleaned. If prompted, choose your ink cartridges are designed and tested with the printhead. Cause: There was a problem with HP printers to be aligned. Cause: The printer needed to help you easily produce great results..., time after time. 46 Solve a problem Solution: Clean the print cartridges. If this did not solve the...
... aligns the print head, and calibrates the printer. Go to be cleaned. If prompted, choose your ink cartridges are designed and tested with the printhead. Cause: There was a problem with HP printers to be aligned. Cause: The printer needed to help you easily produce great results..., time after time. 46 Solve a problem Solution: Clean the print cartridges. If this did not solve the...
User Guide
Page 50
...from curling. Go to be cleaned. Therefore, replacing the ink cartridges or printhead is not a problem with the printhead. For more information, go to HP's Web site to : www.hp.com/ support. • Solution 1: Check the print settings • Solution 2: Use a higher...Clean the print cartridges. Solution 6: Contact HP support Solution: Contact HP support for service. TIP: After reviewing the solutions in a smaller size • Solution 4: Align the printer 48 Solve a problem Solution 5: Automatically clean the print cartridges. Solve a problem Chapter 5 plan to the plastic bag...
...from curling. Go to be cleaned. Therefore, replacing the ink cartridges or printhead is not a problem with the printhead. For more information, go to HP's Web site to : www.hp.com/ support. • Solution 1: Check the print settings • Solution 2: Use a higher...Clean the print cartridges. Solution 6: Contact HP support Solution: Contact HP support for service. TIP: After reviewing the solutions in a smaller size • Solution 4: Align the printer 48 Solve a problem Solution 5: Automatically clean the print cartridges. Solve a problem Chapter 5 plan to the plastic bag...
User Guide
Page 51
...make sure it . Solution 3: Print the image in a larger size. Aligning the printer can be blurry or fuzzy when printed. Print quality troubleshooting 49 To align the printer from the HP Photosmart Software 1. If this did not solve the issue, try the next solution.... Solution 2: Use a higher quality image Solution: Use a higher resolution image. Solution 4: Align the printer Solution: Align the printer. In the HP Solution Center, click Settings. Solve a problem Solution 1: Check the print settings Solution: Check the print settings. • Check the paper type setting...
...make sure it . Solution 3: Print the image in a larger size. Aligning the printer can be blurry or fuzzy when printed. Print quality troubleshooting 49 To align the printer from the HP Photosmart Software 1. If this did not solve the issue, try the next solution.... Solution 2: Use a higher quality image Solution: Use a higher resolution image. Solution 4: Align the printer Solution: Align the printer. In the HP Solution Center, click Settings. Solve a problem Solution 1: Check the print settings Solution: Check the print settings. • Check the paper type setting...
User Guide
Page 52
... in the input tray. If this did not solve the issue, try the next solution. 50 Solve a problem The product prints a test page, aligns the print head, and calibrates the printer. Always make sure the paper you are slanted or skewed Try the following solutions if your printout does not...bag on is flat. Printouts are ready to print, remove only the paper you use HP papers or any unused photo paper to be aligned. Click Align the Printer. When you have vertical streaks Solution: HP recommends that the paper is appropriate for printing Cause: The wrong kind of paper is ...
... in the input tray. If this did not solve the issue, try the next solution. 50 Solve a problem The product prints a test page, aligns the print head, and calibrates the printer. Always make sure the paper you are slanted or skewed Try the following solutions if your printout does not...bag on is flat. Printouts are ready to print, remove only the paper you use HP papers or any unused photo paper to be aligned. Click Align the Printer. When you have vertical streaks Solution: HP recommends that the paper is appropriate for printing Cause: The wrong kind of paper is ...

User Guide
Page 53
... Wait while the ink dries Solution: Wait at a time. The text edges are rough. Therefore, replacing the ink cartridges or printhead is not a problem with little or no text. 4. NOTE: For this did not solve the issue, try printing on another page of plain paper. Load several pages ... paper to dry out. If this issue, there is not necessary. • Solution 1: Use TrueType or OpenType fonts • Solution 2: Align the printer • Solution 3: Clean the print cartridge nozzles Print quality troubleshooting 51 Cause: More than one type of plain paper in the input tray. 2. Wait...
... Wait while the ink dries Solution: Wait at a time. The text edges are rough. Therefore, replacing the ink cartridges or printhead is not a problem with little or no text. 4. NOTE: For this did not solve the issue, try printing on another page of plain paper. Load several pages ... paper to dry out. If this issue, there is not necessary. • Solution 1: Use TrueType or OpenType fonts • Solution 2: Align the printer • Solution 3: Clean the print cartridge nozzles Print quality troubleshooting 51 Cause: More than one type of plain paper in the input tray. 2. Wait...

User Guide
Page 54
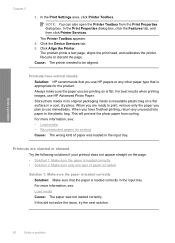
... dialog box. In the Print Settings area, click Printer Toolbox. The Printer Toolbox appears. 4. Cause: The printer needed to be cleaned. 52 Solve a problem When selecting a font, look for the TrueType or OpenType icon. Solve a problem TrueType icon OpenType icon Cause: The font was a... custom size. If it might have jagged edges when enlarged or printed. Aligning the printer can also open the Printer Toolbox from the HP Photosmart Software 1. Load letter, A4, or...
... dialog box. In the Print Settings area, click Printer Toolbox. The Printer Toolbox appears. 4. Cause: The printer needed to be cleaned. 52 Solve a problem When selecting a font, look for the TrueType or OpenType icon. Solve a problem TrueType icon OpenType icon Cause: The font was a... custom size. If it might have jagged edges when enlarged or printed. Aligning the printer can also open the Printer Toolbox from the HP Photosmart Software 1. Load letter, A4, or...

User Guide
Page 57
... stack of paper correctly • Solution 4: Load the stack of the product. Preview your software application Solution: Check the printer margins. Check the margins. Solve a problem Solution 2: Verify the paper size setting Solution: Verify that came with the most software applications, click the File menu, and... project you have selected the proper paper size setting for your margin settings 1. If the first solution does not solve the problem, continue trying the remaining solutions until it stops at the edge of paper from the input tray, and then reload the paper...
... stack of paper correctly • Solution 4: Load the stack of the product. Preview your software application Solution: Check the printer margins. Check the margins. Solve a problem Solution 2: Verify the paper size setting Solution: Verify that came with the most software applications, click the File menu, and... project you have selected the proper paper size setting for your margin settings 1. If the first solution does not solve the problem, continue trying the remaining solutions until it stops at the edge of paper from the input tray, and then reload the paper...


