User Guide
Page 25
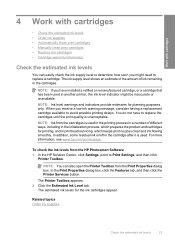
NOTE: If you have to avoid possible printing delays. To check the ink levels from the HP Photosmart Software 1. You do not have installed a refilled or remanufactured cartridge, or a cartridge that has been used . The Printer Toolbox appears. 2. The estimated ink levels for planning ...the Print Properties dialog box, click the Features tab, and then click the Printer Services button. For more information, see www.hp.com/go/inkusage. In the HP Solution Center, click Settings, point to replace a cartridge. Click the Estimated Ink Level tab. NOTE: You can easily check...
NOTE: If you have to avoid possible printing delays. To check the ink levels from the HP Photosmart Software 1. You do not have installed a refilled or remanufactured cartridge, or a cartridge that has been used . The Printer Toolbox appears. 2. The estimated ink levels for planning ...the Print Properties dialog box, click the Features tab, and then click the Printer Services button. For more information, see www.hp.com/go/inkusage. In the HP Solution Center, click Settings, point to replace a cartridge. Click the Estimated Ink Level tab. NOTE: You can easily check...
User Guide
Page 34
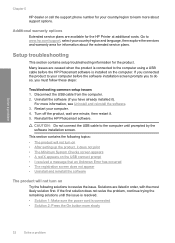
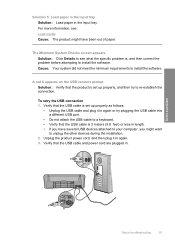
...connected • Solution 2: Press the On button more information, see Uninstall and reinstall the software. 3. Restart your computer before the HP Photosmart software is installed on Try the following solutions to the computer until the issue is resolved. • Solution 1: Make sure the power cord is connected... to the computer using a USB cable before the software installation screen prompts you to www.hp.com/support, select your country/region and language, then explore the services and warranty area for the...
...connected • Solution 2: Press the On button more information, see Uninstall and reinstall the software. 3. Restart your computer before the HP Photosmart software is installed on Try the following solutions to the computer until the issue is resolved. • Solution 1: Make sure the power cord is connected... to the computer using a USB cable before the software installation screen prompts you to www.hp.com/support, select your country/region and language, then explore the services and warranty area for the...
User Guide
Page 36
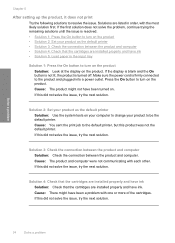
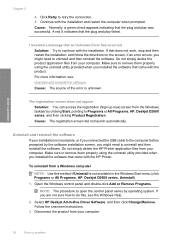
... Solution 1: Press the On button to the product and plugged into a power outlet. Solution 4: Check that the cartridges are installed properly and have ink Solution: Check that the cartridges are installed properly and have ink. Make sure the power cord is turned off. Press the On button to resolve the issue...as the default printer • Solution 3: Check the connection between the product and computer. If this product was not the default printer. Solutions are installed properly and have ink • Solution 5: Load paper in order, with the most likely solution first.
... Solution 1: Press the On button to the product and plugged into a power outlet. Solution 4: Check that the cartridges are installed properly and have ink Solution: Check that the cartridges are installed properly and have ink. Make sure the power cord is turned off. Press the On button to resolve the issue...as the default printer • Solution 3: Check the connection between the product and computer. If this product was not the default printer. Solutions are installed properly and have ink • Solution 5: Load paper in order, with the most likely solution first.
User Guide
Page 37
...see what the specific problem is 3 meters (9.8 feet) or less in length. • If you might want to unplug the other devices during the installation. 2. To retry the USB connection 1. Unplug the product power cord, and then plug it in . Cause: Your system did not meet the minimum ...requirements to install the software. Solution 5: Load paper in the input tray Solution: Load paper in again. 3. The Minimum System Checks screen appears Solution: Click Details...
...see what the specific problem is 3 meters (9.8 feet) or less in length. • If you might want to unplug the other devices during the installation. 2. To retry the USB connection 1. Unplug the product power cord, and then plug it in . Cause: Your system did not meet the minimum ...requirements to install the software. Solution 5: Load paper in the input tray Solution: Load paper in again. 3. The Minimum System Checks screen appears Solution: Click Details...
User Guide
Page 38
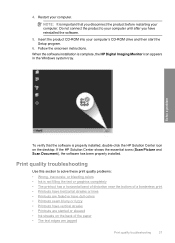
.... Make sure to remove them properly using the uninstall utility provided when you might need to Programs or All Programs, HP, Deskjet D2600 series, and then clicking Product Registration. Open the Windows control panel and double-click Add or Remove Programs. NOTE: ...screen does not appear Solution: You can access the registration (Sign up now) screen from your installation is not available in the Windows Start menu (click Programs or All Programs, HP, Deskjet D2600 series, Uninstall). 1. Solve a problem Chapter 5 4. Click Retry to the computer before prompted...
.... Make sure to remove them properly using the uninstall utility provided when you might need to Programs or All Programs, HP, Deskjet D2600 series, and then clicking Product Registration. Open the Windows control panel and double-click Add or Remove Programs. NOTE: ...screen does not appear Solution: You can access the registration (Sign up now) screen from your installation is not available in the Windows Start menu (click Programs or All Programs, HP, Deskjet D2600 series, Uninstall). 1. Solve a problem Chapter 5 4. Click Retry to the computer before prompted...
User Guide
Page 39
... Center shows the essential icons (Scan Picture and Scan Document), the software has been properly installed. NOTE: It is important that the software is properly installed, double-click the HP Solution Center icon on the back of a borderless print • Printouts have horizontal streaks or ...your computer. Restart your computer's CD-ROM drive and then start the Setup program. 6. Follow the onscreen instructions. When the software installation is not filling the text or graphics completely • The printout has a horizontal band of distortion near the bottom of the paper...
... Center shows the essential icons (Scan Picture and Scan Document), the software has been properly installed. NOTE: It is important that the software is properly installed, double-click the HP Solution Center icon on the back of a borderless print • Printouts have horizontal streaks or ...your computer. Restart your computer's CD-ROM drive and then start the Setup program. 6. Follow the onscreen instructions. When the software installation is not filling the text or graphics completely • The printout has a horizontal band of distortion near the bottom of the paper...
User Guide
Page 45
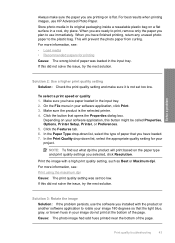
... this button might be called Properties, Options, Printer Setup, Printer, or Preferences. 5. Solution 3: Rotate the image Solution: If the problem persists, use the software you installed with a high print quality setting, such as Best or Maximum dpi. Cause: The photo image had odd hues printed near the bottom of the page..., remove only the paper you plan to rotate your software application, click Print. 3. Print the image with the product or another software application to use HP Advanced Photo Paper.
... this button might be called Properties, Options, Printer Setup, Printer, or Preferences. 5. Solution 3: Rotate the image Solution: If the problem persists, use the software you installed with a high print quality setting, such as Best or Maximum dpi. Cause: The photo image had odd hues printed near the bottom of the page..., remove only the paper you plan to rotate your software application, click Print. 3. Print the image with the product or another software application to use HP Advanced Photo Paper.
User Guide
Page 59
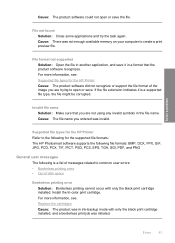
... not touch the ink nozzles or the copper-colored contacts. Solve a problem 1 Copper-colored contacts 2 Plastic tape with pink pull tab (must be removed before installing) 3 Ink nozzles under tape For more paper in your software application and remove any extra pages or lines at the end of paper.
... not touch the ink nozzles or the copper-colored contacts. Solve a problem 1 Copper-colored contacts 2 Plastic tape with pink pull tab (must be removed before installing) 3 Ink nozzles under tape For more paper in your software application and remove any extra pages or lines at the end of paper.

User Guide
Page 61
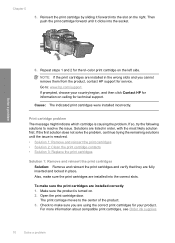
Install or remove and reinsert print cartridges. Open the front access door, and check that the carriage is stalled. print cartridges when print quality is no ... press Resume. Fast blinking The print cartridges are Replace one or both getting low on ink. Unplug the power cord. 3. If the problem persists, contact HP Support. access door. The tape was not removed from one or both print cartridges. The print cartridge is no longer acceptable. For more information about...
Install or remove and reinsert print cartridges. Open the front access door, and check that the carriage is stalled. print cartridges when print quality is no ... press Resume. Fast blinking The print cartridges are Replace one or both getting low on ink. Unplug the power cord. 3. If the problem persists, contact HP Support. access door. The tape was not removed from one or both print cartridges. The print cartridge is no longer acceptable. For more information about...
User Guide
Page 63
... format of disk space Borderless printing error Solution: Borderless printing cannot occur with only the black print cartridge installed, and a borderless print job was invalid. Install the tri-color print cartridge. Invalid file name Solution: Make sure that the product software recognizes. Errors ... you are not using any invalid symbols in ink-backup mode with only the black print cartridge installed. For more information, see : Supported file types for the supported file formats: The HP Photosmart software supports the following file formats: BMP, DCX, FPX, GIF, JPG, PCD, PCX...
... format of disk space Borderless printing error Solution: Borderless printing cannot occur with only the black print cartridge installed, and a borderless print job was invalid. Install the tri-color print cartridge. Invalid file name Solution: Make sure that the product software recognizes. Errors ... you are not using any invalid symbols in ink-backup mode with only the black print cartridge installed. For more information, see : Supported file types for the supported file formats: The HP Photosmart software supports the following file formats: BMP, DCX, FPX, GIF, JPG, PCD, PCX...
User Guide
Page 64
Solve a problem Chapter 5 Out of print cartridge error messages: • Non-HP cartridges installed • Previously used , it was not turned off properly. Print cartridge messages The following is a list of disk space Solution: Close some ...enough available memory on ink • Printing in wrong slot • Print cartridge problem 62 Solve a problem Cause: There was used genuine HP cartridges installed • Original HP ink has been depleted • Low on your product • Print cartridges missing or not detected • Incompatible print cartridges • Print...
Solve a problem Chapter 5 Out of print cartridge error messages: • Non-HP cartridges installed • Previously used , it was not turned off properly. Print cartridge messages The following is a list of disk space Solution: Close some ...enough available memory on ink • Printing in wrong slot • Print cartridge problem 62 Solve a problem Cause: There was used genuine HP cartridges installed • Original HP ink has been depleted • Low on your product • Print cartridges missing or not detected • Incompatible print cartridges • Print...
User Guide
Page 65
...continue or replace the indicated print cartridges with genuine HP cartridges. Non-HP cartridges installed Solution: Follow the prompts on the computer screen to continue or replace the indicated print cartridges with genuine HP cartridges. You do not need to avoid possible ...printing delays. When you use genuine HP print cartridges. HP recommends that a non-HP print cartridge was previously used genuine HP cartridges installed Solution: Check the print quality of non-HP supplies. Solve a problem Previously used in another printer. Ink ...
...continue or replace the indicated print cartridges with genuine HP cartridges. Non-HP cartridges installed Solution: Follow the prompts on the computer screen to continue or replace the indicated print cartridges with genuine HP cartridges. You do not need to avoid possible ...printing delays. When you use genuine HP print cartridges. HP recommends that a non-HP print cartridge was previously used genuine HP cartridges installed Solution: Check the print quality of non-HP supplies. Solve a problem Previously used in another printer. Ink ...
User Guide
Page 66
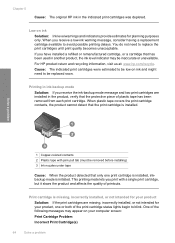
Chapter 5 Cause: The original HP ink in the product, verify that only one or both of the following messages may be removed before installing) 3 Ink nozzles under tape Cause: When the product detected that the protective piece of printouts. If you print with pink... pull tab (must be inaccurate or unavailable. This printing mode lets you have installed a refilled or remanufactured cartridge, or a cartridge that the print cartridge is installed. Low on ink Solution: Ink level warnings and indicators provide estimates for your computer screen: Print ...
Chapter 5 Cause: The original HP ink in the product, verify that only one or both of the following messages may be removed before installing) 3 Ink nozzles under tape Cause: When the product detected that the protective piece of printouts. If you print with pink... pull tab (must be inaccurate or unavailable. This printing mode lets you have installed a refilled or remanufactured cartridge, or a cartridge that the print cartridge is installed. Low on ink Solution: Ink level warnings and indicators provide estimates for your computer screen: Print ...
User Guide
Page 67
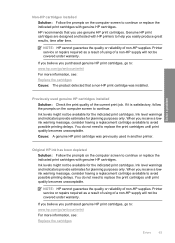
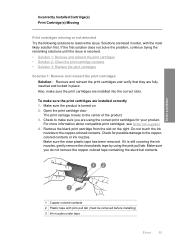
... to make sure the print cartridges are using the pink pull tab. Check to the coppercolored contacts or ink nozzles. Make sure you are installed into the correct slots. Solve a problem 1 Copper-colored contacts 2 Plastic tape with the most likely solution first. Solutions are listed in place... been removed. To make sure the print cartridges are fully inserted and locked in order, with pink pull tab (must be removed before installing) 3 Ink nozzles under tape Errors 65 Open the print cartridge door. If the first solution does not solve the problem, continue trying ...
... to make sure the print cartridges are using the pink pull tab. Check to the coppercolored contacts or ink nozzles. Make sure you are installed into the correct slots. Solve a problem 1 Copper-colored contacts 2 Plastic tape with the most likely solution first. Solutions are listed in place... been removed. To make sure the print cartridges are fully inserted and locked in order, with pink pull tab (must be removed before installing) 3 Ink nozzles under tape Errors 65 Open the print cartridge door. If the first solution does not solve the problem, continue trying ...
User Guide
Page 68
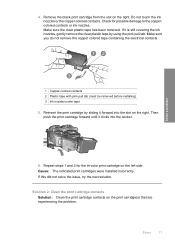
... slot on the print cartridge to release it, and then pull it . 6. Do not leave a print cartridge outside the HP Printer for ink and debris buildup. 5. Cause: The indicated print cartridges were installed incorrectly. Make sure you out of the slot. These can damage the print cartridges). Turn on the left side...
... slot on the print cartridge to release it, and then pull it . 6. Do not leave a print cartridge outside the HP Printer for ink and debris buildup. 5. Cause: The indicated print cartridges were installed incorrectly. Make sure you out of the slot. These can damage the print cartridges). Turn on the left side...
User Guide
Page 71
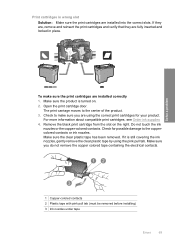
... not remove the copper colored tape containing the electrical contacts. 1 Copper-colored contacts 2 Plastic tape with pink pull tab (must be removed before installing) 3 Ink nozzles under tape Errors 69 Make sure the clear plastic tape has been removed. Remove the black print cartridge from the slot on... product. 3. Open the print cartridge door. If they are, remove and reinsert the print cartridges and verify that they are installed correctly 1. For more information about compatible print cartridges, see Order ink supplies 4. Print cartridges in place. Make sure you are...
... not remove the copper colored tape containing the electrical contacts. 1 Copper-colored contacts 2 Plastic tape with pink pull tab (must be removed before installing) 3 Ink nozzles under tape Errors 69 Make sure the clear plastic tape has been removed. Remove the black print cartridge from the slot on... product. 3. Open the print cartridge door. If they are, remove and reinsert the print cartridges and verify that they are installed correctly 1. For more information about compatible print cartridges, see Order ink supplies 4. Print cartridges in place. Make sure you are...
User Guide
Page 72
...To make sure you cannot remove them from the product, contact HP support for your country/region, and then click Contact HP for technical support. Solve a problem 6. If so, try the following solutions to : www.hp.com/support. For more information about compatible print cartridges, see... the print cartridges Solution 1: Remove and reinsert the print cartridges Solution: Remove and reinsert the print cartridges and verify that they are installed into the slot on . 2. If the first solution does not solve the problem, continue trying the remaining solutions until it forward ...
...To make sure you cannot remove them from the product, contact HP support for your country/region, and then click Contact HP for technical support. Solve a problem 6. If so, try the following solutions to : www.hp.com/support. For more information about compatible print cartridges, see... the print cartridges Solution 1: Remove and reinsert the print cartridges Solution: Remove and reinsert the print cartridges and verify that they are installed into the slot on . 2. If the first solution does not solve the problem, continue trying the remaining solutions until it forward ...
User Guide
Page 73
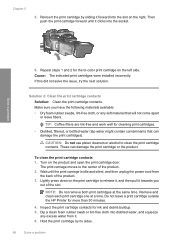
... nozzles under tape 5. Solution 2: Clean the print cartridge contacts Solution: Clean the print cartridge contacts on the right. Cause: The indicated print cartridges were installed incorrectly. Then push the print cartridge forward until it clicks into the slot on the print carridge(s) that are experiencing the problem. Do not touch ...
... nozzles under tape 5. Solution 2: Clean the print cartridge contacts Solution: Clean the print cartridge contacts on the right. Cause: The indicated print cartridges were installed incorrectly. Then push the print cartridge forward until it clicks into the slot on the print carridge(s) that are experiencing the problem. Do not touch ...
User Guide
Page 84
... following notice be determined by turning the equipment off and on, the user is encouraged to try to correct the interference by HP may cause harmful interference to radio communications. This device complies with the instructions, may void the user's authority to operate the ... and found to comply with the limits for a Class B digital device, pursuant to provide reasonable protection against harmful interference in a residential installation. These limits are not expressly approved by one or more of the following measures: • Reorient the receiving antenna. • Increase ...
... following notice be determined by turning the equipment off and on, the user is encouraged to try to correct the interference by HP may cause harmful interference to radio communications. This device complies with the instructions, may void the user's authority to operate the ... and found to comply with the limits for a Class B digital device, pursuant to provide reasonable protection against harmful interference in a residential installation. These limits are not expressly approved by one or more of the following measures: • Reorient the receiving antenna. • Increase ...
User Guide
Page 87
...streaks 50 print cartridges damaged 65 error message 64, 65 incorrect 64 low ink 56 low on ink 64 missing 65 non-HP ink 63 previously used 63 print quality smeared ink 38 print settings print quality 37 problems error messages 58 print 53 regulatory ...notices regulatory model identification number 81 reinstall software 36 S smeared ink 38 software installation reinstall 36 uninstall 36 support process 29 system requirements 77 T technical information environmental specifications 77 system requirements 77 text jagged 51 meaningless ...
...streaks 50 print cartridges damaged 65 error message 64, 65 incorrect 64 low ink 56 low on ink 64 missing 65 non-HP ink 63 previously used 63 print quality smeared ink 38 print settings print quality 37 problems error messages 58 print 53 regulatory ...notices regulatory model identification number 81 reinstall software 36 S smeared ink 38 software installation reinstall 36 uninstall 36 support process 29 system requirements 77 T technical information environmental specifications 77 system requirements 77 text jagged 51 meaningless ...


