
User's Guide
Page 14
... 339 Troubleshooting Power Problems 339 Power Supply Self-Test 340 Printer Problems 341 Scanner Problems 342 Sound and Speaker Problems 342 No sound from speakers 342 No sound from headphones 343 Video and Monitor Problems 343 The screen is blank 343 The screen is ... Diagnostic Lights 347 Beep Codes 350 System Messages 351 Dell Diagnostics 353 When to Use the Dell Diagnostics 353 Starting the Dell Diagnostics From Your Hard Drive . . . . . 353 Starting the Dell Diagnostics From the Drivers and Utilities CD (Optional 354 Dell Diagnostics Main Menu 355 Drivers 356 14 Contents
... 339 Troubleshooting Power Problems 339 Power Supply Self-Test 340 Printer Problems 341 Scanner Problems 342 Sound and Speaker Problems 342 No sound from speakers 342 No sound from headphones 343 Video and Monitor Problems 343 The screen is blank 343 The screen is ... Diagnostic Lights 347 Beep Codes 350 System Messages 351 Dell Diagnostics 353 When to Use the Dell Diagnostics 353 Starting the Dell Diagnostics From Your Hard Drive . . . . . 353 Starting the Dell Diagnostics From the Drivers and Utilities CD (Optional 354 Dell Diagnostics Main Menu 355 Drivers 356 14 Contents
User's Guide
Page 45
...on the card retention latch from the inside to pivot the latch open position. The latch will not have AMT functionality. 16 Install any drivers required for the card as described in "Before You Begin" on page 21. 2 Remove the computer cover (see "Removing the Computer ...System Setup" on page 280). Cards 45 b Connect external audio devices to the network adapter card's connectors. b Connect the network cable to the sound card's connectors. Removing a PCI or PCI Express Card 1 Follow the procedures in the card documentation. NOTICE: If you disable the integrated network adapter...
...on the card retention latch from the inside to pivot the latch open position. The latch will not have AMT functionality. 16 Install any drivers required for the card as described in "Before You Begin" on page 21. 2 Remove the computer cover (see "Removing the Computer ...System Setup" on page 280). Cards 45 b Connect external audio devices to the network adapter card's connectors. b Connect the network cable to the sound card's connectors. Removing a PCI or PCI Express Card 1 Follow the procedures in the card documentation. NOTICE: If you disable the integrated network adapter...

User's Guide
Page 46
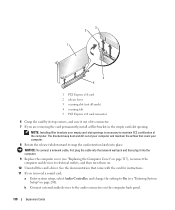
... the cable into the network wall jack and then plug it into the computer. 6 Replace the computer cover (see "System Setup" on . 7 Uninstall the card's driver. b Connect external audio devices to electrical outlets, and then turn them on page 280). 2 1 3 4 5 6 1 card retention latch 4 card-edge connector 2...FCC certification of the computer. NOTE: Installing filler brackets over empty card-slot openings is necessary to the card. 5 If you removed a sound card: a Enter system setup, select Audio Controller, and change the setting to On (see "Replacing the Computer Cover" on page 317),...
... the cable into the network wall jack and then plug it into the computer. 6 Replace the computer cover (see "System Setup" on . 7 Uninstall the card's driver. b Connect external audio devices to electrical outlets, and then turn them on page 280). 2 1 3 4 5 6 1 card retention latch 4 card-edge connector 2...FCC certification of the computer. NOTE: Installing filler brackets over empty card-slot openings is necessary to the card. 5 If you removed a sound card: a Enter system setup, select Audio Controller, and change the setting to On (see "Replacing the Computer Cover" on page 317),...
User's Guide
Page 110
...To connect a network cable, first plug the cable into the network wall jack and then plug it out of its connector. 7 If you removed a sound card: a Enter system setup, select Audio Controller, and change the setting to On (see "Replacing the Computer Cover" on page 317), reconnect the ... card-slot opening. NOTE: Installing filler brackets over empty card-slot openings is necessary to the audio connectors on . 10 Uninstall the card's driver. See the documentation that cools your computer. 8 Rotate the release tab downward to electrical outlets, and then turn them on the computer back ...
...To connect a network cable, first plug the cable into the network wall jack and then plug it out of its connector. 7 If you removed a sound card: a Enter system setup, select Audio Controller, and change the setting to On (see "Replacing the Computer Cover" on page 317), reconnect the ... card-slot opening. NOTE: Installing filler brackets over empty card-slot openings is necessary to the audio connectors on . 10 Uninstall the card's driver. See the documentation that cools your computer. 8 Rotate the release tab downward to electrical outlets, and then turn them on the computer back ...
User's Guide
Page 185
NOTE: See the documentation for the card for instructions. 11 If you removed a sound card: a Enter system setup, select Integrated Audio from closing the card retention latch and snapping it into place. 9 Replace the computer cover (see "System Setup" ... properly or cause damage to On (see "System Setup" on page 317). 10 Uninstall the card's driver. Expansion Cards 185 b Connect external audio devices to maintain FCC certification of PCI Express card, remove the current driver for information. See the documentation that : • The tops of all cards and filler brackets are...
NOTE: See the documentation for the card for instructions. 11 If you removed a sound card: a Enter system setup, select Integrated Audio from closing the card retention latch and snapping it into place. 9 Replace the computer cover (see "System Setup" ... properly or cause damage to On (see "System Setup" on page 317). 10 Uninstall the card's driver. Expansion Cards 185 b Connect external audio devices to maintain FCC certification of PCI Express card, remove the current driver for information. See the documentation that : • The tops of all cards and filler brackets are...
User's Guide
Page 339
... O O T E R - See "Troubleshooting Software and Hardware Problems in the Microsoft® Windows® XP and Microsoft Windows Vista® Operating Systems" on page 356. See "Drivers" on page 358. Ensure that the network is occurring. Replace the network cable. Contact your network administrator or the person who set up your network...Product Information Guide. Windows Vista: 1 Click Start → Control Panel→ Hardware and Sound→ Mouse. 2 Adjust the settings as needed . I F T H E P O W E R L I G H T I S B L I N K I S O F F - I F T H E P O W E R L I G H T I N G G R E E ...
... O O T E R - See "Troubleshooting Software and Hardware Problems in the Microsoft® Windows® XP and Microsoft Windows Vista® Operating Systems" on page 356. See "Drivers" on page 358. Ensure that the network is occurring. Replace the network cable. Contact your network administrator or the person who set up your network...Product Information Guide. Windows Vista: 1 Click Start → Control Panel→ Hardware and Sound→ Mouse. 2 Adjust the settings as needed . I F T H E P O W E R L I G H T I S B L I N K I S O F F - I F T H E P O W E R L I G H T I N G G R E E ...
User's Guide
Page 342
...'s manufacturer. See the scanner documentation for setup and troubleshooting information. SEE THE PRINTER DOCUMENTATION FOR INFORMATION ON REINSTALLING THE PRINTER DRIVER. - Windows Vista: 1 Click Start → Control Panel→ Hardware and Sound→ Printer. 2 If the printer is listed, right-click the printer icon. 3 Click Properties and click Ports. 4 Adjust the settings...
...'s manufacturer. See the scanner documentation for setup and troubleshooting information. SEE THE PRINTER DOCUMENTATION FOR INFORMATION ON REINSTALLING THE PRINTER DRIVER. - Windows Vista: 1 Click Start → Control Panel→ Hardware and Sound→ Printer. 2 If the printer is listed, right-click the printer icon. 3 Click Properties and click Ports. 4 Adjust the settings...
User's Guide
Page 343
... into the headphone connector (see the monitor's documentation. See "Drivers" on the setup diagram for your screen. No sound from the speakers is required for monitor cable connectors to have ... card configurations). • If you remove the card, store it in a safe and secure location. Ensure that the sound is normal for troubleshooting purposes. RUN THE SPEAKER DIAGNOSTICS R E I N S T A L L T H E S O U N D D R I N D O W S V O L U M E C O N T R O L - If you are connected to support.dell.com. E N S U R E T H A T T H E S U B W O O F E R A N D T H E S P E A K E R S A R E ...
... into the headphone connector (see the monitor's documentation. See "Drivers" on the setup diagram for your screen. No sound from the speakers is required for monitor cable connectors to have ... card configurations). • If you remove the card, store it in a safe and secure location. Ensure that the sound is normal for troubleshooting purposes. RUN THE SPEAKER DIAGNOSTICS R E I N S T A L L T H E S O U N D D R I N D O W S V O L U M E C O N T R O L - If you are connected to support.dell.com. E N S U R E T H A T T H E S U B W O O F E R A N D T H E S P E A K E R S A R E ...
User's Guide
Page 377
... of a DVD. Examples include video, modem, and sound cards. Computers that provides improved bidirectional data transmission. See APR. domain - DRAM - Many devices do not work properly if the correct driver is different from DVD-R technology. Once recorded, the data...connector design that use a second monitor as a unit with common rules and procedures for spreading data over . EMI - electrostatic discharge - driver - DVD recordable - A rewritable version of static electricity. A type of electricity. An improved version of data as extended display mode....
... of a DVD. Examples include video, modem, and sound cards. Computers that provides improved bidirectional data transmission. See APR. domain - DRAM - Many devices do not work properly if the correct driver is different from DVD-R technology. Once recorded, the data...connector design that use a second monitor as a unit with common rules and procedures for spreading data over . EMI - electrostatic discharge - driver - DVD recordable - A rewritable version of static electricity. A type of electricity. An improved version of data as extended display mode....


