

User's Guide
Page 11
... 293 Advanced Tab 294 Hibernate Tab 294 Options in Windows Vista 294 Sleep Mode 295 Hibernate Mode 295 Configuring Power Management Settings 295 About RAID Configurations 295 Verifying That RAID Is Working 296 RAID Level 0 296 RAID Level 1 Configuration 297 Configuring Your Computer for RAID 297 Setting Your Computer to RAID-Enabled Mode 297 Contents 11
... 293 Advanced Tab 294 Hibernate Tab 294 Options in Windows Vista 294 Sleep Mode 295 Hibernate Mode 295 Configuring Power Management Settings 295 About RAID Configurations 295 Verifying That RAID Is Working 296 RAID Level 0 296 RAID Level 1 Configuration 297 Configuring Your Computer for RAID 297 Setting Your Computer to RAID-Enabled Mode 297 Contents 11
User's Guide
Page 12
... the Intel Matrix Storage Manager 299 Recovering From a Single Hard Drive Failure (RAID 1) Using the Intel Matrix Storage Manager 300 Migrating to a RAID Level 0 Configuration 301 Migrating to a RAID Level 1 Configuration 301 10 Battery Replacing the Battery 303 11 Replacing the System Board Removing the System Board: Mini Tower, Desktop, Small Form Factor...
... the Intel Matrix Storage Manager 299 Recovering From a Single Hard Drive Failure (RAID 1) Using the Intel Matrix Storage Manager 300 Migrating to a RAID Level 0 Configuration 301 Migrating to a RAID Level 1 Configuration 301 10 Battery Replacing the Battery 303 11 Replacing the System Board Removing the System Board: Mini Tower, Desktop, Small Form Factor...
User's Guide
Page 146
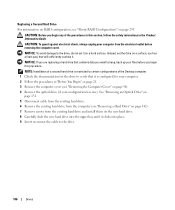
... Optical Drive" on page 131. 5 Disconnect cable from the existing hard drive. 6 Remove the existing hard drive from the computer (see "About RAID Configurations" on page 295. Instead, set it on a hard surface. CAUTION: Before you are replacing a hard drive that will sufficiently cushion it...the Desktop computer. 1 Check the documentation for your computer. 2 Follow the procedures in this procedure. Replacing a Second Hard Drive For information on RAID configuration, see "Removing a Hard Drive" on page 142). 7 Remove screws from the existing hard drive and install them on the new hard...
... Optical Drive" on page 131. 5 Disconnect cable from the existing hard drive. 6 Remove the existing hard drive from the computer (see "About RAID Configurations" on page 295. Instead, set it on a hard surface. CAUTION: Before you are replacing a hard drive that will sufficiently cushion it...the Desktop computer. 1 Check the documentation for your computer. 2 Follow the procedures in this procedure. Replacing a Second Hard Drive For information on RAID configuration, see "Removing a Hard Drive" on page 142). 7 Remove screws from the existing hard drive and install them on the new hard...
User's Guide
Page 282
... (see "Boot Sequence" on the drive. SATA Operation Options for Mini Tower and Desktop: (RAID • RAID Autodetect/AHCI (RAID if signed drives, otherwise AHCI) Autodetect/AHCI • RAID Autodetect/ATA (RAID if signed drives, otherwise ATA) default for small signature is detected on page 287). Settings are..., USB, and Read Only. This option allows you to the eSATA connector on the system board and lists the capacities for RAID on the ultra small form factor computer. Otherwise the drive will be modified. PCI Info Date/Time Boot Sequence Identifies any installed...
... (see "Boot Sequence" on the drive. SATA Operation Options for Mini Tower and Desktop: (RAID • RAID Autodetect/AHCI (RAID if signed drives, otherwise AHCI) Autodetect/AHCI • RAID Autodetect/ATA (RAID if signed drives, otherwise ATA) default for small signature is detected on page 287). Settings are..., USB, and Read Only. This option allows you to the eSATA connector on the system board and lists the capacities for RAID on the ultra small form factor computer. Otherwise the drive will be modified. PCI Info Date/Time Boot Sequence Identifies any installed...

User's Guide
Page 295
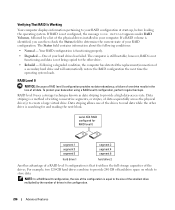
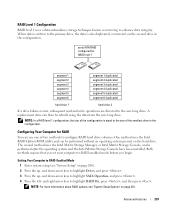
...are the same size. Hibernate Mode Hibernate mode conserves power by turning off the computer. Your Dell computer supports RAID level 0 and RAID level 1. The Intel® RAID controller on your computer. NOTE: If you purchased your computer can use the Windows Power Options...Start , click the arrow in the lower-right corner of the RAID configuration that you may have selected when you purchased your Dell computer with RAID, your computer. NOTE: RAID levels do not represent a hierarchy. A RAID level 0 configuration is recommended for users that the larger drive ...
...are the same size. Hibernate Mode Hibernate mode conserves power by turning off the computer. Your Dell computer supports RAID level 0 and RAID level 1. The Intel® RAID controller on your computer. NOTE: If you purchased your computer can use the Windows Power Options...Start , click the arrow in the lower-right corner of the RAID configuration that you may have selected when you purchased your Dell computer with RAID, your computer. NOTE: RAID levels do not represent a hierarchy. A RAID level 0 configuration is recommended for users that the larger drive ...
User's Guide
Page 296
...detected the replacement/connection of hard drive space on which to provide 240 GB of a secondary hard drive and will automatically restore the RAID configuration the next time the operating system loads. One of data sequentially across the physical drive(s) to the size of the smallest ...Data striping is that it utilizes the full storage capacities of the physical drives installed in the configuration. 296 Advanced Features NOTE: In a RAID level 0 configuration, the size of the configuration is identified, you can then check the Status field to provide a high data-access rate...
...detected the replacement/connection of hard drive space on which to provide 240 GB of a secondary hard drive and will automatically restore the RAID configuration the next time the operating system loads. One of data sequentially across the physical drive(s) to the size of the smallest ...Data striping is that it utilizes the full storage capacities of the physical drives installed in the configuration. 296 Advanced Features NOTE: In a RAID level 0 configuration, the size of the configuration is identified, you can then check the Status field to provide a high data-access rate...
User's Guide
Page 297
... primary drive, the data is performed after the operating system and the Intel Matrix Storage Console have been installed. NOTE: For more information about RAID options, see "System Setup" on the second drive in the configuration. When data is written to highlight SATA Operation, and press . 4 ...Press the left- One method uses the Intel RAID Option ROM utility and can then be performed without an operating system present on page 281. Setting Your Computer to highlight Drives, and press ....
... primary drive, the data is performed after the operating system and the Intel Matrix Storage Console have been installed. NOTE: For more information about RAID options, see "System Setup" on the second drive in the configuration. When data is written to highlight SATA Operation, and press . 4 ...Press the left- One method uses the Intel RAID Option ROM utility and can then be performed without an operating system present on page 281. Setting Your Computer to highlight Drives, and press ....
User's Guide
Page 298
... the up data that you want to select RAID0(Stripe), and press . and down -arrow keys to enter the Intel RAID Option ROM utility. 3 Use the up - In a RAID level 1 configuration, the size of the configuration will be of equal size. and right-arrow keys to highlight Save/Exit,... and press to keep before continuing. If you want to create the RAID volume. 10 Confirm that the correct volume configuration is the maximum available size. 8 Press to create the volume. 9 Press to confirm that...
... the up data that you want to select RAID0(Stripe), and press . and down -arrow keys to enter the Intel RAID Option ROM utility. 3 Use the up - In a RAID level 1 configuration, the size of the configuration will be of equal size. and right-arrow keys to highlight Save/Exit,... and press to keep before continuing. If you want to create the RAID volume. 10 Confirm that the correct volume configuration is the maximum available size. 8 Press to create the volume. 9 Press to confirm that...
User's Guide
Page 299
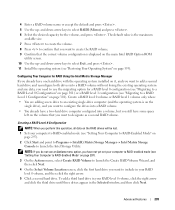
...ROM utility screen. 10 Use the up - and down -arrow keys to use the migrating option for the volume, and press . Create a RAID level 0 volume or RAID level 1 volume only when: • You are adding a new drive to an existing single-drive computer (and the operating system is displayed ...on page 301). 4 Enter a RAID volume name or accept the default and press . 5 Use the up - and down -arrow keys to select RAID1(Mirror) and press . 6 Select the desired...
...ROM utility screen. 10 Use the up - and down -arrow keys to use the migrating option for the volume, and press . Create a RAID level 0 volume or RAID level 1 volume only when: • You are adding a new drive to an existing single-drive computer (and the operating system is displayed ...on page 301). 4 Enter a RAID volume name or accept the default and press . 5 Use the up - and down -arrow keys to select RAID1(Mirror) and press . 6 Select the desired...
User's Guide
Page 300
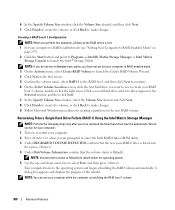
...Volumes with a status of the rebuild. Your computer boots to make changes. 9 Follow Microsoft Windows procedures for your computer). 1 Turn on the new RAID volume. Click a second hard drive until two drives appear in the Selected window, and then click Next. 7 In the Specify Volume Size window, ...Size desired, and then click Next. 7 Click Finish to create the volume, or click Back to the operating system and begins rebuilding the RAID volume automatically. A dialog box appears and displays the progress of Rebuild are prompted to launch the Intel® Storage Utility. NOTE: If ...
...Volumes with a status of the rebuild. Your computer boots to make changes. 9 Follow Microsoft Windows procedures for your computer). 1 Turn on the new RAID volume. Click a second hard drive until two drives appear in the Selected window, and then click Next. 7 In the Specify Volume Size window, ...Size desired, and then click Next. 7 Click Finish to create the volume, or click Back to the operating system and begins rebuilding the RAID volume automatically. A dialog box appears and displays the progress of Rebuild are prompted to launch the Intel® Storage Utility. NOTE: If ...
User's Guide
Page 301
... should be the hard drive containing the data or operating system files that you have not yet set your computer to RAID-enabled mode. 3 On the Actions menu, select Create RAID Volume From Existing Hard Drive to span the stripe array, and click Next. 10 On the Specify Volume Size screen, select... Storage Manager→ Intel Matrix Storage Console to make changes. NOTE: If you do not know the average file size, choose 128 KB as the RAID level. NOTE: If you do not see an Actions menu option, you do not see an Actions menu option, you want to launch the Intel...
... should be the hard drive containing the data or operating system files that you have not yet set your computer to RAID-enabled mode. 3 On the Actions menu, select Create RAID Volume From Existing Hard Drive to span the stripe array, and click Next. 10 On the Specify Volume Size screen, select... Storage Manager→ Intel Matrix Storage Console to make changes. NOTE: If you do not know the average file size, choose 128 KB as the RAID level. NOTE: If you do not see an Actions menu option, you do not see an Actions menu option, you want to launch the Intel...
User's Guide
Page 302
... your computer normally during migration process. 302 Advanced Features NOTE: In step 10, all data contained on the RAID volume). 7 On the Select Source Hard Drive screen, double-click the hard drive from which you want to migrate, and click Next. 8 On the Select ... Specify Volume Size screen, select the volume size you want, and click Next. NOTE: Select the hard drive that you want to use as the RAID level.
... your computer normally during migration process. 302 Advanced Features NOTE: In step 10, all data contained on the RAID volume). 7 On the Select Source Hard Drive screen, double-click the hard drive from which you want to migrate, and click Next. 8 On the Select ... Specify Volume Size screen, select the volume size you want, and click Next. NOTE: Select the hard drive that you want to use as the RAID level.
User's Guide
Page 381
... common implementations of optical drives include CD drives, DVD drives, CD-RW drives, and CD-RW/DVD combo drives. Example of RAID include RAID 0, RAID 1, RAID 5, RAID 10, and RAID 50. An I /O card adhering to it. A physical storage area on the major computer components, such as the CPU (central processing unit). A modification to the PCI ...
... common implementations of optical drives include CD drives, DVD drives, CD-RW drives, and CD-RW/DVD combo drives. Example of RAID include RAID 0, RAID 1, RAID 5, RAID 10, and RAID 50. An I /O card adhering to it. A physical storage area on the major computer components, such as the CPU (central processing unit). A modification to the PCI ...


