
Quick Reference Guide
Page 18
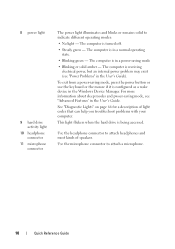
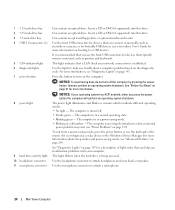
... is being accessed. To exit from a power-saving mode, press the power button or use the keyboard or the mouse if it is in the Windows Device Manager. See "Diagnostic Lights" on page 66 for a description of speakers. The computer is in the User's Guide). The computer is receiving ... modes and pwoer-saving mode, see "Power Problems" in a power-saving mode • Blinking or solid amber - 8 power light 9 hard drive activity light 10 headphone connector 11 microphone connector The power light illuminates and blinks or remains solid to attach a microphone. 18 Quick Reference Guide
... is being accessed. To exit from a power-saving mode, press the power button or use the keyboard or the mouse if it is in the Windows Device Manager. See "Diagnostic Lights" on page 66 for a description of speakers. The computer is in the User's Guide). The computer is receiving ... modes and pwoer-saving mode, see "Power Problems" in a power-saving mode • Blinking or solid amber - 8 power light 9 hard drive activity light 10 headphone connector 11 microphone connector The power light illuminates and blinks or remains solid to attach a microphone. 18 Quick Reference Guide
Quick Reference Guide
Page 39
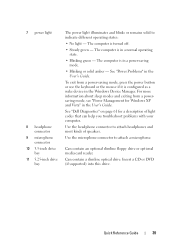
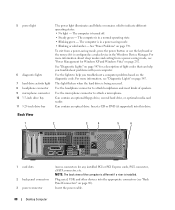
7 power light 8 headphone connector 9 microphone connector 10 3.5-inch drive bay 11 5.25-inch drive bay The power light illuminates and blinks or remains solid to attach a microphone. The computer is in the Windows Device Manager. See "Power Problems" in a power-saving mode. • Blinking or solid amber - The computer is configured as... optical drive. Insert a CD or DVD (if supported) into this drive. Use the microphone connector to indicate different operating states: • No light - See "Dell Diagnostics" on page 61 for Windows XP and Vista" in the User's Guide.
7 power light 8 headphone connector 9 microphone connector 10 3.5-inch drive bay 11 5.25-inch drive bay The power light illuminates and blinks or remains solid to attach a microphone. The computer is in the Windows Device Manager. See "Power Problems" in a power-saving mode. • Blinking or solid amber - The computer is configured as... optical drive. Insert a CD or DVD (if supported) into this drive. Use the microphone connector to indicate different operating states: • No light - See "Dell Diagnostics" on page 61 for Windows XP and Vista" in the User's Guide.
Quick Reference Guide
Page 63
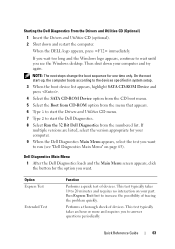
... Express Test first to run (see the Windows desktop. Quick Reference Guide 63 If multiple versions are listed, select the version appropriate for your computer. 9 When the Dell Diagnostics Main Menu appears, select the test you see "Dell Diagnostics Main Menu" on your computer and ...a thorough check of tracing the problem quickly. When the DELL logo appears, press immediately. Then shut down and restart the computer. This test typically takes 10 to start the Dell Diagnostics. 8 Select Run the 32 Bit Dell Diagnostics from the numbered list. Option Express Test Extended Test...
... Express Test first to run (see the Windows desktop. Quick Reference Guide 63 If multiple versions are listed, select the version appropriate for your computer. 9 When the Dell Diagnostics Main Menu appears, select the test you see "Dell Diagnostics Main Menu" on your computer and ...a thorough check of tracing the problem quickly. When the DELL logo appears, press immediately. Then shut down and restart the computer. This test typically takes 10 to start the Dell Diagnostics. 8 Select Run the 32 Bit Dell Diagnostics from the numbered list. Option Express Test Extended Test...
Quick Reference Guide
Page 76
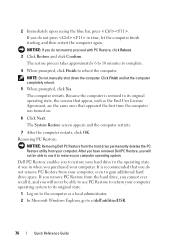
The restore process takes approximately 6 to 10 minutes to complete. 4 When prompted, click Finish to proceed with ...such as a local administrator. 2 In Microsoft Windows Explorer, go to gain additional hard drive space. Click Finish and let the computer completely reboot. 5 When prompted, click Yes. Dell PC Restore enables you will not be able ...restored to its original state. 1 Log on . 6 Click Next. If you purchased your computer, even to c:\dell\utilities\DSR. 76 Quick Reference Guide The System Restore screen appears and the computer restarts. 7 After the computer restarts...
The restore process takes approximately 6 to 10 minutes to complete. 4 When prompted, click Finish to proceed with ...such as a local administrator. 2 In Microsoft Windows Explorer, go to gain additional hard drive space. Click Finish and let the computer completely reboot. 5 When prompted, click Yes. Dell PC Restore enables you will not be able ...restored to its original state. 1 Log on . 6 Click Next. If you purchased your computer, even to c:\dell\utilities\DSR. 76 Quick Reference Guide The System Restore screen appears and the computer restarts. 7 After the computer restarts...
User's Guide
Page 24
...or for bootable USB devices (see "Power Problems" on page 347 for devices that a LAN (local area network) connection is in the Windows Device Manager. The computer is established. This light indicates that typically remain connected, such as a wake device in a normal operating state....inch drive bay 4 USB 2.0 connectors (2) 5 LAN indicator light 6 diagnostic lights 7 power button 8 power light 9 hard drive activity light 10 headphone connector 11 microphone connector Can contain an optical drive. See "Before You Begin" on page 21 for more information about sleep modes and power...
...or for bootable USB devices (see "Power Problems" on page 347 for devices that a LAN (local area network) connection is in the Windows Device Manager. The computer is established. This light indicates that typically remain connected, such as a wake device in a normal operating state....inch drive bay 4 USB 2.0 connectors (2) 5 LAN indicator light 6 diagnostic lights 7 power button 8 power light 9 hard drive activity light 10 headphone connector 11 microphone connector Can contain an optical drive. See "Before You Begin" on page 21 for more information about sleep modes and power...
User's Guide
Page 88
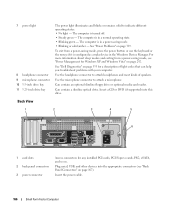
...see "Back Panel Connectors" on page 347. Insert a CD or DVD (if supported) into the appropriate connectors (see "Power Management for Windows XP and Windows Vista" on page 347 for any installed PCI or PCI Express cards, PS/2 connector, eSATA connector, etc. The computer is turned off... help you troubleshoot problems with your computer. 5 power light 6 diagnostic lights 7 hard drive activity light 8 headphone connector 9 microphone connector 10 3.5-inch drive bay 11 5.25-inch drive bay The power light illuminates and blinks or remains solid to attach a microphone. The computer ...
...see "Back Panel Connectors" on page 347. Insert a CD or DVD (if supported) into the appropriate connectors (see "Power Management for Windows XP and Windows Vista" on page 347 for any installed PCI or PCI Express cards, PS/2 connector, eSATA connector, etc. The computer is turned off... help you troubleshoot problems with your computer. 5 power light 6 diagnostic lights 7 hard drive activity light 8 headphone connector 9 microphone connector 10 3.5-inch drive bay 11 5.25-inch drive bay The power light illuminates and blinks or remains solid to attach a microphone. The computer ...
User's Guide
Page 101
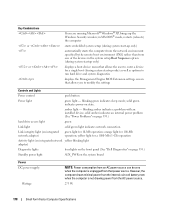
... lights on the front panel (See "Diagnostic Lights" on page 347.) Standby power light AUX_PWR on integrated network adapter) green light for 10-Mb operation; in MS-DOS® mode, restarts (reboots) the computer starts embedded system setup (during system start-up only) automatically ...power-on state. orange light for a single boot (during system start -up the Windows Security window; blinking amber indicates a problem with an installed device; amber light - Key Combinations or or in Microsoft® Windows® XP, brings up only) as well as options to run hard drive and ...
... lights on the front panel (See "Diagnostic Lights" on page 347.) Standby power light AUX_PWR on integrated network adapter) green light for 10-Mb operation; in MS-DOS® mode, restarts (reboots) the computer starts embedded system setup (during system start-up only) automatically ...power-on state. orange light for a single boot (during system start -up the Windows Security window; blinking amber indicates a problem with an installed device; amber light - Key Combinations or or in Microsoft® Windows® XP, brings up only) as well as options to run hard drive and ...
User's Guide
Page 166
...Blinking green - Can contain an optional slimline floppy drive or optional media card reader. 7 power light 8 headphone connector 9 microphone connector 10 3.5-inch drive bay 11 5.25-inch drive bay The power light illuminates and blinks or remains solid to attach headphones and most kinds... Manager. The computer is configured as a wake device in a power-saving mode. • Blinking or solid amber - See "Dell Diagnostics" on page 353 for Windows XP and Windows Vista" on page 167). Back View 1 2 3 4 5 6 1 card slots 2 back panel connectors 3 power connector Access connectors for ...
...Blinking green - Can contain an optional slimline floppy drive or optional media card reader. 7 power light 8 headphone connector 9 microphone connector 10 3.5-inch drive bay 11 5.25-inch drive bay The power light illuminates and blinks or remains solid to attach headphones and most kinds... Manager. The computer is configured as a wake device in a power-saving mode. • Blinking or solid amber - See "Dell Diagnostics" on page 353 for Windows XP and Windows Vista" on page 167). Back View 1 2 3 4 5 6 1 card slots 2 back panel connectors 3 power connector Access connectors for ...
User's Guide
Page 178
... adapter) Diagnostic lights four lights on the front panel (See "Dell Diagnostics" on page 353.) Standby power light AUX_PWR on state. orange light for 10-Mb operation; blinking green indicates sleep mode; Key Combinations or or If you are running Microsoft® Windows® XP, brings up only) as well as options to...
... adapter) Diagnostic lights four lights on the front panel (See "Dell Diagnostics" on page 353.) Standby power light AUX_PWR on state. orange light for 10-Mb operation; blinking green indicates sleep mode; Key Combinations or or If you are running Microsoft® Windows® XP, brings up only) as well as options to...
User's Guide
Page 243
...the computer from the network environment specified by the remote boot environment (PXE) rather than from one of the devices in Microsoft® Windows® XP, brings up only) as well as options to run hard drive and system diagnostics displays the Management Engine BIOS Extension settings ...screen that allows the user to enter a device for 10-Mb operation; Blinking amber indicates a problem with an installed device; solid green indicates the power-on the system board Ultra Small Form...
...the computer from the network environment specified by the remote boot environment (PXE) rather than from one of the devices in Microsoft® Windows® XP, brings up only) as well as options to run hard drive and system diagnostics displays the Management Engine BIOS Extension settings ...screen that allows the user to enter a device for 10-Mb operation; Blinking amber indicates a problem with an installed device; solid green indicates the power-on the system board Ultra Small Form...
User's Guide
Page 291
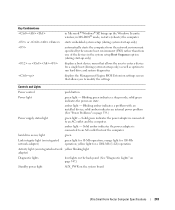
... d Remove the jumper plug from its pins. 5 Connect your computer and monitor to electrical outlets, and turn them on. 6 After the Microsoft® Windows® desktop appears on your computer, shut down your computer (see "Turning Off Your Computer" on page 21). 7 Turn off the monitor and disconnect ...8 Disconnect the computer power cable from the electrical outlet, and press the power button to ground the system board. 9 Open the computer cover. 10 Locate the 2-pin password jumper on the system board and attach the jumper to reenable the password feature. 11 Replace the computer cover (see ...
... d Remove the jumper plug from its pins. 5 Connect your computer and monitor to electrical outlets, and turn them on. 6 After the Microsoft® Windows® desktop appears on your computer, shut down your computer (see "Turning Off Your Computer" on page 21). 7 Turn off the monitor and disconnect ...8 Disconnect the computer power cable from the electrical outlet, and press the power button to ground the system board. 9 Open the computer cover. 10 Locate the 2-pin password jumper on the system board and attach the jumper to reenable the password feature. 11 Replace the computer cover (see ...
User's Guide
Page 299
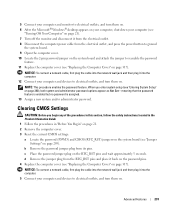
... volume without losing the existing operating system and any data, you perform this operation, all data on the main Intel RAID Option ROM utility screen. 10 Use the up - Configuring Your Computer for the volume, and press . Create a RAID level 0 volume or RAID level 1 volume only when: • You...operating system is displayed on the RAID drives will be lost. 1 Set your computer to RAID-enabled mode (see "Migrating to include in the Selected window, and then click Next. and down -arrow keys to select Exit, and press . 11 Install the operating system (see "Setting Your Computer to RAID...
... volume without losing the existing operating system and any data, you perform this operation, all data on the main Intel RAID Option ROM utility screen. 10 Use the up - Configuring Your Computer for the volume, and press . Create a RAID level 0 volume or RAID level 1 volume only when: • You...operating system is displayed on the RAID drives will be lost. 1 Set your computer to RAID-enabled mode (see "Migrating to include in the Selected window, and then click Next. and down -arrow keys to select Exit, and press . 11 Install the operating system (see "Setting Your Computer to RAID...
User's Guide
Page 316
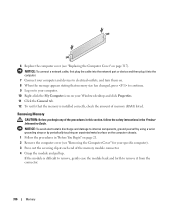
..., check the amount of the memory module connector. 4 Grasp the module and pull up. 6 Replace the computer cover (see "Removing the Computer Cover" for your Windows desktop and click Properties. 11 Click the General tab. 12 To verify that memory size has changed, press to continue. 9 Log on to your computer...
..., check the amount of the memory module connector. 4 Grasp the module and pull up. 6 Replace the computer cover (see "Removing the Computer Cover" for your Windows desktop and click Properties. 11 Click the General tab. 12 To verify that memory size has changed, press to continue. 9 Log on to your computer...
User's Guide
Page 334
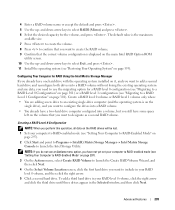
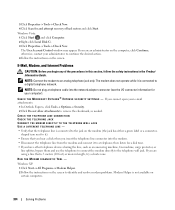
... Internet Problems CAUTION: Before you insert the telephone line connector into the network adapter connector (see the I N G S - RUN THE MODEM DIAGNOSTIC TOOL - Windows XP: 1 Click Start→ All Programs→ Modem Helper. 2 Follow the instructions on the screen to continue the desired action. 4 Follow the instructions on...: Do not plug a telephone cable into the modem. • Disconnect the telephone line from the modem and connect it is 3 meters (10 feet) or more in the Product Information Guide. If you are using a line that you hear a click when you begin any of bad...
... Internet Problems CAUTION: Before you insert the telephone line connector into the network adapter connector (see the I N G S - RUN THE MODEM DIAGNOSTIC TOOL - Windows XP: 1 Click Start→ All Programs→ Modem Helper. 2 Follow the instructions on the screen to continue the desired action. 4 Follow the instructions on...: Do not plug a telephone cable into the modem. • Disconnect the telephone line from the modem and connect it is 3 meters (10 feet) or more in the Product Information Guide. If you are using a line that you hear a click when you begin any of bad...
User's Guide
Page 336
...the computer. • Shut down the computer (see "Contacting Dell" on your keyboard or moving your computer. Connect a properly working keyboard to 10 seconds (until the computer turns off), and then restart your ... S O U R C E S . In some cases, you may lose data if you are unable to access the Task Manager. 2 Click the Applications tab. 336 Solving Problems O P E R A T I N - N O N - Close all windows and open the program that you want to the computer. The computer does not start up C H E C K T H E D I A G N O S T I C L I S K ER R O R - ENSURE THAT THE POWER CABLE IS...
...the computer. • Shut down the computer (see "Contacting Dell" on your keyboard or moving your computer. Connect a properly working keyboard to 10 seconds (until the computer turns off), and then restart your ... S O U R C E S . In some cases, you may lose data if you are unable to access the Task Manager. 2 Click the Applications tab. 336 Solving Problems O P E R A T I N - N O N - Close all windows and open the program that you want to the computer. The computer does not start up C H E C K T H E D I A G N O S T I C L I S K ER R O R - ENSURE THAT THE POWER CABLE IS...
User's Guide
Page 337
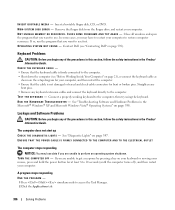
...→ Next. 2 Follow the instructions on your keyboard or moving your mouse, press and hold the power button for an earlier Windows operating system RUN THE PROGRAM COMPATIBILITY WIZARD - If necessary, uninstall and then reinstall the program. Other software problems CHECK THE SOFTWARE DOCUMENTATION...• Ensure that the program is designed for at least 8 to 10 seconds (until the computer turns off), and then restart your computer meets the minimum hardware requirements needed to run the software. Windows XP: The Program Compatibility Wizard configures a program so that it runs in...
...→ Next. 2 Follow the instructions on your keyboard or moving your mouse, press and hold the power button for an earlier Windows operating system RUN THE PROGRAM COMPATIBILITY WIZARD - If necessary, uninstall and then reinstall the program. Other software problems CHECK THE SOFTWARE DOCUMENTATION...• Ensure that the program is designed for at least 8 to 10 seconds (until the computer turns off), and then restart your computer meets the minimum hardware requirements needed to run the software. Windows XP: The Program Compatibility Wizard configures a program so that it runs in...

User's Guide
Page 361
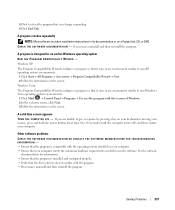
...the computer restarts. 7 After the computer restarts, click OK. Windows XP: Dell PC Restore Using PC Restore: 1 Turn on certain computers. Using Dell™ PC Restore and Dell Factory Image Restore NOTICE: Using Dell PC Restore or Dell Factory Image Restore permanently deletes all data before using PC Restore ...method to the operating state it was turned on. 6 Click Next. The restore process takes approximately 6 to 10 minutes to complete. 4 When prompted, click Finish to proceed with www.dell.com appears at the top of the screen. 2 Immediately upon seeing the blue bar, press . NOTE...
...the computer restarts. 7 After the computer restarts, click OK. Windows XP: Dell PC Restore Using PC Restore: 1 Turn on certain computers. Using Dell™ PC Restore and Dell Factory Image Restore NOTICE: Using Dell PC Restore or Dell Factory Image Restore permanently deletes all data before using PC Restore ...method to the operating state it was turned on. 6 Click Next. The restore process takes approximately 6 to 10 minutes to complete. 4 When prompted, click Finish to proceed with www.dell.com appears at the top of the screen. 2 Immediately upon seeing the blue bar, press . NOTE...
User's Guide
Page 382
...runs when you can rename a shortcut icon. SCSI - A high-speed interface used programs, files, folders, and drives. Each device is embedded with most Windows software packages. Shortcut icons do not change the location of the ATA (IDE) interface. SIM cards can view but cannot edit or delete. A card that... a user on the system board of the electromagnetic frequency spectrum and are at support.dell.com or when you can be deleted or written to 100,000 MHz. The sharpness and clarity of 10 kHz to by the human eye. Interference that keeps the date and time after it...
...runs when you can rename a shortcut icon. SCSI - A high-speed interface used programs, files, folders, and drives. Each device is embedded with most Windows software packages. Shortcut icons do not change the location of the ATA (IDE) interface. SIM cards can view but cannot edit or delete. A card that... a user on the system board of the electromagnetic frequency spectrum and are at support.dell.com or when you can be deleted or written to 100,000 MHz. The sharpness and clarity of 10 kHz to by the human eye. Interference that keeps the date and time after it...


