Quick Start Guide
Page 5
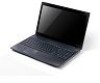
...text with setting up your computer. 3 First things first We would like to thank you for making an Acer notebook your choice for meeting your notebook. The Aspire Generic User Guide contains useful information applying to all models in certain models of your computer can help you ...use Adobe Reader, access the Help and Support menu. It covers basic topics such as system utilities, data recovery, expansion options and troubleshooting. Such instances are only contained in the Aspire product series. For more productive, please refer to the AcerSystem User Guide.
...text with setting up your computer. 3 First things first We would like to thank you for making an Acer notebook your choice for meeting your notebook. The Aspire Generic User Guide contains useful information applying to all models in certain models of your computer can help you ...use Adobe Reader, access the Help and Support menu. It covers basic topics such as system utilities, data recovery, expansion options and troubleshooting. Such instances are only contained in the Aspire product series. For more productive, please refer to the AcerSystem User Guide.
Service Guide
Page 9
... USB/B Board 160 ODD Board 160 Clearing Password Check and BIOS Recovery 161 Clearing Password Check 161 Clear CMOS Jumper 161 BIOS Recovery by Crisis Disk 162 FRU (Field Replaceable Unit) List 163 Aspire 5336 Exploded Diagrams 164 Main Assembly 164 Upper Assembly 165 LCD Assembly 166... LED Assembly 167 Aspire 5336 FRU List 168 Screw List 187 Model Definition and...
... USB/B Board 160 ODD Board 160 Clearing Password Check and BIOS Recovery 161 Clearing Password Check 161 Clear CMOS Jumper 161 BIOS Recovery by Crisis Disk 162 FRU (Field Replaceable Unit) List 163 Aspire 5336 Exploded Diagrams 164 Main Assembly 164 Upper Assembly 165 LCD Assembly 166... LED Assembly 167 Aspire 5336 FRU List 168 Screw List 187 Model Definition and...
Service Guide
Page 39
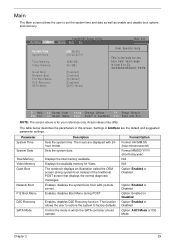
...diagnostic messages. Control the mode in this screen. Valid range is for your reference only. Actual values may differ. Enables, disables D2D Recovery function. Information Main InsydeH20 Setup Utility Security Boot Exit System Time System Date Total Memory: Video Memory: Quiet Boot Network Boot F12 ... Displays the total memory available. Parameter System Time System Date Total Memory Video Memory Quiet Boot Network Boot F12 Boot Menu D2D Recovery SATA Mode Description Sets the system time. The function allows the user to restore the system to set the system time and ...
...diagnostic messages. Control the mode in this screen. Valid range is for your reference only. Actual values may differ. Enables, disables D2D Recovery function. Information Main InsydeH20 Setup Utility Security Boot Exit System Time System Date Total Memory: Video Memory: Quiet Boot Network Boot F12 ... Displays the total memory available. Parameter System Time System Date Total Memory Video Memory Quiet Boot Network Boot F12 Boot Menu D2D Recovery SATA Mode Description Sets the system time. The function allows the user to restore the system to set the system time and ...
Service Guide
Page 45
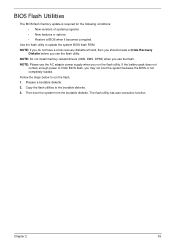
... the bootable diskette. 3. NOTE: Do not install memory-related drivers (XMS, EMS, DPMI) when you use the flash. NOTE: If you do not have a crisis recovery diskette at hand, then you should create a Crisis Recovery Diskette before you use the flash utility.
... the bootable diskette. 3. NOTE: Do not install memory-related drivers (XMS, EMS, DPMI) when you use the flash. NOTE: If you do not have a crisis recovery diskette at hand, then you should create a Crisis Recovery Diskette before you use the flash utility.
Service Guide
Page 156
... correct and that CD/DVD drive is virus free. 3. insert the Windows Vista Operating System DVD in the ODD and restart the computer. The System Recovery Options screen displays. When complete, click Finish. Remove any key to start to enter the BIOS Utility. Run a complete virus scan using System Restore. c. d. Restart...
... correct and that CD/DVD drive is virus free. 3. insert the Windows Vista Operating System DVD in the ODD and restart the computer. The System Recovery Options screen displays. When complete, click Finish. Remove any key to start to enter the BIOS Utility. Run a complete virus scan using System Restore. c. d. Restart...

Service Guide
Page 163
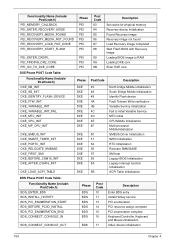
Post Codes These tables describe the POST codes and descriptions during the POST. Memory Initial for Crisis Recovery Simple Memory test Start to Protected mode Patching CPU microcode Setup Cache as RAM Cache as RAM test Setup BIOS ROM cache Enter Boot Firmware ...
Post Codes These tables describe the POST codes and descriptions during the POST. Memory Initial for Crisis Recovery Simple Memory test Start to Protected mode Patching CPU microcode Setup Cache as RAM Cache as RAM test Setup BIOS ROM cache Enter Boot Firmware ...
Service Guide
Page 164
... PEI Post Code 83 84 85 86 87 88 89 8A 8B Description Set cache for physical memory Recovery device Initialization Found Recovery image Recovery image not found Load Recovery Image completed Start Flash BIOS with Recovery image Loading BIOS image to RAM Loading DXE core Enter DXE core Functionality Name (Include\ PostCode.h) DXE_NB_INIT DXE_SB_INIT...
... PEI Post Code 83 84 85 86 87 88 89 8A 8B Description Set cache for physical memory Recovery device Initialization Found Recovery image Recovery image not found Load Recovery Image completed Start Flash BIOS with Recovery image Loading BIOS image to RAM Loading DXE core Enter DXE core Functionality Name (Include\ PostCode.h) DXE_NB_INIT DXE_SB_INIT...

Service Guide
Page 165
...No Boot Device UEFI Boot Start Image Legacy 16 boot entry Try to Boot Legacy OS. Ready to Boot with INT 19 Chapter 4 155 Fast Recovery Start Flash. Functionality Name (Include\ PostCode.h) BDS_CONNECT_STD_ERR BDS_CONNECT_USB_HC BDS_CONNECT_USB_BUS BDS_CONNECT_USB_DEVICE BDS_NO_CONSOLE_ACTION BDS_DISPLAY_LOGO_SYSTEM_INFO BDS_START_IDE_CONTROLLER BDS_START_SATA_CONTROLLER BDS_START_ISA_ACPI_CONTROLLER BDS_START_ISA_BUS BDS_START_ISA_FDD BDS_START_ISA_SEIRAL BDS_START_IDE_BUS BDS_START_AHCI_BUS BDS_CONNECT_LEGACY_ROM BDS_ENUMERATE_ALL_BOOT_OPTION BDS_END_OF_BOOT_SELECTION BDS_ENTER_SETUP...
...No Boot Device UEFI Boot Start Image Legacy 16 boot entry Try to Boot Legacy OS. Ready to Boot with INT 19 Chapter 4 155 Fast Recovery Start Flash. Functionality Name (Include\ PostCode.h) BDS_CONNECT_STD_ERR BDS_CONNECT_USB_HC BDS_CONNECT_USB_BUS BDS_CONNECT_USB_DEVICE BDS_NO_CONSOLE_ACTION BDS_DISPLAY_LOGO_SYSTEM_INFO BDS_START_IDE_CONTROLLER BDS_START_SATA_CONTROLLER BDS_START_ISA_ACPI_CONTROLLER BDS_START_ISA_BUS BDS_START_ISA_FDD BDS_START_ISA_SEIRAL BDS_START_IDE_BUS BDS_START_AHCI_BUS BDS_CONNECT_LEGACY_ROM BDS_ENUMERATE_ALL_BOOT_OPTION BDS_END_OF_BOOT_SELECTION BDS_ENTER_SETUP...
Service Guide
Page 171
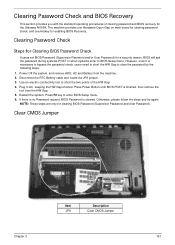
... Password and User Password). Press F2 key to clear the password by the following steps: 1. NOTE: These steps are only for enabling BIOS Recovery. Clearing Password Check Steps for Clearing BIOS Password Check If users set BIOS Password (Supervisor Password and/or User Password) for the Gateway NV50A..... Plug in AC, keeping the HW Gap shorted. Use an electric conductivity tool to short the two points of clearing password and BIOS recovery for a security reason, BIOS will ask the password during systems POST or when systems enter to BIOS Setup menu. Press Power Button until...
... Password and User Password). Press F2 key to clear the password by the following steps: 1. NOTE: These steps are only for enabling BIOS Recovery. Clearing Password Check Steps for Clearing BIOS Password Check If users set BIOS Password (Supervisor Password and/or User Password) for the Gateway NV50A..... Plug in AC, keeping the HW Gap shorted. Use an electric conductivity tool to short the two points of clearing password and BIOS recovery for a security reason, BIOS will ask the password during systems POST or when systems enter to BIOS Setup menu. Press Power Button until...
Service Guide
Page 172
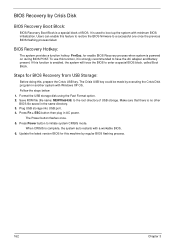
... system with Windows XP OS. The Power button flashes once. 5. Format the USB storage disk using the Fast Format option. 2. BIOS Recovery by regular BIOS flashing process. 162 Chapter 3 Users can enable this function is strongly recommended to a successful one once the previous BIOS ...flashing process failed. BIOS Recovery Hotkey: The system provides a function hotkey: Fn+Esc, for BIOS Recovery from USB Storage: Before doing this function, it is enabled, the system will force the BIOS to ...
... system with Windows XP OS. The Power button flashes once. 5. Format the USB storage disk using the Fast Format option. 2. BIOS Recovery by regular BIOS flashing process. 162 Chapter 3 Users can enable this function is strongly recommended to a successful one once the previous BIOS ...flashing process failed. BIOS Recovery Hotkey: The system provides a function hotkey: Fn+Esc, for BIOS Recovery from USB Storage: Before doing this function, it is enabled, the system will force the BIOS to ...


