Service Guide
Page 8
...83 LCD Module Disassembly Process 84 LCD Module Disassembly Flowchart 84 Removing the LCD Bezel 85 Removing the Camera Module 86 Removing the Inverter Board 87 Removing the LCD/LED Panel 89 Removing the LCD Brackets 90 Removing the LVDS cable 91 Removing the Microphone Cable 92 ...Replacing the Microphone Cable 98 Replacing the LVDS Cable 100 Replacing the LCD Brackets 101 Replacing the LCD/LED Panel 102 Removing the Inverter Board 103 Replacing the Camera Module 105 Replacing the LCD Bezel 106 Main Module Reassembly Procedure 107 Replacing the DC-IN Assembly 107 Replacing...
...83 LCD Module Disassembly Process 84 LCD Module Disassembly Flowchart 84 Removing the LCD Bezel 85 Removing the Camera Module 86 Removing the Inverter Board 87 Removing the LCD/LED Panel 89 Removing the LCD Brackets 90 Removing the LVDS cable 91 Removing the Microphone Cable 92 ...Replacing the Microphone Cable 98 Replacing the LVDS Cable 100 Replacing the LCD Brackets 101 Replacing the LCD/LED Panel 102 Removing the Inverter Board 103 Replacing the Camera Module 105 Replacing the LCD Bezel 106 Main Module Reassembly Procedure 107 Replacing the DC-IN Assembly 107 Replacing...
Service Guide
Page 94
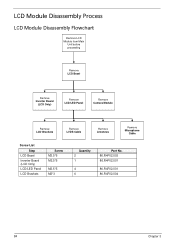
LCD Module Disassembly Process LCD Module Disassembly Flowchart Remove LCD Module from Main Unit before proceeding Remove LCD Bezel Remove Inverter Board (LCD Only) Remove LCD/LED Panel Remove Camera Module Remove LCD Brackets Remove LVDS Cable Remove Antennas Remove Microphone Cable Screw List Step LCD Bezel Inverter Board (LCD Only) LCD/LED Panel LCD Brackets Screw M2.5*6 M2.5*5 M2.5*5 M2*3 Quantity 2 1 4 6 Part No. 86.R4F02.003 86.R4F02.001 86.R4F02.001 86.R4F02.004 84 Chapter 3
LCD Module Disassembly Process LCD Module Disassembly Flowchart Remove LCD Module from Main Unit before proceeding Remove LCD Bezel Remove Inverter Board (LCD Only) Remove LCD/LED Panel Remove Camera Module Remove LCD Brackets Remove LVDS Cable Remove Antennas Remove Microphone Cable Screw List Step LCD Bezel Inverter Board (LCD Only) LCD/LED Panel LCD Brackets Screw M2.5*6 M2.5*5 M2.5*5 M2*3 Quantity 2 1 4 6 Part No. 86.R4F02.003 86.R4F02.001 86.R4F02.001 86.R4F02.004 84 Chapter 3
Service Guide
Page 97
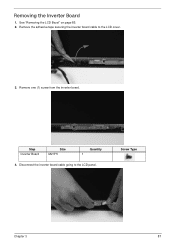
See "Removing the LCD Bezel" on page 85. 2. Disconnect the inverter board cable going to the LCD cover. 3. Step Inverter Board Size M2.5*5 Quantity 1 4. Screw Type Chapter 3 87 Removing the Inverter Board 1. Remove the adhesive tape securing the inverter board cable to the LCD panel. Remove one (1) screw from the inverter board.
See "Removing the LCD Bezel" on page 85. 2. Disconnect the inverter board cable going to the LCD cover. 3. Step Inverter Board Size M2.5*5 Quantity 1 4. Screw Type Chapter 3 87 Removing the Inverter Board 1. Remove the adhesive tape securing the inverter board cable to the LCD panel. Remove one (1) screw from the inverter board.
Service Guide
Page 98
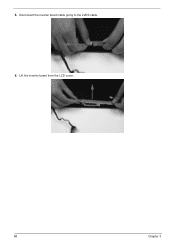
Disconnect the inverter board cable going to the LVDS cable. 6. Lift the inverter board from the LCD cover. 88 Chapter 3 5.
Disconnect the inverter board cable going to the LVDS cable. 6. Lift the inverter board from the LCD cover. 88 Chapter 3 5.
Service Guide
Page 113
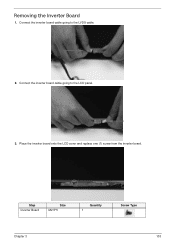
Removing the Inverter Board 1. Step Inverter Board Size M2.5*5 Quantity 1 Screw Type Chapter 3 103 Place the inverter board onto the LCD cover and replace one (1) screw from the inverter board. Connect the inverter board cable going to the LVDS cable. 2. Connect the inverter board cable going to the LCD panel. 3.
Removing the Inverter Board 1. Step Inverter Board Size M2.5*5 Quantity 1 Screw Type Chapter 3 103 Place the inverter board onto the LCD cover and replace one (1) screw from the inverter board. Connect the inverter board cable going to the LVDS cable. 2. Connect the inverter board cable going to the LCD panel. 3.
Service Guide
Page 114
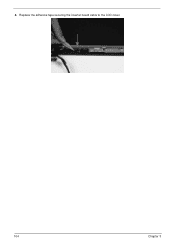
4. Replace the adhesive tape securing the inverter board cable to the LCD cover. 104 Chapter 3
4. Replace the adhesive tape securing the inverter board cable to the LCD cover. 104 Chapter 3


