
Quick Start Guide
Page 5
...addition it : 1 Click on Start > All Programs > AcerSystem. 2 Click on AcerSystem User Guide. This guide contains detailed information on the screen to complete the installation. The Quick Guide introduces you to the basic features and functions of guides: First off, the setup poster helps you get...on AcerSystem User Guide will occasionally refer to functions or features which are marked in the Aspire product series. 3 First things first We would like to thank you for making an Acer notebook your choice for meeting your new computer. For more productive, please refer to ...
...addition it : 1 Click on Start > All Programs > AcerSystem. 2 Click on AcerSystem User Guide. This guide contains detailed information on the screen to complete the installation. The Quick Guide introduces you to the basic features and functions of guides: First off, the setup poster helps you get...on AcerSystem User Guide will occasionally refer to functions or features which are marked in the Aspire product series. 3 First things first We would like to thank you for making an Acer notebook your choice for meeting your new computer. For more productive, please refer to ...

Quick Start Guide
Page 7
5 English # Icon 2 3 4 5 6 7 8 9 10 Item Display screen HDD indicator Description Also called Liquid-Crystal Display (LCD), displays computer output. Indicates the computer's power status. Internal microphone for sound recording. Note: Push to ...
5 English # Icon 2 3 4 5 6 7 8 9 10 Item Display screen HDD indicator Description Also called Liquid-Crystal Display (LCD), displays computer output. Indicates the computer's power status. Internal microphone for sound recording. Note: Push to ...
Quick Start Guide
Page 8
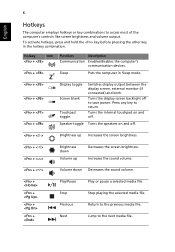
...Description Communication Enables/disables the computer's communication devices. Increases the sound volume. + < > Volume down Volume up Decreases the screen brightness. Sleep Puts the computer in the hotkey combination. Jump to return. English 6 Hotkeys The computer employs hotkeys or ...key combinations to save power. Turns the internal touchpad on and off. + < > Brightness up Increases the screen brightness. + < > + < > Brightness down Decreases the sound volume. + + + + Play/Pause Stop Previous Next Play or pause ...
...Description Communication Enables/disables the computer's communication devices. Increases the sound volume. + < > Volume down Volume up Decreases the screen brightness. Sleep Puts the computer in the hotkey combination. Jump to return. English 6 Hotkeys The computer employs hotkeys or ...key combinations to save power. Turns the internal touchpad on and off. + < > Brightness up Increases the screen brightness. + < > + < > Brightness down Decreases the sound volume. + + + + Play/Pause Stop Previous Next Play or pause ...
Service Guide
Page 5
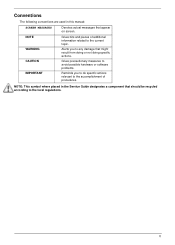
... local regulations. Conventions The following conventions are used in the Service Guide designates a component that should be recycled according to any damage that appear on screen. Alerts you to do specific actions relevant to the current topic. NOTE: This symbol where placed in this manual...
... local regulations. Conventions The following conventions are used in the Service Guide designates a component that should be recycled according to any damage that appear on screen. Alerts you to do specific actions relevant to the current topic. NOTE: This symbol where placed in this manual...
Service Guide
Page 16
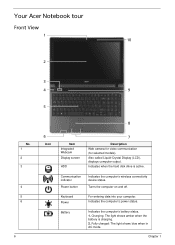
... called Liquid-Crystal Display (LCD), displays computer output. Communication indicator Power button Indicates the computer's wireless connectivity device status. Your Acer Notebook tour Front View 1 10 2 3 4 9 5 No. 1 2 3 4 5 6 6 8 6 Icon Item Integrated Webcam Display screen HDD 7 Description Web camera for video communication (for selected models). Charging: The light shows amber when the battery is...
... called Liquid-Crystal Display (LCD), displays computer output. Communication indicator Power button Indicates the computer's wireless connectivity device status. Your Acer Notebook tour Front View 1 10 2 3 4 9 5 No. 1 2 3 4 5 6 6 8 6 Icon Item Integrated Webcam Display screen HDD 7 Description Web camera for video communication (for selected models). Charging: The light shows amber when the battery is...
Service Guide
Page 23
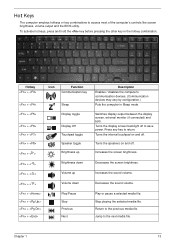
... the selected media file. Jump to return. Switches display output between the display screen, external monitor (if connected) and both. Press any key to the next media file. Turns the display screen backlight off to the previous media file. Increases the sound volume. Decreases the ... (Communication devices may vary by configuration.) Puts the computer in the hotkey combination. Turns the internal touchpad on and off . Decreases the screen brightness. Return to save power. Chapter 1 13 Turns the speakers on and off . To activate hot keys, press and hold the key...
... the selected media file. Jump to return. Switches display output between the display screen, external monitor (if connected) and both. Press any key to the next media file. Turns the display screen backlight off to the previous media file. Increases the sound volume. Decreases the ... (Communication devices may vary by configuration.) Puts the computer in the hotkey combination. Turns the internal touchpad on and off . Decreases the screen brightness. Return to save power. Chapter 1 13 Turns the speakers on and off . To activate hot keys, press and hold the key...
Service Guide
Page 33
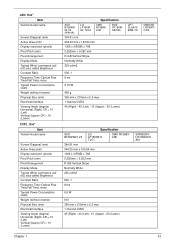
LED 15.6" Item Vendor/model name Screen Diagonal (mm) Active Area (mm) Display resolution (pixels) Pixel Pitch (mm) Pixel Arrangement Display Mode Typical White Luminance (cd/ m2) also called Brightness Contrast Ratio ... inverter) Physical Size (mm) Electrical Interface Viewing Angle (degree) Horizontal (Right) CR = 10 (Left) Vertical (Upper) CR = 10 (Lower) CCFL 15.6" Item Vendor/model name Screen Diagonal (mm) Active Area (mm) Display resolution (pixels) Pixel Pitch (mm) Pixel Arrangement Display Mode Typical White Luminance (cd/ m2) also called Brightness Contrast Ratio...
LED 15.6" Item Vendor/model name Screen Diagonal (mm) Active Area (mm) Display resolution (pixels) Pixel Pitch (mm) Pixel Arrangement Display Mode Typical White Luminance (cd/ m2) also called Brightness Contrast Ratio ... inverter) Physical Size (mm) Electrical Interface Viewing Angle (degree) Horizontal (Right) CR = 10 (Left) Vertical (Upper) CR = 10 (Lower) CCFL 15.6" Item Vendor/model name Screen Diagonal (mm) Active Area (mm) Display resolution (pixels) Pixel Pitch (mm) Pixel Arrangement Display Mode Typical White Luminance (cd/ m2) also called Brightness Contrast Ratio...
Service Guide
Page 37
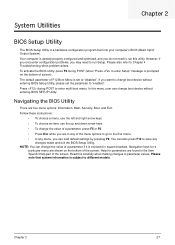
In this menu, user can change the value of the screen. Navigating the BIOS Utility There are shown on the bottom of the screen. Please also refer to "enabled". If you want to change boot device without entering BIOS Setup Utility, please set to "disabled"....during POST to enter multi-boot menu. Press during POST (when "Press to enter Setup" message is enclosed in the Item Specific Help part of screen). Please note that system information is a hardware configuration program built into your computer's BIOS (Basic Input/ Output System). Chapter 2 27 System Utilities...
In this menu, user can change the value of the screen. Navigating the BIOS Utility There are shown on the bottom of the screen. Please also refer to "enabled". If you want to change boot device without entering BIOS Setup Utility, please set to "disabled"....during POST to enter multi-boot menu. Press during POST (when "Press to enter Setup" message is enclosed in the Item Specific Help part of screen). Please note that system information is a hardware configuration program built into your computer's BIOS (Basic Input/ Output System). Chapter 2 27 System Utilities...

Service Guide
Page 38
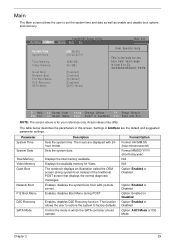
... Exit Select Item F5/F6 Change Values F9 Setup Default Select Menu Enter Select SubMenu F10 Save and Exit NOTE: The screen above is an identifier standard used in boldface are the default and suggested parameter settings Parameter CPU Type CPU Speed IDEO Model...field displays the serial number of IDEO installed on the system. This field displays the manufacturer of IDEO installed on the system. Aspire 5336 BIOS Information The Information screen displays a summary of the Distributed Computing Environment (DCE). 28 Chapter 2 This field displays the serial number of this unit....
... Exit Select Item F5/F6 Change Values F9 Setup Default Select Menu Enter Select SubMenu F10 Save and Exit NOTE: The screen above is an identifier standard used in boldface are the default and suggested parameter settings Parameter CPU Type CPU Speed IDEO Model...field displays the serial number of IDEO installed on the system. This field displays the manufacturer of IDEO installed on the system. Aspire 5336 BIOS Information The Information screen displays a summary of the Distributed Computing Environment (DCE). 28 Chapter 2 This field displays the serial number of this unit....
Service Guide
Page 39
... the system to set the system time and date as well as enable and disable boot options and recovery. Control the mode in this screen. Format/Option Format: HH:MM:SS (hour:minute:second) Format MM/DD/YYYY (month/day/year) N/A N/A Option: Enabled or Disabled...below describes the parameters in which the SATA controller should operate. Enables, disables Boot Menu during system boot instead of the traditional POST screen that displays the normal diagnostic messages. Enables, disables D2D Recovery function. Information Main InsydeH20 Setup Utility Security Boot Exit System Time System...
... the system to set the system time and date as well as enable and disable boot options and recovery. Control the mode in this screen. Format/Option Format: HH:MM:SS (hour:minute:second) Format MM/DD/YYYY (month/day/year) N/A N/A Option: Enabled or Disabled...below describes the parameters in which the SATA controller should operate. Enables, disables Boot Menu during system boot instead of the traditional POST screen that displays the normal diagnostic messages. Enables, disables D2D Recovery function. Information Main InsydeH20 Setup Utility Security Boot Exit System Time System...
Service Guide
Page 40
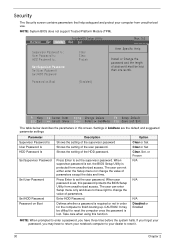
... set the supervisor password. NOTE: System BIOS does not support Trusted Platform Module (TPM). Defines whether a password is protected from unauthorized use. Security The Security screen contains parameters that help safeguard and protect your computer from unauthorized access. The user can not either enter the Setup menu nor change the value...
... set the supervisor password. NOTE: System BIOS does not support Trusted Platform Module (TPM). Defines whether a password is protected from unauthorized use. Security The Security screen contains parameters that help safeguard and protect your computer from unauthorized access. The user can not either enter the Setup menu nor change the value...
Service Guide
Page 41
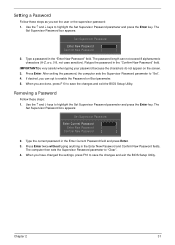
... you set the user or the supervisor password: 1. Removing a Password Follow these steps as you are done, press F10 to enable the Password on the screen. 3. The Set Supervisor Password box appears: Set Supervisor Password Enter New Password [ ] Confirm New Password [ ] 2. Retype the password in the Enter New Password and Confirm...
... you set the user or the supervisor password: 1. Removing a Password Follow these steps as you are done, press F10 to enable the Password on the screen. 3. The Set Supervisor Password box appears: Set Supervisor Password Enter New Password [ ] Confirm New Password [ ] 2. Retype the password in the Enter New Password and Confirm...
Service Guide
Page 42
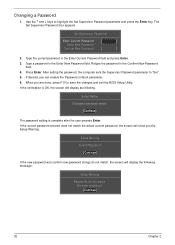
... [ ] Enter New Password [ ] Confirm New Password [ ] 2. Setup Notice Changes have been saved. [Continue] The password setting is OK, the screen will display as following message. Re-enter password. [Continue] 32 Chapter 2 Use the ↑ and ↓ keys to "Set". 5. After setting the.... 3. If the current password entered does not match the actual current password, the screen will display the following . Press Enter. Setup Warning Passwords do not match, the screen will show you the Setup Warning. If the verification is complete after the user presses...
... [ ] Enter New Password [ ] Confirm New Password [ ] 2. Setup Notice Changes have been saved. [Continue] The password setting is OK, the screen will display as following message. Re-enter password. [Continue] 32 Chapter 2 Use the ↑ and ↓ keys to "Set". 5. After setting the.... 3. If the current password entered does not match the actual current password, the screen will display the following . Press Enter. Setup Warning Passwords do not match, the screen will show you the Setup Warning. If the verification is complete after the user presses...
Service Guide
Page 44
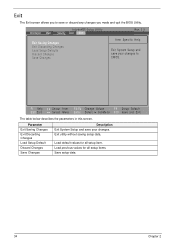
... Item F5/F6 Change Values F9 Setup Default Select Menu Enter Select SubMenu F10 Save and Exit The table below describes the parameters in this screen. Information Main InsydeH20 Setup Utility Security Boot Exit Rev. 3.5 Exit Saving Changes Exit Discarding Changes Load Setup Defaults Discard Changes Save Changes Item... you to save your changes to CMOS. Exit utility without saving setup data. Load default values for all setup item. Exit The Exit screen allows you made and quit the BIOS Utility. Load previous values for all setup items. Save setup data. 34 Chapter 2
... Item F5/F6 Change Values F9 Setup Default Select Menu Enter Select SubMenu F10 Save and Exit The table below describes the parameters in this screen. Information Main InsydeH20 Setup Utility Security Boot Exit Rev. 3.5 Exit Saving Changes Exit Discarding Changes Load Setup Defaults Discard Changes Save Changes Item... you to save your changes to CMOS. Exit utility without saving setup data. Load default values for all setup item. Exit The Exit screen allows you made and quit the BIOS Utility. Load previous values for all setup items. Save setup data. 34 Chapter 2
Service Guide
Page 48
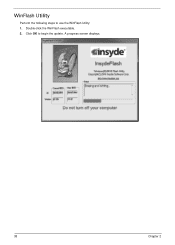
Click OK to use the WinFlash Utility: 1. WinFlash Utility Perform the following steps to begin the update. A progress screen displays. 38 Chapter 2 Double-click the WinFlash executable. 2.
Click OK to use the WinFlash Utility: 1. WinFlash Utility Perform the following steps to begin the update. A progress screen displays. 38 Chapter 2 Double-click the WinFlash executable. 2.
Service Guide
Page 49
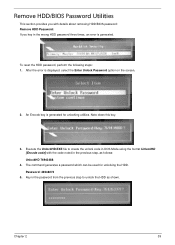
... reset the HDD password, perform the following steps: 1. Chapter 2 39 Password: 46548274 5. After the error is displayed, select the Enter Unlock Password option on the screen. 2. Note down this key. 3.
... reset the HDD password, perform the following steps: 1. Chapter 2 39 Password: 46548274 5. After the error is displayed, select the Enter Unlock Password option on the screen. 2. Note down this key. 3.
Service Guide
Page 50
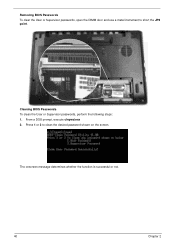
Press 1 or 2 to short the JP9 point. Removing BIOS Passwords To clear the User or Supervisor passwords, open the DIMM door and use a metal instrument to clean the desired password shown on the screen. From a DOS prompt, execute clnpwd.exe 2. The onscreen message determines whether the function is successful or not. 40 Chapter 2 Cleaning BIOS Passwords To clean the User or Supervisor passwords, perform the following steps: 1.
Press 1 or 2 to short the JP9 point. Removing BIOS Passwords To clear the User or Supervisor passwords, open the DIMM door and use a metal instrument to clean the desired password shown on the screen. From a DOS prompt, execute clnpwd.exe 2. The onscreen message determines whether the function is successful or not. 40 Chapter 2 Cleaning BIOS Passwords To clean the User or Supervisor passwords, perform the following steps: 1.
Service Guide
Page 51
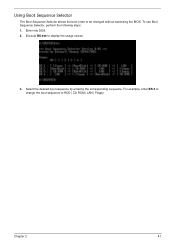
Select the desired boot sequence by entering the corresponding sequence. For example, enter BS 2 to change the boot sequence to display the usage screen. 3. Enter into DOS. 2. Execute BS.exe to HDD | CD ROM | LAN | Floppy. Chapter 2 41 To use Boot Sequence Selector, perform the following steps: 1. Using Boot Sequence Selector The Boot Sequence Selector allows the boot order to be changed without accessing the BIOS.
Select the desired boot sequence by entering the corresponding sequence. For example, enter BS 2 to change the boot sequence to display the usage screen. 3. Enter into DOS. 2. Execute BS.exe to HDD | CD ROM | LAN | Floppy. Chapter 2 41 To use Boot Sequence Selector, perform the following steps: 1. Using Boot Sequence Selector The Boot Sequence Selector allows the boot order to be changed without accessing the BIOS.
Service Guide
Page 52
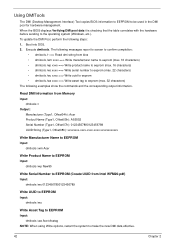
...the corresponding output information. The following steps: 1. Read DMI Information from Memory Input: dmitools /r Output: Manufacturer (Type1, Offset04h): Acer Product Name (Type1, Offset05h): AS5552 Serial Number (Type1, Offset07h): 01234567890123456789 UUID String (Type1, Offset08h): xxxxxxxx-xxxx-xxxx-xxxx-xxxxxxxxxxxx ... the DMI pool for hardware management. Boot into DOS. 2. To update the DMI Pool, perform the following messages report to screen to confirm completion: • dmitools /r ==> Read dmi string from Intel WFM20.pdf) Input: dmitools /ws 01234567890123456789 Write UUID...
...the corresponding output information. The following steps: 1. Read DMI Information from Memory Input: dmitools /r Output: Manufacturer (Type1, Offset04h): Acer Product Name (Type1, Offset05h): AS5552 Serial Number (Type1, Offset07h): 01234567890123456789 UUID String (Type1, Offset08h): xxxxxxxx-xxxx-xxxx-xxxx-xxxxxxxxxxxx ... the DMI pool for hardware management. Boot into DOS. 2. To update the DMI Pool, perform the following messages report to screen to confirm completion: • dmitools /r ==> Read dmi string from Intel WFM20.pdf) Input: dmitools /ws 01234567890123456789 Write UUID...
Service Guide
Page 152
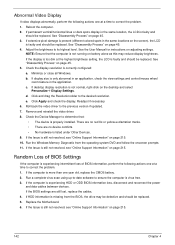
... Devices. 9. d. There are no device conflicts. • No hardware is correctly configured: a. Random Loss of BIOS Settings If the computer is not running on the screen), the LCD is virus free. 3. Replace the Motherboard. 6. NOTE: Ensure that the computer is experiencing intermittent loss of BIOS information, perform the following actions one...
... Devices. 9. d. There are no device conflicts. • No hardware is correctly configured: a. Random Loss of BIOS Settings If the computer is not running on the screen), the LCD is virus free. 3. Replace the Motherboard. 6. NOTE: Ensure that the computer is experiencing intermittent loss of BIOS information, perform the following actions one...


