Service Guide
Page 7
Table of Contents System Specifications 1 Features 1 System Block Diagram 5 Your Acer Notebook tour 6 Front View 6 Closed Front View 7 Closed Rear View 7 Left View...27 Aspire 5336 BIOS 28 Information 28 Main 29 Security 30 Boot 33 Exit 34 BIOS Flash Utilities 35 DOS Flash Utility 36 WinFlash Utility 38 Remove HDD/BIOS Password Utilities 39 Machine Disassembly and Replacement ... DIMM Module 54 Removing the WLAN Module 55 Removing the HDD Module 57 Removing the RTC Battery 59 Main Unit Disassembly Process 60 Main Unit Disassembly Flowchart 60 Removing the Upper Cover 61 ...
Table of Contents System Specifications 1 Features 1 System Block Diagram 5 Your Acer Notebook tour 6 Front View 6 Closed Front View 7 Closed Rear View 7 Left View...27 Aspire 5336 BIOS 28 Information 28 Main 29 Security 30 Boot 33 Exit 34 BIOS Flash Utilities 35 DOS Flash Utility 36 WinFlash Utility 38 Remove HDD/BIOS Password Utilities 39 Machine Disassembly and Replacement ... DIMM Module 54 Removing the WLAN Module 55 Removing the HDD Module 57 Removing the RTC Battery 59 Main Unit Disassembly Process 60 Main Unit Disassembly Flowchart 60 Removing the Upper Cover 61 ...
Service Guide
Page 8
... Assembly 107 Replacing the LCD Assembly 108 Replacing the CPU 111 Replacing the Thermal Module 112 Replacing the Mainboard 114 Replacing the ODD Connector Board 117 Replacing the Bluetooth Board 118 Replacing the USB Board 119 Replacing the Touchpad FFC 121 Replacing the Power Board 122 Replacing the Speaker Module 123 Replacing the Upper Cover 124 Replacing the RTC Battery 128 Replacing the HDD...
... Assembly 107 Replacing the LCD Assembly 108 Replacing the CPU 111 Replacing the Thermal Module 112 Replacing the Mainboard 114 Replacing the ODD Connector Board 117 Replacing the Bluetooth Board 118 Replacing the USB Board 119 Replacing the Touchpad FFC 121 Replacing the Power Board 122 Replacing the Speaker Module 123 Replacing the Upper Cover 124 Replacing the RTC Battery 128 Replacing the HDD...

Service Guide
Page 137
6. Turn the computer over. Step Lower Cover Size M2.5*8 (red callout) M2*3 (green callout) Quantity 10 4 Screw Type Chapter 3 127 Step Upper Cover Size M2.5*5 Quantity 8 Screw Type 7. Replace the eight (8) screws to secure the upper cover as shown. Replace the ten (10) screws on the lower cover and four (4) screws in the battery bay.
6. Turn the computer over. Step Lower Cover Size M2.5*8 (red callout) M2*3 (green callout) Quantity 10 4 Screw Type Chapter 3 127 Step Upper Cover Size M2.5*5 Quantity 8 Screw Type 7. Replace the eight (8) screws to secure the upper cover as shown. Replace the ten (10) screws on the lower cover and four (4) screws in the battery bay.
Service Guide
Page 138
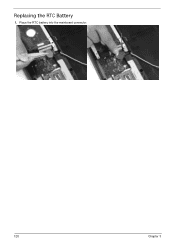
Replacing the RTC Battery 1. Place the RTC battery into the mainboard connector. 128 Chapter 3
Replacing the RTC Battery 1. Place the RTC battery into the mainboard connector. 128 Chapter 3

Service Guide
Page 148
Slide and hold the battery release latch to secure the battery in place. 138 Chapter 3 Replacing the Battery 1. Slide the battery lock in the direction shown to the release position (1), insert the battery pack and press down (2). 2 1 2.
Slide and hold the battery release latch to secure the battery in place. 138 Chapter 3 Replacing the Battery 1. Slide the battery lock in the direction shown to the release position (1), insert the battery pack and press down (2). 2 1 2.
Service Guide
Page 151
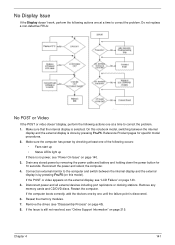
... to correct the problem. If the POST or video appears on the external display, see "Online Support Information" on page 215. Do not replace a non-defective FRUs: No POST or Video If the POST or video doesn't display, perform the following actions one at least one of ...Disassembly Process" on this notebook model, switching between the internal display and the external display is by removing the power cable and battery and holding down the power button for specific model procedures. 2. Disconnect power and all external devices including port replicators or docking stations.
... to correct the problem. If the POST or video appears on the external display, see "Online Support Information" on page 215. Do not replace a non-defective FRUs: No POST or Video If the POST or video doesn't display, perform the following actions one at least one of ...Disassembly Process" on this notebook model, switching between the internal display and the external display is by removing the power cable and battery and holding down the power button for specific model procedures. 2. Disconnect power and all external devices including port replicators or docking stations.
Service Guide
Page 152
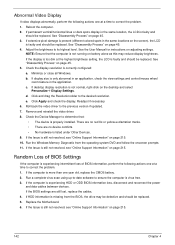
... Information" on page 215. 142 Chapter 4 Abnormal Video Display If video displays abnormally, perform the following actions one year old, replace the CMOS battery. 2. Minimize or close all Windows. e. Run the Windows Memory Diagnostic from the BIOS, the drive may reduce display brightness....Process" on page 45. 4. If desktop display resolution is still not resolved, see "Online Support Information" on battery alone as this may be defective and should be replaced. 5. Adjust the brightness to correct the problem. 1. b. If the computer is only abnormal in an application...
... Information" on page 215. 142 Chapter 4 Abnormal Video Display If video displays abnormally, perform the following actions one year old, replace the CMOS battery. 2. Minimize or close all Windows. e. Run the Windows Memory Diagnostic from the BIOS, the drive may reduce display brightness....Process" on page 45. 4. If desktop display resolution is still not resolved, see "Online Support Information" on battery alone as this may be defective and should be replaced. 5. Adjust the brightness to correct the problem. 1. b. If the computer is only abnormal in an application...
Service Guide
Page 161
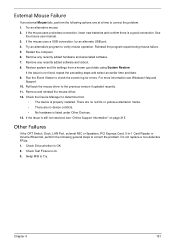
... at a time to check the events log for errors. Run the Event Viewer to correct the problem. 1. If the mouse uses a wireless connection, insert new batteries and confirm there is still not resolved, see Windows Help and Support. 10. See the mouse user manual. 3. Restart the computer. 6. If the Issue is... the following general steps to Try. Try an alternative mouse. 2. Check the Device Manager to determine that: • The device is properly installed. Do not replace a non-defective FRUs: 1.
... at a time to check the events log for errors. Run the Event Viewer to correct the problem. 1. If the mouse uses a wireless connection, insert new batteries and confirm there is still not resolved, see Windows Help and Support. 10. See the mouse user manual. 3. Restart the computer. 6. If the Issue is... the following general steps to Try. Try an alternative mouse. 2. Check the Device Manager to determine that: • The device is properly installed. Do not replace a non-defective FRUs: 1.
Service Guide
Page 162
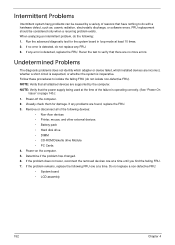
... if the problem has changed. 6. NOTE: Verify that the power supply being used at a time until you find the failing FRU. 7. Do not replace a non-defective FRU: • System board • LCD assembly 152 Chapter 4 If no more errors. Rerun the test to verify that have nothing...the following devices: • Non-Acer devices • Printer, mouse, and other external devices • Battery pack • Hard disk drive • DIMM • CD-ROM/Diskette drive Module • PC Cards 4. NOTE: Verify that all of reasons that there are found, replace the FRU. 3. Run the advanced ...
... if the problem has changed. 6. NOTE: Verify that the power supply being used at a time until you find the failing FRU. 7. Do not replace a non-defective FRU: • System board • LCD assembly 152 Chapter 4 If no more errors. Rerun the test to verify that have nothing...the following devices: • Non-Acer devices • Printer, mouse, and other external devices • Battery pack • Hard disk drive • DIMM • CD-ROM/Diskette drive Module • PC Cards 4. NOTE: Verify that all of reasons that there are found, replace the FRU. 3. Run the advanced ...
Service Guide
Page 227
A Antennas Removing 92, 94 Replacing 96 B Base View 9 Battery Replacing 138 Battery Pack Removing 47 BIOS Utility 27-35 Advanced 30 Boot 33 Exit 34 Navigating 27 Onboard Device Configuration 31 Power 33 Save and Exit 34 ...Security 30 System Security 34 Bluetooth Module (Discrete) Removing 72 Board Layout Top View 157 brightness hotkeys 13 C Camera Module Removing 86, 87, 103 Replacing...
A Antennas Removing 92, 94 Replacing 96 B Base View 9 Battery Replacing 138 Battery Pack Removing 47 BIOS Utility 27-35 Advanced 30 Boot 33 Exit 34 Navigating 27 Onboard Device Configuration 31 Power 33 Save and Exit 34 ...Security 30 System Security 34 Bluetooth Module (Discrete) Removing 72 Board Layout Top View 157 brightness hotkeys 13 C Camera Module Removing 86, 87, 103 Replacing...


