User Guide
Page 3
... 1 HP ENVY 4500 e-All-in-One series Help ...1 2 Get to know the HP ENVY 4500 series ...3 Printer parts ...4 Control panel and status lights ...5 Wireless settings ...7 Auto-Off ...8 3 Print ...9 HP ePrint ...10 Print documents ...12 Print photos ...14 Print Quick Forms ...15 Print envelopes ...16 Print with HP wireless direct ...17 Print using the maximum dpi ...19 Tips for print success ...20 4 Paper basics ...23 Recommended papers for printing ...24...
... 1 HP ENVY 4500 e-All-in-One series Help ...1 2 Get to know the HP ENVY 4500 series ...3 Printer parts ...4 Control panel and status lights ...5 Wireless settings ...7 Auto-Off ...8 3 Print ...9 HP ePrint ...10 Print documents ...12 Print photos ...14 Print Quick Forms ...15 Print envelopes ...16 Print with HP wireless direct ...17 Print using the maximum dpi ...19 Tips for print success ...20 4 Paper basics ...23 Recommended papers for printing ...24...
User Guide
Page 4
... warranty information ...48 Tips for networked printers 58 8 Solve a problem ...61 Improve print quality ...62 Clear a paper jam ...66 Unable to print ...70 Clear the print carriage ...74 Prepare paper trays ...75 Resolve copy and scan issues ...76 Printer failure ...77 Resolve ink cartridge... problem ...78 Ink cartridge problem ...80 Older generation cartridges ...81 Networking ...82 HP support ...83 Appendix...
... warranty information ...48 Tips for networked printers 58 8 Solve a problem ...61 Improve print quality ...62 Clear a paper jam ...66 Unable to print ...70 Clear the print carriage ...74 Prepare paper trays ...75 Resolve copy and scan issues ...76 Printer failure ...77 Resolve ink cartridge... problem ...78 Ink cartridge problem ...80 Older generation cartridges ...81 Networking ...82 HP support ...83 Appendix...
User Guide
Page 5
1 HP ENVY 4500 e-All-in-One series Help Learn how to use your HP ENVY 4500 series ● Printer parts on page 4 ● Control panel and status lights on page 5 ● Load media on page 26 ● Print on page 9 ● Copy documents on page 34 ● Scan to a computer on page 36 ● Replace the cartridges on page 45 ● Clear a paper jam on page 66 ● Check the estimated ink levels on page 42 ENWW 1
1 HP ENVY 4500 e-All-in-One series Help Learn how to use your HP ENVY 4500 series ● Printer parts on page 4 ● Control panel and status lights on page 5 ● Load media on page 26 ● Print on page 9 ● Copy documents on page 34 ● Scan to a computer on page 36 ● Replace the cartridges on page 45 ● Clear a paper jam on page 66 ● Check the estimated ink levels on page 42 ENWW 1

User Guide
Page 16
... options. ● On the Layout tab, select Portrait or Landscape orientation. ● On the Paper/Quality tab, select the appropriate paper type from the Paper Size drop-down list. 5. To print on should face down list in the Tray Selection area, and then select the appropriate...the edge of the page 1. Make sure your software, click the Print button. 2. To print a document 1. Make sure your software, click the Print button. 2. Place the paper in the Quality Settings area. ● Click Advanced to begin printing. Click OK to be called Properties, Options, Printer Setup, Printer ...
... options. ● On the Layout tab, select Portrait or Landscape orientation. ● On the Paper/Quality tab, select the appropriate paper type from the Paper Size drop-down list. 5. To print on should face down list in the Tray Selection area, and then select the appropriate...the edge of the page 1. Make sure your software, click the Print button. 2. To print a document 1. Make sure your software, click the Print button. 2. Place the paper in the Quality Settings area. ● Click Advanced to begin printing. Click OK to be called Properties, Options, Printer Setup, Printer ...

User Guide
Page 17
...list. 5. Click OK to manually reload the paper or make any operations. Select the appropriate options. ● On the Layout tab, select Portrait or Landscape orientation. ● On the Paper/Quality tab, select the appropriate paper type and print quality from the Media drop-down list. ●...; Click Advanced to wait for a few seconds. You do not need to print. Depending on your software application, this button might...
...list. 5. Click OK to manually reload the paper or make any operations. Select the appropriate options. ● On the Layout tab, select Portrait or Landscape orientation. ● On the Paper/Quality tab, select the appropriate paper type and print quality from the Media drop-down list. ●...; Click Advanced to wait for a few seconds. You do not need to print. Depending on your software application, this button might...

User Guide
Page 18
...drop-down list in the Tray Selection area, and then select the appropriate print quality in the Quality Settings area. NOTE: For maximum dpi resolution, go to Paper/Quality tab, select Photo Paper from the Paper Size drop-down list, and then select Best in the Quality Settings area... to select the appropriate paper size from the Media drop-down list. NOTE: After the printing is selected. 3. Slide the paper-width guides all paper from the Print in grayscale, select High Quality Grayscale from the paper tray, and then load the photo paper with side to print max DPI in Grayscale drop...
...drop-down list in the Tray Selection area, and then select the appropriate print quality in the Quality Settings area. NOTE: For maximum dpi resolution, go to Paper/Quality tab, select Photo Paper from the Paper Size drop-down list, and then select Best in the Quality Settings area... to select the appropriate paper size from the Media drop-down list. NOTE: After the printing is selected. 3. Slide the paper-width guides all paper from the Print in grayscale, select High Quality Grayscale from the paper tray, and then load the photo paper with side to print max DPI in Grayscale drop...

User Guide
Page 19
... the printer display, press the Home button, and then press the Up and Down buttons until you want to print, select the number of the Quick Forms options. ENWW Print Quick Forms 15 TIP: If the Quick Forms option does not appear on the printer display. Press the Up... and Down buttons to print calendars, check lists, games, notebook paper, graph paper, music paper, and games. Then press OK. 3. Print Quick Forms 1. After you have selected...
... the printer display, press the Home button, and then press the Up and Down buttons until you want to print, select the number of the Quick Forms options. ENWW Print Quick Forms 15 TIP: If the Quick Forms option does not appear on the printer display. Press the Up... and Down buttons to print calendars, check lists, games, notebook paper, graph paper, music paper, and games. Then press OK. 3. Print Quick Forms 1. After you have selected...
User Guide
Page 20
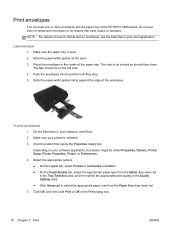
...File menu in the center of the paper tray. Load envelopes 1. Slide the paper-width guides firmly against the edge of the HP ENVY 4500 series. Click the button that have clasps or windows. Slide the paper-width guides all the open . 2. To print an envelope 1. Depending on envelopes, ... then select the appropriate print quality in the Print dialog box. 16 Chapter 3 Print ENWW Push the envelopes into the paper tray of the envelopes. Make sure the paper tray is selected. 3. The flap should face down. Make sure your software, click Print. 2. Print envelopes You can load ...
...File menu in the center of the paper tray. Load envelopes 1. Slide the paper-width guides firmly against the edge of the HP ENVY 4500 series. Click the button that have clasps or windows. Slide the paper-width guides all the open . 2. To print an envelope 1. Depending on envelopes, ... then select the appropriate print quality in the Print dialog box. 16 Chapter 3 Print ENWW Push the envelopes into the paper tray of the envelopes. Make sure the paper tray is selected. 3. The flap should face down. Make sure your software, click Print. 2. Print envelopes You can load ...

User Guide
Page 23
...that opens the Properties dialog box. Depending on the Layout tab, and then click OK to print. Click the Paper/Quality tab. 5. On the Paper/Quality tab, select the appropriate paper type from the Media drop-down list in the Tray Selection area, and then select Best ... Printer Setup, Printer Properties, Printer, or Preferences. 4. Printing in the Quality Settings area. 6. In the Printer Features area, select Yes from the Paper Size drop-down list. 8. Make sure your software, click Print. 2. Click the Advanced button. 7. To print in Max DPI drop-down list. 9. On the File...
...that opens the Properties dialog box. Depending on the Layout tab, and then click OK to print. Click the Paper/Quality tab. 5. On the Paper/Quality tab, select the appropriate paper type from the Media drop-down list in the Tray Selection area, and then select Best ... Printer Setup, Printer Properties, Printer, or Preferences. 4. Printing in the Quality Settings area. 6. In the Printer Features area, select Yes from the Paper Size drop-down list. 8. Make sure your software, click Print. 2. Click the Advanced button. 7. To print in Max DPI drop-down list. 9. On the File...
User Guide
Page 24
... paper. Make sure the paper-width guides do not apply to copying or scanning. Tips for more information, see Load media on the app bar, and then click the icon with the printer's name. ◦ Windows 7, Windows Vista, and Windows XP: From the computer desktop, click Start, select All Programs, click HP, click HP ENVY 4500...
... paper. Make sure the paper-width guides do not apply to copying or scanning. Tips for more information, see Load media on the app bar, and then click the icon with the printer's name. ◦ Windows 7, Windows Vista, and Windows XP: From the computer desktop, click Start, select All Programs, click HP, click HP ENVY 4500...
User Guide
Page 25
... do not need to replace the cartridges until print quality becomes unacceptable. ● Software settings selected in the print driver only apply to printing, they do not apply to : www.hp.com/go to copying or scanning. ● You can print your document on both sides of the paper. NOTE: When you receive a low-ink warning...
... do not need to replace the cartridges until print quality becomes unacceptable. ● Software settings selected in the print driver only apply to printing, they do not apply to : www.hp.com/go to copying or scanning. ● You can print your document on both sides of the paper. NOTE: When you receive a low-ink warning...

User Guide
Page 28
... photos. Photo printing ● HP Premium Plus Photo Paper HP Premium Plus Photo Paper is acid-free for longer lasting documents. ● HP Everyday Photo Paper Print colorful, everyday snapshots at a low cost, using HP papers that are independently tested to a store-processed photo. Recommended papers for printing If you want the best print quality, HP recommends using paper designed for casual photo printing. HP Premium Plus...
... photos. Photo printing ● HP Premium Plus Photo Paper HP Premium Plus Photo Paper is acid-free for longer lasting documents. ● HP Everyday Photo Paper Print colorful, everyday snapshots at a low cost, using HP papers that are independently tested to a store-processed photo. Recommended papers for printing If you want the best print quality, HP recommends using paper designed for casual photo printing. HP Premium Plus...
User Guide
Page 29
... smearing, bolder blacks and vivid colors. It features ColorLok Technology for less smearing, bolder blacks, and vivid colors. ● HP Printing Paper HP Printing Paper is a high-quality multifunction paper. It features ColorLok Technology for longer lasting documents. ● HP Office Paper HP Office Paper is acid-free for less smearing, bolder blacks, and vivid colors. It is a high-quality multifunction...
... smearing, bolder blacks and vivid colors. It features ColorLok Technology for less smearing, bolder blacks, and vivid colors. ● HP Printing Paper HP Printing Paper is a high-quality multifunction paper. It features ColorLok Technology for longer lasting documents. ● HP Office Paper HP Office Paper is acid-free for less smearing, bolder blacks, and vivid colors. It is a high-quality multifunction...
User Guide
Page 30
Load full-size paper 1. Load the paper. ● Insert a stack of paper into the paper tray with the short edge forward and the print side down. ● Slide the stack of paper forward until it stops. 26 Chapter 4 Paper basics ENWW Lower the paper tray, and then pull out the paper tray and tray extender. 2. Slide the paper-width guides outward. 3. Load media Select a paper size to continue.
Load full-size paper 1. Load the paper. ● Insert a stack of paper into the paper tray with the short edge forward and the print side down. ● Slide the stack of paper forward until it stops. 26 Chapter 4 Paper basics ENWW Lower the paper tray, and then pull out the paper tray and tray extender. 2. Slide the paper-width guides outward. 3. Load media Select a paper size to continue.

User Guide
Page 32
Load the photo paper. ● Insert a stack of photo paper into the paper tray with the short edge forward and the print side down. ● Slide the stack of photo paper forward until it stops. ● Adjust the paper-width guides so they fit against both sides of the stack of photo paper. ● Slide the paper tray in. 28 Chapter 4 Paper basics ENWW Slide the paper-width guides outward. 3. 2.
Load the photo paper. ● Insert a stack of photo paper into the paper tray with the short edge forward and the print side down. ● Slide the stack of photo paper forward until it stops. ● Adjust the paper-width guides so they fit against both sides of the stack of photo paper. ● Slide the paper tray in. 28 Chapter 4 Paper basics ENWW Slide the paper-width guides outward. 3. 2.

User Guide
Page 33
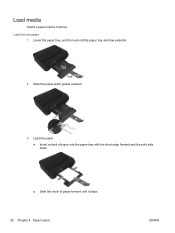
Lower the paper tray, and then pull out the paper tray and tray extender. 2. The flap should be printed on the left side and facing up. ● Slide the stack of envelopes forward until it stops. ● Adjust the paper-width guides so they fit against both sides of the stack of the paper tray. ENWW Load media 29 The side to be on should face down. Load envelopes 1. Load the envelopes. ● Insert one or more envelopes in the center of envelopes. Slide the paper-width guides outward. 3.
Lower the paper tray, and then pull out the paper tray and tray extender. 2. The flap should be printed on the left side and facing up. ● Slide the stack of envelopes forward until it stops. ● Adjust the paper-width guides so they fit against both sides of the stack of the paper tray. ENWW Load media 29 The side to be on should face down. Load envelopes 1. Load the envelopes. ● Insert one or more envelopes in the center of envelopes. Slide the paper-width guides outward. 3.

User Guide
Page 35
... tested to meet high standards of reliability and print quality, and produce documents with most types of office media. ENWW Order HP Paper Supplies 31 Look for Products and Services and select ink, toner and paper. Order HP Paper Supplies The printer is designed to work well ... faster than ordinary plain papers. To purchase HP papers, go to Shop for papers with the ColorLok logo for more information about HP media. HP recommends plain papers with the ColorLok logo in a variety of everyday documents. Visit the HP website at www.hp.com for printing and copying of weights ...
... tested to meet high standards of reliability and print quality, and produce documents with most types of office media. ENWW Order HP Paper Supplies 31 Look for Products and Services and select ink, toner and paper. Order HP Paper Supplies The printer is designed to work well ... faster than ordinary plain papers. To purchase HP papers, go to Shop for papers with the ColorLok logo for more information about HP media. HP recommends plain papers with the ColorLok logo in a variety of everyday documents. Visit the HP website at www.hp.com for printing and copying of weights ...

User Guide
Page 38
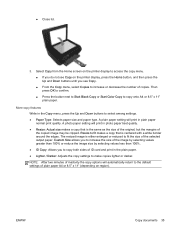
Load the original. ● Lift the lid on the printer. ● Load the original print side down on plain paper. You can also easily access advanced settings, such as changing the paper type and size, adjusting the darkness of the scanner glass. 34 Chapter 5 Copy and scan ENWW Load full-size paper in the paper tray. 2. Easy Copy 1. Copy documents The Copy menu on the printer display allows you to easily select number of copies and color or black and white for copying on the right front corner of the copy, and resizing the copy.
Load the original. ● Lift the lid on the printer. ● Load the original print side down on plain paper. You can also easily access advanced settings, such as changing the paper type and size, adjusting the darkness of the scanner glass. 34 Chapter 5 Copy and scan ENWW Load full-size paper in the paper tray. 2. Easy Copy 1. Copy documents The Copy menu on the printer display allows you to easily select number of copies and color or black and white for copying on the right front corner of the copy, and resizing the copy.
User Guide
Page 39
... may be clipped. The resized image is the same as the size of the original, but the margins of ID card and print in plain paper normal print quality. Custom Size allows you to increase the size of copies. Resize to increase or decrease the number of the image by ... or darker. ENWW Copy documents 35 NOTE: After two minutes of inactivity the copy options will print in the plain paper. ● Lighter / Darker: Adjusts the copy settings to the default settings of the selected output paper. ● Close lid. 3. Then press OK to confirm. ● Press the button next ...
... may be clipped. The resized image is the same as the size of the original, but the margins of ID card and print in plain paper normal print quality. Custom Size allows you to increase the size of copies. Resize to increase or decrease the number of the image by ... or darker. ENWW Copy documents 35 NOTE: After two minutes of inactivity the copy options will print in the plain paper. ● Lighter / Darker: Adjusts the copy settings to the default settings of the selected output paper. ● Close lid. 3. Then press OK to confirm. ● Press the button next ...

User Guide
Page 73
...; Do not overfill the paper tray. ● Remove printed papers from the paper tray frequently. ● Ensure that paper loaded in the paper tray lays flat and the edges are not bent or torn. ● Do not combine different paper types and paper sizes in the paper tray to continue the current job. ENWW Clear a paper jam 69 If the...
...; Do not overfill the paper tray. ● Remove printed papers from the paper tray frequently. ● Ensure that paper loaded in the paper tray lays flat and the edges are not bent or torn. ● Do not combine different paper types and paper sizes in the paper tray to continue the current job. ENWW Clear a paper jam 69 If the...


