Operating Instructions
Page 4
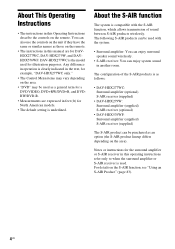
...The default setting is underlined. The following S-AIR products can enjoy system sound in another room. About the S-AIR function The system is compatible with the system: • Surround amplifier: You can enjoy surround speaker sound wirelessly. • S-AIR receiver: You can be purchased as those...) for DAVHDX277WC, DAV-HDX279W, and DAVHDX576WF. For details on the remote. You can be used . DAV-HDX277WC is the model used for the surround amplifier or S-AIR receiver in this Operating Instructions describe the controls on the S-AIR function, see "Using an S-AIR Product" (page...
...The default setting is underlined. The following S-AIR products can enjoy system sound in another room. About the S-AIR function The system is compatible with the system: • Surround amplifier: You can enjoy surround speaker sound wirelessly. • S-AIR receiver: You can be purchased as those...) for DAVHDX277WC, DAV-HDX279W, and DAVHDX576WF. For details on the remote. You can be used . DAV-HDX277WC is the model used for the surround amplifier or S-AIR receiver in this Operating Instructions describe the controls on the S-AIR function, see "Using an S-AIR Product" (page...
Operating Instructions
Page 5
Table of Contents About This Operating Instructions..........4 About the S-AIR function 4 Playable Discs 6 Getting Started Step 1: Assembling the Speakers 13 Step 2: Positioning the System... 18 Step 3: Connecting the System... 22 Step 4: Setting up the Wireless System 42 Step 5: Performing the Quick Setup 44 Step 6: ...Device Using the Control for HDMI Function for "BRAVIA" Sync 79 Using the DIGITAL MEDIA PORT Adapter 82 Using an S-AIR Product 83 Other Operations Getting Optimal Surround Sound for a Room 89 Calibrating the Appropriate Settings Automatically 90 Controlling the TV...
Table of Contents About This Operating Instructions..........4 About the S-AIR function 4 Playable Discs 6 Getting Started Step 1: Assembling the Speakers 13 Step 2: Positioning the System... 18 Step 3: Connecting the System... 22 Step 4: Setting up the Wireless System 42 Step 5: Performing the Quick Setup 44 Step 6: ...Device Using the Control for HDMI Function for "BRAVIA" Sync 79 Using the DIGITAL MEDIA PORT Adapter 82 Using an S-AIR Product 83 Other Operations Getting Optimal Surround Sound for a Room 89 Calibrating the Appropriate Settings Automatically 90 Controlling the TV...
Operating Instructions
Page 8
...music CD format or video CD format are trademarks of Sony Corporation. 8US This system incorporates with Dolby* Digital and Dolby Pro Logic (II) adaptive matrix surround ... DTS** Digital Surround System. * Manufactured under license from Dolby Laboratories. "DTS" and "DTS Digital Surround" are trademarks of Dolby Laboratories. ** Manufactured under license from DTS, Inc. "S-AIR" and its logo ...; This system can play a Multi Session CD when an MP3 file is intended for home and other limited viewing uses only unless otherwise authorized by Macrovision. Region code Your system has a...
...music CD format or video CD format are trademarks of Sony Corporation. 8US This system incorporates with Dolby* Digital and Dolby Pro Logic (II) adaptive matrix surround ... DTS** Digital Surround System. * Manufactured under license from Dolby Laboratories. "DTS" and "DTS Digital Surround" are trademarks of Dolby Laboratories. ** Manufactured under license from DTS, Inc. "S-AIR" and its logo ...; This system can play a Multi Session CD when an MP3 file is intended for home and other limited viewing uses only unless otherwise authorized by Macrovision. Region code Your system has a...
Operating Instructions
Page 9
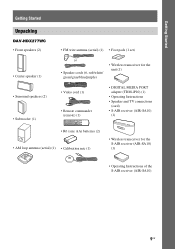
Getting Started Getting Started Unpacking DAV-HDX277WC • Front speakers (2) • Center speaker (1) • Surround speakers (2) • Subwoofer (1) • FM wire antenna (aerial) (1) • Foot pads (1 set) or • ...• Video cord (1) • Remote commander (remote) (1) • DIGITAL MEDIA PORT adapter (TDM-iP10) (1) • Operating Instructions • Speaker and TV connections (card) • S-AIR receiver (AIR-SA10) (1) • R6 (size AA) batteries (2) • AM loop antenna (aerial) (1) • Calibration mic (1) • Wireless transceiver for the...
Getting Started Getting Started Unpacking DAV-HDX277WC • Front speakers (2) • Center speaker (1) • Surround speakers (2) • Subwoofer (1) • FM wire antenna (aerial) (1) • Foot pads (1 set) or • ...• Video cord (1) • Remote commander (remote) (1) • DIGITAL MEDIA PORT adapter (TDM-iP10) (1) • Operating Instructions • Speaker and TV connections (card) • S-AIR receiver (AIR-SA10) (1) • R6 (size AA) batteries (2) • AM loop antenna (aerial) (1) • Calibration mic (1) • Wireless transceiver for the...
Operating Instructions
Page 11
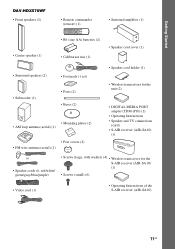
Getting Started DAV-HDX576WF • Front speakers (2) • Remote commander (remote) (1) • Surround amplifier (1) • Center speaker (1) • R6 (size AA) batteries (2) • Calibration mic (1) • Speaker ... holder (1) • Wireless transceivers for the unit (2) • DIGITAL MEDIA PORT adapter (TDM-iP10) (1) • Operating Instructions • Speaker and TV connections (card) • S-AIR receiver (AIR-SA10) (1) or • Speaker cords (6, red/white/ green/gray/blue/purple) • Screws (large, with washer) (4) • Wireless transceiver for the...
Getting Started DAV-HDX576WF • Front speakers (2) • Remote commander (remote) (1) • Surround amplifier (1) • Center speaker (1) • R6 (size AA) batteries (2) • Calibration mic (1) • Speaker ... holder (1) • Wireless transceivers for the unit (2) • DIGITAL MEDIA PORT adapter (TDM-iP10) (1) • Operating Instructions • Speaker and TV connections (card) • S-AIR receiver (AIR-SA10) (1) or • Speaker cords (6, red/white/ green/gray/blue/purple) • Screws (large, with washer) (4) • Wireless transceiver for the...
Operating Instructions
Page 22
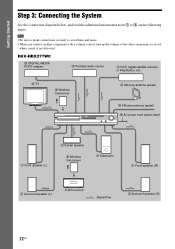
Getting Started Step 3: Connecting the System See the connection diagram below, and read the additional information from 1 to a level where sound is not distorted. Note • Be sure to make connections ... hum and noise. • When you connect another component with a volume control, turn up the volume of the other components to 6 on the following pages. DAV-HDX277WC 3 DIGITAL MEDIA PORT adapter 3 Portable audio source 3 VCR, digital satellite receiver, or PlayStation, etc. 2 TV 5 Wireless transceiver 4 AM loop antenna (aerial) 4 FM wire antenna...
Getting Started Step 3: Connecting the System See the connection diagram below, and read the additional information from 1 to a level where sound is not distorted. Note • Be sure to make connections ... hum and noise. • When you connect another component with a volume control, turn up the volume of the other components to 6 on the following pages. DAV-HDX277WC 3 DIGITAL MEDIA PORT adapter 3 Portable audio source 3 VCR, digital satellite receiver, or PlayStation, etc. 2 TV 5 Wireless transceiver 4 AM loop antenna (aerial) 4 FM wire antenna...
Operating Instructions
Page 26
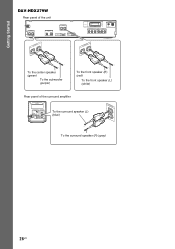
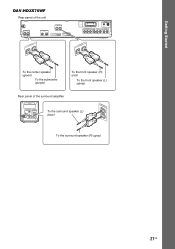
Getting Started DAV-HDX279W Rear panel of the unit SPEAKER CENTER SUBWOOFER SPEAKER TV/VIDEO DIGITAL IN COAXIAL OPTICAL FRONT R FRONT L HDMI OUT DMPORT DC5V 0.7A MAX SPEAKER ... center speaker (green) To the subwoofer (purple) To the front speaker (R) (red) To the front speaker (L) (white) Rear panel of the surround amplifier EZW-RT10 S-AIR ID A B C PAIRING SPEAKER L SURROUND SELECTOR R SURROUND SURROUND BACK To the surround speaker (L) (blue) SPEAKER L R To the surround speaker (R) (gray) 26US
Getting Started DAV-HDX279W Rear panel of the unit SPEAKER CENTER SUBWOOFER SPEAKER TV/VIDEO DIGITAL IN COAXIAL OPTICAL FRONT R FRONT L HDMI OUT DMPORT DC5V 0.7A MAX SPEAKER ... center speaker (green) To the subwoofer (purple) To the front speaker (R) (red) To the front speaker (L) (white) Rear panel of the surround amplifier EZW-RT10 S-AIR ID A B C PAIRING SPEAKER L SURROUND SELECTOR R SURROUND SURROUND BACK To the surround speaker (L) (blue) SPEAKER L R To the surround speaker (R) (gray) 26US
Operating Instructions
Page 27
Getting Started DAV-HDX576WF Rear panel of the unit SPEAKER CENTER SUBWOOFER SPEAKER TV DIGITAL IN COAXIAL OPTICAL FRONT R FRONT L HDMI OUT DMPORT DC5V 0.7A MAX SPEAKER CENTER ... center speaker (green) To the subwoofer (purple) To the front speaker (R) (red) To the front speaker (L) (white) Rear panel of the surround amplifier EZW-RT10 S-AIR ID A B C PAIRING SPEAKER L SURROUND SELECTOR R SURROUND SURROUND BACK To the surround speaker (L) (blue) SPEAKER L R To the surround speaker (R) (gray) 27US
Getting Started DAV-HDX576WF Rear panel of the unit SPEAKER CENTER SUBWOOFER SPEAKER TV DIGITAL IN COAXIAL OPTICAL FRONT R FRONT L HDMI OUT DMPORT DC5V 0.7A MAX SPEAKER CENTER ... center speaker (green) To the subwoofer (purple) To the front speaker (R) (red) To the front speaker (L) (white) Rear panel of the surround amplifier EZW-RT10 S-AIR ID A B C PAIRING SPEAKER L SURROUND SELECTOR R SURROUND SURROUND BACK To the surround speaker (L) (blue) SPEAKER L R To the surround speaker (R) (gray) 27US
Operating Instructions
Page 38
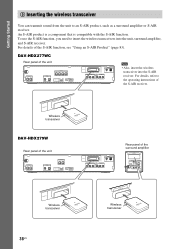
.... For details, refer to insert the wireless transceivers into the S-AIR receiver. DAV-HDX277WC Rear panel of the S-AIR receiver. An S-AIR product is a component that is compatible with the S-AIR function. For details of the surround amplifier EZW-RT10 S-AIR ID A B C PAIRING SPEAKER L SURROUND SELECTOR R SURROUND SURROUND BACK EZW-RT10 Wireless transceiver EZW-RT10 Wireless...
.... For details, refer to insert the wireless transceivers into the S-AIR receiver. DAV-HDX277WC Rear panel of the S-AIR receiver. An S-AIR product is a component that is compatible with the S-AIR function. For details of the surround amplifier EZW-RT10 S-AIR ID A B C PAIRING SPEAKER L SURROUND SELECTOR R SURROUND SURROUND BACK EZW-RT10 Wireless transceiver EZW-RT10 Wireless...
Operating Instructions
Page 39
... wireless transceiver, make sure that the V marks are aligned. • Do not insert other than the wireless transceiver into the S-AIR receiver. Getting Started DAV-HDX576WF Rear panel of the unit SPEAKER CENTER SUBWOOFER SPEAKER TV DIGITAL IN COAXIAL OPTICAL FRONT R FRONT L HDMI OUT DMPORT DC5V 0....PB/CB PR/CR R AUDIO IN L R AUDIO IN L Rear panel of the wireless transceiver. • Insert the wireless transceiver with the S-AIR logo facing up. • Insert the wireless transceiver so that the AC power cord (mains lead) is not connected to the operating instructions of the...
... wireless transceiver, make sure that the V marks are aligned. • Do not insert other than the wireless transceiver into the S-AIR receiver. Getting Started DAV-HDX576WF Rear panel of the unit SPEAKER CENTER SUBWOOFER SPEAKER TV DIGITAL IN COAXIAL OPTICAL FRONT R FRONT L HDMI OUT DMPORT DC5V 0....PB/CB PR/CR R AUDIO IN L R AUDIO IN L Rear panel of the wireless transceiver. • Insert the wireless transceiver with the S-AIR logo facing up. • Insert the wireless transceiver so that the AC power cord (mains lead) is not connected to the operating instructions of the...
Operating Instructions
Page 40
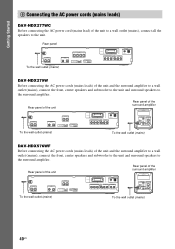
... front, center speakers and subwoofer to the unit and surround speakers to the unit. Getting Started 6 Connecting the AC power cords (mains leads) DAV-HDX277WC Before connecting the AC power cord (mains lead) of the unit to a wall outlet (mains), connect all the speakers to the surround... 75 TV/VIDEO Y PB/CB PR/CR R AUDIO IN L Rear panel of the surround amplifier EZW-RT10 S-AIR ID A B C PAIRING SPEAKER L SURROUND SELECTOR R SURROUND SURROUND BACK To the wall outlet (mains) DAV-HDX576WF Before connecting the AC power cords (mains leads) of the surround amplifier EZW-RT10...
... front, center speakers and subwoofer to the unit and surround speakers to the unit. Getting Started 6 Connecting the AC power cords (mains leads) DAV-HDX277WC Before connecting the AC power cord (mains lead) of the unit to a wall outlet (mains), connect all the speakers to the surround... 75 TV/VIDEO Y PB/CB PR/CR R AUDIO IN L Rear panel of the surround amplifier EZW-RT10 S-AIR ID A B C PAIRING SPEAKER L SURROUND SELECTOR R SURROUND SURROUND BACK To the wall outlet (mains) DAV-HDX576WF Before connecting the AC power cords (mains leads) of the surround amplifier EZW-RT10...
Operating Instructions
Page 42
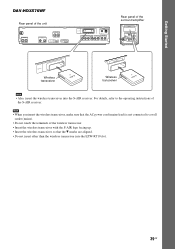
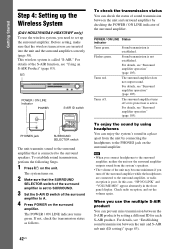
..., see "Surround amplifier operation" (page 105). Getting Started Step 4: Setting up the Wireless System (DAV-HDX279W/DAV-HDX576WF only) To use the multiple S-AIR product You can prevent miss transmission between the S-AIR products by setting a different ID for each S-AIR product. For details of the surround amplifier. To establish sound transmission, perform the following Steps...
..., see "Surround amplifier operation" (page 105). Getting Started Step 4: Setting up the Wireless System (DAV-HDX279W/DAV-HDX576WF only) To use the multiple S-AIR product You can prevent miss transmission between the S-AIR products by setting a different ID for each S-AIR product. For details of the surround amplifier. To establish sound transmission, perform the following Steps...
Operating Instructions
Page 43
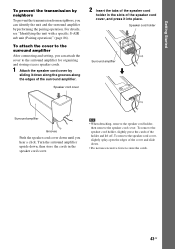
... off. Speaker cord cover 2 Insert the tabs of the speaker cord holder in the speaker cord cover. For details, see "Identifying the unit with a specific S-AIR sub unit (Pairing operation)" (page 86). Note • When detaching, remove the speaker cord holder, then remove the speaker cord cover.
... off. Speaker cord cover 2 Insert the tabs of the speaker cord holder in the speaker cord cover. For details, see "Identifying the unit with a specific S-AIR sub unit (Pairing operation)" (page 86). Note • When detaching, remove the speaker cord holder, then remove the speaker cord cover.
Operating Instructions
Page 50
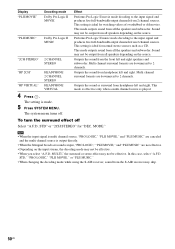
...is ideal for watching videos of overdubbed or old movies. STD" or "2CH STEREO" for normal stereo sources such as surround from the S-AIR receiver may not be output from all the speakers and subwoofer. MODE." MULTI," the surround or stereo effect may not be output from 2...STD," "PRO LOGIC," "PLII MOVIE," or "PLII MUSIC." • When changing the decoding mode while using the S-AIR receiver, sound from headphone left and right. This setting is played. The system menu turns off Select "A.F.D. Display "PLII MOVIE" Decoding mode Dolby Pro Logic II MOVIE "PLII MUSIC" Dolby Pro Logic...
...is ideal for watching videos of overdubbed or old movies. STD" or "2CH STEREO" for normal stereo sources such as surround from the S-AIR receiver may not be output from all the speakers and subwoofer. MODE." MULTI," the surround or stereo effect may not be output from 2...STD," "PRO LOGIC," "PLII MOVIE," or "PLII MUSIC." • When changing the decoding mode while using the S-AIR receiver, sound from headphone left and right. This setting is played. The system menu turns off Select "A.F.D. Display "PLII MOVIE" Decoding mode Dolby Pro Logic II MOVIE "PLII MUSIC" Dolby Pro Logic...
Operating Instructions
Page 51
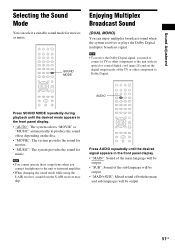
...can select a suitable sound mode for music. Sound Adjustment Selecting the Sound Mode You can enjoy multiplex broadcast sound when the system receives or plays the Dolby Digital multiplex broadcast signal. AUDIO Press SOUND MODE repeatedly during playback until the desired signal appears ...in the front panel display. • "AUTO": The system selects "MOVIE" or "MUSIC" automatically to the unit or surround amplifier. • When changing the sound mode while using the S-AIR receiver, sound from the S-AIR receiver may skip.
...can select a suitable sound mode for music. Sound Adjustment Selecting the Sound Mode You can enjoy multiplex broadcast sound when the system receives or plays the Dolby Digital multiplex broadcast signal. AUDIO Press SOUND MODE repeatedly during playback until the desired signal appears ...in the front panel display. • "AUTO": The system selects "MOVIE" or "MUSIC" automatically to the unit or surround amplifier. • When changing the sound mode while using the S-AIR receiver, sound from the S-AIR receiver may skip.
Operating Instructions
Page 53
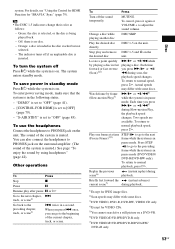
... details, see "Using the Control for HDMI Function for JPEG image files. 2)Scan speeds may differ with some discs. The system enters standby mode. "S-AIR STBY" is on the unit. To cancel, press it again or VOLUME + to "OFF" (page 85). Stop play after pause X or H Go... is muted. Other operations To Press Stop x Pause X Resume play and remove DISC 1-5 and A on . twice in standby mode Press "/1 while the system is loaded in the following status. - Change a disc while playing another disc DISC SKIP Play the desired disc directly DISC 1-5 on the surround amplifier. (...
... details, see "Using the Control for HDMI Function for JPEG image files. 2)Scan speeds may differ with some discs. The system enters standby mode. "S-AIR STBY" is on the unit. To cancel, press it again or VOLUME + to "OFF" (page 85). Stop play after pause X or H Go... is muted. Other operations To Press Stop x Pause X Resume play and remove DISC 1-5 and A on . twice in standby mode Press "/1 while the system is loaded in the following status. - Change a disc while playing another disc DISC SKIP Play the desired disc directly DISC 1-5 on the surround amplifier. (...
Operating Instructions
Page 72
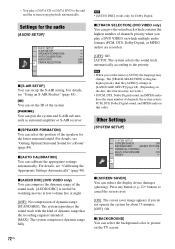
... device damages (ghosting). For details, see "Using an S-AIR Product" (page 83). [ID] You can set the ID of the system. [PAIRING] You can pair the system and S-AIR sub unit, such as surround amplifier or S-AIR receiver. For details, see "Calibrating the Appropriate Settings Automatically..." (page 90). Other Settings [SYSTEM SETUP] SYSTEM SETUP SCREEN SAVER: ON BACKGROUND: JACKET PICTURE...
... device damages (ghosting). For details, see "Using an S-AIR Product" (page 83). [ID] You can set the ID of the system. [PAIRING] You can pair the system and S-AIR sub unit, such as surround amplifier or S-AIR receiver. For details, see "Calibrating the Appropriate Settings Automatically..." (page 90). Other Settings [SYSTEM SETUP] SYSTEM SETUP SCREEN SAVER: ON BACKGROUND: JACKET PICTURE...
Operating Instructions
Page 83
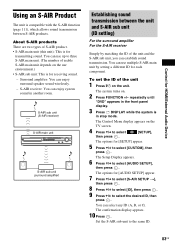
... There are two types of the unit 1 Press "/1 on the use environment.) • S-AIR sub unit: This is in another room. S-AIR receiver: You can enjoy system sound in stop mode. You can establish sound transmission. The Control Menu display appears on . 2 Press FUNCTION ... ID for each component. repeatedly until "DVD" appears in the front panel display. 3 Press DISPLAY while the system is for receiving sound. - The options for [AUDIO SETUP] appear. 7 Press X/x to select [S-AIR SETUP t], then press . 8 Press X/x to select [ID], then press . 9 Press X/x to select ...
... There are two types of the unit 1 Press "/1 on the use environment.) • S-AIR sub unit: This is in another room. S-AIR receiver: You can enjoy system sound in stop mode. You can establish sound transmission. The Control Menu display appears on . 2 Press FUNCTION ... ID for each component. repeatedly until "DVD" appears in the front panel display. 3 Press DISPLAY while the system is for receiving sound. - The options for [AUDIO SETUP] appear. 7 Press X/x to select [S-AIR SETUP t], then press . 8 Press X/x to select [ID], then press . 9 Press X/x to select ...

Operating Instructions
Page 84
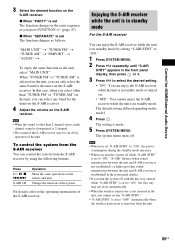
...pairing operation (page 86). Note • It is easy to set the ID of the S-AIR receiver Refer to perform the pairing operation between the unit and the S-AIR receiver. Enjoying the system's sound in another S-AIR sub unit, such as a surround amplifier, by using another room. To set the same ...ID for selecting ID. To prevent this, you can enjoy the system's sound by the pairing operation, you may also receive your system's sound if IDs are using the S-AIR receiver. Note • When you are the same, or you need to the operating instructions ...
...pairing operation (page 86). Note • It is easy to set the ID of the S-AIR receiver Refer to perform the pairing operation between the unit and the S-AIR receiver. Enjoying the system's sound in another S-AIR sub unit, such as a surround amplifier, by using another room. To set the same ...ID for selecting ID. To prevent this, you can enjoy the system's sound by the pairing operation, you may also receive your system's sound if IDs are using the S-AIR receiver. Note • When you are the same, or you need to the operating instructions ...
Operating Instructions
Page 85
... the model. 4 Press . x When "SEPARATE" is made. 5 Press SYSTEM MENU. To control the system from the S-AIR receiver You can control the system from the unit. 85US The default setting differs depending on the S-AIR receiver. To enjoy the same function as you can enjoy the...as follows. "MAIN UNIT" t "TUNER FM" t "TUNER AM" t "DMPORT" t "AUDIO" t ... The system menu turns off by setting "S-AIR STBY" to "ON." 1 Press SYSTEM MENU. 2 Press X/x repeatedly until "S-AIR STBY" appears in the front panel display, then press or c. 3 Press X/x to "OFF" automatically when the wireless...
... the model. 4 Press . x When "SEPARATE" is made. 5 Press SYSTEM MENU. To control the system from the S-AIR receiver You can control the system from the unit. 85US The default setting differs depending on the S-AIR receiver. To enjoy the same function as you can enjoy the...as follows. "MAIN UNIT" t "TUNER FM" t "TUNER AM" t "DMPORT" t "AUDIO" t ... The system menu turns off by setting "S-AIR STBY" to "ON." 1 Press SYSTEM MENU. 2 Press X/x repeatedly until "S-AIR STBY" appears in the front panel display, then press or c. 3 Press X/x to "OFF" automatically when the wireless...


