Operating Instructions
Page 2
...amplifiers) that any changes or modifications not expressly approved in this manual could void your Sony dealer regarding this product. Owner's Record The model and serial numbers are designed to rain...the separation between the equipment and receiver. - CAUTION THIS CLASS B DIGITAL DEVICE COMPLIES WITH PART 15 OF THE FCC RULES OPERATION IS SUBJECT TO THE FOLLOWING TWO CONDITIONS: (1) THIS DEVICE...safety purpose of the polarized or grounding-type plug. A polarized plug has two DAV-HDX277WC/DAV-HDX279W/ DAV-HDX576WF Serial No Date of Manufacture Marking is intended to alert the user to...
...amplifiers) that any changes or modifications not expressly approved in this manual could void your Sony dealer regarding this product. Owner's Record The model and serial numbers are designed to rain...the separation between the equipment and receiver. - CAUTION THIS CLASS B DIGITAL DEVICE COMPLIES WITH PART 15 OF THE FCC RULES OPERATION IS SUBJECT TO THE FOLLOWING TWO CONDITIONS: (1) THIS DEVICE...safety purpose of the polarized or grounding-type plug. A polarized plug has two DAV-HDX277WC/DAV-HDX279W/ DAV-HDX576WF Serial No Date of Manufacture Marking is intended to alert the user to...
Operating Instructions
Page 5
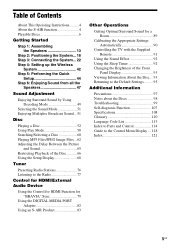
... Instructions..........4 About the S-AIR function 4 Playable Discs 6 Getting Started Step 1: Assembling the Speakers 13 Step 2: Positioning the System... 18 Step 3: Connecting the System... 22 Step 4: Setting up the Wireless System 42 Step 5: Performing the Quick Setup 44 Step 6: Enjoying Sound from all the Speakers 47 Sound Adjustment Enjoying Surround Sound... 97 Notes about the Discs 98 Troubleshooting 99 Self-diagnosis Function 107 Specifications 108 Glossary 110 Language Code List 113 Index to Parts and Control 114 Guide to the Control Menu Display ... 118 Index 121 5US
... Instructions..........4 About the S-AIR function 4 Playable Discs 6 Getting Started Step 1: Assembling the Speakers 13 Step 2: Positioning the System... 18 Step 3: Connecting the System... 22 Step 4: Setting up the Wireless System 42 Step 5: Performing the Quick Setup 44 Step 6: Enjoying Sound from all the Speakers 47 Sound Adjustment Enjoying Surround Sound... 97 Notes about the Discs 98 Troubleshooting 99 Self-diagnosis Function 107 Specifications 108 Glossary 110 Language Code List 113 Index to Parts and Control 114 Guide to the Control Menu Display ... 118 Index 121 5US
Operating Instructions
Page 7
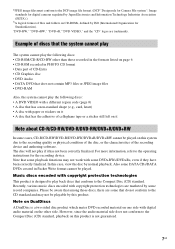
... to the Compact Disc (CD) standard, playback on this product. Also some DATA CDs/DATA DVDs created in PHOTO CD format • Data part of CD-Extra • CD Graphics disc • DVD Audio • DATA DVD that has the adhesive of cellophane tape or a sticker still... the recording device and authoring software. 2)JPEG image files must conform to the DCF image file format. (DCF "Design rule for Camera File system": Image standards for digital cameras regulated by Japan Electronics and Information Technology Industries Association (JEITA).) 3)A logical format of files and folders on CD-...
... to the Compact Disc (CD) standard, playback on this product. Also some DATA CDs/DATA DVDs created in PHOTO CD format • Data part of CD-Extra • CD Graphics disc • DVD Audio • DATA DVD that has the adhesive of cellophane tape or a sticker still... the recording device and authoring software. 2)JPEG image files must conform to the DCF image file format. (DCF "Design rule for Camera File system": Image standards for digital cameras regulated by Japan Electronics and Information Technology Industries Association (JEITA).) 3)A logical format of files and folders on CD-...
Operating Instructions
Page 13
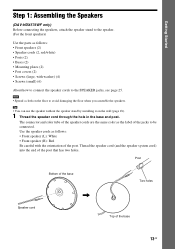
Getting Started Step 1: Assembling the Speakers (DAV-HDX576WF only) Before connecting the speakers, attach the speaker stand to the speaker. (For the front speakers) Use the parts as the label of the base 13US Tip • You can use the speaker without the speaker stand by installing it on the floor... Be careful with washer) (4) • Screws (small) (6) About how to connect the speaker cords to be connected. Thread the speaker cord (and the speaker system cord) into the end of the post. Post Bottom of the base Speaker cord , Two holes Top of the jacks to the SPEAKER jacks, see...
Getting Started Step 1: Assembling the Speakers (DAV-HDX576WF only) Before connecting the speakers, attach the speaker stand to the speaker. (For the front speakers) Use the parts as the label of the base 13US Tip • You can use the speaker without the speaker stand by installing it on the floor... Be careful with washer) (4) • Screws (small) (6) About how to connect the speaker cords to be connected. Thread the speaker cord (and the speaker system cord) into the end of the post. Post Bottom of the base Speaker cord , Two holes Top of the jacks to the SPEAKER jacks, see...

Operating Instructions
Page 14
... rear panel matches the color tube of the post cover, then secure with the tab of the speaker cord. Speaker cord , Hole Post cover , Upper part of the post Screw (small) 3 Lay the post in the slot of the speaker, slide the post to the other end of the post. Rear...
... rear panel matches the color tube of the post cover, then secure with the tab of the speaker cord. Speaker cord , Hole Post cover , Upper part of the post Screw (small) 3 Lay the post in the slot of the speaker, slide the post to the other end of the post. Rear...

Operating Instructions
Page 15
... the speaker 5 Attach the post to #. Getting Started 4 Connect the speaker cords to the speaker. Insert the post so that the slot on the lower part of the post aligns with the two screws. Post Slit Projection Base , Screws (small) Note • Make sure that the slit on the post aligns...
... the speaker 5 Attach the post to #. Getting Started 4 Connect the speaker cords to the speaker. Insert the post so that the slot on the lower part of the post aligns with the two screws. Post Slit Projection Base , Screws (small) Note • Make sure that the slit on the post aligns...
Operating Instructions
Page 28
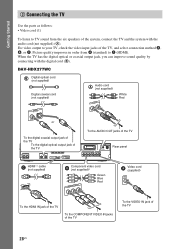
For video output to C (HDMI). DAV-HDX277WC Digital optical cord (not supplied) Digital coaxial cord (not supplied) TDVIG/VITIDALEION COAXIAL...the VIDEO IN jack of the TV, and select connection method A, B, or C. Getting Started 2 Connecting the TV Use the parts as follows: • Video cord (1) To listen to TV sound from A (standard) to your TV, check the video ...input jacks of the TV 28US Picture quality improves in order from the six speakers of the system, connect the TV and the system with the digital cord (B). When the TV has the digital optical or coaxial output jack, ...
For video output to C (HDMI). DAV-HDX277WC Digital optical cord (not supplied) Digital coaxial cord (not supplied) TDVIG/VITIDALEION COAXIAL...the VIDEO IN jack of the TV, and select connection method A, B, or C. Getting Started 2 Connecting the TV Use the parts as follows: • Video cord (1) To listen to TV sound from A (standard) to your TV, check the video ...input jacks of the TV 28US Picture quality improves in order from the six speakers of the system, connect the TV and the system with the digital cord (B). When the TV has the digital optical or coaxial output jack, ...
Operating Instructions
Page 99
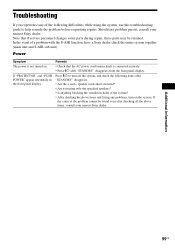
... checking the above items, consult your nearest Sony dealer. Press "/1 to help remedy the problem before requesting repairs. Additional Information 99US Troubleshooting If you using the system, use this troubleshooting guide to turn on . • Check that if service personnel changes some parts during repair, these parts may be found even after "STANDBY" disappears...
... checking the above items, consult your nearest Sony dealer. Press "/1 to help remedy the problem before requesting repairs. Additional Information 99US Troubleshooting If you using the system, use this troubleshooting guide to turn on . • Check that if service personnel changes some parts during repair, these parts may be found even after "STANDBY" disappears...
Operating Instructions
Page 109
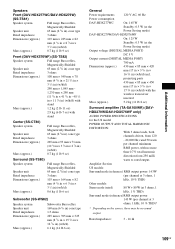
projecting parts 430 mm × 85 mm × 450 mm (17 in × 3 3/8 in × 17 3/4 in ) (w/h/d) incl. HDX279W/DAV-HDX576WF only) AUDIO POWER SPECIFICATIONS for the US model POWER OUTPUT AND TOTAL HARMONIC DISTORTION: With 3 ohms loads,...more than 0.7% total harmonic distortion from 120 - 20,000 Hz; Rated impedance: 3 - 16 Ω 109US Additional Information Speakers Front (DAV-HDX277WC/DAV-HDX279W) (SS-TS81) Speaker system Full range Bass reflex, Magnetically Shielded Speaker unit 65 mm (2 5/8 in) cone type Rated impedance 3 ohms Dimensions (approx.) 103 mm...
projecting parts 430 mm × 85 mm × 450 mm (17 in × 3 3/8 in × 17 3/4 in ) (w/h/d) incl. HDX279W/DAV-HDX576WF only) AUDIO POWER SPECIFICATIONS for the US model POWER OUTPUT AND TOTAL HARMONIC DISTORTION: With 3 ohms loads,...more than 0.7% total harmonic distortion from 120 - 20,000 Hz; Rated impedance: 3 - 16 Ω 109US Additional Information Speakers Front (DAV-HDX277WC/DAV-HDX279W) (SS-TS81) Speaker system Full range Bass reflex, Magnetically Shielded Speaker unit 65 mm (2 5/8 in) cone type Rated impedance 3 ohms Dimensions (approx.) 103 mm...
Operating Instructions
Page 114
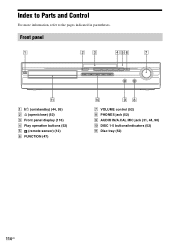
Front panel A "/1 (on/standby) (44, 95) B A (open/close) (52) C Front panel display (116) D Play operation buttons (52) E (remote sensor) (12) F FUNCTION (47) G VOLUME control (52) H PHONES jack (52) I AUDIO IN/A.CAL MIC jack (31, 44, 90) J DISC 1-5 buttons/indicators (52) K Disc tray (52) 114US Index to Parts and Control For more information, refer to the pages indicated in parentheses.
Front panel A "/1 (on/standby) (44, 95) B A (open/close) (52) C Front panel display (116) D Play operation buttons (52) E (remote sensor) (12) F FUNCTION (47) G VOLUME control (52) H PHONES jack (52) I AUDIO IN/A.CAL MIC jack (31, 44, 90) J DISC 1-5 buttons/indicators (52) K Disc tray (52) 114US Index to Parts and Control For more information, refer to the pages indicated in parentheses.

