Operating Instructions
Page 1
3-283-032-11(1) DVD Home Theatre System Operating Instructions DAV-HDX277WC / HDX279W / HDX576WF ©2008 Sony Corporation
3-283-032-11(1) DVD Home Theatre System Operating Instructions DAV-HDX277WC / HDX279W / HDX576WF ©2008 Sony Corporation
Operating Instructions
Page 2
...the rear exterior of the control unit. Consult the dealer or an experienced radio/TV technician for sale in this manual could void your Sony dealer regarding this apparatus to excessive heat such as sunshine, fire or the like. You are cautioned that any heat sources such as ...only. This symbol is no guarantee that produce heat. 9) Do not defeat the safety purpose of the polarized or grounding-type plug. DAV-HDX277WC/DAV-HDX279W/ DAV-HDX576WF Serial No Date of Manufacture Marking is intended to alert the user to comply with the manufacturer's instructions. 8) Do not install near...
...the rear exterior of the control unit. Consult the dealer or an experienced radio/TV technician for sale in this manual could void your Sony dealer regarding this apparatus to excessive heat such as sunshine, fire or the like. You are cautioned that any heat sources such as ...only. This symbol is no guarantee that produce heat. 9) Do not defeat the safety purpose of the polarized or grounding-type plug. DAV-HDX277WC/DAV-HDX279W/ DAV-HDX576WF Serial No Date of Manufacture Marking is intended to alert the user to comply with the manufacturer's instructions. 8) Do not install near...
Operating Instructions
Page 4
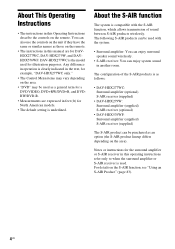
... (optional) S-AIR receiver (supplied) • DAV-HDX279W: Surround amplifier (supplied) S-AIR receiver (optional) • DAV-HDX576WF: Surround amplifier (supplied) S-AIR receiver (supplied) The S-AIR product can be used . About the S-AIR function The system is used as an option (the S-AIR product... 4US You can enjoy system sound in this Operating Instructions describe the controls on the remote. • The instructions in feet (ft) for a DVD VIDEO, DVD+RW/DVD+R, and DVDRW/DVD-R. • Measurements are for DAVHDX277WC, DAV-HDX279W, and DAVHDX576WF. The following S-AIR ...
... (optional) S-AIR receiver (supplied) • DAV-HDX279W: Surround amplifier (supplied) S-AIR receiver (optional) • DAV-HDX576WF: Surround amplifier (supplied) S-AIR receiver (supplied) The S-AIR product can be used . About the S-AIR function The system is used as an option (the S-AIR product... 4US You can enjoy system sound in this Operating Instructions describe the controls on the remote. • The instructions in feet (ft) for a DVD VIDEO, DVD+RW/DVD+R, and DVDRW/DVD-R. • Measurements are for DAVHDX277WC, DAV-HDX279W, and DAVHDX576WF. The following S-AIR ...
Operating Instructions
Page 9
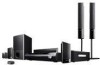
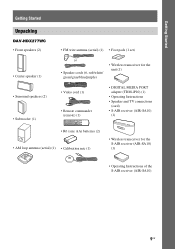
Getting Started Getting Started Unpacking DAV-HDX277WC • Front speakers (2) • Center speaker (1) • Surround speakers (2) • Subwoofer (1) • FM wire antenna (aerial) (1) • Foot pads (1 set) or • Speaker cords (6, ...
Getting Started Getting Started Unpacking DAV-HDX277WC • Front speakers (2) • Center speaker (1) • Surround speakers (2) • Subwoofer (1) • FM wire antenna (aerial) (1) • Foot pads (1 set) or • Speaker cords (6, ...
Operating Instructions
Page 10
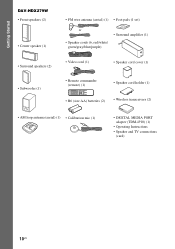
Getting Started DAV-HDX279W • Front speakers (2) • Center speaker (1) • Surround speakers (2) • Subwoofer (1) • FM wire antenna (aerial) (1) • Foot pads (1 set) or • Surround amplifier (1) &#...
Getting Started DAV-HDX279W • Front speakers (2) • Center speaker (1) • Surround speakers (2) • Subwoofer (1) • FM wire antenna (aerial) (1) • Foot pads (1 set) or • Surround amplifier (1) &#...
Operating Instructions
Page 11
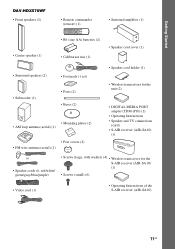
Getting Started DAV-HDX576WF • Front speakers (2) • Remote commander (remote) (1) • Surround amplifier (1) • Center speaker (1) • R6 (size AA) batteries (2) • Calibration mic (1) • Speaker cord ...
Getting Started DAV-HDX576WF • Front speakers (2) • Remote commander (remote) (1) • Surround amplifier (1) • Center speaker (1) • R6 (size AA) batteries (2) • Calibration mic (1) • Speaker cord ...
Operating Instructions
Page 13
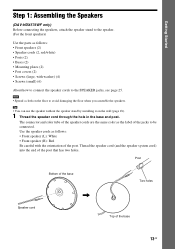
... the same color as the label of the jacks to avoid damaging the floor when you assemble the speakers. Getting Started Step 1: Assembling the Speakers (DAV-HDX576WF only) Before connecting the speakers, attach the speaker stand to the speaker. (For the front speakers) Use the parts as follows: • ...; You can use the speaker without the speaker stand by installing it on the floor to be connected. Thread the speaker cord (and the speaker system cord) into the end of the base 13US Use the speaker cords as follows: • Front speaker (L): White • Front speaker (R): Red Be ...
... the same color as the label of the jacks to avoid damaging the floor when you assemble the speakers. Getting Started Step 1: Assembling the Speakers (DAV-HDX576WF only) Before connecting the speakers, attach the speaker stand to the speaker. (For the front speakers) Use the parts as follows: • ...; You can use the speaker without the speaker stand by installing it on the floor to be connected. Thread the speaker cord (and the speaker system cord) into the end of the base 13US Use the speaker cords as follows: • Front speaker (L): White • Front speaker (R): Red Be ...
Operating Instructions
Page 18
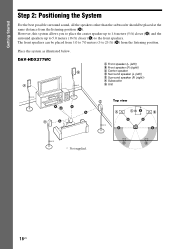
... best possible surround sound, all the speakers other than the subwoofer should be placed from 1.0 to 7.0 meters (3 to the front speakers. Place the system as illustrated below. D E 18US DAV-HDX277WC B A A Front speaker (L (left)) B Front speaker (R (right)) C Center speaker D Surround speaker (L (left)) E Surround speaker (R (right)) F Subwoofer G Unit CF G E Top view AA A A A CB B D A A C A C * Not...
... best possible surround sound, all the speakers other than the subwoofer should be placed from 1.0 to 7.0 meters (3 to the front speakers. Place the system as illustrated below. D E 18US DAV-HDX277WC B A A Front speaker (L (left)) B Front speaker (R (right)) C Center speaker D Surround speaker (L (left)) E Surround speaker (R (right)) F Subwoofer G Unit CF G E Top view AA A A A CB B D A A C A C * Not...
Operating Instructions
Page 19
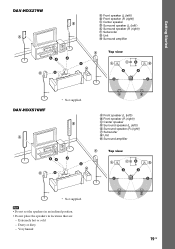
D E DAV-HDX576WF A A Front speaker (L (left)) B Front speaker (R (right)) B C Center speaker D Surround speaker (L (left )) E Surround speaker (R (right)) F Subwoofer G Unit H Surround amplifier CF G AA A D A E ...; Do not set the speakers in an inclined position. • Do not place the speakers in locations that are: - Extremely hot or cold - Getting Started DAV-HDX279W A A Front speaker (L (left)) B Front speaker (R (right)) B C Center speaker D Surround speaker (L (left )) E Surround speaker (R (right)) F Subwoofer G Unit H Surround amplifier CF G AA A D A E ...
D E DAV-HDX576WF A A Front speaker (L (left)) B Front speaker (R (right)) B C Center speaker D Surround speaker (L (left )) E Surround speaker (R (right)) F Subwoofer G Unit H Surround amplifier CF G AA A D A E ...; Do not set the speakers in an inclined position. • Do not place the speakers in locations that are: - Extremely hot or cold - Getting Started DAV-HDX279W A A Front speaker (L (left)) B Front speaker (R (right)) B C Center speaker D Surround speaker (L (left )) E Surround speaker (R (right)) F Subwoofer G Unit H Surround amplifier CF G AA A D A E ...
Operating Instructions
Page 20
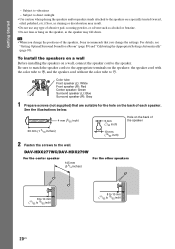
... inch) 30 mm (1 3/16 inches) 5 mm (7/32 inch) 10 mm (13/32 inch) Hole on the back of the speaker 2 Fasten the screws to #. DAV-HDX277WC/DAV-HDX279W For the center speaker 145 mm (5 3/4 inches) For the other speakers 8 to 10 mm (11/32 to 13/32 inch) 8 to 10 mm (11... the speakers on a specially treated (waxed, oiled, polished, etc.) floor, as staining or discoloration may result. • Do not use any type of the speakers, Sony recommends that are suitable for a Room" (page 89) and "Calibrating the Appropriate Settings Automatically" (page 90).
... inch) 30 mm (1 3/16 inches) 5 mm (7/32 inch) 10 mm (13/32 inch) Hole on the back of the speaker 2 Fasten the screws to #. DAV-HDX277WC/DAV-HDX279W For the center speaker 145 mm (5 3/4 inches) For the other speakers 8 to 10 mm (11/32 to 13/32 inch) 8 to 10 mm (11... the speakers on a specially treated (waxed, oiled, polished, etc.) floor, as staining or discoloration may result. • Do not use any type of the speakers, Sony recommends that are suitable for a Room" (page 89) and "Calibrating the Appropriate Settings Automatically" (page 90).
Operating Instructions
Page 21
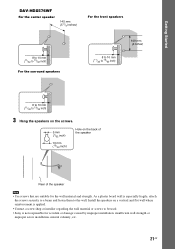
... wall strength or improper screw installation, natural calamity, etc. 21US As a plaster board wall is not responsible for the wall material and strength. Getting Started DAV-HDX576WF For the center speaker 145 mm (5 3/4 inches) For the front speakers 8 to 10 mm (11/32 to 13/32 inch) For the surround speakers... on a vertical and flat wall where reinforcement is applied. • Contact a screw shop or installer regarding the wall material or screws to be used. • Sony is especially fragile, attach the screws securely to a beam and fasten them to the wall.
... wall strength or improper screw installation, natural calamity, etc. 21US As a plaster board wall is not responsible for the wall material and strength. Getting Started DAV-HDX576WF For the center speaker 145 mm (5 3/4 inches) For the front speakers 8 to 10 mm (11/32 to 13/32 inch) For the surround speakers... on a vertical and flat wall where reinforcement is applied. • Contact a screw shop or installer regarding the wall material or screws to be used. • Sony is especially fragile, attach the screws securely to a beam and fasten them to the wall.
Operating Instructions
Page 22
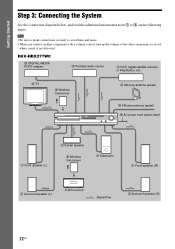
DAV-HDX277WC 3 DIGITAL MEDIA PORT adapter 3 Portable audio source 3 VCR, digital satellite receiver, or PlayStation, etc. 2 TV 5 Wireless transceiver 4 AM loop antenna (aerial) 4 FM wire ...mains lead) 1 Front speaker (L) 1 Center speaker 5 Wireless transceiver 1 Subwoofer 1 Front speaker (R) 1 Surround speaker (L) S-AIR receiver :Signal flow 1 Surround speaker (R) 22US Getting Started Step 3: Connecting the System See the connection diagram below, and read the additional information from 1 to a level where sound is not distorted. Note • Be sure to make connections...
DAV-HDX277WC 3 DIGITAL MEDIA PORT adapter 3 Portable audio source 3 VCR, digital satellite receiver, or PlayStation, etc. 2 TV 5 Wireless transceiver 4 AM loop antenna (aerial) 4 FM wire ...mains lead) 1 Front speaker (L) 1 Center speaker 5 Wireless transceiver 1 Subwoofer 1 Front speaker (R) 1 Surround speaker (L) S-AIR receiver :Signal flow 1 Surround speaker (R) 22US Getting Started Step 3: Connecting the System See the connection diagram below, and read the additional information from 1 to a level where sound is not distorted. Note • Be sure to make connections...
Operating Instructions
Page 23
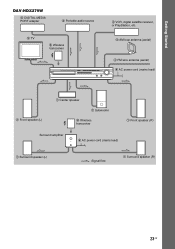
Getting Started DAV-HDX279W 3 DIGITAL MEDIA PORT adapter 3 Portable audio source 2 TV 5 Wireless transceiver 3 VCR, digital satellite receiver, or PlayStation, etc. 4 AM loop antenna (aerial) 4 FM wire antenna (aerial) 6 AC power cord (mains lead) 1 Front speaker (L) 1 Center speaker 1 Subwoofer 5 Wireless transceiver 1 Front speaker (R) Surround amplifier 6 AC power cord (mains lead) 1 Surround speaker (L) :Signal flow 1 Surround speaker (R) 23US
Getting Started DAV-HDX279W 3 DIGITAL MEDIA PORT adapter 3 Portable audio source 2 TV 5 Wireless transceiver 3 VCR, digital satellite receiver, or PlayStation, etc. 4 AM loop antenna (aerial) 4 FM wire antenna (aerial) 6 AC power cord (mains lead) 1 Front speaker (L) 1 Center speaker 1 Subwoofer 5 Wireless transceiver 1 Front speaker (R) Surround amplifier 6 AC power cord (mains lead) 1 Surround speaker (L) :Signal flow 1 Surround speaker (R) 23US

Operating Instructions
Page 25
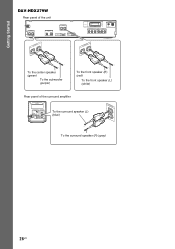
DAV-HDX277WC Rear panel SPEAKER CENTER SUBWOOFER SPEAKER TV/VIDEO DIGITAL IN COAXIAL OPTICAL FRONT R FRONT L SUR R SUR L HDMI OUT DMPORT DC5V 0.7A MAX EZW-RT10 ...
DAV-HDX277WC Rear panel SPEAKER CENTER SUBWOOFER SPEAKER TV/VIDEO DIGITAL IN COAXIAL OPTICAL FRONT R FRONT L SUR R SUR L HDMI OUT DMPORT DC5V 0.7A MAX EZW-RT10 ...
Operating Instructions
Page 26
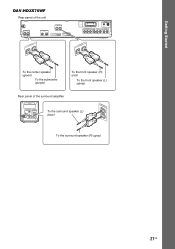
Getting Started DAV-HDX279W Rear panel of the unit SPEAKER CENTER SUBWOOFER SPEAKER TV/VIDEO DIGITAL IN COAXIAL OPTICAL FRONT R FRONT L HDMI OUT DMPORT DC5V 0.7A MAX SPEAKER ...
Getting Started DAV-HDX279W Rear panel of the unit SPEAKER CENTER SUBWOOFER SPEAKER TV/VIDEO DIGITAL IN COAXIAL OPTICAL FRONT R FRONT L HDMI OUT DMPORT DC5V 0.7A MAX SPEAKER ...
Operating Instructions
Page 27
Getting Started DAV-HDX576WF Rear panel of the unit SPEAKER CENTER SUBWOOFER SPEAKER TV DIGITAL IN COAXIAL OPTICAL FRONT R FRONT L HDMI OUT DMPORT DC5V 0.7A MAX SPEAKER CENTER ...
Getting Started DAV-HDX576WF Rear panel of the unit SPEAKER CENTER SUBWOOFER SPEAKER TV DIGITAL IN COAXIAL OPTICAL FRONT R FRONT L HDMI OUT DMPORT DC5V 0.7A MAX SPEAKER CENTER ...
Operating Instructions
Page 28
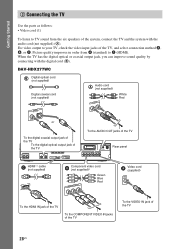
... the TV has the digital optical or coaxial output jack, you can improve sound quality by connecting with the audio cord (not supplied) (A). DAV-HDX277WC Digital optical cord (not supplied) Digital coaxial cord (not supplied) TDVIG/VITIDALEION COAXIAL OPTICAL or Audio cord (not supplied) TV/VIDEO R...input jacks of the TV 28US Picture quality improves in order from A (standard) to TV sound from the six speakers of the system, connect the TV and the system with the digital cord (B). Getting Started 2 Connecting the TV Use the parts as follows: • Video cord (1) To listen to...
... the TV has the digital optical or coaxial output jack, you can improve sound quality by connecting with the audio cord (not supplied) (A). DAV-HDX277WC Digital optical cord (not supplied) Digital coaxial cord (not supplied) TDVIG/VITIDALEION COAXIAL OPTICAL or Audio cord (not supplied) TV/VIDEO R...input jacks of the TV 28US Picture quality improves in order from A (standard) to TV sound from the six speakers of the system, connect the TV and the system with the digital cord (B). Getting Started 2 Connecting the TV Use the parts as follows: • Video cord (1) To listen to...

Operating Instructions
Page 29
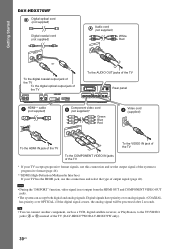
Getting Started DAV-HDX279W Digital optical cord (not supplied) Digital coaxial cord (not supplied) TDVIG/VITIDALEION COAXIAL OPTICAL or Audio cord (not supplied) TV/VIDEO R AUDIO IN L White ...
Getting Started DAV-HDX279W Digital optical cord (not supplied) Digital coaxial cord (not supplied) TDVIG/VITIDALEION COAXIAL OPTICAL or Audio cord (not supplied) TV/VIDEO R AUDIO IN L White ...
Operating Instructions
Page 30
Getting Started DAV-HDX576WF Digital optical cord (not supplied) Digital coaxial cord (not supplied) TV DIGITAL ...the TV * If your TV accepts progressive format signals, use this connection and set the output signal of the system to the TV/VIDEO jacks (A or B) instead of output signal (page 46). Digital signals have priority over ...During the "DMPORT" function, video signal is not output from the HDMI OUT and COMPONENT VIDEO OUT jacks. • The system can connect another component, such as a VCR, digital satellite receiver, or PlayStation, to progressive format (page 46). ** HDMI...
Getting Started DAV-HDX576WF Digital optical cord (not supplied) Digital coaxial cord (not supplied) TV DIGITAL ...the TV * If your TV accepts progressive format signals, use this connection and set the output signal of the system to the TV/VIDEO jacks (A or B) instead of output signal (page 46). Digital signals have priority over ...During the "DMPORT" function, video signal is not output from the HDMI OUT and COMPONENT VIDEO OUT jacks. • The system can connect another component, such as a VCR, digital satellite receiver, or PlayStation, to progressive format (page 46). ** HDMI...
Operating Instructions
Page 31
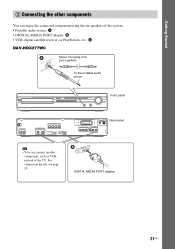
... Started 3 Connecting the other components You can enjoy the connected component using the six speakers of the system. • Portable audio source: A • DIGITAL MEDIA PORT adapter: B • VCR, digital satellite receiver, or PlayStation, etc.: C DAV-HDX277WC Stereo mini-plug cord (not supplied) To the portable audio source Front panel SPEAKER CENTER...
... Started 3 Connecting the other components You can enjoy the connected component using the six speakers of the system. • Portable audio source: A • DIGITAL MEDIA PORT adapter: B • VCR, digital satellite receiver, or PlayStation, etc.: C DAV-HDX277WC Stereo mini-plug cord (not supplied) To the portable audio source Front panel SPEAKER CENTER...


