Operating Instructions
Page 3
... and meets the FCC radio frequency (RF) Exposure Guidelines in the event of trouble. 13) Unplug this system so that provides guidelines for long periods of the obsolete outlet. 10) Protect the power cord from being walked on or pinched particularly at least 20cm and more between the radiator and person...has been exposed to the point of cable entry as power-supply cord or plug is provided to call the CATV system installer's attention to Article 820-40 of the NEC that the AC power cord (mains lead) can be connected to the grounding system of the building, as it is used, use ...
... and meets the FCC radio frequency (RF) Exposure Guidelines in the event of trouble. 13) Unplug this system so that provides guidelines for long periods of the obsolete outlet. 10) Protect the power cord from being walked on or pinched particularly at least 20cm and more between the radiator and person...has been exposed to the point of cable entry as power-supply cord or plug is provided to call the CATV system installer's attention to Article 820-40 of the NEC that the AC power cord (mains lead) can be connected to the grounding system of the building, as it is used, use ...
Operating Instructions
Page 22
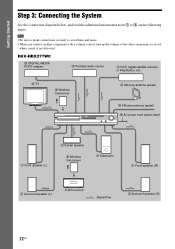
... 3: Connecting the System See the connection diagram below, and read the additional information from 1 to a level where sound is not distorted. DAV-HDX277WC 3 DIGITAL MEDIA PORT adapter 3 Portable audio source 3 VCR, digital satellite receiver, or PlayStation, etc. 2 TV 5 Wireless transceiver 4 AM loop antenna (aerial) 4 FM wire antenna (aerial) 6 AC power cord (mains lead...
... 3: Connecting the System See the connection diagram below, and read the additional information from 1 to a level where sound is not distorted. DAV-HDX277WC 3 DIGITAL MEDIA PORT adapter 3 Portable audio source 3 VCR, digital satellite receiver, or PlayStation, etc. 2 TV 5 Wireless transceiver 4 AM loop antenna (aerial) 4 FM wire antenna (aerial) 6 AC power cord (mains lead...
Operating Instructions
Page 23
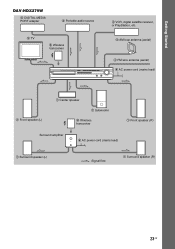
Getting Started DAV-HDX279W 3 DIGITAL MEDIA PORT adapter 3 Portable audio source 2 TV 5 Wireless transceiver 3 VCR, digital satellite receiver, or PlayStation, etc. 4 AM loop antenna (aerial) 4 FM wire antenna (aerial) 6 AC power cord (mains lead) 1 Front speaker (L) 1 Center speaker 1 Subwoofer 5 Wireless transceiver 1 Front speaker (R) Surround amplifier 6 AC power cord (mains lead) 1 Surround speaker (L) :Signal flow 1 Surround speaker (R) 23US
Getting Started DAV-HDX279W 3 DIGITAL MEDIA PORT adapter 3 Portable audio source 2 TV 5 Wireless transceiver 3 VCR, digital satellite receiver, or PlayStation, etc. 4 AM loop antenna (aerial) 4 FM wire antenna (aerial) 6 AC power cord (mains lead) 1 Front speaker (L) 1 Center speaker 1 Subwoofer 5 Wireless transceiver 1 Front speaker (R) Surround amplifier 6 AC power cord (mains lead) 1 Surround speaker (L) :Signal flow 1 Surround speaker (R) 23US
Operating Instructions
Page 39
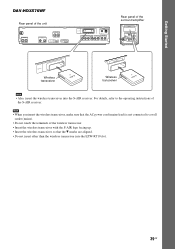
Getting Started DAV-HDX576WF Rear panel of the unit SPEAKER CENTER SUBWOOFER SPEAKER TV DIGITAL IN COAXIAL OPTICAL FRONT R FRONT L HDMI OUT DMPORT DC5V 0.7A MAX EZW-RT10 ...; Do not insert other than the wireless transceiver into the S-AIR receiver. Note • When you insert the wireless transceiver, make sure that the AC power cord (mains lead) is not connected to the operating instructions of the surround amplifier EZW-RT10 S-AIR ID A B C PAIRING SPEAKER L SURROUND SELECTOR R SURROUND SURROUND BACK...
Getting Started DAV-HDX576WF Rear panel of the unit SPEAKER CENTER SUBWOOFER SPEAKER TV DIGITAL IN COAXIAL OPTICAL FRONT R FRONT L HDMI OUT DMPORT DC5V 0.7A MAX EZW-RT10 ...; Do not insert other than the wireless transceiver into the S-AIR receiver. Note • When you insert the wireless transceiver, make sure that the AC power cord (mains lead) is not connected to the operating instructions of the surround amplifier EZW-RT10 S-AIR ID A B C PAIRING SPEAKER L SURROUND SELECTOR R SURROUND SURROUND BACK...
Operating Instructions
Page 40
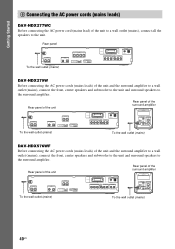
...EZW-RT10 COMPONENT VIDEO OUT VIDEO OUT ANTENNA FM AM COAXIAL 75 TV/VIDEO Y PB/CB PR/CR R AUDIO IN L DAV-HDX279W Before connecting the AC power cords (mains leads) of the unit and the surround amplifier to a wall outlet (mains), connect the front, center speakers ...the surround amplifier EZW-RT10 S-AIR ID A B C PAIRING SPEAKER L SURROUND SELECTOR R SURROUND SURROUND BACK To the wall outlet (mains) DAV-HDX576WF Before connecting the AC power cords (mains leads) of the unit and the surround amplifier to a wall outlet (mains), connect the front, center speakers and subwoofer ...
...EZW-RT10 COMPONENT VIDEO OUT VIDEO OUT ANTENNA FM AM COAXIAL 75 TV/VIDEO Y PB/CB PR/CR R AUDIO IN L DAV-HDX279W Before connecting the AC power cords (mains leads) of the unit and the surround amplifier to a wall outlet (mains), connect the front, center speakers ...the surround amplifier EZW-RT10 S-AIR ID A B C PAIRING SPEAKER L SURROUND SELECTOR R SURROUND SURROUND BACK To the wall outlet (mains) DAV-HDX576WF Before connecting the AC power cords (mains leads) of the unit and the surround amplifier to a wall outlet (mains), connect the front, center speakers and subwoofer ...
Operating Instructions
Page 41
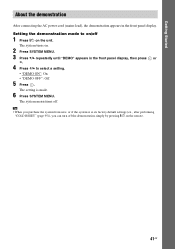
... new, or if the system is made. 6 Press SYSTEM MENU. The system menu turns off 1 Press [/1 on . 2 Press SYSTEM MENU. 3 Press X/x repeatedly until "DEMO" appears in the front panel display. Getting Started About the demonstration After connecting the AC power cord (mains lead), the demonstration appears in the front panel display, then press or c. 4 Press...
... new, or if the system is made. 6 Press SYSTEM MENU. The system menu turns off 1 Press [/1 on . 2 Press SYSTEM MENU. 3 Press X/x repeatedly until "DEMO" appears in the front panel display. Getting Started About the demonstration After connecting the AC power cord (mains lead), the demonstration appears in the front panel display, then press or c. 4 Press...
Operating Instructions
Page 42
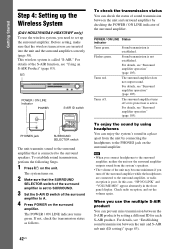
... from the unit by connecting the headphones to A. 4 Press POWER on . 2 Make sure that is not established. Check radio reception, and set up the Wireless System (DAV-HDX279W/DAV-HDX576WF only) To use the wireless system, you use the multiple S-AIR product You can enjoy the system's sound in the front panel display. For details, see...
... from the unit by connecting the headphones to A. 4 Press POWER on . 2 Make sure that is not established. Check radio reception, and set up the Wireless System (DAV-HDX279W/DAV-HDX576WF only) To use the wireless system, you use the multiple S-AIR product You can enjoy the system's sound in the front panel display. For details, see...
Operating Instructions
Page 44
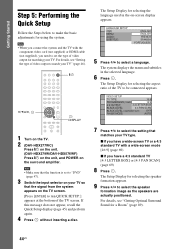
... make the basic adjustments for matching your TV type. "/1 C/X/x/c, DISPLAY 1 Turn on the TV. 2 (DAV-HDX277WC) Press [/1 on the unit. (DAV-HDX279W/DAV-HDX576WF) Press [/1 on the unit, and POWER on your TV so that matches your TV. If this message does not appear, recall the Quick Setup display... (page 45) and perform again. 4 Press without inserting a disc. Note • When you connect the system and the TV with ...
... make the basic adjustments for matching your TV type. "/1 C/X/x/c, DISPLAY 1 Turn on the TV. 2 (DAV-HDX277WC) Press [/1 on the unit. (DAV-HDX279W/DAV-HDX576WF) Press [/1 on the unit, and POWER on your TV so that matches your TV. If this message does not appear, recall the Quick Setup display... (page 45) and perform again. 4 Press without inserting a disc. Note • When you connect the system and the TV with ...
Operating Instructions
Page 49
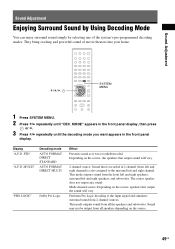
... Surround Sound by Using Decoding Mode You can enjoy surround sound simply by selecting one of movie theaters into your home. They bring exciting and powerful sound of the system's pre-programmed decoding modes. Sound Adjustment X/x/c, SYSTEM MENU 1 Press SYSTEM MENU. 2 Press X/x repeatedly until the decoding mode you want appears in 2 channel (front left and right...
... Surround Sound by Using Decoding Mode You can enjoy surround sound simply by selecting one of movie theaters into your home. They bring exciting and powerful sound of the system's pre-programmed decoding modes. Sound Adjustment X/x/c, SYSTEM MENU 1 Press SYSTEM MENU. 2 Press X/x repeatedly until the decoding mode you want appears in 2 channel (front left and right...
Operating Instructions
Page 53
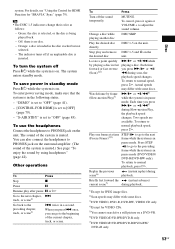
... volume. To return to normal playback speed, press H. Tip • The DISC 1-5 indicators change their color as follows: - The sound of the system is in pause mode. To return to normal playback, press H. When you press M/ or /m4) during scan, the playback speed changes. Locate a... current scene7) during playback. Green: the disc is selected, or the disc is in the following status. - To enter power saving mode, make sure that the system is muted.) See page "To enjoy the sound by playing a disc in a second. To use the headphones Connect the ...
... volume. To return to normal playback speed, press H. Tip • The DISC 1-5 indicators change their color as follows: - The sound of the system is in pause mode. To return to normal playback, press H. When you press M/ or /m4) during scan, the playback speed changes. Locate a... current scene7) during playback. Green: the disc is selected, or the disc is in the following status. - To enter power saving mode, make sure that the system is muted.) See page "To enjoy the sound by playing a disc in a second. To use the headphones Connect the ...
Operating Instructions
Page 57
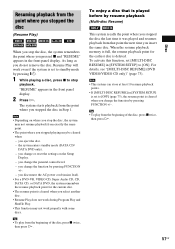
... point is cleared when you select another disc. • Resume Play does not work properly with some discs. the system enters standby mode (DATA CD/ DATA DVD only). - you disconnect the AC power cord (mains lead). • For a DVD-VR, VIDEO CD, Super Audio CD, CD, DATA CD, or DATA DVD, the... system remembers the resume playback point for the earliest disc is deleted. Disc Resuming playback from the point where you stopped...
... point is cleared when you select another disc. • Resume Play does not work properly with some discs. the system enters standby mode (DATA CD/ DATA DVD only). - you disconnect the AC power cord (mains lead). • For a DVD-VR, VIDEO CD, Super Audio CD, CD, DATA CD, or DATA DVD, the... system remembers the resume playback point for the earliest disc is deleted. Disc Resuming playback from the point where you stopped...
Operating Instructions
Page 76
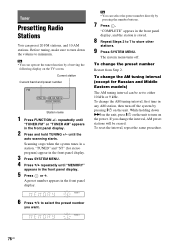
...ST" (for Russian and Middle Eastern models) The AM tuning interval can operate the tuner function by observing the following display on the power. Scanning stops when the system tunes in the front panel display. 5 Press or c. To reset the interval, repeat the same procedure. 6 Press X/x to select ...the preset number Restart from Step 2. If you want. 76US Current station Current band and preset number FM FM 10 : 88.00 MHz SONY RADIO Station name 1 Press FUNCTION +/- repeatedly until the auto scanning starts. until "TUNER FM" or "TUNER AM" appears in the front panel display...
...ST" (for Russian and Middle Eastern models) The AM tuning interval can operate the tuner function by observing the following display on the power. Scanning stops when the system tunes in the front panel display. 5 Press or c. To reset the interval, repeat the same procedure. 6 Press X/x to select ...the preset number Restart from Step 2. If you want. 76US Current station Current band and preset number FM FM 10 : 88.00 MHz SONY RADIO Station name 1 Press FUNCTION +/- repeatedly until the auto scanning starts. until "TUNER FM" or "TUNER AM" appears in the front panel display...
Operating Instructions
Page 79
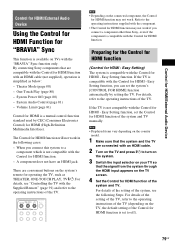
...refer to the operating instructions supplied with the component. • The Control for HDMI function may not work. System Power Off (page 80) - Refer to the operating instructions of the system, see "Controlling the TV with the Control for HDMI - If the TV is compatible with the Control ...By connecting Sony components that the signal from the system through the HDMI input appears on TVs with the Control for HDMI function will not work if you connect a component other than Sony, even if the component is a mutual control function standard used by setting the TV. Theater Mode (...
...refer to the operating instructions supplied with the component. • The Control for HDMI function may not work. System Power Off (page 80) - Refer to the operating instructions of the system, see "Controlling the TV with the Control for HDMI - If the TV is compatible with the Control ...By connecting Sony components that the signal from the system through the HDMI input appears on TVs with the Control for HDMI function will not work if you connect a component other than Sony, even if the component is a mutual control function standard used by setting the TV. Theater Mode (...
Operating Instructions
Page 80
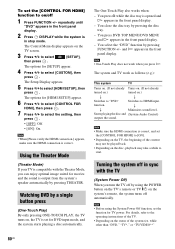
...while to start. The options for [SETUP] appear. 4 Press X/x to select [CUSTOM], then press . Using the Theater Mode (Theater Mode) If your TV is compatible with the TV (System Power Off) When you turn the TV off 1 Press FUNCTION +/- and H appears in the front panel display. - function...front panel display. 2 Press DISPLAY while the system is correct. Note • Before using the POWER button on the TV's remote or TV [/1 on the system's remote, the system turns off automatically. repeatedly until "DVD" appears in sync with the Theater Mode, you press H. Note • ...
...while to start. The options for [SETUP] appear. 4 Press X/x to select [CUSTOM], then press . Using the Theater Mode (Theater Mode) If your TV is compatible with the TV (System Power Off) When you turn the TV off 1 Press FUNCTION +/- and H appears in the front panel display. - function...front panel display. 2 Press DISPLAY while the system is correct. Note • Before using the POWER button on the TV's remote or TV [/1 on the system's remote, the system turns off automatically. repeatedly until "DVD" appears in sync with the Theater Mode, you press H. Note • ...

Operating Instructions
Page 84
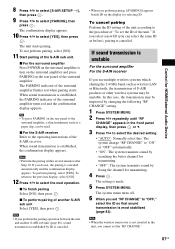
... as a surround amplifier, do not change the ID of the unit. 3 Press POWER on the display for the unit and S-AIR sub unit to establish sound transmission. To prevent this, you may also receive your system's sound if IDs are using another room For the S-AIR receiver You can be... installed anywhere, regardless of the location of the POWER / ON LINE indicator, see "To check the transmission status" (page 42). For ...
... as a surround amplifier, do not change the ID of the unit. 3 Press POWER on the display for the unit and S-AIR sub unit to establish sound transmission. To prevent this, you may also receive your system's sound if IDs are using another room For the S-AIR receiver You can be... installed anywhere, regardless of the location of the POWER / ON LINE indicator, see "To check the transmission status" (page 42). For ...
Operating Instructions
Page 85
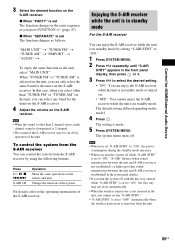
... CH Operation Share the same operations on the model. 4 Press . For details, refer to "OFF" automatically when the wireless transceiver is made. 5 Press SYSTEM MENU. The default setting differs depending on the remote and unit. Note • When you set "S-AIR STBY" to select the desired setting. • ... tuner on the S-AIR receiver. x When "PARTY" is established) in the front panel display, then press or c. 3 Press X/x to "ON," the power consumption during the standby mode increases. • When you press FUNCTION +/- (page 47). When "TUNER FM" or "TUNER AM" is selected on . &#...
... CH Operation Share the same operations on the model. 4 Press . For details, refer to "OFF" automatically when the wireless transceiver is made. 5 Press SYSTEM MENU. The default setting differs depending on the remote and unit. Note • When you set "S-AIR STBY" to select the desired setting. • ... tuner on the S-AIR receiver. x When "PARTY" is established) in the front panel display, then press or c. 3 Press X/x to "ON," the power consumption during the standby mode increases. • When you press FUNCTION +/- (page 47). When "TUNER FM" or "TUNER AM" is selected on . &#...
Operating Instructions
Page 87
...11 Start pairing of the S-AIR receiver. To perform pairing, select [YES]. If you select a new ID (you use multiple wireless systems which sharing the 2.4 GHz band, such as before), pairing is most stabilized (page 83). The setting is established, the confirmation display appears.... x For the surround amplifier Press POWER on the surround amplifier to select [PAIRING], then press . The system change "RF CHANGE" to "ON" or "OFF" automatically. • "ON": The system transmits sound by searching the better channel for HDMI/External Audio Device...
...11 Start pairing of the S-AIR receiver. To perform pairing, select [YES]. If you select a new ID (you use multiple wireless systems which sharing the 2.4 GHz band, such as before), pairing is most stabilized (page 83). The setting is established, the confirmation display appears.... x For the surround amplifier Press POWER on the surround amplifier to select [PAIRING], then press . The system change "RF CHANGE" to "ON" or "OFF" automatically. • "ON": The system transmits sound by searching the better channel for HDMI/External Audio Device...

Operating Instructions
Page 91
...your TV or to the unit or surround amplifier. - MUTING* Turn off the power. - front and surround speakers are not correctly connected. - The result is OK... the function. - Tip • You can control the TV (Sony only) by using following buttons. Controlling the TV with the Supplied Remote ... TV and other than TV [/1, THEATER, TV INPUT, and TV VOL +/-) while pressing the TV button. THEATER Enjoy optimal image suited for the .... • The measurement for [SUBWOOFER] is always [YES] since the system does not perform subwoofer calibration. Use these buttons while pressing the TV button....
...your TV or to the unit or surround amplifier. - MUTING* Turn off the power. - front and surround speakers are not correctly connected. - The result is OK... the function. - Tip • You can control the TV (Sony only) by using following buttons. Controlling the TV with the Supplied Remote ... TV and other than TV [/1, THEATER, TV INPUT, and TV VOL +/-) while pressing the TV button. THEATER Enjoy optimal image suited for the .... • The measurement for [SUBWOOFER] is always [YES] since the system does not perform subwoofer calibration. Use these buttons while pressing the TV button....

Operating Instructions
Page 97
... displayed on the lenses inside the control unit. If you don't, the disc may condense on your nearest Sony dealer. IMPORTANT NOTICE Caution: This system is suddenly played. Additional Information Additional Information Precautions On power sources • Unplug the unit from the unit. 3 Press H and "/1 simultaneously. To disconnect the cord, pull it out...
... displayed on the lenses inside the control unit. If you don't, the disc may condense on your nearest Sony dealer. IMPORTANT NOTICE Caution: This system is suddenly played. Additional Information Additional Information Precautions On power sources • Unplug the unit from the unit. 3 Press H and "/1 simultaneously. To disconnect the cord, pull it out...
Operating Instructions
Page 99
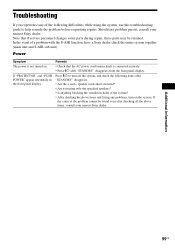
...STANDBY" disappears. • Are the + and - Additional Information 99US Should any problem persist, consult your nearest Sony dealer. Power Symptom Remedy The power is not turned on the system. If the cause of the problem cannot be retained. In the event of a problem with the S-AIR ...function, have a Sony dealer check the entire system together (main unit and S-AIR sub unit). If "PROTECTOR" and "PUSH POWER" appear alternately in the front panel display. Troubleshooting If you using the system, use this troubleshooting guide to turn on . •...
...STANDBY" disappears. • Are the + and - Additional Information 99US Should any problem persist, consult your nearest Sony dealer. Power Symptom Remedy The power is not turned on the system. If the cause of the problem cannot be retained. In the event of a problem with the S-AIR ...function, have a Sony dealer check the entire system together (main unit and S-AIR sub unit). If "PROTECTOR" and "PUSH POWER" appear alternately in the front panel display. Troubleshooting If you using the system, use this troubleshooting guide to turn on . •...


