Operating Instructions
Page 1
3-283-032-11(1) DVD Home Theatre System Operating Instructions DAV-HDX277WC / HDX279W / HDX576WF ©2008 Sony Corporation
3-283-032-11(1) DVD Home Theatre System Operating Instructions DAV-HDX277WC / HDX279W / HDX576WF ©2008 Sony Corporation
Operating Instructions
Page 2
... product's enclosure that to which can radiate radio frequency energy and, if not installed and used in this manual could void your Sony dealer regarding this apparatus to rain or moisture. Record the serial number in cabinet. Refer to them whenever you call upon your ...authority to radio communications. DAV-HDX277WC/DAV-HDX279W/ DAV-HDX576WF Serial No Date of Manufacture Marking is located on a circuit different from that may cause harmful interference to operate this apparatus...
... product's enclosure that to which can radiate radio frequency energy and, if not installed and used in this manual could void your Sony dealer regarding this apparatus to rain or moisture. Record the serial number in cabinet. Refer to them whenever you call upon your ...authority to radio communications. DAV-HDX277WC/DAV-HDX279W/ DAV-HDX576WF Serial No Date of Manufacture Marking is located on a circuit different from that may cause harmful interference to operate this apparatus...
Operating Instructions
Page 4
...or S-AIR receiver in this manual are expressed in feet (ft) for illustration purposes. Notes or instructions for DAVHDX277WC, DAV-HDX279W, and DAVHDX576WF. For details on the area). The configuration of sound between S-AIR products wirelessly. About This Operating Instructions • ...system is underlined. You can enjoy system sound in this Operating Instructions describe the controls on the remote. • The instructions in this operating instructions refer only to when the surround amplifier or S-AIR receiver is clearly indicated in the text, for example, "DAV-...
...or S-AIR receiver in this manual are expressed in feet (ft) for illustration purposes. Notes or instructions for DAVHDX277WC, DAV-HDX279W, and DAVHDX576WF. For details on the area). The configuration of sound between S-AIR products wirelessly. About This Operating Instructions • ...system is underlined. You can enjoy system sound in this Operating Instructions describe the controls on the remote. • The instructions in this operating instructions refer only to when the surround amplifier or S-AIR receiver is clearly indicated in the text, for example, "DAV-...
Operating Instructions
Page 9
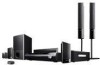
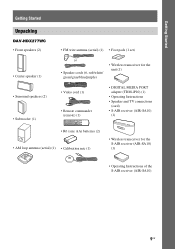
Getting Started Getting Started Unpacking DAV-HDX277WC • Front speakers (2) • Center speaker (1) • Surround speakers (2) • Subwoofer (1) • FM wire antenna (aerial) (1) • Foot pads (1 set) or • Speaker cords (6, ...
Getting Started Getting Started Unpacking DAV-HDX277WC • Front speakers (2) • Center speaker (1) • Surround speakers (2) • Subwoofer (1) • FM wire antenna (aerial) (1) • Foot pads (1 set) or • Speaker cords (6, ...
Operating Instructions
Page 10
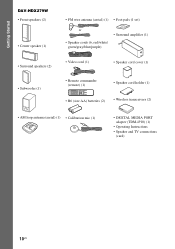
Getting Started DAV-HDX279W • Front speakers (2) • Center speaker (1) • Surround speakers (2) • Subwoofer (1) • FM wire antenna (aerial) (1) • Foot pads (1 set) or • Surround amplifier (1) &#...
Getting Started DAV-HDX279W • Front speakers (2) • Center speaker (1) • Surround speakers (2) • Subwoofer (1) • FM wire antenna (aerial) (1) • Foot pads (1 set) or • Surround amplifier (1) &#...
Operating Instructions
Page 11
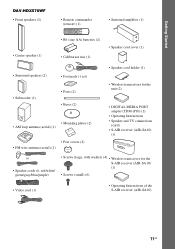
Getting Started DAV-HDX576WF • Front speakers (2) • Remote commander (remote) (1) • Surround amplifier (1) • Center speaker (1) • R6 (size AA) batteries (2) • Calibration mic (1) • Speaker cord ...
Getting Started DAV-HDX576WF • Front speakers (2) • Remote commander (remote) (1) • Surround amplifier (1) • Center speaker (1) • R6 (size AA) batteries (2) • Calibration mic (1) • Speaker cord ...
Operating Instructions
Page 13
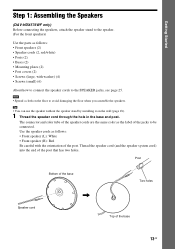
... on the wall (page 18). 1 Thread the speaker cord through the hole in the base and post. Getting Started Step 1: Assembling the Speakers (DAV-HDX576WF only) Before connecting the speakers, attach the speaker stand to the speaker. (For the front speakers) Use the parts as follows: • Front...; Bases (2) • Mounting plates (2) • Post covers (2) • Screws (large, with the orientation of the post. Thread the speaker cord (and the speaker system cord) into the end of the jacks to be connected. Use the speaker cords as the label of the post that has two holes. Tip...
... on the wall (page 18). 1 Thread the speaker cord through the hole in the base and post. Getting Started Step 1: Assembling the Speakers (DAV-HDX576WF only) Before connecting the speakers, attach the speaker stand to the speaker. (For the front speakers) Use the parts as follows: • Front...; Bases (2) • Mounting plates (2) • Post covers (2) • Screws (large, with the orientation of the post. Thread the speaker cord (and the speaker system cord) into the end of the jacks to be connected. Use the speaker cords as the label of the post that has two holes. Tip...
Operating Instructions
Page 18
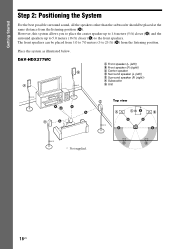
... the listening position (A). DAV-HDX277WC B A A Front speaker (L (left)) B Front speaker (R (right)) C Center speaker D Surround speaker (L (left)) E Surround speaker (R (right)) F Subwoofer G Unit CF G E Top view AA A A A CB B D A A C A C * Not supplied. Getting Started Step 2: Positioning the System For the best possible ...sound, all the speakers other than the subwoofer should be placed from 1.0 to 7.0 meters (3 to the front speakers. However, this system allows you to place the center speaker up to 1.6 meters (5 ft) closer (B) and the surround speakers up to 5.0 meters ...
... the listening position (A). DAV-HDX277WC B A A Front speaker (L (left)) B Front speaker (R (right)) C Center speaker D Surround speaker (L (left)) E Surround speaker (R (right)) F Subwoofer G Unit CF G E Top view AA A A A CB B D A A C A C * Not supplied. Getting Started Step 2: Positioning the System For the best possible ...sound, all the speakers other than the subwoofer should be placed from 1.0 to 7.0 meters (3 to the front speakers. However, this system allows you to place the center speaker up to 1.6 meters (5 ft) closer (B) and the surround speakers up to 5.0 meters ...
Operating Instructions
Page 19
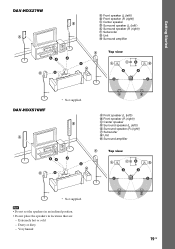
...; Do not set the speakers in an inclined position. • Do not place the speakers in locations that are: - D E DAV-HDX576WF A A Front speaker (L (left)) B Front speaker (R (right)) B C Center speaker D Surround speaker (L (left ))... E Surround speaker (R (right)) F Subwoofer G Unit H Surround amplifier CF G AA A D A E A H Top view A CB B A A C C * Not supplied. Getting Started DAV-HDX279W A A Front speaker (L (left)) B Front speaker (R (right)) B C Center speaker D Surround speaker (L (left )) E Surround speaker (R (right)) F Subwoofer G Unit H Surround ...
...; Do not set the speakers in an inclined position. • Do not place the speakers in locations that are: - D E DAV-HDX576WF A A Front speaker (L (left)) B Front speaker (R (right)) B C Center speaker D Surround speaker (L (left ))... E Surround speaker (R (right)) F Subwoofer G Unit H Surround amplifier CF G AA A D A E A H Top view A CB B A A C C * Not supplied. Getting Started DAV-HDX279W A A Front speaker (L (left)) B Front speaker (R (right)) B C Center speaker D Surround speaker (L (left )) E Surround speaker (R (right)) F Subwoofer G Unit H Surround ...
Operating Instructions
Page 20
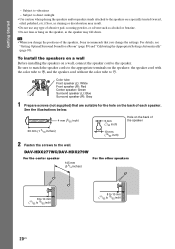
... speaker (L): White Front speaker (R): Red Center speaker: Green Surround speaker (L): Blue Surround speaker (R): Gray 1 Prepare screws (not supplied) that you change the settings. DAV-HDX277WC/DAV-HDX279W For the center speaker 145 mm (5 3/4 inches) For the other speakers 8 to 10 mm (11/32 to 13/32 inch) 8 to 10 mm ... speakers on a wall Before installing the speakers on a wall, connect the speaker cord to the appropriate terminals on the back of the speakers, Sony recommends that are suitable for a Room" (page 89) and "Calibrating the Appropriate Settings Automatically" (page 90).
... speaker (L): White Front speaker (R): Red Center speaker: Green Surround speaker (L): Blue Surround speaker (R): Gray 1 Prepare screws (not supplied) that you change the settings. DAV-HDX277WC/DAV-HDX279W For the center speaker 145 mm (5 3/4 inches) For the other speakers 8 to 10 mm (11/32 to 13/32 inch) 8 to 10 mm ... speakers on a wall Before installing the speakers on a wall, connect the speaker cord to the appropriate terminals on the back of the speakers, Sony recommends that are suitable for a Room" (page 89) and "Calibrating the Appropriate Settings Automatically" (page 90).
Operating Instructions
Page 21
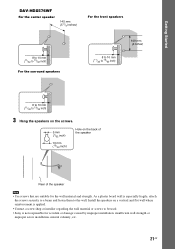
Getting Started DAV-HDX576WF For the center speaker 145 mm (5 3/4 inches) For the front speakers 8 to 10 mm (11/32 to 13/32 inch) For the surround speakers 8 ... the wall material and strength. As a plaster board wall is especially fragile, attach the screws securely to a beam and fasten them to be used. • Sony is applied. • Contact a screw shop or installer regarding the wall material or screws to the wall. Install the speakers on the back of the...
Getting Started DAV-HDX576WF For the center speaker 145 mm (5 3/4 inches) For the front speakers 8 to 10 mm (11/32 to 13/32 inch) For the surround speakers 8 ... the wall material and strength. As a plaster board wall is especially fragile, attach the screws securely to a beam and fasten them to be used. • Sony is applied. • Contact a screw shop or installer regarding the wall material or screws to the wall. Install the speakers on the back of the...
Operating Instructions
Page 22
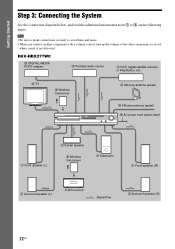
DAV-HDX277WC 3 DIGITAL MEDIA PORT adapter 3 Portable audio source 3 VCR, digital satellite receiver, or PlayStation, etc. 2 TV 5 Wireless transceiver 4 AM loop antenna (aerial) 4 FM wire antenna (... you connect another component with a volume control, turn up the volume of the other components to 6 on the following pages. Getting Started Step 3: Connecting the System See the connection diagram below, and read the additional information from 1 to a level where sound is not distorted.
DAV-HDX277WC 3 DIGITAL MEDIA PORT adapter 3 Portable audio source 3 VCR, digital satellite receiver, or PlayStation, etc. 2 TV 5 Wireless transceiver 4 AM loop antenna (aerial) 4 FM wire antenna (... you connect another component with a volume control, turn up the volume of the other components to 6 on the following pages. Getting Started Step 3: Connecting the System See the connection diagram below, and read the additional information from 1 to a level where sound is not distorted.
Operating Instructions
Page 23
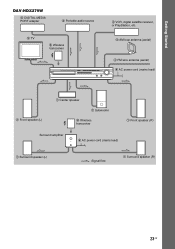
Getting Started DAV-HDX279W 3 DIGITAL MEDIA PORT adapter 3 Portable audio source 2 TV 5 Wireless transceiver 3 VCR, digital satellite receiver, or PlayStation, etc. 4 AM loop antenna (aerial) 4 FM wire antenna (aerial) 6 AC power cord (mains lead) 1 Front speaker (L) 1 Center speaker 1 Subwoofer 5 Wireless transceiver 1 Front speaker (R) Surround amplifier 6 AC power cord (mains lead) 1 Surround speaker (L) :Signal flow 1 Surround speaker (R) 23US
Getting Started DAV-HDX279W 3 DIGITAL MEDIA PORT adapter 3 Portable audio source 2 TV 5 Wireless transceiver 3 VCR, digital satellite receiver, or PlayStation, etc. 4 AM loop antenna (aerial) 4 FM wire antenna (aerial) 6 AC power cord (mains lead) 1 Front speaker (L) 1 Center speaker 1 Subwoofer 5 Wireless transceiver 1 Front speaker (R) Surround amplifier 6 AC power cord (mains lead) 1 Surround speaker (L) :Signal flow 1 Surround speaker (R) 23US

Operating Instructions
Page 25
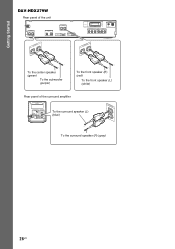
... color as the label of speaker Color tube (+) (-) Connector When connecting to the unit, insert the connector until it clicks. Rear of the jacks to #. DAV-HDX277WC Rear panel SPEAKER CENTER SUBWOOFER SPEAKER TV/VIDEO DIGITAL IN COAXIAL OPTICAL FRONT R FRONT L SUR R SUR L HDMI OUT DMPORT DC5V 0.7A MAX EZW-RT10...
... color as the label of speaker Color tube (+) (-) Connector When connecting to the unit, insert the connector until it clicks. Rear of the jacks to #. DAV-HDX277WC Rear panel SPEAKER CENTER SUBWOOFER SPEAKER TV/VIDEO DIGITAL IN COAXIAL OPTICAL FRONT R FRONT L SUR R SUR L HDMI OUT DMPORT DC5V 0.7A MAX EZW-RT10...
Operating Instructions
Page 26
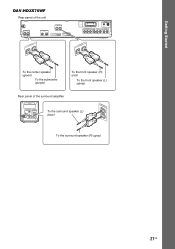
Getting Started DAV-HDX279W Rear panel of the unit SPEAKER CENTER SUBWOOFER SPEAKER TV/VIDEO DIGITAL IN COAXIAL OPTICAL FRONT R FRONT L HDMI OUT DMPORT DC5V 0.7A MAX SPEAKER ...
Getting Started DAV-HDX279W Rear panel of the unit SPEAKER CENTER SUBWOOFER SPEAKER TV/VIDEO DIGITAL IN COAXIAL OPTICAL FRONT R FRONT L HDMI OUT DMPORT DC5V 0.7A MAX SPEAKER ...
Operating Instructions
Page 27
Getting Started DAV-HDX576WF Rear panel of the unit SPEAKER CENTER SUBWOOFER SPEAKER TV DIGITAL IN COAXIAL OPTICAL FRONT R FRONT L HDMI OUT DMPORT DC5V 0.7A MAX SPEAKER CENTER ...
Getting Started DAV-HDX576WF Rear panel of the unit SPEAKER CENTER SUBWOOFER SPEAKER TV DIGITAL IN COAXIAL OPTICAL FRONT R FRONT L HDMI OUT DMPORT DC5V 0.7A MAX SPEAKER CENTER ...
Operating Instructions
Page 28
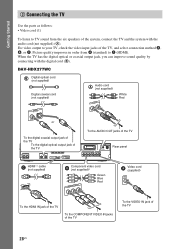
... audio cord (not supplied) (A). For video output to C (HDMI). Picture quality improves in order from the six speakers of the system, connect the TV and the system with the digital cord (B). DAV-HDX277WC Digital optical cord (not supplied) Digital coaxial cord (not supplied) TDVIG/VITIDALEION COAXIAL OPTICAL or Audio cord (not supplied) TV...
... audio cord (not supplied) (A). For video output to C (HDMI). Picture quality improves in order from the six speakers of the system, connect the TV and the system with the digital cord (B). DAV-HDX277WC Digital optical cord (not supplied) Digital coaxial cord (not supplied) TDVIG/VITIDALEION COAXIAL OPTICAL or Audio cord (not supplied) TV...

Operating Instructions
Page 29
Getting Started DAV-HDX279W Digital optical cord (not supplied) Digital coaxial cord (not supplied) TDVIG/VITIDALEION COAXIAL OPTICAL or Audio cord (not supplied) TV/VIDEO R AUDIO IN L White ...
Getting Started DAV-HDX279W Digital optical cord (not supplied) Digital coaxial cord (not supplied) TDVIG/VITIDALEION COAXIAL OPTICAL or Audio cord (not supplied) TV/VIDEO R AUDIO IN L White ...
Operating Instructions
Page 30
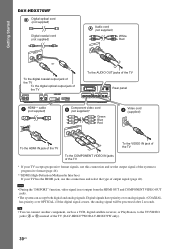
.... Note • During the "DMPORT" function, video signal is not output from the HDMI OUT and COMPONENT VIDEO OUT jacks. • The system can connect another component, such as a VCR, digital satellite receiver, or PlayStation, to progressive format (page 46). ** HDMI (High-Definition Multimedia Interface...VIDEO jacks (A or B) instead of output signal (page 46). Tip • You can accept both digital and analog signals. Getting Started DAV-HDX576WF Digital optical cord (not supplied) Digital coaxial cord (not supplied) TV DIGITAL IN COAXIAL OPTICAL or Audio cord (not supplied) TV...
.... Note • During the "DMPORT" function, video signal is not output from the HDMI OUT and COMPONENT VIDEO OUT jacks. • The system can connect another component, such as a VCR, digital satellite receiver, or PlayStation, to progressive format (page 46). ** HDMI (High-Definition Multimedia Interface...VIDEO jacks (A or B) instead of output signal (page 46). Tip • You can accept both digital and analog signals. Getting Started DAV-HDX576WF Digital optical cord (not supplied) Digital coaxial cord (not supplied) TV DIGITAL IN COAXIAL OPTICAL or Audio cord (not supplied) TV...
Operating Instructions
Page 31
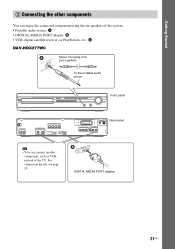
... 3 Connecting the other components You can enjoy the connected component using the six speakers of the system. • Portable audio source: A • DIGITAL MEDIA PORT adapter: B • VCR, digital satellite receiver, or PlayStation, etc.: C DAV-HDX277WC Stereo mini-plug cord (not supplied) To the portable audio source Front panel SPEAKER CENTER SUBWOOFER...
... 3 Connecting the other components You can enjoy the connected component using the six speakers of the system. • Portable audio source: A • DIGITAL MEDIA PORT adapter: B • VCR, digital satellite receiver, or PlayStation, etc.: C DAV-HDX277WC Stereo mini-plug cord (not supplied) To the portable audio source Front panel SPEAKER CENTER SUBWOOFER...


