Operating Instructions
Page 44
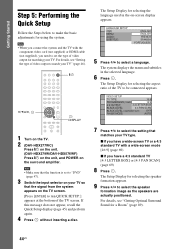
... on the unit. (DAV-HDX279W/DAV-HDX576WF) Press [/1 on the unit, and POWER on the surround amplifier. For details, see "Getting Optimal Surround Sound for using the system. VIDEO SETUP TV TYPE: 16:9 PROGRESSIVE (COMPONENT OUT): 16:9 4:3 OUTPUT: 4:3 LETTER BOX BLACK LEVEL: 4:3 PAN SCAN BLACK LEVEL (COMPONENT OUT):... OFF PAUSE MODE: AUTO 7 Press X/x to select the setting that the function is set the type of video output to match your TV so that the signal from the system appears on the TV screen....
... on the unit. (DAV-HDX279W/DAV-HDX576WF) Press [/1 on the unit, and POWER on the surround amplifier. For details, see "Getting Optimal Surround Sound for using the system. VIDEO SETUP TV TYPE: 16:9 PROGRESSIVE (COMPONENT OUT): 16:9 4:3 OUTPUT: 4:3 LETTER BOX BLACK LEVEL: 4:3 PAN SCAN BLACK LEVEL (COMPONENT OUT):... OFF PAUSE MODE: AUTO 7 Press X/x to select the setting that the function is set the type of video output to match your TV so that the signal from the system appears on the TV screen....
Operating Instructions
Page 68
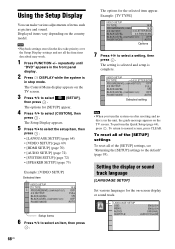
...SETUP TV TYPE: 4:3 LETTER BOX PROGRESSIVE (COMPONENT OUT): OFF 4:3 OUTPUT: FULL BLACK LEVEL: ON BLACK LEVEL (COMPONENT OUT): OFF PAUSE MODE: AUTO Selected setting Note • When you turn the system on the TV screen. To perform the Quick Setup (page 44), press . ...SETUP] (page 70) • [AUDIO SETUP] (page 72) • [SYSTEM SETUP] (page 72) • [SPEAKER SETUP] (page 73) Example: [VIDEO SETUP] Selected item VIDEO SETUP TV TYPE: PROGRESSIVE (COMPONENT OUT): 4:3 OUTPUT: BLACK LEVEL: BLACK LEVEL (COMPONENT OUT): PAUSE MODE: 16:9 OFF FULL ON OFF AUTO Setup items...
...SETUP TV TYPE: 4:3 LETTER BOX PROGRESSIVE (COMPONENT OUT): OFF 4:3 OUTPUT: FULL BLACK LEVEL: ON BLACK LEVEL (COMPONENT OUT): OFF PAUSE MODE: AUTO Selected setting Note • When you turn the system on the TV screen. To perform the Quick Setup (page 44), press . ...SETUP] (page 70) • [AUDIO SETUP] (page 72) • [SYSTEM SETUP] (page 72) • [SPEAKER SETUP] (page 73) Example: [VIDEO SETUP] Selected item VIDEO SETUP TV TYPE: PROGRESSIVE (COMPONENT OUT): 4:3 OUTPUT: BLACK LEVEL: BLACK LEVEL (COMPONENT OUT): PAUSE MODE: 16:9 OFF FULL ON OFF AUTO Setup items...

Operating Instructions
Page 69
...appears. 2 Press C/c to on the disc, the language may be connected. When you select [AUDIO FOLLOW], the language for the disc's menu. The system automatically displays the wide picture on the entire screen and cuts off the portions that is not recorded on the DVD VIDEO, one of the... enter a language code from the COMPONENT VIDEO OUT jacks to select [START], then press . 69US VIDEO SETUP TV TYPE: PROGRESSIVE (COMPONENT OUT): 4:3 OUTPUT: BLACK LEVEL: BLACK LEVEL (COMPONENT OUT): PAUSE MODE: 16:9 OFF FULL ON OFF AUTO x [TV TYPE] You can select the aspect ratio of the sound track.
...appears. 2 Press C/c to on the disc, the language may be connected. When you select [AUDIO FOLLOW], the language for the disc's menu. The system automatically displays the wide picture on the entire screen and cuts off the portions that is not recorded on the DVD VIDEO, one of the... enter a language code from the COMPONENT VIDEO OUT jacks to select [START], then press . 69US VIDEO SETUP TV TYPE: PROGRESSIVE (COMPONENT OUT): 4:3 OUTPUT: BLACK LEVEL: BLACK LEVEL (COMPONENT OUT): PAUSE MODE: 16:9 OFF FULL ON OFF AUTO x [TV TYPE] You can select the aspect ratio of the sound track.
Operating Instructions
Page 70
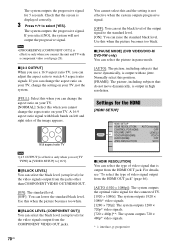
... the aspect ratio on your TV, change the setting on your TV, not the system. [FULL]: Select this when you can adjust the aspect ratio to [16:9]. x [BLACK LEVEL] You can raise the standard black level. Use this when you cannot change the aspect ratio on left and right sides...LEVEL2 YCBCR OFF SD x [HDMI RESOLUTION] You can lower the standard black level. For details, see "To select the type of the output signal to select [YES]. The system outputs the progressive signal for the connected TV. [1920 × 1080i]: The system outputs 1920 × 1080i* video signals. [1280 × 720p]:...
... the aspect ratio on your TV, change the setting on your TV, not the system. [FULL]: Select this when you can adjust the aspect ratio to [16:9]. x [BLACK LEVEL] You can raise the standard black level. Use this when you cannot change the aspect ratio on left and right sides...LEVEL2 YCBCR OFF SD x [HDMI RESOLUTION] You can lower the standard black level. For details, see "To select the type of the output signal to select [YES]. The system outputs the progressive signal for the connected TV. [1920 × 1080i]: The system outputs 1920 × 1080i* video signals. [1280 × 720p]:...
Operating Instructions
Page 71
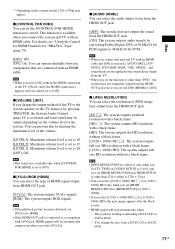
... [HDMI RESOLUTION] in [HDMI SETUP] to a component with a black frame. [(1920 × 1080i) HD]: The system outputs full size HD resolution without the HDMI connection of JPEG image files output from the HDMI OUT jack. [ON]: The system outputs audio signals by pressing THEATER, the System Audio Control (page 81) is activated and loud sound...
... [HDMI RESOLUTION] in [HDMI SETUP] to a component with a black frame. [(1920 × 1080i) HD]: The system outputs full size HD resolution without the HDMI connection of JPEG image files output from the HDMI OUT jack. [ON]: The system outputs audio signals by pressing THEATER, the System Audio Control (page 81) is activated and loud sound...
Operating Instructions
Page 73
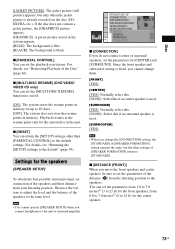
...default settings. If the disc does not contain a jacket picture, the [GRAPHICS] picture appears. [GRAPHICS]: A preset picture stored in the system appears. [BLUE]: The background is blue. [BLACK]: The background is used . [SURROUND] [YES]: Normally select this. [NONE]: Select this if no center speaker is used . [SUBWOOFER... connection of [SPEAKER FORMATION] setting remains the same, but only when the jacket picture is already recorded on /off. [ON]: The system stores the resume points in the unit. For details, see "Returning the [SETUP] settings to on the disc (CDEXTRA, etc.). Settings...
...default settings. If the disc does not contain a jacket picture, the [GRAPHICS] picture appears. [GRAPHICS]: A preset picture stored in the system appears. [BLUE]: The background is blue. [BLACK]: The background is used . [SURROUND] [YES]: Normally select this. [NONE]: Select this if no center speaker is used . [SUBWOOFER... connection of [SPEAKER FORMATION] setting remains the same, but only when the jacket picture is already recorded on /off. [ON]: The system stores the resume points in the unit. For details, see "Returning the [SETUP] settings to on the disc (CDEXTRA, etc.). Settings...
Operating Instructions
Page 121
... 72, 89 SPEAKER SETUP 73 CONNECTION 73 DISTANCE 73, 74 LEVEL 74 SUBTITLE 54, 69 Super Audio CD 55, 111 SYSTEM MENU 41, 48, 49, 54, 77, 85, 87, 92, 93 SYSTEM SETUP 72 T TEST TONE 74 TIME 61 TRACK SELECTION 72 TV TYPE 69 V VIDEO SETUP 69 VOLUME LIMIT 71 121US... 55 A A/V SYNC 65 ANGLE 54 ATTENUATE 48 AUDIO 69 AUDIO (HDMI) 71 AUDIO DRC 72 AUDIO SETUP 72 AUTO CALIBRATION 72, 90, 110 B BACKGROUND 72 BLACK LEVEL 70 BLACK LEVEL (COMPONENT OUT) 70 C COLD RESET 95 CONTROL FOR HDMI 71 Control for HDMI 79 Control Menu Display 118 CUSTOM 68, 95 D D.
... 72, 89 SPEAKER SETUP 73 CONNECTION 73 DISTANCE 73, 74 LEVEL 74 SUBTITLE 54, 69 Super Audio CD 55, 111 SYSTEM MENU 41, 48, 49, 54, 77, 85, 87, 92, 93 SYSTEM SETUP 72 T TEST TONE 74 TIME 61 TRACK SELECTION 72 TV TYPE 69 V VIDEO SETUP 69 VOLUME LIMIT 71 121US... 55 A A/V SYNC 65 ANGLE 54 ATTENUATE 48 AUDIO 69 AUDIO (HDMI) 71 AUDIO DRC 72 AUDIO SETUP 72 AUTO CALIBRATION 72, 90, 110 B BACKGROUND 72 BLACK LEVEL 70 BLACK LEVEL (COMPONENT OUT) 70 C COLD RESET 95 CONTROL FOR HDMI 71 Control for HDMI 79 Control Menu Display 118 CUSTOM 68, 95 D D.


