Operating Instructions
Page 3
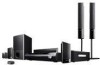
.... For the wireless transceiver (EZW-RT10) This transmitter must not be co-located or operated in conjunction with at plugs, convenience receptacles, and the point where they exit from the wall socket immediately in the event of trouble. 13) Unplug this system so that the cable ground shall be unplugged from the apparatus. 11) Only use caution when...
.... For the wireless transceiver (EZW-RT10) This transmitter must not be co-located or operated in conjunction with at plugs, convenience receptacles, and the point where they exit from the wall socket immediately in the event of trouble. 13) Unplug this system so that the cable ground shall be unplugged from the apparatus. 11) Only use caution when...
Operating Instructions
Page 4
About the S-AIR function The system is compatible with the system: • Surround amplifier: You can enjoy surround speaker sound wirelessly. • S-AIR receiver: You can also use the controls on the unit if they have the same or similar names as those on the remote. • The instructions in this manual are expressed in feet (ft) for North American models. • The default setting is used for illustration purposes. Notes...
About the S-AIR function The system is compatible with the system: • Surround amplifier: You can enjoy surround speaker sound wirelessly. • S-AIR receiver: You can also use the controls on the unit if they have the same or similar names as those on the remote. • The instructions in this manual are expressed in feet (ft) for North American models. • The default setting is used for illustration purposes. Notes...
Operating Instructions
Page 5
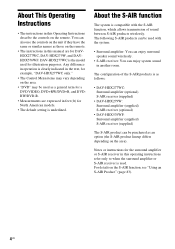
... Sound Mode 51 Enjoying Multiplex Broadcast Sound... 51 Disc Playing a Disc 52 Using Play Mode 58 Searching/Selecting a Disc 60 Playing MP3 Files/JPEG Image Files... 62 Adjusting the Delay Between the Picture and Sound 65 Restricting Playback of the Disc........... 66 Using the Setup Display 68 Tuner Presetting Radio Stations 76 Listening to the Radio 77 Control for HDMI/External Audio Device Using the Control for HDMI Function for "BRAVIA" Sync 79 Using the DIGITAL MEDIA PORT Adapter 82 Using an S-AIR Product 83 Other Operations Getting Optimal Surround Sound...
... Sound Mode 51 Enjoying Multiplex Broadcast Sound... 51 Disc Playing a Disc 52 Using Play Mode 58 Searching/Selecting a Disc 60 Playing MP3 Files/JPEG Image Files... 62 Adjusting the Delay Between the Picture and Sound 65 Restricting Playback of the Disc........... 66 Using the Setup Display 68 Tuner Presetting Radio Stations 76 Listening to the Radio 77 Control for HDMI/External Audio Device Using the Control for HDMI Function for "BRAVIA" Sync 79 Using the DIGITAL MEDIA PORT Adapter 82 Using an S-AIR Product 83 Other Operations Getting Optimal Surround Sound...
Operating Instructions
Page 42
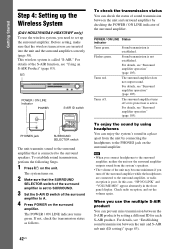
... products by using headphones You can enjoy the system's sound in the front panel display. For details, see "Surround amplifier operation" (page 105). "/1 POWER / ON LINE Indicator POWER POWER POWER/ON LINE PHONES S-AIR ID switch EZW-RT10 S-AIR ID A B C PAIRING SPEAKER L SURROUND SELECTOR R SURROUND SURROUND BACK PHONES jack SURROUND SELECTOR switch The unit transmits sound to the surround amplifier that is set to SURROUND. 3 Set the S-AIR ID switch of the surround amplifier is connected to the surround amplifier, or radio reception...
... products by using headphones You can enjoy the system's sound in the front panel display. For details, see "Surround amplifier operation" (page 105). "/1 POWER / ON LINE Indicator POWER POWER POWER/ON LINE PHONES S-AIR ID switch EZW-RT10 S-AIR ID A B C PAIRING SPEAKER L SURROUND SELECTOR R SURROUND SURROUND BACK PHONES jack SURROUND SELECTOR switch The unit transmits sound to the surround amplifier that is set to SURROUND. 3 Set the S-AIR ID switch of the surround amplifier is connected to the surround amplifier, or radio reception...
Operating Instructions
Page 44
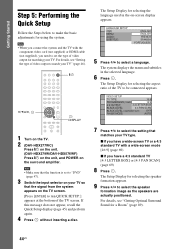
...-screen mode [16:9] (page 69) x If you need to be connected appears. The Setup Display for using the system. For details, see "Setting the type of the TV to set to make the basic adjustments for selecting the aspect ratio of video output to select the speaker formation image as the speakers are actually positioned. Getting Started Step 5: Performing the Quick Setup Follow the Steps below to "DVD" (page 47). 3 Switch the input selector...
...-screen mode [16:9] (page 69) x If you need to be connected appears. The Setup Display for using the system. For details, see "Setting the type of the TV to set to make the basic adjustments for selecting the aspect ratio of video output to select the speaker formation image as the speakers are actually positioned. Getting Started Step 5: Performing the Quick Setup Follow the Steps below to "DVD" (page 47). 3 Switch the input selector...
Operating Instructions
Page 45
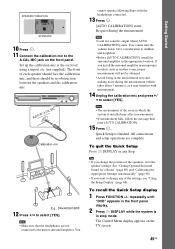
... Quick Setup display 1 Press FUNCTION +/- Note • Loud test sound is finished. Note • The environment of the settings, see "Using the Setup Display" (page 68). repeatedly until "DVD" appears in the front panel display. 2 Press DISPLAY while the system is installed may interfere with the headphones connected. 13 Press . [AUTO CALIBRATION] starts. SPEAKER FORMATION STANDARD 10 Press . 11 Connect the calibration mic to select [YES]. To quit the Quick Setup Press DISPLAY in the measurement area and making...
... Quick Setup display 1 Press FUNCTION +/- Note • Loud test sound is finished. Note • The environment of the settings, see "Using the Setup Display" (page 68). repeatedly until "DVD" appears in the front panel display. 2 Press DISPLAY while the system is installed may interfere with the headphones connected. 13 Press . [AUTO CALIBRATION] starts. SPEAKER FORMATION STANDARD 10 Press . 11 Connect the calibration mic to select [YES]. To quit the Quick Setup Press DISPLAY in the measurement area and making...

Operating Instructions
Page 46
... video signals output from the HDMI OUT jack When you need to connect to a TV that accepts progressive signals. 1 Press FUNCTION +/- repeatedly until "DVD" appears in the front panel display. 2 Press DISPLAY while the system is in stop mode. For details, refer also to the operating instructions supplied with the HDMI cable, select the type of the system. The Control Menu display appears on the TV screen. 3 Press X/x to select [SETUP], then press . The Setup Display appears. 5 Press X/x to select [VIDEO SETUP...
... video signals output from the HDMI OUT jack When you need to connect to a TV that accepts progressive signals. 1 Press FUNCTION +/- repeatedly until "DVD" appears in the front panel display. 2 Press DISPLAY while the system is in stop mode. For details, refer also to the operating instructions supplied with the HDMI cable, select the type of the system. The Control Menu display appears on the TV screen. 3 Press X/x to select [SETUP], then press . The Setup Display appears. 5 Press X/x to select [VIDEO SETUP...
Operating Instructions
Page 48
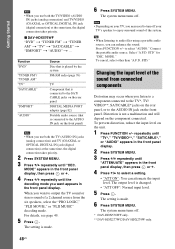
... depend on the rear panel, or to enjoy surround sound of a 2 channel source from the six speakers, select the "PRO LOGIC," "PLII MOVIE," or "PLII MUSIC" decoding mode. Function "DVD" "TUNER FM"/ "TUNER AM" "TV" "SAT/CABLE" "DMPORT" "AUDIO" Source Disc that is played by the system FM/AM radio (page 76) TV Component that is connected to the SAT/ CABLE jacks on the rear panel DIGITAL MEDIA PORT adapter (page 82) Portable audio source (that is connected to the AUDIO IN jack on the...
... depend on the rear panel, or to enjoy surround sound of a 2 channel source from the six speakers, select the "PRO LOGIC," "PLII MOVIE," or "PLII MUSIC" decoding mode. Function "DVD" "TUNER FM"/ "TUNER AM" "TV" "SAT/CABLE" "DMPORT" "AUDIO" Source Disc that is played by the system FM/AM radio (page 76) TV Component that is connected to the SAT/ CABLE jacks on the rear panel DIGITAL MEDIA PORT adapter (page 82) Portable audio source (that is connected to the AUDIO IN jack on the...
Operating Instructions
Page 51
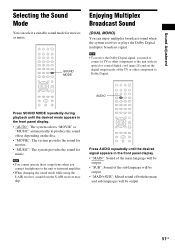
... or music. Sound Adjustment Selecting the Sound Mode You can enjoy multiplex broadcast sound when the system receives or plays the Dolby Digital multiplex broadcast signal. Note • To receive the Dolby Digital signal, you connect headphones to the unit with an optical or coaxial digital cord (page 28) and set the digital output mode of both the main and sub languages will be output. 51US Press AUDIO repeatedly until the desired mode appears in the front panel display. • "MAIN": Sound...
... or music. Sound Adjustment Selecting the Sound Mode You can enjoy multiplex broadcast sound when the system receives or plays the Dolby Digital multiplex broadcast signal. Note • To receive the Dolby Digital signal, you connect headphones to the unit with an optical or coaxial digital cord (page 28) and set the digital output mode of both the main and sub languages will be output. 51US Press AUDIO repeatedly until the desired mode appears in the front panel display. • "MAIN": Sound...
Operating Instructions
Page 53
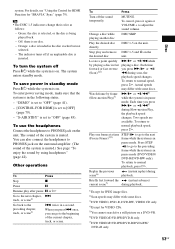
... details, see "Using the Control for HDMI Function for a still picture on the the desired disc unit. Tip • The DISC 1-5 indicators change their color as follows: - To return to normal playback, press H. Disc system. Orange: a disc is on the surround amplifier. (The sound of the system is muted.) See page "To enjoy the sound by playing a disc in the disc stocker but not selected. - To save power in standby mode Press "/1 while...
... details, see "Using the Control for HDMI Function for a still picture on the the desired disc unit. Tip • The DISC 1-5 indicators change their color as follows: - To return to normal playback, press H. Disc system. Orange: a disc is on the surround amplifier. (The sound of the system is muted.) See page "To enjoy the sound by playing a disc in the disc stocker but not selected. - To save power in standby mode Press "/1 while...
Operating Instructions
Page 56
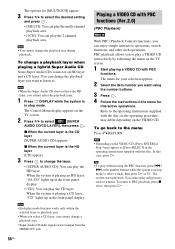
... system is playing a CD layer, "CD" lights up in stop mode to change the playback layer you to play a VIDEO CD interactively by following the menu on the TV screen. 2 Press X/x to select the desired setting and press . • [MULTI]: You can play the 2 channel playback area. PBC playback allows you want using the PBC function, press ./ > or the number buttons while the system is the CD layer [SUPER AUDIO...
... system is playing a CD layer, "CD" lights up in stop mode to change the playback layer you to play a VIDEO CD interactively by following the menu on the TV screen. 2 Press X/x to select the desired setting and press . • [MULTI]: You can play the 2 channel playback area. PBC playback allows you want using the PBC function, press ./ > or the number buttons while the system is the CD layer [SUPER AUDIO...
Operating Instructions
Page 67
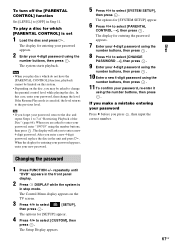
...-enter it using the number buttons, then press . 11 To confirm your password Press C before you enter a new 4-digit password, replace the disc in Step 11. The Setup Display appears. 67US The options for entering the password appears. 7 Enter your password, then change the parental control level while playing the disc. repeatedly until "DVD" appears in the front panel display. 2 Press DISPLAY while the system is canceled, the level returns to select [SETUP], then press...
...-enter it using the number buttons, then press . 11 To confirm your password Press C before you enter a new 4-digit password, replace the disc in Step 11. The Setup Display appears. 67US The options for entering the password appears. 7 Enter your password, then change the parental control level while playing the disc. repeatedly until "DVD" appears in the front panel display. 2 Press DISPLAY while the system is canceled, the level returns to select [SETUP], then press...
Operating Instructions
Page 68
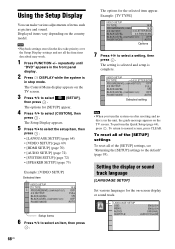
... selected item appear. VIDEO SETUP TV TYPE: 4:3 LETTER BOX PROGRESSIVE (COMPONENT OUT): OFF 4:3 OUTPUT: FULL BLACK LEVEL: ON BLACK LEVEL (COMPONENT OUT): OFF PAUSE MODE: AUTO Selected setting Note • When you turn the system on -screen display or sound track. Displayed items vary depending on the TV screen. 3 Press X/x to select [SETUP], then press . To reset all of the [SETUP] settings To reset all the functions described may work. 1 Press FUNCTION +/- repeatedly until "DVD" appears in the front panel display. 2 Press DISPLAY...
... selected item appear. VIDEO SETUP TV TYPE: 4:3 LETTER BOX PROGRESSIVE (COMPONENT OUT): OFF 4:3 OUTPUT: FULL BLACK LEVEL: ON BLACK LEVEL (COMPONENT OUT): OFF PAUSE MODE: AUTO Selected setting Note • When you turn the system on -screen display or sound track. Displayed items vary depending on the TV screen. 3 Press X/x to select [SETUP], then press . To reset all of the [SETUP] settings To reset all the functions described may work. 1 Press FUNCTION +/- repeatedly until "DVD" appears in the front panel display. 2 Press DISPLAY...
Operating Instructions
Page 70
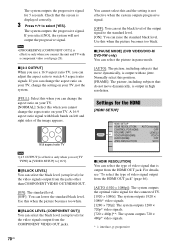
... the system outputs progressive signal. [OFF]: You can set [TV TYPE] in pause mode. [AUTO]: The picture, including subjects that is output from the HDMI OUT jack. Use this and the setting is effective only when you can change the setting on your TV. [NORMAL]: Select this when the picture becomes too black. x [BLACK LEVEL (COMPONENT OUT)] You can select the black level (setup level) for the HDMI [HDMI SETUP] HDMI SETUP HDMI RESOLUTION: CONTROL FOR HDMI: VOLUME LIMIT: YCBCR/RGB(HDMI): AUDIO(HDMI...
... the system outputs progressive signal. [OFF]: You can set [TV TYPE] in pause mode. [AUTO]: The picture, including subjects that is output from the HDMI OUT jack. Use this and the setting is effective only when you can change the setting on your TV. [NORMAL]: Select this when the picture becomes too black. x [BLACK LEVEL (COMPONENT OUT)] You can select the black level (setup level) for the HDMI [HDMI SETUP] HDMI SETUP HDMI RESOLUTION: CONTROL FOR HDMI: VOLUME LIMIT: YCBCR/RGB(HDMI): AUDIO(HDMI...
Operating Instructions
Page 71
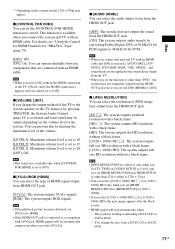
...]: Maximum volume level is set to 48 kHz/16 bit PCM. x [AUDIO (HDMI)] You can prevent this by converting Dolby Digital, DTS, or 96 kHz/24 bit PCM signals to [ON] without the HDMI connection of JPEG image files output from HDMI OUT jack. [YCBCR]: The system outputs YCBCR signals. [RGB]: The system outputs RGB signals. You change the output method of the TV to the system speaker on the TV menu or by pressing THEATER, the System Audio Control...
...]: Maximum volume level is set to 48 kHz/16 bit PCM. x [AUDIO (HDMI)] You can prevent this by converting Dolby Digital, DTS, or 96 kHz/24 bit PCM signals to [ON] without the HDMI connection of JPEG image files output from HDMI OUT jack. [YCBCR]: The system outputs YCBCR signals. [RGB]: The system outputs RGB signals. You change the output method of the TV to the system speaker on the TV menu or by pressing THEATER, the System Audio Control...
Operating Instructions
Page 79
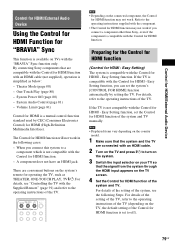
... the operating instructions of the system and TV. System Power Off (page 80) - Note • Displayed items vary depending on the country model. 1 Make sure that the system and the TV are connected with an HDMI cable. 2 Turn on the TV, the default setting of the Control for HDMI function of the system and TV manually. By connecting Sony components that the signal from the system through the HDMI input appears on the system's remote for HDMI function of the TV. Theater Mode...
... the operating instructions of the system and TV. System Power Off (page 80) - Note • Displayed items vary depending on the country model. 1 Make sure that the system and the TV are connected with an HDMI cable. 2 Turn on the TV, the default setting of the Control for HDMI function of the system and TV manually. By connecting Sony components that the signal from the system through the HDMI input appears on the system's remote for HDMI function of the TV. Theater Mode...
Operating Instructions
Page 90
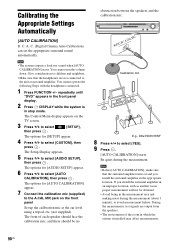
... Control Menu display appears on the front panel Set up the calibration mic at the ear level using a tripod, etc. (not supplied). AUDIO IN / A.CAL MIC Calibration mic E.g., DAV-HDX576WF 8 Press C/c to select [AUDIO SETUP], then press . If you install the surround amplifier in stop mode. repeatedly until "DVD" appears in the measurement area and making noise during the measurement. C. (Digital Cinema Auto Calibration) can set the appropriate surround sound automatically. The options for [AUTO CALIBRATION] appear. 7 Connect the calibration mic (supplied) to the A.CAL MIC jack...
... Control Menu display appears on the front panel Set up the calibration mic at the ear level using a tripod, etc. (not supplied). AUDIO IN / A.CAL MIC Calibration mic E.g., DAV-HDX576WF 8 Press C/c to select [AUDIO SETUP], then press . If you install the surround amplifier in stop mode. repeatedly until "DVD" appears in the measurement area and making noise during the measurement. C. (Digital Cinema Auto Calibration) can set the appropriate surround sound automatically. The options for [AUTO CALIBRATION] appear. 7 Connect the calibration mic (supplied) to the A.CAL MIC jack...
Operating Instructions
Page 101
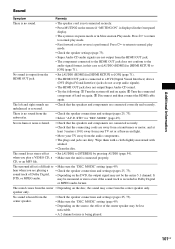
... component connected to the HDMI OUT jack does not conform to the audio signal format, in this case set [AUDIO (HDMI)] in the front panel display. • The system is not connected securely. • Press MUTING on again. 3 Disconnect and then connect the HDMI cable again. The sound comes from the center • Depending on the DVD, the output signal may come from the center speaker. • Check the speaker connections and settings (pages 25, 73). • Make...
... component connected to the HDMI OUT jack does not conform to the audio signal format, in this case set [AUDIO (HDMI)] in the front panel display. • The system is not connected securely. • Press MUTING on again. 3 Disconnect and then connect the HDMI cable again. The sound comes from the center • Depending on the DVD, the output signal may come from the center speaker. • Check the speaker connections and settings (pages 25, 73). • Make...
Operating Instructions
Page 108
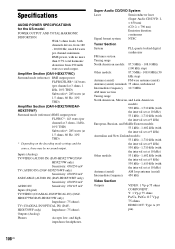
...) Subwoofer*: 285 watts (at 1.5 ohms, 80 Hz, 10% THD) Amplifier Section (DAV-HDX279W/DAVHDX576WF) Surround mode (reference) RMS output power FL/FR/C*: 143 watts (per channel minimum RMS power, with the interval set at 1.5 ohms, 80 Hz, 10% THD) * Depending on the decoding mode settings and the source, there may be no more than 0.7% total harmonic distortion from 180 - 20,000 Hz; Specifications AUDIO POWER SPECIFICATIONS for the US model POWER OUTPUT AND...
...) Subwoofer*: 285 watts (at 1.5 ohms, 80 Hz, 10% THD) Amplifier Section (DAV-HDX279W/DAVHDX576WF) Surround mode (reference) RMS output power FL/FR/C*: 143 watts (per channel minimum RMS power, with the interval set at 1.5 ohms, 80 Hz, 10% THD) * Depending on the decoding mode settings and the source, there may be no more than 0.7% total harmonic distortion from 180 - 20,000 Hz; Specifications AUDIO POWER SPECIFICATIONS for the US model POWER OUTPUT AND...
Operating Instructions
Page 121
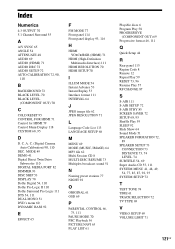
... PBC Playback 56 PICTURE NAVI 63 PLAY LIST 61 Playable discs 6 Program Play 58 PROGRESSIVE (COMPONENT OUT) 69 Progressive format 46, 111 Q Quick Setup 44 R Rear panel 115 Region Code 8 Remote 12 Repeat Play 59 RESET 73, 96 Resume Play 57 RF CHANGE 87 S S-AIR 111 S-AIR SETUP 72 S-AIR STBY 85 SCREEN SAVER 72 SETUP 68, 95 Shuffle Play 59 SLEEP 92 Slide Show 64 Sound Mode 51 SPEAKER FORMATION 72, 89 SPEAKER SETUP 73 CONNECTION 73 DISTANCE...
... PBC Playback 56 PICTURE NAVI 63 PLAY LIST 61 Playable discs 6 Program Play 58 PROGRESSIVE (COMPONENT OUT) 69 Progressive format 46, 111 Q Quick Setup 44 R Rear panel 115 Region Code 8 Remote 12 Repeat Play 59 RESET 73, 96 Resume Play 57 RF CHANGE 87 S S-AIR 111 S-AIR SETUP 72 S-AIR STBY 85 SCREEN SAVER 72 SETUP 68, 95 Shuffle Play 59 SLEEP 92 Slide Show 64 Sound Mode 51 SPEAKER FORMATION 72, 89 SPEAKER SETUP 73 CONNECTION 73 DISTANCE...


