Operating Instructions
Page 3
...disconnected from the AC power source (mains) as long as practical. This equipment should be installed and operated with FCC radiation exposure limits set forth for uncontrolled equipment and meets the FCC radio frequency (RF) Exposure Guidelines in particular, specifies that the cable ground shall be ... The wide blade or the third prong are provided for your outlet, consult an electrician for replacement of trouble. 13) Unplug this system so that provides guidelines for long periods of cable entry as it is used, use attachments/accessories specified by the manufacturer. 12) Use...
...disconnected from the AC power source (mains) as long as practical. This equipment should be installed and operated with FCC radiation exposure limits set forth for uncontrolled equipment and meets the FCC radio frequency (RF) Exposure Guidelines in particular, specifies that the cable ground shall be ... The wide blade or the third prong are provided for your outlet, consult an electrician for replacement of trouble. 13) Unplug this system so that provides guidelines for long periods of cable entry as it is used, use attachments/accessories specified by the manufacturer. 12) Use...
Operating Instructions
Page 4
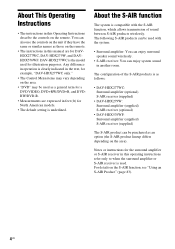
...DVD-R. • Measurements are for example, "DAV-HDX277WC only." • The Control Menu items may vary depending on the area). Notes or instructions for North American models. • The default setting is compatible with the system: • Surround amplifier: You can enjoy surround... (supplied) S-AIR receiver (supplied) The S-AIR product can enjoy system sound in another room. Any difference in operation is clearly indicated in the text, for DAVHDX277WC, DAV-HDX279W, and DAVHDX576WF. The configuration of sound between S-AIR products wirelessly. About This Operating...
...DVD-R. • Measurements are for example, "DAV-HDX277WC only." • The Control Menu items may vary depending on the area). Notes or instructions for North American models. • The default setting is compatible with the system: • Surround amplifier: You can enjoy surround... (supplied) S-AIR receiver (supplied) The S-AIR product can enjoy system sound in another room. Any difference in operation is clearly indicated in the text, for DAVHDX277WC, DAV-HDX279W, and DAVHDX576WF. The configuration of sound between S-AIR products wirelessly. About This Operating...
Operating Instructions
Page 5
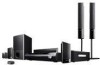
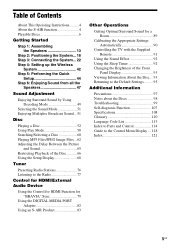
... S-AIR function 4 Playable Discs 6 Getting Started Step 1: Assembling the Speakers 13 Step 2: Positioning the System... 18 Step 3: Connecting the System... 22 Step 4: Setting up the Wireless System 42 Step 5: Performing the Quick Setup 44 Step 6: Enjoying Sound from all the Speakers 47 Sound Adjustment...92 Changing the Brightness of the Front Panel Display 93 Viewing Information About the Disc ... 93 Returning to the Default Settings ......... 95 Additional Information Precautions 97 Notes about the Discs 98 Troubleshooting 99 Self-diagnosis Function 107 Specifications 108 Glossary ...
... S-AIR function 4 Playable Discs 6 Getting Started Step 1: Assembling the Speakers 13 Step 2: Positioning the System... 18 Step 3: Connecting the System... 22 Step 4: Setting up the Wireless System 42 Step 5: Performing the Quick Setup 44 Step 6: Enjoying Sound from all the Speakers 47 Sound Adjustment...92 Changing the Brightness of the Front Panel Display 93 Viewing Information About the Disc ... 93 Returning to the Default Settings ......... 95 Additional Information Precautions 97 Notes about the Discs 98 Troubleshooting 99 Self-diagnosis Function 107 Specifications 108 Glossary ...
Operating Instructions
Page 8
...prohibited by area limitations.] will play a Multi Session CD when a JPEG image file is intended for home and other intellectual property rights. Region code Your system has a region code printed on the rear of DTS, Inc. Depending on a DVD or VIDEO ...format are trademarks or registered trademarks of Sony Corporation. 8US This system incorporates High-Definition Multimedia Interface (HDMITM) technology. Note about playback operations of this copyright protection technology must be intentionally set by area restrictions. Since this system will appear on the TV screen. "...
...prohibited by area limitations.] will play a Multi Session CD when a JPEG image file is intended for home and other intellectual property rights. Region code Your system has a region code printed on the rear of DTS, Inc. Depending on a DVD or VIDEO ...format are trademarks or registered trademarks of Sony Corporation. 8US This system incorporates High-Definition Multimedia Interface (HDMITM) technology. Note about playback operations of this copyright protection technology must be intentionally set by area restrictions. Since this system will appear on the TV screen. "...
Operating Instructions
Page 9
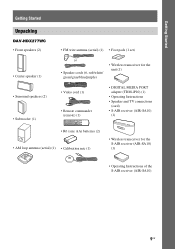
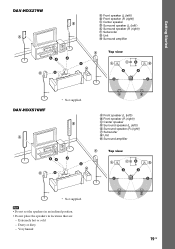
Getting Started Getting Started Unpacking DAV-HDX277WC • Front speakers (2) • Center speaker (1) • Surround speakers (2) • Subwoofer (1) • FM wire antenna (aerial) (1) • Foot pads (1 set) or • Speaker cords (6, red/white/ green/gray/blue/purple) • Wireless transceiver for the unit (1) • Video cord (1) • Remote commander (remote) (1) • DIGITAL ...
Getting Started Getting Started Unpacking DAV-HDX277WC • Front speakers (2) • Center speaker (1) • Surround speakers (2) • Subwoofer (1) • FM wire antenna (aerial) (1) • Foot pads (1 set) or • Speaker cords (6, red/white/ green/gray/blue/purple) • Wireless transceiver for the unit (1) • Video cord (1) • Remote commander (remote) (1) • DIGITAL ...
Operating Instructions
Page 10
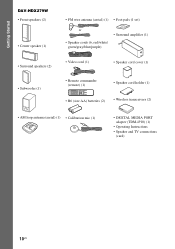
Getting Started DAV-HDX279W • Front speakers (2) • Center speaker (1) • Surround speakers (2) • Subwoofer (1) • FM wire antenna (aerial) (1) • Foot pads (1 set) or • Surround amplifier (1) • Speaker cords (6, red/white/ green/gray/blue/purple) • Video cord (1) • Speaker cord cover (1) • Remote commander (remote) (1) • ...
Getting Started DAV-HDX279W • Front speakers (2) • Center speaker (1) • Surround speakers (2) • Subwoofer (1) • FM wire antenna (aerial) (1) • Foot pads (1 set) or • Surround amplifier (1) • Speaker cords (6, red/white/ green/gray/blue/purple) • Video cord (1) • Speaker cord cover (1) • Remote commander (remote) (1) • ...
Operating Instructions
Page 11
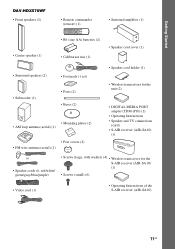
Getting Started DAV-HDX576WF • Front speakers (2) • Remote commander (remote) (1) • Surround amplifier (1) • Center speaker (1) • R6 (size AA) batteries (2) • Calibration mic (1) • Speaker cord cover (1) • Surround speakers (2) • Subwoofer (1) • Foot pads (1 set) • Posts (2) • Bases (2) • Mounting plates (2) • AM loop antenna (aerial) (1) • Post covers...
Getting Started DAV-HDX576WF • Front speakers (2) • Remote commander (remote) (1) • Surround amplifier (1) • Center speaker (1) • R6 (size AA) batteries (2) • Calibration mic (1) • Speaker cord cover (1) • Surround speakers (2) • Subwoofer (1) • Foot pads (1 set) • Posts (2) • Bases (2) • Mounting plates (2) • AM loop antenna (aerial) (1) • Post covers...
Operating Instructions
Page 19
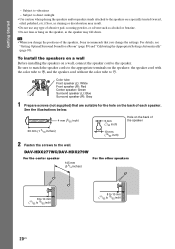
... speaker (R (right)) F Subwoofer G Unit H Surround amplifier CF G AA A D A E A H Top view A CB B A A C C * Not supplied. Dusty or dirty - Extremely hot or cold - Very humid D E 19US Getting Started DAV-HDX279W A A Front speaker (L (left)) B Front speaker (R (right)) B C Center speaker D Surround speaker (L (left )) E Surround speaker (R (right)) F Subwoofer G Unit H Surround amplifier CF G AA A D A E A H Top view A CB B A A C C * Not...
... speaker (R (right)) F Subwoofer G Unit H Surround amplifier CF G AA A D A E A H Top view A CB B A A C C * Not supplied. Dusty or dirty - Extremely hot or cold - Very humid D E 19US Getting Started DAV-HDX279W A A Front speaker (L (left)) B Front speaker (R (right)) B C Center speaker D Surround speaker (L (left )) E Surround speaker (R (right)) F Subwoofer G Unit H Surround amplifier CF G AA A D A E A H Top view A CB B A A C C * Not...
Operating Instructions
Page 20
... not use any type of the speaker 2 Fasten the screws to the speakers on the back of the speakers, Sony recommends that are suitable for a Room" (page 89) and "Calibrating the Appropriate Settings Automatically" (page 90). Subject to direct sunlight • Use caution when placing the speakers and/or speaker stands ...: the speaker cord with the color tube to 3, and the speaker cord without the color tube to the speaker. Subject to 13/32 inch) 20US DAV-HDX277WC/DAV-HDX279W For the center speaker 145 mm (5 3/4 inches) For the other speakers 8 to 10 mm (11/32 to 13/32 inch) 8 to 10 ...
... not use any type of the speaker 2 Fasten the screws to the speakers on the back of the speakers, Sony recommends that are suitable for a Room" (page 89) and "Calibrating the Appropriate Settings Automatically" (page 90). Subject to direct sunlight • Use caution when placing the speakers and/or speaker stands ...: the speaker cord with the color tube to 3, and the speaker cord without the color tube to the speaker. Subject to 13/32 inch) 20US DAV-HDX277WC/DAV-HDX279W For the center speaker 145 mm (5 3/4 inches) For the other speakers 8 to 10 mm (11/32 to 13/32 inch) 8 to 10 ...
Operating Instructions
Page 30
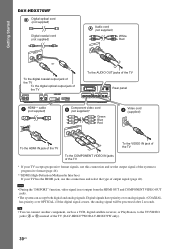
.... Note • During the "DMPORT" function, video signal is not output from the HDMI OUT and COMPONENT VIDEO OUT jacks. • The system can connect another component, such as a VCR, digital satellite receiver, or PlayStation, to progressive format (page 46). ** HDMI (High-Definition Multimedia ...Interface) If your TV accepts progressive format signals, use this connection and set the output signal of the system to the TV/VIDEO jacks (A or B) instead of output signal (page 46). Getting Started DAV-HDX576WF Digital optical cord (not supplied) Digital coaxial cord (not supplied) TV...
.... Note • During the "DMPORT" function, video signal is not output from the HDMI OUT and COMPONENT VIDEO OUT jacks. • The system can connect another component, such as a VCR, digital satellite receiver, or PlayStation, to progressive format (page 46). ** HDMI (High-Definition Multimedia ...Interface) If your TV accepts progressive format signals, use this connection and set the output signal of the system to the TV/VIDEO jacks (A or B) instead of output signal (page 46). Getting Started DAV-HDX576WF Digital optical cord (not supplied) Digital coaxial cord (not supplied) TV...
Operating Instructions
Page 41
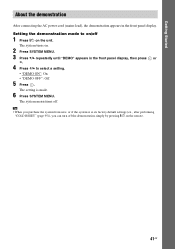
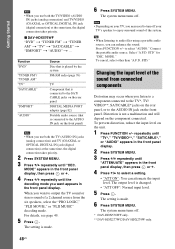
Tip • When you purchase the system from new, or if the system is made. 6 Press SYSTEM MENU. The system menu turns off. The setting is at its factory default settings (ex., after performing "COLD RESET" (page 95)), you can turn off the demonstration simply by pressing [/1 on... display, then press or c. 4 Press X/x to on/off 1 Press [/1 on the remote. 41US Setting the demonstration mode to select a setting. • "DEMO ON": On. • "DEMO OFF": Off. 5 Press . The system turns on. 2 Press SYSTEM MENU. 3 Press X/x repeatedly until "DEMO" appears in the front panel display.
Tip • When you purchase the system from new, or if the system is made. 6 Press SYSTEM MENU. The system menu turns off. The setting is at its factory default settings (ex., after performing "COLD RESET" (page 95)), you can turn off the demonstration simply by pressing [/1 on... display, then press or c. 4 Press X/x to on/off 1 Press [/1 on the remote. 41US Setting the demonstration mode to select a setting. • "DEMO ON": On. • "DEMO OFF": Off. 5 Press . The system turns on. 2 Press SYSTEM MENU. 3 Press X/x repeatedly until "DEMO" appears in the front panel display.
Operating Instructions
Page 42
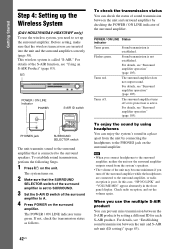
... on the surround amplifier. The POWER / ON LINE indicator turns green. Check radio reception, and set up the Wireless System (DAV-HDX279W/DAV-HDX576WF only) To use the wireless system, you use the multiple S-AIR product You can prevent miss transmission between the S-AIR products by connecting the headphones to A. 4 Press POWER on . 2 Make sure...
... on the surround amplifier. The POWER / ON LINE indicator turns green. Check radio reception, and set up the Wireless System (DAV-HDX279W/DAV-HDX576WF only) To use the wireless system, you use the multiple S-AIR product You can prevent miss transmission between the S-AIR products by connecting the headphones to A. 4 Press POWER on . 2 Make sure...
Operating Instructions
Page 43
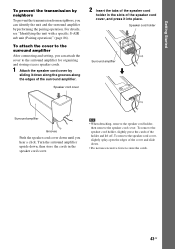
... details, see "Identifying the unit with a specific S-AIR sub unit (Pairing operation)" (page 86). To attach the cover to the surround amplifier After connecting and setting, you hear a click. Note • When detaching, remove the speaker cord holder, then remove the speaker cord cover. To remove the speaker cord holder, slightly...
... details, see "Identifying the unit with a specific S-AIR sub unit (Pairing operation)" (page 86). To attach the cover to the surround amplifier After connecting and setting, you hear a click. Note • When detaching, remove the speaker cord holder, then remove the speaker cord cover. To remove the speaker cord holder, slightly...
Operating Instructions
Page 44
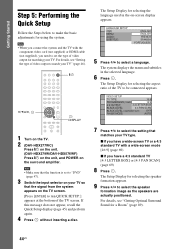
...Press . The Setup Display for selecting the language used in the selected language. 6 Press . "/1 C/X/x/c, DISPLAY 1 Turn on the TV. 2 (DAV-HDX277WC) Press [/1 on the unit. (DAV-HDX279W/DAV-HDX576WF) Press [/1 on the unit, and POWER on your TV. VIDEO SETUP TV TYPE: 16:9 PROGRESSIVE (COMPONENT OUT): 16:9 4:3 OUTPUT: 4:3... 3 Switch the input selector on the surround amplifier. Note • When you connect the system and the TV with a wide-screen mode [16:9] (page 69) x If you need to set the type of video output for selecting the aspect ratio of the TV screen. The Setup ...
...Press . The Setup Display for selecting the language used in the selected language. 6 Press . "/1 C/X/x/c, DISPLAY 1 Turn on the TV. 2 (DAV-HDX277WC) Press [/1 on the unit. (DAV-HDX279W/DAV-HDX576WF) Press [/1 on the unit, and POWER on your TV. VIDEO SETUP TV TYPE: 16:9 PROGRESSIVE (COMPONENT OUT): 16:9 4:3 OUTPUT: 4:3... 3 Switch the input selector on the surround amplifier. Note • When you connect the system and the TV with a wide-screen mode [16:9] (page 69) x If you need to set the type of video output for selecting the aspect ratio of the TV screen. The Setup ...
Operating Instructions
Page 45
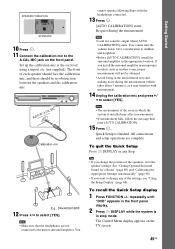
...Quick Setup display 1 Press FUNCTION +/- AUDIO IN / A.CAL MIC Calibration mic E.g., DAV-HDX576WF 12 Press C/c to change the position of each speaker should face the calibration ... stop mode. Give consideration to select [YES]. The front of the speakers, reset the speaker settings. You cannot operate following Steps with measurement. 14 Unplug the calibration mic and press C/ c to...YES]. repeatedly until "DVD" appears in the front panel display. 2 Press DISPLAY while the system is installed may interfere with the headphones connected. 13 Press . [AUTO CALIBRATION] starts. Note ...
...Quick Setup display 1 Press FUNCTION +/- AUDIO IN / A.CAL MIC Calibration mic E.g., DAV-HDX576WF 12 Press C/c to change the position of each speaker should face the calibration ... stop mode. Give consideration to select [YES]. The front of the speakers, reset the speaker settings. You cannot operate following Steps with measurement. 14 Unplug the calibration mic and press C/ c to...YES]. repeatedly until "DVD" appears in the front panel display. 2 Press DISPLAY while the system is installed may interfere with the headphones connected. 13 Press . [AUTO CALIBRATION] starts. Note ...

Operating Instructions
Page 46
... options for [HDMI SETUP] appear. 6 Press X/x to select [HDMI RESOLUTION], then press . 7 Press X/x to select the desired setting, then press . • [AUTO (1920 × 1080p)]: The system outputs the optimal video signal for [VIDEO SETUP] appear. 6 Press X/x to select [PROGRESSIVE (COMPONENT OUT)], then press . 46US Does your TV Depending on the country...
... options for [HDMI SETUP] appear. 6 Press X/x to select [HDMI RESOLUTION], then press . 7 Press X/x to select the desired setting, then press . • [AUTO (1920 × 1080p)]: The system outputs the optimal video signal for [VIDEO SETUP] appear. 6 Press X/x to select [PROGRESSIVE (COMPONENT OUT)], then press . 46US Does your TV Depending on the country...

Operating Instructions
Page 47
... signal. your TV is connected to select [YES]. Follow the Steps below. 8 Press C/c to select the desired setting, then press . [OFF]: The system does not output progressive signals. FUNCTION +/- your TV does not accept progressive signals, or, - Check that is displayed... correctly. 9 Press C/c to the COMPONENT VIDEO OUT jacks. repeatedly until the desired function appears in this system. X/x/c, SYSTEM MENU 1 Press FUNCTION +/- x DAV-HDX277WC/DAV-HDX279W "DVD" t "TUNER FM" t "TUNER AM" t "TV/VIDEO" t "DMPORT" t "AUDIO" t ... the TV ...
... signal. your TV is connected to select [YES]. Follow the Steps below. 8 Press C/c to select the desired setting, then press . [OFF]: The system does not output progressive signals. FUNCTION +/- your TV does not accept progressive signals, or, - Check that is displayed... correctly. 9 Press C/c to the COMPONENT VIDEO OUT jacks. repeatedly until the desired function appears in this system. X/x/c, SYSTEM MENU 1 Press FUNCTION +/- x DAV-HDX277WC/DAV-HDX279W "DVD" t "TUNER FM" t "TUNER AM" t "TV/VIDEO" t "DMPORT" t "AUDIO" t ... the TV ...
Operating Instructions
Page 48
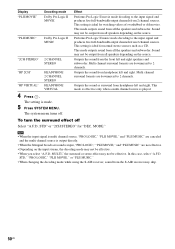
... listen to a component connected to the TV*, TV/ VIDEO**, SAT/CABLE* jacks on the rear panel, or to select a setting. • "ATT ON": You can enhance the sound. The system menu turns off . x DAV-HDX576WF "DVD" t "TUNER FM" t "TUNER AM" t "TV" t "SAT/CABLE" t "DMPORT" t "AUDIO" t ... or OPTICAL DIGITAL IN) jack (digital connection) at the same time, the digital connection takes priority. The system menu turns off . * DAV-HDX576WF only. ** DAV-HDX277WC/DAV-HDX279W only. 48US MODE." Select "A.F.D. To prevent distortion, reduce the input level on the component connected. Distortion...
... listen to a component connected to the TV*, TV/ VIDEO**, SAT/CABLE* jacks on the rear panel, or to select a setting. • "ATT ON": You can enhance the sound. The system menu turns off . x DAV-HDX576WF "DVD" t "TUNER FM" t "TUNER AM" t "TV" t "SAT/CABLE" t "DMPORT" t "AUDIO" t ... or OPTICAL DIGITAL IN) jack (digital connection) at the same time, the digital connection takes priority. The system menu turns off . * DAV-HDX576WF only. ** DAV-HDX277WC/DAV-HDX279W only. 48US MODE." Select "A.F.D. To prevent distortion, reduce the input level on the component connected. Distortion...
Operating Instructions
Page 50
... the decoding mode while using the S-AIR receiver, sound from 2 channel sources. Multi channel surround formats are downmixed to 2 channels. The system menu turns off Select "A.F.D. This setting is input, "PRO LOGIC," "PLII MOVIE," and "PLII MUSIC" are not effective. • Depending on the input stream, the decoding...signal and produces five full-bandwidth output channels from the S-AIR receiver may not be effective. • When you select "A.F.D. The setting is played. STD" or "2CH STEREO" for "DEC. This mode is effective only when a multi channel source is made. 5 Press...
... the decoding mode while using the S-AIR receiver, sound from 2 channel sources. Multi channel surround formats are downmixed to 2 channels. The system menu turns off Select "A.F.D. This setting is input, "PRO LOGIC," "PLII MOVIE," and "PLII MUSIC" are not effective. • Depending on the input stream, the decoding...signal and produces five full-bandwidth output channels from the S-AIR receiver may not be effective. • When you select "A.F.D. The setting is played. STD" or "2CH STEREO" for "DEC. This mode is effective only when a multi channel source is made. 5 Press...
Operating Instructions
Page 51
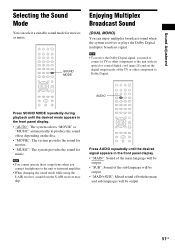
...sound mode for music. AUDIO Press SOUND MODE repeatedly during playback until the desired signal appears in the front panel display. • "AUTO": The system selects "MOVIE" or "MUSIC" automatically to Dolby Digital. Note • To receive the Dolby Digital signal, you connect headphones to the unit ...with an optical or coaxial digital cord (page 28) and set the digital output mode of both the main and sub languages will be output. 51US Sound Adjustment Selecting the Sound Mode You can enjoy...
...sound mode for music. AUDIO Press SOUND MODE repeatedly during playback until the desired signal appears in the front panel display. • "AUTO": The system selects "MOVIE" or "MUSIC" automatically to Dolby Digital. Note • To receive the Dolby Digital signal, you connect headphones to the unit ...with an optical or coaxial digital cord (page 28) and set the digital output mode of both the main and sub languages will be output. 51US Sound Adjustment Selecting the Sound Mode You can enjoy...


