Operating Instructions
Page 5
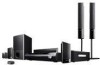
...the S-AIR function 4 Playable Discs 6 Getting Started Step 1: Assembling the Speakers 13 Step 2: Positioning the System... 18 Step 3: Connecting the System... 22 Step 4: Setting up the Wireless System 42 Step 5: Performing the Quick Setup 44 Step 6: Enjoying Sound from all the Speakers 47 Sound Adjustment ...Using the DIGITAL MEDIA PORT Adapter 82 Using an S-AIR Product 83 Other Operations Getting Optimal Surround Sound for a Room 89 Calibrating the Appropriate Settings Automatically 90 Controlling the TV with the Supplied Remote 91 Using the Sound Effect 92 Using the Sleep Timer ...
...the S-AIR function 4 Playable Discs 6 Getting Started Step 1: Assembling the Speakers 13 Step 2: Positioning the System... 18 Step 3: Connecting the System... 22 Step 4: Setting up the Wireless System 42 Step 5: Performing the Quick Setup 44 Step 6: Enjoying Sound from all the Speakers 47 Sound Adjustment ...Using the DIGITAL MEDIA PORT Adapter 82 Using an S-AIR Product 83 Other Operations Getting Optimal Surround Sound for a Room 89 Calibrating the Appropriate Settings Automatically 90 Controlling the TV with the Supplied Remote 91 Using the Sound Effect 92 Using the Sleep Timer ...
Operating Instructions
Page 9
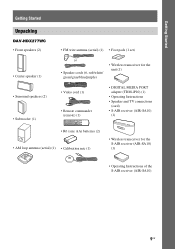
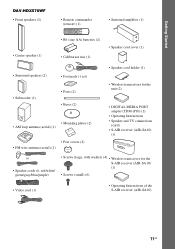
Getting Started Getting Started Unpacking DAV-HDX277WC • Front speakers (2) • Center speaker (1) • Surround speakers (2) • Subwoofer (1) • FM wire antenna (aerial) (1) • Foot pads (1 set) or • Speaker ... • Operating Instructions • Speaker and TV connections (card) • S-AIR receiver (AIR-SA10) (1) • R6 (size AA) batteries (2) • AM loop antenna (aerial) (1) • Calibration mic (1) • Wireless transceiver for the S-AIR receiver (AIR-SA10) (1) • Operating Instructions of the S-AIR receiver (AIR-SA10) 9US
Getting Started Getting Started Unpacking DAV-HDX277WC • Front speakers (2) • Center speaker (1) • Surround speakers (2) • Subwoofer (1) • FM wire antenna (aerial) (1) • Foot pads (1 set) or • Speaker ... • Operating Instructions • Speaker and TV connections (card) • S-AIR receiver (AIR-SA10) (1) • R6 (size AA) batteries (2) • AM loop antenna (aerial) (1) • Calibration mic (1) • Wireless transceiver for the S-AIR receiver (AIR-SA10) (1) • Operating Instructions of the S-AIR receiver (AIR-SA10) 9US
Operating Instructions
Page 10
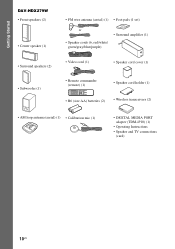
Getting Started DAV-HDX279W • Front speakers (2) • Center speaker (1) • Surround speakers (2) • Subwoofer (1) • FM wire antenna (aerial) (1) • Foot pads (1 set) or • Surround amplifier (1) &#...; Speaker cord cover (1) • Remote commander (remote) (1) • Speaker cord holder (1) • R6 (size AA) batteries (2) • Wireless transceivers (2) • AM loop antenna (aerial) (1) • Calibration mic (1) • DIGITAL MEDIA PORT adapter (TDM-iP10) (1) • Operating Instructions • Speaker and TV connections (card) 10US
Getting Started DAV-HDX279W • Front speakers (2) • Center speaker (1) • Surround speakers (2) • Subwoofer (1) • FM wire antenna (aerial) (1) • Foot pads (1 set) or • Surround amplifier (1) &#...; Speaker cord cover (1) • Remote commander (remote) (1) • Speaker cord holder (1) • R6 (size AA) batteries (2) • Wireless transceivers (2) • AM loop antenna (aerial) (1) • Calibration mic (1) • DIGITAL MEDIA PORT adapter (TDM-iP10) (1) • Operating Instructions • Speaker and TV connections (card) 10US
Operating Instructions
Page 11
Getting Started DAV-HDX576WF • Front speakers (2) • Remote commander (remote) (1) • Surround amplifier (1) • Center speaker (1) • R6 (size AA) batteries (2) • Calibration mic (1) • Speaker cord cover (1) • Surround speakers (2) • Subwoofer (1) • Foot pads (1 set) • Posts (2) • Bases (2) • Mounting plates (2) • AM loop antenna (...
Getting Started DAV-HDX576WF • Front speakers (2) • Remote commander (remote) (1) • Surround amplifier (1) • Center speaker (1) • R6 (size AA) batteries (2) • Calibration mic (1) • Speaker cord cover (1) • Surround speakers (2) • Subwoofer (1) • Foot pads (1 set) • Posts (2) • Bases (2) • Mounting plates (2) • AM loop antenna (...
Operating Instructions
Page 20
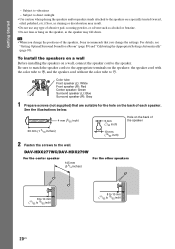
... settings. To install the speakers on a wall Before installing the speakers on the back of the speakers, Sony recommends that are suitable for a Room" (page 89) and "Calibrating the Appropriate Settings Automatically" (page 90). DAV-HDX277WC/DAV-HDX279W For the center speaker 145 mm (5 3/4 inches) For the other speakers 8 to 10 mm (11/32...
... settings. To install the speakers on a wall Before installing the speakers on the back of the speakers, Sony recommends that are suitable for a Room" (page 89) and "Calibrating the Appropriate Settings Automatically" (page 90). DAV-HDX277WC/DAV-HDX279W For the center speaker 145 mm (5 3/4 inches) For the other speakers 8 to 10 mm (11/32...
Operating Instructions
Page 45
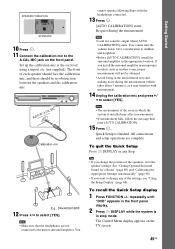
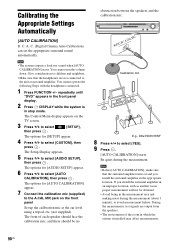
AUDIO IN / A.CAL MIC Calibration mic E.g., DAV-HDX576WF 12 Press C/c to the A.CAL MIC jack on the TV screen. 45US Getting Started Note • Loud test sound is finished. repeatedly until "DVD" appears in the front panel display. 2 Press DISPLAY while the system is installed may interfere with the headphones connected. 13 Press . [AUTO...
AUDIO IN / A.CAL MIC Calibration mic E.g., DAV-HDX576WF 12 Press C/c to the A.CAL MIC jack on the TV screen. 45US Getting Started Note • Loud test sound is finished. repeatedly until "DVD" appears in the front panel display. 2 Press DISPLAY while the system is installed may interfere with the headphones connected. 13 Press . [AUTO...
Operating Instructions
Page 72
...89). The [TRACK SELECTION] setting has higher priority than the [AUDIO] settings in this order. For details, see "Calibrating the Appropriate Settings Automatically" (page 90). x [AUTO CALIBRATION] You can compress the dynamic range of the sound track. [AUDIO DRC] is useful for about 15 minutes. [OFF... (ghosting). x [AUDIO DRC] (DVD VIDEO only) You can calibrate the appropriate settings automatically. For details, see "Getting Optimal Surround Sound for Dolby Digital. Note • When you do not operate the system for watching movies at low volume late at night. [OFF]: No...
...89). The [TRACK SELECTION] setting has higher priority than the [AUDIO] settings in this order. For details, see "Calibrating the Appropriate Settings Automatically" (page 90). x [AUTO CALIBRATION] You can compress the dynamic range of the sound track. [AUDIO DRC] is useful for about 15 minutes. [OFF... (ghosting). x [AUDIO DRC] (DVD VIDEO only) You can calibrate the appropriate settings automatically. For details, see "Getting Optimal Surround Sound for Dolby Digital. Note • When you do not operate the system for watching movies at low volume late at night. [OFF]: No...
Operating Instructions
Page 89
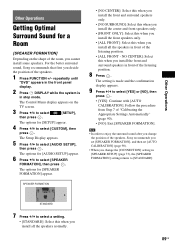
...to select a setting. • [STANDARD]: Select this when you install all the speakers in the front panel display. 2 Press DISPLAY while the system is made and the confirmation display appears. 9 Press C/c to select [AUDIO SETUP], then press . Note • In order to [STANDARD]. For...), the [SPEAKER FORMATION] setting returns to enjoy the surround sound after you change the position of the speakers, Sony recommends you set [SPEAKER FORMATION], and then set [AUTO CALIBRATION] (page 90). • When you decide the position of the listening position. 8 Press . The Setup Display...
...to select a setting. • [STANDARD]: Select this when you install all the speakers in the front panel display. 2 Press DISPLAY while the system is made and the confirmation display appears. 9 Press C/c to select [AUDIO SETUP], then press . Note • In order to [STANDARD]. For...), the [SPEAKER FORMATION] setting returns to enjoy the surround sound after you change the position of the speakers, Sony recommends you set [SPEAKER FORMATION], and then set [AUTO CALIBRATION] (page 90). • When you decide the position of the listening position. 8 Press . The Setup Display...
Operating Instructions
Page 90
... display. 2 Press DISPLAY while the system is in which the system is installed may affect measurements. 90US The options for [SETUP] appear. 4 Press X/x to select [AUTO CALIBRATION], then press . Note • Before [AUTO CALIBRATION], make sure that the headphones are ...be obtained. • Avoid being in the appropriate location. The options for [AUTO CALIBRATION] appear. 7 Connect the calibration mic (supplied) to avoid measurement failure. AUDIO IN / A.CAL MIC Calibration mic E.g., DAV-HDX576WF 8 Press C/c to select [AUDIO SETUP], then press . C. Be quiet ...
... display. 2 Press DISPLAY while the system is in which the system is installed may affect measurements. 90US The options for [SETUP] appear. 4 Press X/x to select [AUTO CALIBRATION], then press . Note • Before [AUTO CALIBRATION], make sure that the headphones are ...be obtained. • Avoid being in the appropriate location. The options for [AUTO CALIBRATION] appear. 7 Connect the calibration mic (supplied) to avoid measurement failure. AUDIO IN / A.CAL MIC Calibration mic E.g., DAV-HDX576WF 8 Press C/c to select [AUDIO SETUP], then press . C. Be quiet ...

Operating Instructions
Page 91
... for movies. do not press any button. - Use these buttons while pressing the TV button. 91US THEATER Enjoy optimal image suited for [SUBWOOFER] is always [YES] since the system does not perform subwoofer calibration. TV CH +/-* Select the TV channel. MUTING* Turn off the power. - do not insert or... [YES]. Follow the message, then select [YES] to the unit or surround amplifier. - Tip • You can control the TV (Sony only) by using following buttons. See page 73. TV INPUT Switch the TV's input source between the listening position and each speaker. TV VOL...
... for movies. do not press any button. - Use these buttons while pressing the TV button. 91US THEATER Enjoy optimal image suited for [SUBWOOFER] is always [YES] since the system does not perform subwoofer calibration. TV CH +/-* Select the TV channel. MUTING* Turn off the power. - do not insert or... [YES]. Follow the message, then select [YES] to the unit or surround amplifier. - Tip • You can control the TV (Sony only) by using following buttons. See page 73. TV INPUT Switch the TV's input source between the listening position and each speaker. TV VOL...
Operating Instructions
Page 110
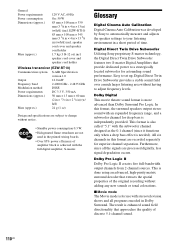
... any new sounds or tonal colorations. All six channels in ) (w/h/d) incl. Glossary Digital Cinema Auto Calibration Digital Cinema Auto Calibration was developed by Sony to automatically measure and adjusts the speaker settings to change without having to a strategically located subwoofer for ... effect is more advanced than Dolby Surround Pro Logic. Dolby Digital This movie theater sound format is needed). speaker cord cover and speaker cord holder Wireless transceiver (EZW-RT10) Communication system S-AIR Specification version 1.0 Output 12.0 mW Frequency band 2.4000 GHz - ...
... any new sounds or tonal colorations. All six channels in ) (w/h/d) incl. Glossary Digital Cinema Auto Calibration Digital Cinema Auto Calibration was developed by Sony to automatically measure and adjusts the speaker settings to change without having to a strategically located subwoofer for ... effect is more advanced than Dolby Surround Pro Logic. Dolby Digital This movie theater sound format is needed). speaker cord cover and speaker cord holder Wireless transceiver (EZW-RT10) Communication system S-AIR Specification version 1.0 Output 12.0 mW Frequency band 2.4000 GHz - ...
Operating Instructions
Page 120
... can select the data type; Use Quick Setup to select the desired language of the TV, and select yes or no to start the Auto Calibration. [CUSTOM] In addition to be played when playing a DATA CD/DATA DVD.
... can select the data type; Use Quick Setup to select the desired language of the TV, and select yes or no to start the Auto Calibration. [CUSTOM] In addition to be played when playing a DATA CD/DATA DVD.
Operating Instructions
Page 121
Index Numerics 4:3 OUTPUT 70 5.1 Channel Surround 55 A A/V SYNC 65 ANGLE 54 ATTENUATE 48 AUDIO 69 AUDIO (HDMI) 71 AUDIO DRC 72 AUDIO SETUP 72 AUTO CALIBRATION 72, 90, 110 B BACKGROUND 72 BLACK LEVEL 70 BLACK LEVEL (COMPONENT OUT) 70 C COLD RESET 95 CONTROL FOR HDMI 71 Control for HDMI 79 Control ... 72, 89 SPEAKER SETUP 73 CONNECTION 73 DISTANCE 73, 74 LEVEL 74 SUBTITLE 54, 69 Super Audio CD 55, 111 SYSTEM MENU 41, 48, 49, 54, 77, 85, 87, 92, 93 SYSTEM SETUP 72 T TEST TONE 74 TIME 61 TRACK SELECTION 72 TV TYPE 69 V VIDEO SETUP 69 VOLUME LIMIT 71 121US...
Index Numerics 4:3 OUTPUT 70 5.1 Channel Surround 55 A A/V SYNC 65 ANGLE 54 ATTENUATE 48 AUDIO 69 AUDIO (HDMI) 71 AUDIO DRC 72 AUDIO SETUP 72 AUTO CALIBRATION 72, 90, 110 B BACKGROUND 72 BLACK LEVEL 70 BLACK LEVEL (COMPONENT OUT) 70 C COLD RESET 95 CONTROL FOR HDMI 71 Control for HDMI 79 Control ... 72, 89 SPEAKER SETUP 73 CONNECTION 73 DISTANCE 73, 74 LEVEL 74 SUBTITLE 54, 69 Super Audio CD 55, 111 SYSTEM MENU 41, 48, 49, 54, 77, 85, 87, 92, 93 SYSTEM SETUP 72 T TEST TONE 74 TIME 61 TRACK SELECTION 72 TV TYPE 69 V VIDEO SETUP 69 VOLUME LIMIT 71 121US...


