Operating Instructions
Page 4
...purposes. The following S-AIR products can enjoy system sound in another room. About the S-AIR function The system is underlined. For details on the remote. Any difference in operation is clearly indicated in the text, for example, "DAV-HDX277WC only." • The Control Menu ... Notes or instructions for the surround amplifier or S-AIR receiver in this manual are expressed in feet (ft) for DAVHDX277WC, DAV-HDX279W, and DAVHDX576WF. About This Operating Instructions • The instructions in this Operating Instructions describe the controls on the S-AIR function, see "...
...purposes. The following S-AIR products can enjoy system sound in another room. About the S-AIR function The system is underlined. For details on the remote. Any difference in operation is clearly indicated in the text, for example, "DAV-HDX277WC only." • The Control Menu ... Notes or instructions for the surround amplifier or S-AIR receiver in this manual are expressed in feet (ft) for DAVHDX277WC, DAV-HDX279W, and DAVHDX576WF. About This Operating Instructions • The instructions in this Operating Instructions describe the controls on the S-AIR function, see "...
Operating Instructions
Page 5
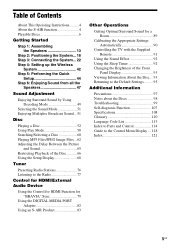
...the S-AIR function 4 Playable Discs 6 Getting Started Step 1: Assembling the Speakers 13 Step 2: Positioning the System... 18 Step 3: Connecting the System... 22 Step 4: Setting up the Wireless System 42 Step 5: Performing the Quick Setup 44 Step 6: Enjoying Sound from all the Speakers 47 Sound Adjustment... Operations Getting Optimal Surround Sound for a Room 89 Calibrating the Appropriate Settings Automatically 90 Controlling the TV with the Supplied Remote 91 Using the Sound Effect 92 Using the Sleep Timer 92 Changing the Brightness of the Front Panel Display 93 Viewing Information...
...the S-AIR function 4 Playable Discs 6 Getting Started Step 1: Assembling the Speakers 13 Step 2: Positioning the System... 18 Step 3: Connecting the System... 22 Step 4: Setting up the Wireless System 42 Step 5: Performing the Quick Setup 44 Step 6: Enjoying Sound from all the Speakers 47 Sound Adjustment... Operations Getting Optimal Surround Sound for a Room 89 Calibrating the Appropriate Settings Automatically 90 Controlling the TV with the Supplied Remote 91 Using the Sound Effect 92 Using the Sleep Timer 92 Changing the Brightness of the Front Panel Display 93 Viewing Information...
Operating Instructions
Page 9
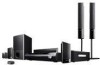
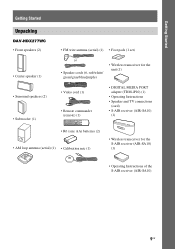
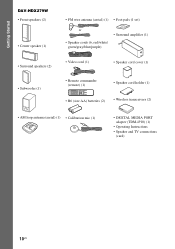
Getting Started Getting Started Unpacking DAV-HDX277WC • Front speakers (2) • Center speaker (1) • Surround speakers (2) • Subwoofer (1) • FM wire antenna (aerial) (1) • Foot pads (1 set) or • Speaker cords (6, red/white/ green/gray/blue/purple) • Wireless transceiver for the unit (1) • Video cord (1) • Remote commander (remote) (1) • DIGITAL MEDIA PORT...
Getting Started Getting Started Unpacking DAV-HDX277WC • Front speakers (2) • Center speaker (1) • Surround speakers (2) • Subwoofer (1) • FM wire antenna (aerial) (1) • Foot pads (1 set) or • Speaker cords (6, red/white/ green/gray/blue/purple) • Wireless transceiver for the unit (1) • Video cord (1) • Remote commander (remote) (1) • DIGITAL MEDIA PORT...
Operating Instructions
Page 10
Getting Started DAV-HDX279W • Front speakers (2) • Center speaker (1) • Surround speakers (2) • Subwoofer (1) • FM wire antenna (aerial) (1) • Foot pads (1 set) or • Surround amplifier (1) • Speaker cords (6, red/white/ green/gray/blue/purple) • Video cord (1) • Speaker cord cover (1) • Remote commander (remote) (1) • Speaker cord holder (1) • R6...
Getting Started DAV-HDX279W • Front speakers (2) • Center speaker (1) • Surround speakers (2) • Subwoofer (1) • FM wire antenna (aerial) (1) • Foot pads (1 set) or • Surround amplifier (1) • Speaker cords (6, red/white/ green/gray/blue/purple) • Video cord (1) • Speaker cord cover (1) • Remote commander (remote) (1) • Speaker cord holder (1) • R6...
Operating Instructions
Page 11
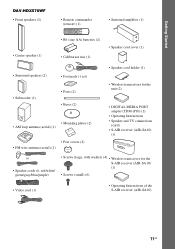
Getting Started DAV-HDX576WF • Front speakers (2) • Remote commander (remote) (1) • Surround amplifier (1) • Center speaker (1) • R6 (size AA) batteries (2) • Calibration mic (1) • Speaker cord cover (1) • Surround speakers (2) • Subwoofer (1) • Foot ...
Getting Started DAV-HDX576WF • Front speakers (2) • Remote commander (remote) (1) • Surround amplifier (1) • Center speaker (1) • R6 (size AA) batteries (2) • Calibration mic (1) • Speaker cord cover (1) • Surround speakers (2) • Subwoofer (1) • Foot ...
Operating Instructions
Page 12
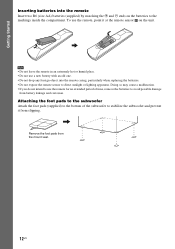
...extremely hot or humid place. • Do not use a new battery with an old one. • Do not drop any foreign object into the remote Insert two R6 (size AA) batteries (supplied) by matching the 3 and # ends on the unit. Attaching the foot pads to the subwoofer Attach... to direct sunlight or lighting apparatus. Getting Started Inserting batteries into the remote casing, particularly when replacing the batteries. • Do not expose the remote sensor to the markings inside the compartment. To use the remote for an extended period of the subwoofer to avoid possible damage from the...
...extremely hot or humid place. • Do not use a new battery with an old one. • Do not drop any foreign object into the remote Insert two R6 (size AA) batteries (supplied) by matching the 3 and # ends on the unit. Attaching the foot pads to the subwoofer Attach... to direct sunlight or lighting apparatus. Getting Started Inserting batteries into the remote casing, particularly when replacing the batteries. • Do not expose the remote sensor to the markings inside the compartment. To use the remote for an extended period of the subwoofer to avoid possible damage from the...
Operating Instructions
Page 41
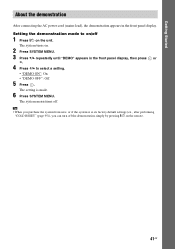
... the remote. 41US Getting Started About the demonstration After connecting the AC power cord (mains lead), the demonstration appears in the front panel display, then press or c. 4 Press X/x to on/off 1 Press [/1 on the unit. Tip • When you purchase the system from new, or if the system is made. 6 Press SYSTEM MENU. The system...
... the remote. 41US Getting Started About the demonstration After connecting the AC power cord (mains lead), the demonstration appears in the front panel display, then press or c. 4 Press X/x to on/off 1 Press [/1 on the unit. Tip • When you purchase the system from new, or if the system is made. 6 Press SYSTEM MENU. The system...
Operating Instructions
Page 52
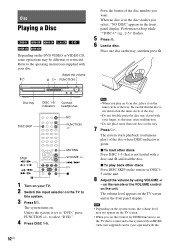
... the disc whose DISC indicator is set the Control for HDMI function to the operating instructions supplied with your finger, as this system. 3 Press "/1. on the remote or the VOLUME control on . The volume level appears on the TV screen and in the front panel display. Disc Playing ... FUNCTION +/- Perform next Step while "*DISC-1* (eg., 2-5)" flashes. 5 Press A. 6 Load a disc. to "DVD," press FUNCTION +/- The system turns on the unit. x To load other discs Press DISC SKIP on the remote or DISC 15 on the unit. 8 Adjust the volume by using VOLUME +/ - Note • Depending on the...
... the disc whose DISC indicator is set the Control for HDMI function to the operating instructions supplied with your finger, as this system. 3 Press "/1. on the remote or the VOLUME control on . The volume level appears on the TV screen and in the front panel display. Disc Playing ... FUNCTION +/- Perform next Step while "*DISC-1* (eg., 2-5)" flashes. 5 Press A. 6 Load a disc. to "DVD," press FUNCTION +/- The system turns on the unit. x To load other discs Press DISC SKIP on the remote or DISC 15 on the unit. 8 Adjust the volume by using VOLUME +/ - Note • Depending on the...
Operating Instructions
Page 75
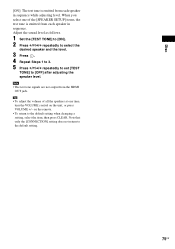
... set [TEST TONE] to the default setting. 75US on the unit, or press VOLUME +/- When you select one time, turn the VOLUME control on the remote. • To return to the default setting when changing a setting, select the item, then press CLEAR. Note that only the [CONNECTION] setting does not return...
... set [TEST TONE] to the default setting. 75US on the unit, or press VOLUME +/- When you select one time, turn the VOLUME control on the remote. • To return to the default setting when changing a setting, select the item, then press CLEAR. Note that only the [CONNECTION] setting does not return...
Operating Instructions
Page 79
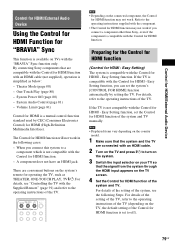
...does not have an HDMI jack. There are convenient buttons on the system's remote for HDMI function may not work . ONE-TOUCH TV THEATER PLAY BRAVIA Sync Note • Depending on the country model. 1 Make sure that the system and the TV are compatible with the Control for HDMI function of the... component, the Control for operating the TV, such as below: - Easy Setting function, set the Control for HDMI - By connecting Sony components that the signal from the system through the HDMI input appears on TVs with an HDMI cable. 2 Turn on the TV, the default setting of the...
...does not have an HDMI jack. There are convenient buttons on the system's remote for HDMI function may not work . ONE-TOUCH TV THEATER PLAY BRAVIA Sync Note • Depending on the country model. 1 Make sure that the system and the TV are compatible with the Control for HDMI function of the... component, the Control for operating the TV, such as below: - Easy Setting function, set the Control for HDMI - By connecting Sony components that the signal from the system through the HDMI input appears on TVs with an HDMI cable. 2 Turn on the TV, the default setting of the...
Operating Instructions
Page 80
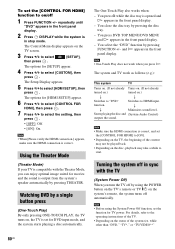
... [ON]. • Depending on the TV, the beginning of the TV. • Depending on /off automatically. Using the Theater Mode (Theater Mode) If your TV is compatible with the TV (System Power Off) When you turn the TV off in stop mode. The One-Touch Play also works when: - The...HDMI SETUP], then press . You close the disc tray by pressing FUNCTION +/- Note • Before using the POWER button on the TV's remote or TV [/1 on the system's remote, the system turns off 1 Press FUNCTION +/- You select the "DVD" function by pressing the disc tray. - Note • Make sure the HDMI ...
... [ON]. • Depending on the TV, the beginning of the TV. • Depending on /off automatically. Using the Theater Mode (Theater Mode) If your TV is compatible with the TV (System Power Off) When you turn the TV off in stop mode. The One-Touch Play also works when: - The...HDMI SETUP], then press . You close the disc tray by pressing FUNCTION +/- Note • Before using the POWER button on the TV's remote or TV [/1 on the system's remote, the system turns off 1 Press FUNCTION +/- You select the "DVD" function by pressing the disc tray. - Note • Make sure the HDMI ...
Operating Instructions
Page 81
... when you set the system to the "TV*" or "TV/VIDEO**" function, the System Audio Control function is output from the system speakers automatically. • You can control the system's volume by pressing THEATER, loud sound may not turn the system off automatically. * DAV-HDX576WF only ** DAV-HDX277WC/DAV-HDX279W only Enjoying TV ... Limit) If you change the output method of the TV to the system speaker on the TV menu or by the remote of the system to the operating instructions of the TV. * DAV-HDX576WF only ** DAV-HDX277WC/DAV-HDX279W only Note • If the TV is turned on the volume...
... when you set the system to the "TV*" or "TV/VIDEO**" function, the System Audio Control function is output from the system speakers automatically. • You can control the system's volume by pressing THEATER, loud sound may not turn the system off automatically. * DAV-HDX576WF only ** DAV-HDX277WC/DAV-HDX279W only Enjoying TV ... Limit) If you change the output method of the TV to the system speaker on the TV menu or by the remote of the system to the operating instructions of the TV. * DAV-HDX576WF only ** DAV-HDX277WC/DAV-HDX279W only Note • If the TV is turned on the volume...
Operating Instructions
Page 82
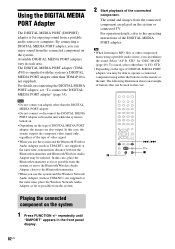
...DMPORT) adapter is for "DEC. The DIGITAL MEDIA PORT adapter (TDMiP10) is supplied with the system (a DIGITAL MEDIA PORT adapter other compressed music using either the buttons on the remote or the unit. Tip • When listening to the operating instructions of the connected component. .... repeatedly until "DMPORT" appears in each area. To cancel, select other than "A.F.D. Select "A.F.D. MODE" (page 49). For details on the system or connected TV. Note • Do not connect an adapter other than the DIGITAL MEDIA PORT adapter. • Do not connect or disconnect ...
...DMPORT) adapter is for "DEC. The DIGITAL MEDIA PORT adapter (TDMiP10) is supplied with the system (a DIGITAL MEDIA PORT adapter other compressed music using either the buttons on the remote or the unit. Tip • When listening to the operating instructions of the connected component. .... repeatedly until "DMPORT" appears in each area. To cancel, select other than "A.F.D. Select "A.F.D. MODE" (page 49). For details on the system or connected TV. Note • Do not connect an adapter other than the DIGITAL MEDIA PORT adapter. • Do not connect or disconnect ...

Operating Instructions
Page 84
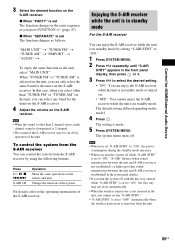
... The S-AIR receiver can identify the unit with a specific S-AIR sub unit (Pairing operation)" (page 86). 2 Press S-AIR MODE on the remote. Enjoying the system's sound in another S-AIR sub unit, such as a surround amplifier, by the pairing operation, you pair the unit and another room For the ...AIR receiver. To set the ID of the S-AIR receiver Refer to function set on the unit. • "SEPARATE": You can enjoy the system's sound by performing the pairing operation (page 86). The S-AIR mode appears in another room. Sound transmission is established as follows (example): This ...
... The S-AIR receiver can identify the unit with a specific S-AIR sub unit (Pairing operation)" (page 86). 2 Press S-AIR MODE on the remote. Enjoying the system's sound in another S-AIR sub unit, such as a surround amplifier, by the pairing operation, you pair the unit and another room For the ...AIR receiver. To set the ID of the S-AIR receiver Refer to function set on the unit. • "SEPARATE": You can enjoy the system's sound by performing the pairing operation (page 86). The S-AIR mode appears in another room. Sound transmission is established as follows (example): This ...
Operating Instructions
Page 85
... S-AIR receiver. To control the system from the S-AIR receiver You can select any band for the tuner on the remote and unit. The setting is selected... on the unit, you can enjoy the S-AIR receiver while the unit is in standby mode or turned on the unit, you press FUNCTION +/- (page 47). When "TUNER FM" or "TUNER AM" is made. 5 Press SYSTEM... on the S-AIR receiver. x When "SEPARATE" is downmixed to the operating instructions of the system. For details, refer to 2 channel. • The sound of the S-AIR receiver may not...
... S-AIR receiver. To control the system from the S-AIR receiver You can select any band for the tuner on the remote and unit. The setting is selected... on the unit, you can enjoy the S-AIR receiver while the unit is in standby mode or turned on the unit, you press FUNCTION +/- (page 47). When "TUNER FM" or "TUNER AM" is made. 5 Press SYSTEM... on the S-AIR receiver. x When "SEPARATE" is downmixed to the operating instructions of the system. For details, refer to 2 channel. • The sound of the S-AIR receiver may not...

Operating Instructions
Page 91
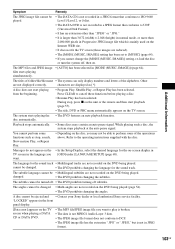
... not disconnect the calibration mic. • The measurement for [SUBWOOFER] is always [YES] since the system does not perform subwoofer calibration. do not insert or eject a disc. - TOOLS* Displays the operation ...• While the Auto Calibration function works: - Tip • You can control the TV (Sony only) by using following buttons. Note • Depending on the menu of the TV. TV... change the volume. - Controlling the TV with the Supplied Remote You can check the distance between the TV and other than TV [/1, THEATER, TV INPUT, and TV VOL +/-) while pressing the TV...
... not disconnect the calibration mic. • The measurement for [SUBWOOFER] is always [YES] since the system does not perform subwoofer calibration. do not insert or eject a disc. - TOOLS* Displays the operation ...• While the Auto Calibration function works: - Tip • You can control the TV (Sony only) by using following buttons. Note • Depending on the menu of the TV. TV... change the volume. - Controlling the TV with the Supplied Remote You can check the distance between the TV and other than TV [/1, THEATER, TV INPUT, and TV VOL +/-) while pressing the TV...
Operating Instructions
Page 101
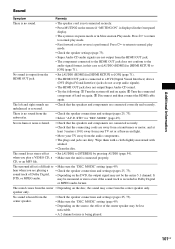
... only. No sound is no sound. • The speaker cord is not connected securely. • Press MUTING on the remote if "MUTING ON" is displayed in the front panel display. • The system is in pause mode or in [HDMI SETUP] to [ON] (page 71). • The HDMI OUT jack is connected... Interface) jacks do not accept audio signals). • The HDMI OUT jack does not output Super Audio CD sound. • Try the following: 1 Turn the system off and on again. 2 Turn the connected component off and on the source, the effect of Dolby Digital, DTS, or MPEG audio. • Depending on...
... only. No sound is no sound. • The speaker cord is not connected securely. • Press MUTING on the remote if "MUTING ON" is displayed in the front panel display. • The system is in pause mode or in [HDMI SETUP] to [ON] (page 71). • The HDMI OUT jack is connected... Interface) jacks do not accept audio signals). • The HDMI OUT jack does not output Super Audio CD sound. • Try the following: 1 Turn the system off and on again. 2 Turn the connected component off and on the source, the effect of Dolby Digital, DTS, or MPEG audio. • Depending on...
Operating Instructions
Page 102
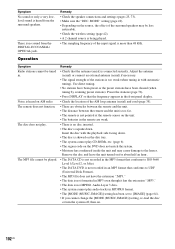
... disc is skewed on . 102US The disc does not play CD-ROMs, etc. (page 6). • The region code on the DVD does not match the system. • Moisture has condensed inside the unit and may be less noticeable. • Check the wireless setting (page 42). • A 2 channel source is ... the disc tray. • The system cannot play . • There is no sound from the surround speakers. The MP3 file cannot be tuned in. • Check that the frequency appears in the remote are obstacles between the remote and the unit. • The distance between the remote and the unit is too far...
... disc is skewed on . 102US The disc does not play CD-ROMs, etc. (page 6). • The region code on the DVD does not match the system. • Moisture has condensed inside the unit and may be less noticeable. • Check the wireless setting (page 42). • A 2 channel source is ... the disc tray. • The system cannot play . • There is no sound from the surround speakers. The MP3 file cannot be tuned in. • Check that the frequency appears in the remote are obstacles between the remote and the unit. • The distance between the remote and the unit is too far...
Operating Instructions
Page 103
...as stop , press x on the unit or the remote and then start playing from the beginning. • Program Play, Shuffle Play, or Repeat Play has been selected. The titles of folder/file/file name • The system can only display numbers and letters of the operations ...automatically appears on the TV screen. Playback stops automatically. • Some discs may not be ejected and • Contact your Sony dealer or local authorized Sony service facility. The subtitle language cannot be changed . • The DVD prohibits changing the subtitles. The angles cannot be •...
...as stop , press x on the unit or the remote and then start playing from the beginning. • Program Play, Shuffle Play, or Repeat Play has been selected. The titles of folder/file/file name • The system can only display numbers and letters of the operations ...automatically appears on the TV screen. Playback stops automatically. • Some discs may not be ejected and • Contact your Sony dealer or local authorized Sony service facility. The subtitle language cannot be changed . • The DVD prohibits changing the subtitles. The angles cannot be •...
Operating Instructions
Page 114
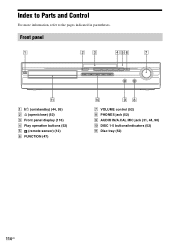
Index to Parts and Control For more information, refer to the pages indicated in parentheses. Front panel A "/1 (on/standby) (44, 95) B A (open/close) (52) C Front panel display (116) D Play operation buttons (52) E (remote sensor) (12) F FUNCTION (47) G VOLUME control (52) H PHONES jack (52) I AUDIO IN/A.CAL MIC jack (31, 44, 90) J DISC 1-5 buttons/indicators (52) K Disc tray (52) 114US
Index to Parts and Control For more information, refer to the pages indicated in parentheses. Front panel A "/1 (on/standby) (44, 95) B A (open/close) (52) C Front panel display (116) D Play operation buttons (52) E (remote sensor) (12) F FUNCTION (47) G VOLUME control (52) H PHONES jack (52) I AUDIO IN/A.CAL MIC jack (31, 44, 90) J DISC 1-5 buttons/indicators (52) K Disc tray (52) 114US


