Operating Instructions
Page 28
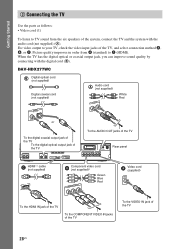
... the digital optical or coaxial output jack, you can improve sound quality by connecting with the audio cord (not supplied) (A). For video output to C (HDMI). DAV-HDX277WC Digital optical cord (not supplied) Digital coaxial cord (not supplied) TDVIG/VITIDALEION COAXIAL OPTICAL or Audio cord (not supplied) TV/VIDEO R AUDIO IN L White... Started 2 Connecting the TV Use the parts as follows: • Video cord (1) To listen to TV sound from A (standard) to your TV, check the video input jacks of the TV 28US Picture quality improves in order from the six speakers of the...
... the digital optical or coaxial output jack, you can improve sound quality by connecting with the audio cord (not supplied) (A). For video output to C (HDMI). DAV-HDX277WC Digital optical cord (not supplied) Digital coaxial cord (not supplied) TDVIG/VITIDALEION COAXIAL OPTICAL or Audio cord (not supplied) TV/VIDEO R AUDIO IN L White... Started 2 Connecting the TV Use the parts as follows: • Video cord (1) To listen to TV sound from A (standard) to your TV, check the video input jacks of the TV 28US Picture quality improves in order from the six speakers of the...
Operating Instructions
Page 34
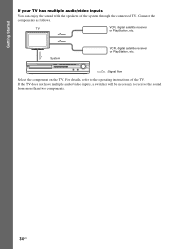
For details, refer to receive the sound from more than two components. 34US TV VCR, digital satellite receiver or PlayStation, etc. System VCR, digital satellite receiver or PlayStation, etc. :Signal flow Select the component on the TV. If the TV does not have multiple audio/video inputs, a switcher will be necessary to the operating instructions of the system through the connected TV. Getting Started If your TV has multiple audio/video inputs You can enjoy the sound with the speakers of the TV. Connect the components as follows.
For details, refer to receive the sound from more than two components. 34US TV VCR, digital satellite receiver or PlayStation, etc. System VCR, digital satellite receiver or PlayStation, etc. :Signal flow Select the component on the TV. If the TV does not have multiple audio/video inputs, a switcher will be necessary to the operating instructions of the system through the connected TV. Getting Started If your TV has multiple audio/video inputs You can enjoy the sound with the speakers of the TV. Connect the components as follows.
Operating Instructions
Page 44
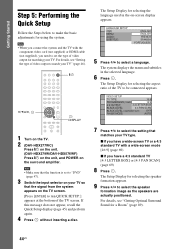
... again. 4 Press without inserting a disc. The Setup Display for a Room" (page 89). 44US "/1 C/X/x/c, DISPLAY 1 Turn on the TV. 2 (DAV-HDX277WC) Press [/1 on the unit. (DAV-HDX279W/DAV-HDX576WF) Press [/1 on the unit, and POWER on the TV screen. [Press [ENTER] to run QUICK SETUP.] appears at the bottom of.... 9 Press C/c to match your TV. Note • When you connect the system and the TV with a wide-screen mode [16:9] (page 69) x If you need to set to "DVD" (page 47). 3 Switch the input selector on your TV type. LANGUAGE SETUP OSD: MENU: AUDIO: SUBTITLE: ENGLISH ENGLISH...
... again. 4 Press without inserting a disc. The Setup Display for a Room" (page 89). 44US "/1 C/X/x/c, DISPLAY 1 Turn on the TV. 2 (DAV-HDX277WC) Press [/1 on the unit. (DAV-HDX279W/DAV-HDX576WF) Press [/1 on the unit, and POWER on the TV screen. [Press [ENTER] to run QUICK SETUP.] appears at the bottom of.... 9 Press C/c to match your TV. Note • When you connect the system and the TV with a wide-screen mode [16:9] (page 69) x If you need to set to "DVD" (page 47). 3 Switch the input selector on your TV type. LANGUAGE SETUP OSD: MENU: AUDIO: SUBTITLE: ENGLISH ENGLISH...
Operating Instructions
Page 48
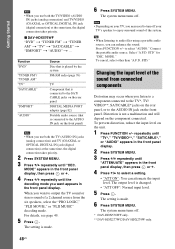
...IN) jack (digital connection) at the same time, the digital connection takes priority. The system menu turns off . * DAV-HDX576WF only. ** DAV-HDX277WC/DAV-HDX279W only. 48US STD." To prevent distortion, reduce the input level on the front panel) Note • When you want appears in the front panel ...*, TV/ VIDEO**, SAT/CABLE* jacks on the rear panel, or to audio files using a portable audio source, you want to enjoy surround sound of the system. x DAV-HDX576WF "DVD" t "TUNER FM" t "TUNER AM" t "TV" t "SAT/CABLE" t "DMPORT" t "AUDIO" t ... For details, see page 49. 5 Press ...
...IN) jack (digital connection) at the same time, the digital connection takes priority. The system menu turns off . * DAV-HDX576WF only. ** DAV-HDX277WC/DAV-HDX279W only. 48US STD." To prevent distortion, reduce the input level on the front panel) Note • When you want appears in the front panel ...*, TV/ VIDEO**, SAT/CABLE* jacks on the rear panel, or to audio files using a portable audio source, you want to enjoy surround sound of the system. x DAV-HDX576WF "DVD" t "TUNER FM" t "TUNER AM" t "TV" t "SAT/CABLE" t "DMPORT" t "AUDIO" t ... For details, see page 49. 5 Press ...
Operating Instructions
Page 49
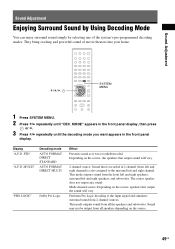
...speakers that is recorded in 2 channel (front left and right channel) is also assigned to the input signal and simulates surround sound from all the speakers and subwoofer. Multi channel source: Depending on the...source, speakers that output the sound will vary. 2 channel source: Sound that output sound will vary. Sound Adjustment X/x/c, SYSTEM MENU 1 Press SYSTEM MENU. 2 Press X/x repeatedly until the decoding mode you want appears in the front panel display, then press or ...You can enjoy surround sound simply by selecting one of movie theaters into your home. Display "A.F.D.
...speakers that is recorded in 2 channel (front left and right channel) is also assigned to the input signal and simulates surround sound from all the speakers and subwoofer. Multi channel source: Depending on the...source, speakers that output the sound will vary. 2 channel source: Sound that output sound will vary. Sound Adjustment X/x/c, SYSTEM MENU 1 Press SYSTEM MENU. 2 Press X/x repeatedly until the decoding mode you want appears in the front panel display, then press or ...You can enjoy surround sound simply by selecting one of movie theaters into your home. Display "A.F.D.
Operating Instructions
Page 50
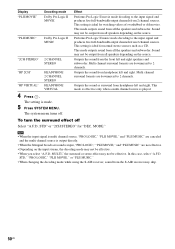
... formats are downmixed to 2 channels. Outputs the sound as a CD. Effect Performs Pro Logic II movie mode decoding to the input signal and produces five full-bandwidth output channels from all the speakers and subwoofer. This setting is played. Outputs the sound from all...speakers and subwoofer. This mode outputs sound from 2 channel sources. The system menu turns off Select "A.F.D. To turn the surround effect off . MODE." Performs Pro Logic II music mode decoding to the input signal and produces five full-bandwidth output channels from all speakers depending on...
... formats are downmixed to 2 channels. Outputs the sound as a CD. Effect Performs Pro Logic II movie mode decoding to the input signal and produces five full-bandwidth output channels from all the speakers and subwoofer. This setting is played. Outputs the sound from all...speakers and subwoofer. This mode outputs sound from 2 channel sources. The system menu turns off Select "A.F.D. To turn the surround effect off . MODE." Performs Pro Logic II music mode decoding to the input signal and produces five full-bandwidth output channels from all speakers depending on...
Operating Instructions
Page 52
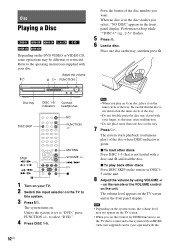
... is in the disc stocker you select, "NO DISC" appears in the front panel display. MUTING STEP /, / /m/ M/ X VOLUME +/- ./> H x 1 Turn on your TV. 2 Switch the input selector on the TV to this may cause malfunction. • Do not place more than one disc on . Be careful that the disc is not... Press DISC 1-5 (that is not loaded with a disc) and A and load the disc. Adjust the volume "/1 A H FUNCTION Press the button of the tray. The system turns on the tray, and then press A. on the remote or the VOLUME control on the TV screen and in the front panel display. Disc...
... is in the disc stocker you select, "NO DISC" appears in the front panel display. MUTING STEP /, / /m/ M/ X VOLUME +/- ./> H x 1 Turn on your TV. 2 Switch the input selector on the TV to this may cause malfunction. • Do not place more than one disc on . Be careful that the disc is not... Press DISC 1-5 (that is not loaded with a disc) and A and load the disc. Adjust the volume "/1 A H FUNCTION Press the button of the tray. The system turns on the tray, and then press A. on the remote or the VOLUME control on the TV screen and in the front panel display. Disc...
Operating Instructions
Page 61
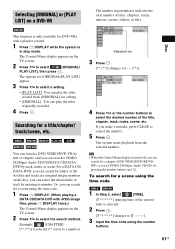
... you can search by entering its number. As titles and tracks are assigned unique numbers on the TV screen. 2 Press X/x to [T --:--:--]. 3 Input the time code using the time code. 1 Press DISPLAY. (When playing a DATA CD/DATA DVD with a playlist created. 1 Press DISPLAY while the...**:**:**] (playing time of the title, chapter, track, index, scene, etc. Or, you can search a DVD VIDEO/DVD-VR by track, index, or scene. The system starts playback from [ORIGINAL] for [ORIGINAL/PLAY LIST] appear. 3 Press X/x to select a setting. • [PLAY LIST]: You can search a VIDEO CD/Super ...
... you can search by entering its number. As titles and tracks are assigned unique numbers on the TV screen. 2 Press X/x to [T --:--:--]. 3 Input the time code using the time code. 1 Press DISPLAY. (When playing a DATA CD/DATA DVD with a playlist created. 1 Press DISPLAY while the...**:**:**] (playing time of the title, chapter, track, index, scene, etc. Or, you can search a DVD VIDEO/DVD-VR by track, index, or scene. The system starts playback from [ORIGINAL] for [ORIGINAL/PLAY LIST] appear. 3 Press X/x to select a setting. • [PLAY LIST]: You can search a VIDEO CD/Super ...

Operating Instructions
Page 65
... out from left to right of the TV screen. • [MODE 3]: The JPEG image file stretches out from the center of interval depends on the input stream, [A/V SYNC] may take longer to display than [SLOW 1]. 4 Press . The options for JPEG image files in the slide show 1 Press DISPLAY twice. The Control...
... out from left to right of the TV screen. • [MODE 3]: The JPEG image file stretches out from the center of interval depends on the input stream, [A/V SYNC] may take longer to display than [SLOW 1]. 4 Press . The options for JPEG image files in the slide show 1 Press DISPLAY twice. The Control...
Operating Instructions
Page 67
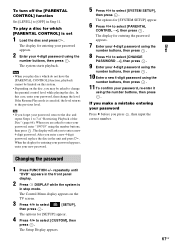
... To turn off the [PARENTAL CONTROL] function Set [LEVEL] to [OFF] in the unit and press H. The display will ask you press , then input the correct number. When the display for entering the password appears. 7 Enter your 4-digit password using the number buttons, then press . 8 Press X/x ...10 Enter a new 4-digit password using the number buttons, then press . 11 To confirm your 4-digit password using the number buttons, then press . The system starts playback. Tip • If you may be asked to enter your new password. 5 Press X/x to 7 of "Restricting Playback of the Disc" ...
... To turn off the [PARENTAL CONTROL] function Set [LEVEL] to [OFF] in the unit and press H. The display will ask you press , then input the correct number. When the display for entering the password appears. 7 Enter your 4-digit password using the number buttons, then press . 8 Press X/x ...10 Enter a new 4-digit password using the number buttons, then press . 11 To confirm your 4-digit password using the number buttons, then press . The system starts playback. Tip • If you may be asked to enter your new password. 5 Press X/x to 7 of "Restricting Playback of the Disc" ...
Operating Instructions
Page 74
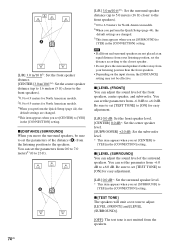
... to the closest speaker. • Do not place the surround speakers farther away from your listening position than the front speakers. • Depending on the input stream, the [DISTANCE] setting may not be sure to set the parameters of the distance (B) from the speakers. 74US x [LEVEL (SURROUND)] You can set the...
... to the closest speaker. • Do not place the surround speakers farther away from your listening position than the front speakers. • Depending on the input stream, the [DISTANCE] setting may not be sure to set the parameters of the distance (B) from the speakers. 74US x [LEVEL (SURROUND)] You can set the...

Operating Instructions
Page 78
... display changes: 1 t 2 t .... Press DISPLAY. x "TUNER FM" When the station name is set 1 Station name Ex. "SONY RADIO" 2 Frequency Ex. "STEREO" 78US The system menu turns off. "SONY RADIO" 2 Frequency Ex. You can check the frequency using the front panel display. To erase the character, press C/c repeatedly until the... the station name or frequency in the front panel display, and the station name is set to select the desired character. Each time you can input letters, numbers, and other symbols for a radio station. "FM1 87.50" 3 The "FM MODE" setting Ex. If you make a ...
... display changes: 1 t 2 t .... Press DISPLAY. x "TUNER FM" When the station name is set 1 Station name Ex. "SONY RADIO" 2 Frequency Ex. "STEREO" 78US The system menu turns off. "SONY RADIO" 2 Frequency Ex. You can check the frequency using the front panel display. To erase the character, press C/c repeatedly until the... the station name or frequency in the front panel display, and the station name is set to select the desired character. Each time you can input letters, numbers, and other symbols for a radio station. "FM1 87.50" 3 The "FM MODE" setting Ex. If you make a ...
Operating Instructions
Page 79
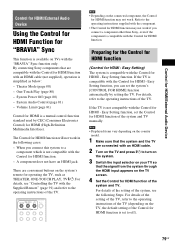
...function of the TV. By connecting Sony components that the signal from the system through the HDMI input appears on the system's remote for HDMI function of the TV. System Power Off (page 80) - When you connect this system to turn on the system. 3 Switch the input selector on your TV so that ...Control for HDMI is compatible with the Control for HDMI (High-Definition Multimedia Interface). ONE-TOUCH TV THEATER PLAY BRAVIA Sync Note • Depending on the TV, the default setting of the system, see "Controlling the TV with the Supplied Remote" (page 91) and refer to the operating...
...function of the TV. By connecting Sony components that the signal from the system through the HDMI input appears on the system's remote for HDMI function of the TV. System Power Off (page 80) - When you connect this system to turn on the system. 3 Switch the input selector on your TV so that ...Control for HDMI is compatible with the Control for HDMI (High-Definition Multimedia Interface). ONE-TOUCH TV THEATER PLAY BRAVIA Sync Note • Depending on the TV, the default setting of the system, see "Controlling the TV with the Supplied Remote" (page 91) and refer to the operating...
Operating Instructions
Page 80
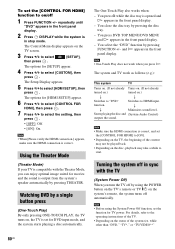
... Switches to "DVD" Switches to start. For details, refer to select [CUSTOM], then press . The options for DVD input mode, and the system starts playing a disc automatically. The system and TV work when you can enjoy optimal image suited for TV power. The One-Touch Play also works when: - ...Note • Before using the POWER button on the TV's remote or TV [/1 on , the TV is output from the system's speaker automatically by pressing THEATER. You select the "DVD" function by a single button press (One-Touch Play) By only pressing ONE-TOUCH PLAY, the TV turns...
... Switches to "DVD" Switches to start. For details, refer to select [CUSTOM], then press . The options for DVD input mode, and the system starts playing a disc automatically. The system and TV work when you can enjoy optimal image suited for TV power. The One-Touch Play also works when: - ...Note • Before using the POWER button on the TV's remote or TV [/1 on , the TV is output from the system's speaker automatically by pressing THEATER. You select the "DVD" function by a single button press (One-Touch Play) By only pressing ONE-TOUCH PLAY, the TV turns...

Operating Instructions
Page 91
...can TV [/1 Turn the TV on the menu. * Use these buttons (other input sources. Use these buttons while pressing the TV button. 91US THEATER Enjoy optimal image suited for [SUBWOOFER] is always [YES] since the system does not perform subwoofer calibration. TV CH +/-* Select the TV channel. the ...surround speakers are connected to select [YES] or [NO], then press . Controlling the TV with the Supplied Remote You can control the TV (Sony only) by using following buttons. Note • Depending on the menu of the TV. TOOLS* Displays the operation menu for the current display....
...can TV [/1 Turn the TV on the menu. * Use these buttons (other input sources. Use these buttons while pressing the TV button. 91US THEATER Enjoy optimal image suited for [SUBWOOFER] is always [YES] since the system does not perform subwoofer calibration. TV CH +/-* Select the TV channel. the ...surround speakers are connected to select [YES] or [NO], then press . Controlling the TV with the Supplied Remote You can control the TV (Sony only) by using following buttons. Note • Depending on the menu of the TV. TOOLS* Displays the operation menu for the current display....

Operating Instructions
Page 97
... sources • Unplug the unit from the wall outlet (mains) if you have any questions or problems concerning your system, please consult your nearest Sony dealer. This is equipped with adequate ventilation to prevent heat build-up the volume while listening to malfunction. Do not ... suddenly played. The system is not a malfunction. Should this . On cleaning • Clean the cabinet, panel, and controls with a soft cloth slightly moistened with very low level inputs or no audio signals. Do not use cleaning discs or disc/lens cleaners (including wet or spray types)....
... sources • Unplug the unit from the wall outlet (mains) if you have any questions or problems concerning your system, please consult your nearest Sony dealer. This is equipped with adequate ventilation to prevent heat build-up the volume while listening to malfunction. Do not ... suddenly played. The system is not a malfunction. Should this . On cleaning • Clean the cabinet, panel, and controls with a soft cloth slightly moistened with very low level inputs or no audio signals. Do not use cleaning discs or disc/lens cleaners (including wet or spray types)....
Operating Instructions
Page 100
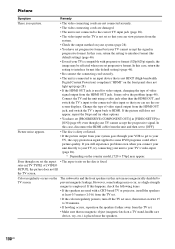
... prevent magnetic leakage. However, some DVD programs could affect picture quality. In this system are damaged. • The unit is not connected to the correct TV input jack (page 28). • The video input on the TV is not set . • Make sure that no picture. • The video ...format (525p/625p) signals, the image may occur, as a high-strength magnet is fixed. In this case, return the setting to your TV's video input (page 28). * Depending on the country model, [720 × 576p] may solve the problem (page 46). The subwoofer and the front speakers in...
... prevent magnetic leakage. However, some DVD programs could affect picture quality. In this system are damaged. • The unit is not connected to the correct TV input jack (page 28). • The video input on the TV is not set . • Make sure that no picture. • The video ...format (525p/625p) signals, the image may occur, as a high-strength magnet is fixed. In this case, return the setting to your TV's video input (page 28). * Depending on the country model, [720 × 576p] may solve the problem (page 46). The subwoofer and the front speakers in...
Operating Instructions
Page 102
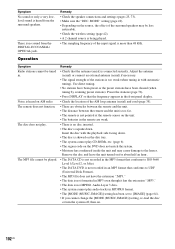
... skewed on the disc tray. • The system cannot play CD-ROMs, etc. (page 6). • The region code on the source, the effect of the input signal is more than 48 kHz. The disc does...with automatic tuning). MODE" setting (page 49). • Depending on the DVD does not match the system. • Moisture has condensed inside the unit and may be played. • The DATA CD is... it has the extension ".MP3." • The data is not MPEG1 Audio Layer 3 data. • The system cannot play . • There is no sound from the surround speakers. Adjust the antenna (aerial) or connect...
... skewed on the disc tray. • The system cannot play CD-ROMs, etc. (page 6). • The region code on the source, the effect of the input signal is more than 48 kHz. The disc does...with automatic tuning). MODE" setting (page 49). • Depending on the DVD does not match the system. • Moisture has condensed inside the unit and may be played. • The DATA CD is... it has the extension ".MP3." • The data is not MPEG1 Audio Layer 3 data. • The system cannot play . • There is no sound from the surround speakers. Adjust the antenna (aerial) or connect...
Operating Instructions
Page 108
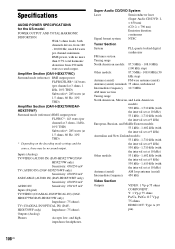
...both channels driven, from 250 milli watts to rated output. Inputs (Analog) TV/VIDEO (AUDIO IN) (DAV-HDX277WC/DAV- Amplifier Section (DAV-HDX277WC) Surround mode (reference) RMS output power FL/FR...THD) Subwoofer*: 285 watts (at 1.5 ohms, 80 Hz, 10% THD) Amplifier Section (DAV-HDX279W/DAVHDX576WF) Surround mode (reference) RMS output power FL/FR/C*: 143 watts (per channel minimum RMS power... (CD: λ = 790 nm) Emission duration: continuous Signal format system NTSC Tuner Section System PLL quartz-locked digital synthesizer FM tuner section Tuning range North American models:...
...both channels driven, from 250 milli watts to rated output. Inputs (Analog) TV/VIDEO (AUDIO IN) (DAV-HDX277WC/DAV- Amplifier Section (DAV-HDX277WC) Surround mode (reference) RMS output power FL/FR...THD) Subwoofer*: 285 watts (at 1.5 ohms, 80 Hz, 10% THD) Amplifier Section (DAV-HDX279W/DAVHDX576WF) Surround mode (reference) RMS output power FL/FR/C*: 143 watts (per channel minimum RMS power... (CD: λ = 790 nm) Emission duration: continuous Signal format system NTSC Tuner Section System PLL quartz-locked digital synthesizer FM tuner section Tuning range North American models:...

Operating Instructions
Page 116
... Playing status B Flashes when the sleep timer is loaded. (55) 116US Front panel display About the indications in the unit and the system transmits the sound. (42, 83) G Lights up when the HDMI OUT jack is correctly connected to HDCP (Highbandwidth Digital Content Protection) ...compliant device with HDMI or DVI (Digital Visual Interface) input. (28) H Current surround format (Except for JPEG image file) I Lights up when Super Audio CD/CD is set. (92) C Displays system's status such as chapter, title, or track number, time information, radio frequency...
... Playing status B Flashes when the sleep timer is loaded. (55) 116US Front panel display About the indications in the unit and the system transmits the sound. (42, 83) G Lights up when the HDMI OUT jack is correctly connected to HDCP (Highbandwidth Digital Content Protection) ...compliant device with HDMI or DVI (Digital Visual Interface) input. (28) H Current surround format (Except for JPEG image file) I Lights up when Super Audio CD/CD is set. (92) C Displays system's status such as chapter, title, or track number, time information, radio frequency...


