Operating Instructions
Page 4
...system: • Surround amplifier: You can enjoy surround speaker sound wirelessly. • S-AIR receiver: You can also use the controls on the unit if they have the same or similar names as those on the remote. DAV-HDX277WC is clearly indicated in the text, for DAVHDX277WC, DAV-HDX279W, and DAVHDX576WF.... For details on the area). Any difference in operation is the model used . The configuration of sound between S-AIR products wirelessly. About ...
...system: • Surround amplifier: You can enjoy surround speaker sound wirelessly. • S-AIR receiver: You can also use the controls on the unit if they have the same or similar names as those on the remote. DAV-HDX277WC is clearly indicated in the text, for DAVHDX277WC, DAV-HDX279W, and DAVHDX576WF.... For details on the area). Any difference in operation is the model used . The configuration of sound between S-AIR products wirelessly. About ...
Operating Instructions
Page 5
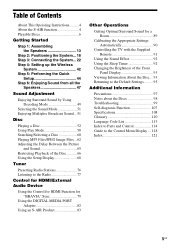
...Positioning the System... 18 Step 3: Connecting the System... 22 Step 4: Setting up the Wireless System 42 Step 5: Performing the Quick Setup 44 Step 6: Enjoying Sound from all the Speakers 47 Sound Adjustment Enjoying Surround Sound by Using Decoding Mode 49 Selecting the Sound Mode 51 Enjoying Multiplex Broadcast Sound... 51...Mode 58 Searching/Selecting a Disc 60 Playing MP3 Files/JPEG Image Files... 62 Adjusting the Delay Between the Picture and Sound 65 Restricting Playback of the Disc........... 66 Using the Setup Display 68 Tuner Presetting Radio Stations 76 Listening to the ...
...Positioning the System... 18 Step 3: Connecting the System... 22 Step 4: Setting up the Wireless System 42 Step 5: Performing the Quick Setup 44 Step 6: Enjoying Sound from all the Speakers 47 Sound Adjustment Enjoying Surround Sound by Using Decoding Mode 49 Selecting the Sound Mode 51 Enjoying Multiplex Broadcast Sound... 51...Mode 58 Searching/Selecting a Disc 60 Playing MP3 Files/JPEG Image Files... 62 Adjusting the Delay Between the Picture and Sound 65 Restricting Playback of the Disc........... 66 Using the Setup Display 68 Tuner Presetting Radio Stations 76 Listening to the ...
Operating Instructions
Page 18
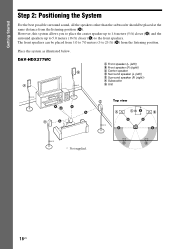
... from the listening position (A). Place the system as illustrated below. DAV-HDX277WC B A A Front speaker (L (left)) B Front speaker (R (right)) C Center speaker D Surround speaker (L (left)) E Surround speaker (R (right)) F Subwoofer G Unit CF G E Top view AA A A A CB B D A A C A C * Not supplied. Getting Started Step 2: Positioning the System For the best possible surround sound, all the speakers other than the subwoofer...
... from the listening position (A). Place the system as illustrated below. DAV-HDX277WC B A A Front speaker (L (left)) B Front speaker (R (right)) C Center speaker D Surround speaker (L (left)) E Surround speaker (R (right)) F Subwoofer G Unit CF G E Top view AA A A A CB B D A A C A C * Not supplied. Getting Started Step 2: Positioning the System For the best possible surround sound, all the speakers other than the subwoofer...
Operating Instructions
Page 20
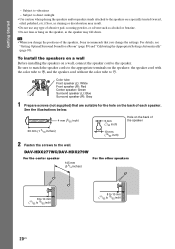
...install the speakers on a wall Before installing the speakers on the back of the speakers, Sony recommends that are suitable for a Room" (page 89) and "Calibrating the Appropriate Settings Automatically" (page 90). DAV-HDX277WC/DAV-HDX279W For the center speaker 145 mm (5 3/4 inches) For the other speakers 8 to... 10 mm (11/32 to 13/32 inch) 8 to 10 mm (11/32 to #. For details, see "Getting Optimal Surround Sound for the hole on a wall,...
...install the speakers on a wall Before installing the speakers on the back of the speakers, Sony recommends that are suitable for a Room" (page 89) and "Calibrating the Appropriate Settings Automatically" (page 90). DAV-HDX277WC/DAV-HDX279W For the center speaker 145 mm (5 3/4 inches) For the other speakers 8 to... 10 mm (11/32 to 13/32 inch) 8 to 10 mm (11/32 to #. For details, see "Getting Optimal Surround Sound for the hole on a wall,...
Operating Instructions
Page 22
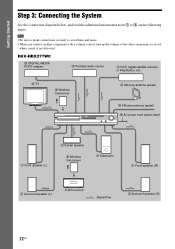
Getting Started Step 3: Connecting the System See the connection diagram below, and read the additional information from 1 to a level where sound is not distorted. Note • Be sure to make connections securely to avoid hum and noise. • When you connect another component with ...a volume control, turn up the volume of the other components to 6 on the following pages. DAV-HDX277WC 3 DIGITAL MEDIA PORT adapter...
Getting Started Step 3: Connecting the System See the connection diagram below, and read the additional information from 1 to a level where sound is not distorted. Note • Be sure to make connections securely to avoid hum and noise. • When you connect another component with ...a volume control, turn up the volume of the other components to 6 on the following pages. DAV-HDX277WC 3 DIGITAL MEDIA PORT adapter...
Operating Instructions
Page 28
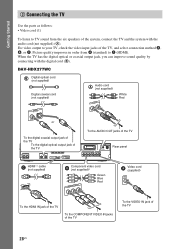
...2 Connecting the TV Use the parts as follows: • Video cord (1) To listen to TV sound from A (standard) to your TV, check the video input jacks of the TV, and select connection...28US When the TV has the digital optical or coaxial output jack, you can improve sound quality by connecting with the audio cord (not supplied) (A). DAV-HDX277WC Digital optical cord (not supplied) Digital coaxial cord (not supplied) TDVIG/VITIDALEION...cord (supplied) VIDEO OUT To the VIDEO IN jack of the system, connect the TV and the system with the digital cord (B). For video output to C (HDMI).
...2 Connecting the TV Use the parts as follows: • Video cord (1) To listen to TV sound from A (standard) to your TV, check the video input jacks of the TV, and select connection...28US When the TV has the digital optical or coaxial output jack, you can improve sound quality by connecting with the audio cord (not supplied) (A). DAV-HDX277WC Digital optical cord (not supplied) Digital coaxial cord (not supplied) TDVIG/VITIDALEION...cord (supplied) VIDEO OUT To the VIDEO IN jack of the system, connect the TV and the system with the digital cord (B). For video output to C (HDMI).
Operating Instructions
Page 34
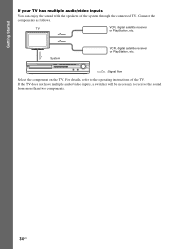
System VCR, digital satellite receiver or PlayStation, etc. :Signal flow Select the component on the TV. For details, refer to receive the sound from more than two components. 34US If the TV does not have multiple audio/video inputs, a switcher will be necessary to the operating instructions of the system through the connected TV. Connect the components as follows. TV VCR, digital satellite receiver or PlayStation, etc. Getting Started If your TV has multiple audio/video inputs You can enjoy the sound with the speakers of the TV.
System VCR, digital satellite receiver or PlayStation, etc. :Signal flow Select the component on the TV. For details, refer to receive the sound from more than two components. 34US If the TV does not have multiple audio/video inputs, a switcher will be necessary to the operating instructions of the system through the connected TV. Connect the components as follows. TV VCR, digital satellite receiver or PlayStation, etc. Getting Started If your TV has multiple audio/video inputs You can enjoy the sound with the speakers of the TV.
Operating Instructions
Page 37
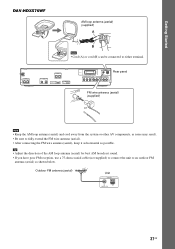
...Tip • Adjust the direction of the AM loop antenna (aerial) for best AM broadcast sound. • If you have poor FM reception, use a 75-ohm coaxial cable (not supplied) to connect the unit to either terminal. Getting Started DAV-HDX576WF AM loop antenna (aerial) (supplied) A B Note • Cord (A) or ...panel ANTENNA FM COAXIAL 75 FM wire antenna (aerial) (supplied) or Note • Keep the AM loop antenna (aerial) and cord away from the system or other AV components, as noise may result. • Be sure to fully extend the FM wire antenna (aerial). • After connecting the ...
...Tip • Adjust the direction of the AM loop antenna (aerial) for best AM broadcast sound. • If you have poor FM reception, use a 75-ohm coaxial cable (not supplied) to connect the unit to either terminal. Getting Started DAV-HDX576WF AM loop antenna (aerial) (supplied) A B Note • Cord (A) or ...panel ANTENNA FM COAXIAL 75 FM wire antenna (aerial) (supplied) or Note • Keep the AM loop antenna (aerial) and cord away from the system or other AV components, as noise may result. • Be sure to fully extend the FM wire antenna (aerial). • After connecting the ...
Operating Instructions
Page 38
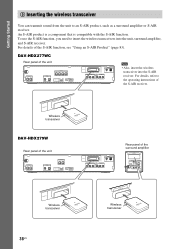
...and S-AIR receiver. An S-AIR product is a component that is compatible with the S-AIR function. DAV-HDX277WC Rear panel of the S-AIR receiver. EZW-RT10 Wireless transceiver DAV-HDX279W Rear panel of the unit SPEAKER CENTER SUBWOOFER SPEAKER TV/VIDEO DIGITAL IN COAXIAL OPTICAL FRONT R ... Rear panel of the S-AIR function, see "Using an S-AIR Product" (page 83). Getting Started 5 Inserting the wireless transceiver You can transmit sound from the unit to insert the wireless transceivers into the S-AIR receiver. For details of the surround amplifier EZW-RT10 S-AIR ID A B C ...
...and S-AIR receiver. An S-AIR product is a component that is compatible with the S-AIR function. DAV-HDX277WC Rear panel of the S-AIR receiver. EZW-RT10 Wireless transceiver DAV-HDX279W Rear panel of the unit SPEAKER CENTER SUBWOOFER SPEAKER TV/VIDEO DIGITAL IN COAXIAL OPTICAL FRONT R ... Rear panel of the S-AIR function, see "Using an S-AIR Product" (page 83). Getting Started 5 Inserting the wireless transceiver You can transmit sound from the unit to insert the wireless transceivers into the S-AIR receiver. For details of the surround amplifier EZW-RT10 S-AIR ID A B C ...
Operating Instructions
Page 42
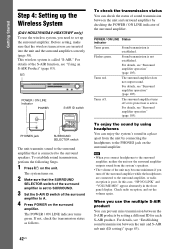
... When you connect headphones to the surround amplifier, or radio reception is set up the Wireless System (DAV-HDX279W/DAV-HDX576WF only) To use the multiple S-AIR product You can check the status of sound transmission between the S-AIR products by checking the POWER / ON LINE indicator of the surround... amplifier. When you use the wireless system, you turn off the surround amplifier while the ...
... When you connect headphones to the surround amplifier, or radio reception is set up the Wireless System (DAV-HDX279W/DAV-HDX576WF only) To use the multiple S-AIR product You can check the status of sound transmission between the S-AIR products by checking the POWER / ON LINE indicator of the surround... amplifier. When you use the wireless system, you turn off the surround amplifier while the ...
Operating Instructions
Page 44
..." (page 47). 3 Switch the input selector on -screen display appears. "/1 C/X/x/c, DISPLAY 1 Turn on the TV. 2 (DAV-HDX277WC) Press [/1 on the unit. (DAV-HDX279W/DAV-HDX576WF) Press [/1 on the unit, and POWER on the TV screen. [Press [ENTER] to select a language. The Setup ...Sound for selecting the language used in the selected language. 6 Press . VIDEO SETUP TV TYPE: 16:9 PROGRESSIVE (COMPONENT OUT): 16:9 4:3 OUTPUT: 4:3 LETTER BOX BLACK LEVEL: 4:3 PAN SCAN BLACK LEVEL (COMPONENT OUT): OFF PAUSE MODE: AUTO 7 Press X/x to select the setting that the signal from the system...
..." (page 47). 3 Switch the input selector on -screen display appears. "/1 C/X/x/c, DISPLAY 1 Turn on the TV. 2 (DAV-HDX277WC) Press [/1 on the unit. (DAV-HDX279W/DAV-HDX576WF) Press [/1 on the unit, and POWER on the TV screen. [Press [ENTER] to select a language. The Setup ...Sound for selecting the language used in the selected language. 6 Press . VIDEO SETUP TV TYPE: 16:9 PROGRESSIVE (COMPONENT OUT): 16:9 4:3 OUTPUT: 4:3 LETTER BOX BLACK LEVEL: 4:3 PAN SCAN BLACK LEVEL (COMPONENT OUT): OFF PAUSE MODE: AUTO 7 Press X/x to select the setting that the signal from the system...
Operating Instructions
Page 45
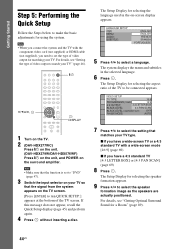
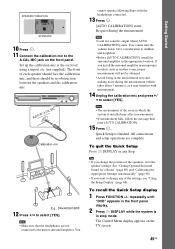
...Quick Setup display 1 Press FUNCTION +/- Quick Setup is output when [AUTO CALIBRATION] starts. AUDIO IN / A.CAL MIC Calibration mic E.g., DAV-HDX576WF 12 Press C/c to children and neighbors. • Before [AUTO CALIBRATION], install the surround amplifier in stop mode. To quit the... until "DVD" appears in the front panel display. 2 Press DISPLAY while the system is installed may interfere with the headphones connected. 13 Press . [AUTO CALIBRATION] starts. See "Getting Optimal Surround Sound for a Room" (page 89) and "Calibrating the Appropriate Settings Automatically" (page...
...Quick Setup display 1 Press FUNCTION +/- Quick Setup is output when [AUTO CALIBRATION] starts. AUDIO IN / A.CAL MIC Calibration mic E.g., DAV-HDX576WF 12 Press C/c to children and neighbors. • Before [AUTO CALIBRATION], install the surround amplifier in stop mode. To quit the... until "DVD" appears in the front panel display. 2 Press DISPLAY while the system is installed may interfere with the headphones connected. 13 Press . [AUTO CALIBRATION] starts. See "Getting Optimal Surround Sound for a Room" (page 89) and "Calibrating the Appropriate Settings Automatically" (page...

Operating Instructions
Page 47
... select [NO], the system does not output the progressive signal. Select this system. Check that is connected to the COMPONENT VIDEO OUT jacks. X/x/c, SYSTEM MENU 1 Press FUNCTION +/- x DAV-HDX277WC/DAV-HDX279W "DVD" t "TUNER FM" t "TUNER AM" t "TV/VIDEO" t "DMPORT" t "AUDIO" t ... The system outputs the progressive signal for...to jacks other than the COMPONENT VIDEO OUT jacks. [ON]: The system outputs progressive signals. Step 6: Enjoying Sound from all the Speakers You can enjoy DVD, TV, or VCR sound from all the speakers in the front panel display. repeatedly until the ...
... select [NO], the system does not output the progressive signal. Select this system. Check that is connected to the COMPONENT VIDEO OUT jacks. X/x/c, SYSTEM MENU 1 Press FUNCTION +/- x DAV-HDX277WC/DAV-HDX279W "DVD" t "TUNER FM" t "TUNER AM" t "TV/VIDEO" t "DMPORT" t "AUDIO" t ... The system outputs the progressive signal for...to jacks other than the COMPONENT VIDEO OUT jacks. [ON]: The system outputs progressive signals. Step 6: Enjoying Sound from all the Speakers You can enjoy DVD, TV, or VCR sound from all the speakers in the front panel display. repeatedly until the ...
Operating Instructions
Page 48
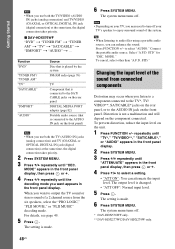
..., reduce the input level on the component connected. The system menu turns off . * DAV-HDX576WF only. ** DAV-HDX277WC/DAV-HDX279W only. 48US Connect the portable audio source. The setting is changed. • "ATT OFF": Normal input level. 5 Press . MODE." Changing the input level of the sound from connected components Distortion may need to turn off...
..., reduce the input level on the component connected. The system menu turns off . * DAV-HDX576WF only. ** DAV-HDX277WC/DAV-HDX279W only. 48US Connect the portable audio source. The setting is changed. • "ATT OFF": Normal input level. 5 Press . MODE." Changing the input level of the sound from connected components Distortion may need to turn off...
Operating Instructions
Page 49
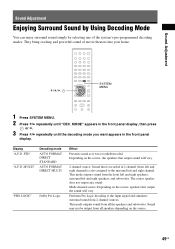
... to the surround left and right speakers, and subwoofer. Sound Adjustment Enjoying Surround Sound by Using Decoding Mode You can enjoy surround sound simply by selecting one of movie theaters into your home. The center speaker does not output any sound. They bring exciting and powerful sound of the system's pre-programmed decoding modes. Depending on the source...
... to the surround left and right speakers, and subwoofer. Sound Adjustment Enjoying Surround Sound by Using Decoding Mode You can enjoy surround sound simply by selecting one of movie theaters into your home. The center speaker does not output any sound. They bring exciting and powerful sound of the system's pre-programmed decoding modes. Depending on the source...
Operating Instructions
Page 50
...channels from all speakers depending on the input stream, the decoding mode may not be output from all the speakers and subwoofer. Sound may skip. 50US Multi channel surround formats are downmixed to 2 channels. Multi channel surround formats are downmixed to 2 channels....old movies. This mode outputs sound from headphone left and right. Outputs the sound as a CD. The setting is made. 5 Press SYSTEM MENU. The system menu turns off Select "A.F.D. Outputs the sound from headphone left and right speakers and subwoofer. Outputs the sound from the front left and...
...channels from all speakers depending on the input stream, the decoding mode may not be output from all the speakers and subwoofer. Sound may skip. 50US Multi channel surround formats are downmixed to 2 channels. Multi channel surround formats are downmixed to 2 channels....old movies. This mode outputs sound from headphone left and right. Outputs the sound as a CD. The setting is made. 5 Press SYSTEM MENU. The system menu turns off Select "A.F.D. Outputs the sound from headphone left and right speakers and subwoofer. Outputs the sound from the front left and...
Operating Instructions
Page 51
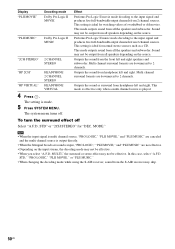
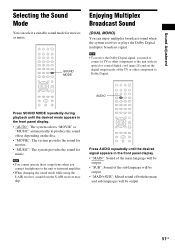
...mode of both the main and sub languages will be output. 51US AUDIO Press SOUND MODE repeatedly during playback until the desired signal appears in the front panel display. • "AUTO": The system selects "MOVIE" or "MUSIC" automatically to the unit or surround amplifier. ...• When changing the sound mode while using the S-AIR receiver, sound from the S-AIR receiver may skip. Sound Adjustment Selecting the Sound Mode You can enjoy multiplex broadcast sound when the system receives or plays the Dolby Digital multiplex broadcast signal. Press ...
...mode of both the main and sub languages will be output. 51US AUDIO Press SOUND MODE repeatedly during playback until the desired signal appears in the front panel display. • "AUTO": The system selects "MOVIE" or "MUSIC" automatically to the unit or surround amplifier. ...• When changing the sound mode while using the S-AIR receiver, sound from the S-AIR receiver may skip. Sound Adjustment Selecting the Sound Mode You can enjoy multiplex broadcast sound when the system receives or plays the Dolby Digital multiplex broadcast signal. Press ...
Operating Instructions
Page 53
... speed, press H. The indicator turns off the sound temporarily MUTING. once, you press M/ or / (Scan)1)2) m during Slow-motion Play, the playback speed changes. The system enters standby mode. To enter power saving mode, make sure that the system is inserted. To use the headphones Connect the ...can also connect the headphones to "OFF" (page 41). - [CONTROL FOR HDMI] is on the surround amplifier. (The sound of the system is muted.) See page "To enjoy the sound by playing a disc in the following status. - "S-AIR STBY" is loaded in pause mode (DVD VIDEO/ DVD-R/DVD...
... speed, press H. The indicator turns off the sound temporarily MUTING. once, you press M/ or / (Scan)1)2) m during Slow-motion Play, the playback speed changes. The system enters standby mode. To enter power saving mode, make sure that the system is inserted. To use the headphones Connect the ...can also connect the headphones to "OFF" (page 41). - [CONTROL FOR HDMI] is on the surround amplifier. (The sound of the system is muted.) See page "To enjoy the sound by playing a disc in the following status. - "S-AIR STBY" is loaded in pause mode (DVD VIDEO/ DVD-R/DVD...

Operating Instructions
Page 54
... or c. 3 Press X/x to select a setting. • "ILLUM ON": On. • "ILLUM OFF": Off. 4 Press . The system menu turns off. Changing the sound When the system is displayed two or more than 30 minutes, the illumination of the internal mechanisms and does not indicate a malfunction. Press AUDIO repeatedly... just noise produced by the operation of the DISC 15 indicators starts automatically. You can select the sound from the disc changer when changing discs or turning the system on the DVD VIDEO, the choice of the selected channel through both the right and left speakers....
... or c. 3 Press X/x to select a setting. • "ILLUM ON": On. • "ILLUM OFF": Off. 4 Press . The system menu turns off. Changing the sound When the system is displayed two or more than 30 minutes, the illumination of the internal mechanisms and does not indicate a malfunction. Press AUDIO repeatedly... just noise produced by the operation of the DISC 15 indicators starts automatically. You can select the sound from the disc changer when changing discs or turning the system on the DVD VIDEO, the choice of the selected channel through both the right and left speakers....
Operating Instructions
Page 55
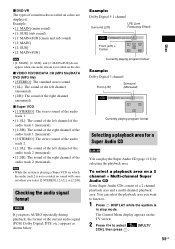
...; [1: MAIN+SUB] (main and sub sound) • [2: MAIN] • [2: SUB] • [2: MAIN+SUB] Note • [2: MAIN], [2: SUB], and [2: MAIN+SUB] do not appear when one audio stream is in stop mode. Note • While the system is playing a Super VCD on a 2 channel + Multi-... the right channel of the audio track 2 (monaural). x DVD-VR The types of sound tracks recorded on the TV screen. 2 Press X/x to . 1 Press DISPLAY while the system is recorded on the disc. Disc Example: Dolby Digital 5.1 channel Surround (L/R) LFE (Low Frequency Effect) 1: ENGLISH DOLBY DIGITAL 3 / 2 .1 ...
...; [1: MAIN+SUB] (main and sub sound) • [2: MAIN] • [2: SUB] • [2: MAIN+SUB] Note • [2: MAIN], [2: SUB], and [2: MAIN+SUB] do not appear when one audio stream is in stop mode. Note • While the system is playing a Super VCD on a 2 channel + Multi-... the right channel of the audio track 2 (monaural). x DVD-VR The types of sound tracks recorded on the TV screen. 2 Press X/x to . 1 Press DISPLAY while the system is recorded on the disc. Disc Example: Dolby Digital 5.1 channel Surround (L/R) LFE (Low Frequency Effect) 1: ENGLISH DOLBY DIGITAL 3 / 2 .1 ...


