Operating Instructions
Page 26
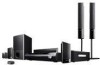
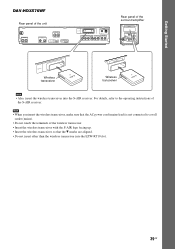
Getting Started DAV-HDX279W Rear panel of the unit SPEAKER CENTER SUBWOOFER SPEAKER TV/VIDEO DIGITAL IN COAXIAL OPTICAL FRONT R FRONT L HDMI OUT DMPORT DC5V 0.7A MAX SPEAKER ... center speaker (green) To the subwoofer (purple) To the front speaker (R) (red) To the front speaker (L) (white) Rear panel of the surround amplifier EZW-RT10 S-AIR ID A B C PAIRING SPEAKER L SURROUND SELECTOR R SURROUND SURROUND BACK To the surround speaker (L) (blue) SPEAKER L R To the surround speaker (R) (gray) 26US
Getting Started DAV-HDX279W Rear panel of the unit SPEAKER CENTER SUBWOOFER SPEAKER TV/VIDEO DIGITAL IN COAXIAL OPTICAL FRONT R FRONT L HDMI OUT DMPORT DC5V 0.7A MAX SPEAKER ... center speaker (green) To the subwoofer (purple) To the front speaker (R) (red) To the front speaker (L) (white) Rear panel of the surround amplifier EZW-RT10 S-AIR ID A B C PAIRING SPEAKER L SURROUND SELECTOR R SURROUND SURROUND BACK To the surround speaker (L) (blue) SPEAKER L R To the surround speaker (R) (gray) 26US
Operating Instructions
Page 27
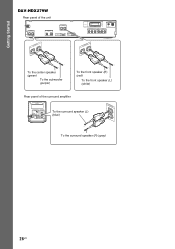
Getting Started DAV-HDX576WF Rear panel of the unit SPEAKER CENTER SUBWOOFER SPEAKER TV DIGITAL IN COAXIAL OPTICAL FRONT R FRONT L HDMI OUT DMPORT DC5V 0.7A MAX SPEAKER CENTER ... center speaker (green) To the subwoofer (purple) To the front speaker (R) (red) To the front speaker (L) (white) Rear panel of the surround amplifier EZW-RT10 S-AIR ID A B C PAIRING SPEAKER L SURROUND SELECTOR R SURROUND SURROUND BACK To the surround speaker (L) (blue) SPEAKER L R To the surround speaker (R) (gray) 27US
Getting Started DAV-HDX576WF Rear panel of the unit SPEAKER CENTER SUBWOOFER SPEAKER TV DIGITAL IN COAXIAL OPTICAL FRONT R FRONT L HDMI OUT DMPORT DC5V 0.7A MAX SPEAKER CENTER ... center speaker (green) To the subwoofer (purple) To the front speaker (R) (red) To the front speaker (L) (white) Rear panel of the surround amplifier EZW-RT10 S-AIR ID A B C PAIRING SPEAKER L SURROUND SELECTOR R SURROUND SURROUND BACK To the surround speaker (L) (blue) SPEAKER L R To the surround speaker (R) (gray) 27US
Operating Instructions
Page 38
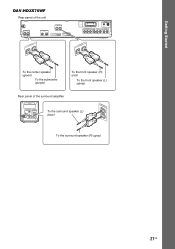
... the wireless transceivers into the S-AIR receiver. DAV-HDX277WC Rear panel of the surround amplifier EZW-RT10 S-AIR ID A B C PAIRING SPEAKER L SURROUND SELECTOR R SURROUND SURROUND BACK EZW-RT10 Wireless transceiver EZW-RT10 Wireless transceiver 38US An S-AIR product is a component that is compatible with the S-AIR function. EZW-RT10 Wireless transceiver DAV-HDX279W Rear panel of the...
... the wireless transceivers into the S-AIR receiver. DAV-HDX277WC Rear panel of the surround amplifier EZW-RT10 S-AIR ID A B C PAIRING SPEAKER L SURROUND SELECTOR R SURROUND SURROUND BACK EZW-RT10 Wireless transceiver EZW-RT10 Wireless transceiver 38US An S-AIR product is a component that is compatible with the S-AIR function. EZW-RT10 Wireless transceiver DAV-HDX279W Rear panel of the...
Operating Instructions
Page 39
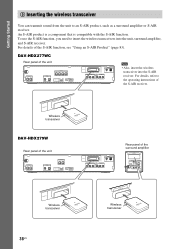
... wireless transceiver so that the V marks are aligned. • Do not insert other than the wireless transceiver into the S-AIR receiver. Getting Started DAV-HDX576WF Rear panel of the unit SPEAKER CENTER SUBWOOFER SPEAKER TV DIGITAL IN COAXIAL OPTICAL FRONT R FRONT L HDMI OUT DMPORT ...TV SAT/CABLE Y PB/CB PR/CR R AUDIO IN L R AUDIO IN L Rear panel of the surround amplifier EZW-RT10 S-AIR ID A B C PAIRING SPEAKER L SURROUND SELECTOR R SURROUND SURROUND BACK EZW-RT10 Wireless transceiver EZW-RT10 Wireless transceiver Note • Also, insert the wireless transceiver...
... wireless transceiver so that the V marks are aligned. • Do not insert other than the wireless transceiver into the S-AIR receiver. Getting Started DAV-HDX576WF Rear panel of the unit SPEAKER CENTER SUBWOOFER SPEAKER TV DIGITAL IN COAXIAL OPTICAL FRONT R FRONT L HDMI OUT DMPORT ...TV SAT/CABLE Y PB/CB PR/CR R AUDIO IN L R AUDIO IN L Rear panel of the surround amplifier EZW-RT10 S-AIR ID A B C PAIRING SPEAKER L SURROUND SELECTOR R SURROUND SURROUND BACK EZW-RT10 Wireless transceiver EZW-RT10 Wireless transceiver Note • Also, insert the wireless transceiver...
Operating Instructions
Page 40
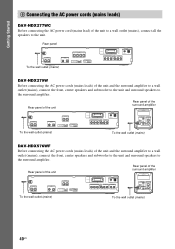
...Y PB/CB PR/CR R AUDIO IN L Rear panel of the surround amplifier EZW-RT10 S-AIR ID A B C PAIRING SPEAKER L SURROUND SELECTOR R SURROUND SURROUND BACK To the wall outlet (mains) DAV-HDX576WF Before connecting the AC power cords (mains leads) of the unit and the surround amplifier ... to the surround amplifier. Getting Started 6 Connecting the AC power cords (mains leads) DAV-HDX277WC Before connecting the AC power cord (mains lead) of the surround amplifier EZW-RT10 S-AIR ID A B C PAIRING SPEAKER L SURROUND SELECTOR R SURROUND SURROUND BACK To the wall outlet (mains) To the...
...Y PB/CB PR/CR R AUDIO IN L Rear panel of the surround amplifier EZW-RT10 S-AIR ID A B C PAIRING SPEAKER L SURROUND SELECTOR R SURROUND SURROUND BACK To the wall outlet (mains) DAV-HDX576WF Before connecting the AC power cords (mains leads) of the unit and the surround amplifier ... to the surround amplifier. Getting Started 6 Connecting the AC power cords (mains leads) DAV-HDX277WC Before connecting the AC power cord (mains lead) of the surround amplifier EZW-RT10 S-AIR ID A B C PAIRING SPEAKER L SURROUND SELECTOR R SURROUND SURROUND BACK To the wall outlet (mains) To the...
Operating Instructions
Page 42
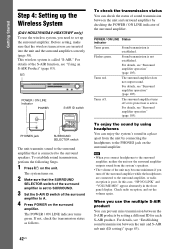
... alternately in a place apart from the system's speakers. • The volume of the S-AIR function, see "Surround amplifier operation" (page 105). "/1 POWER / ON LINE Indicator POWER POWER POWER/ON LINE PHONES S-AIR ID switch EZW-RT10 S-AIR ID A B C PAIRING SPEAKER L SURROUND SELECTOR R SURROUND SURROUND ...set the volume again. Getting Started Step 4: Setting up the Wireless System (DAV-HDX279W/DAV-HDX576WF only) To use the multiple S-AIR product You can prevent miss transmission between the unit and S-AIR sub unit (ID setting)" (page 83). The surround amplifier turns ...
... alternately in a place apart from the system's speakers. • The volume of the S-AIR function, see "Surround amplifier operation" (page 105). "/1 POWER / ON LINE Indicator POWER POWER POWER/ON LINE PHONES S-AIR ID switch EZW-RT10 S-AIR ID A B C PAIRING SPEAKER L SURROUND SELECTOR R SURROUND SURROUND ...set the volume again. Getting Started Step 4: Setting up the Wireless System (DAV-HDX279W/DAV-HDX576WF only) To use the multiple S-AIR product You can prevent miss transmission between the unit and S-AIR sub unit (ID setting)" (page 83). The surround amplifier turns ...
Operating Instructions
Page 43
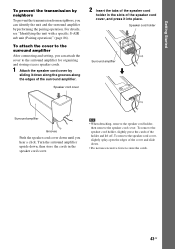
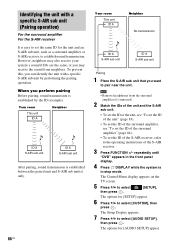
For details, see "Identifying the unit with a specific S-AIR sub unit (Pairing operation)" (page 86). To remove the speaker cord cover, slightly splay open the edges of the surround amplifier. Note • When detaching, remove the speaker ... neighbors, you can attach the cover to the surround amplifier for organizing and storing excess speaker cords. 1 Attach the speaker cord cover by performing the pairing operation. Speaker cord cover 2 Insert the tabs of the holder and lift off. To attach the cover to the surround amplifier After connecting and setting...
For details, see "Identifying the unit with a specific S-AIR sub unit (Pairing operation)" (page 86). To remove the speaker cord cover, slightly splay open the edges of the surround amplifier. Note • When detaching, remove the speaker ... neighbors, you can attach the cover to the surround amplifier for organizing and storing excess speaker cords. 1 Attach the speaker cord cover by performing the pairing operation. Speaker cord cover 2 Insert the tabs of the holder and lift off. To attach the cover to the surround amplifier After connecting and setting...
Operating Instructions
Page 72
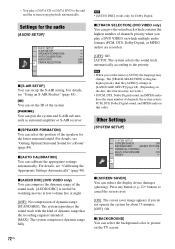
...can compress the dynamic range of the system. [PAIRING] You can select the background color or picture on the disc, this function may change. x [SPEAKER FORMATION] You can set up the S-AIR setting. Settings for the audio [AUDIO SETUP] AUDIO SETUP S-AIR SETUP: SPEAKER FORMATION: AUTO CALIBRATION: ... the sound track with the kind of channels priority when you do not operate the system for Dolby Digital. x [BACKGROUND] You can pair the system and S-AIR sub unit, such as surround amplifier or S-AIR receiver. You play a DVD VIDEO on which multiple audio formats (PCM, DTS, ...
...can compress the dynamic range of the system. [PAIRING] You can select the background color or picture on the disc, this function may change. x [SPEAKER FORMATION] You can set up the S-AIR setting. Settings for the audio [AUDIO SETUP] AUDIO SETUP S-AIR SETUP: SPEAKER FORMATION: AUTO CALIBRATION: ... the sound track with the kind of channels priority when you do not operate the system for Dolby Digital. x [BACKGROUND] You can pair the system and S-AIR sub unit, such as surround amplifier or S-AIR receiver. You play a DVD VIDEO on which multiple audio formats (PCM, DTS, ...

Operating Instructions
Page 84
... ID of the unit" (page 83). • To set the ID of the S-AIR receiver, refer to function set on the display for enjoying the system's sound in another S-AIR sub unit, such as a surround amplifier, by performing the pairing operation (page 86). However, neighbors may receive the sound from neighbors. To prevent this...
... ID of the unit" (page 83). • To set the ID of the S-AIR receiver, refer to function set on the display for enjoying the system's sound in another S-AIR sub unit, such as a surround amplifier, by performing the pairing operation (page 86). However, neighbors may receive the sound from neighbors. To prevent this...
Operating Instructions
Page 86
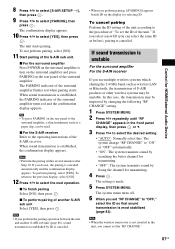
... display appears on the TV screen. 5 Press X/x to the operating instructions of the S-AIR receiver. 3 Press FUNCTION +/- When you perform pairing Before pairing, sound transmission is in the front panel display. 4 Press DISPLAY while the system is established by performing the pairing operation. Note • Remove headphones from neighbors. The options for [SETUP] appear. 6 Press...
... display appears on the TV screen. 5 Press X/x to the operating instructions of the S-AIR receiver. 3 Press FUNCTION +/- When you perform pairing Before pairing, sound transmission is in the front panel display. 4 Press DISPLAY while the system is established by performing the pairing operation. Note • Remove headphones from neighbors. The options for [SETUP] appear. 6 Press...
Operating Instructions
Page 87
... the ID setting of the unit according to the procedure of "To set "RF CHANGE" to select [PAIRING], then press . x To perform pairing of S-AIR products or other wireless systems may be used. x For the S-AIR receiver Refer to select the next operation. When sound transmission is established, the confirmation display appears. To return to...
... the ID setting of the unit according to the procedure of "To set "RF CHANGE" to select [PAIRING], then press . x To perform pairing of S-AIR products or other wireless systems may be used. x For the S-AIR receiver Refer to select the next operation. When sound transmission is established, the confirmation display appears. To return to...
Operating Instructions
Page 104
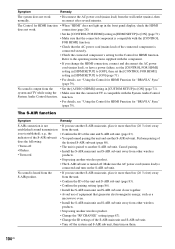
system and TV while using another S-AIR main unit, place it more than 8 m (26 1/4 feet) away from the unit. • Confirm the ID of the unit and S-AIR sub unit (page 83). • Confirm the pairing setting (page 86). • Install the S-AIR main unit and S-AIR sub unit closer ... connected component is connected securely. • Check the connected component's setting for the Control for HDMI function. Cancel pairing. • Install the S-AIR main unit and S-AIR sub unit away from other wireless products. • Stop using the • Make sure that the connected TV ...
system and TV while using another S-AIR main unit, place it more than 8 m (26 1/4 feet) away from the unit. • Confirm the ID of the unit and S-AIR sub unit (page 83). • Confirm the pairing setting (page 86). • Install the S-AIR main unit and S-AIR sub unit closer ... connected component is connected securely. • Check the connected component's setting for the Control for HDMI function. Cancel pairing. • Install the S-AIR main unit and S-AIR sub unit away from other wireless products. • Stop using the • Make sure that the connected TV ...
Operating Instructions
Page 105
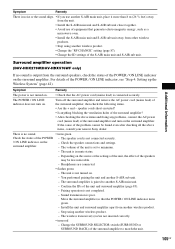
...of the POWER / ON LINE indicator, see "Step 4: Setting up the Wireless System" (page 42). Turn off the surround amplifier and remove the AC power cord...Pairing operation is in mute status. - Change the SURROUND SELECTOR switch (SURROUND or SURROUND BACK) of the POWER / ON LINE indicator on the surround amplifier. - The unit is not completed. - Surround amplifier operation (DAV-HDX279W/DAV... items, consult your nearest Sony dealer. Symptom Remedy The power is output from another wireless product. - You performed pairing the unit and another S-AIR main unit. - Headphones ...
...of the POWER / ON LINE indicator, see "Step 4: Setting up the Wireless System" (page 42). Turn off the surround amplifier and remove the AC power cord...Pairing operation is in mute status. - Change the SURROUND SELECTOR switch (SURROUND or SURROUND BACK) of the POWER / ON LINE indicator on the surround amplifier. - The unit is not completed. - Surround amplifier operation (DAV-HDX279W/DAV... items, consult your nearest Sony dealer. Symptom Remedy The power is output from another wireless product. - You performed pairing the unit and another S-AIR main unit. - Headphones ...

Operating Instructions
Page 111
... into the EZWRT10/EZW-T100. Interlace format (Interlaced scanning) The Interlace format is the NTSC standard method for digital video signals. S-AIR (Sony Audio Interactive Radio frequency) Recent times have one method of a conventional CD, and with 1-bit quantization, achieves both video and audio... and CD layer combination. 111US Additional Information Dolby Surround Pro Logic As one pair of Dolby Surround Pro Logic, you to the all scanning lines (525 lines for the NTSC system). DTS Digital audio compression technology developed by the age of high quality digital ...
... into the EZWRT10/EZW-T100. Interlace format (Interlaced scanning) The Interlace format is the NTSC standard method for digital video signals. S-AIR (Sony Audio Interactive Radio frequency) Recent times have one method of a conventional CD, and with 1-bit quantization, achieves both video and audio... and CD layer combination. 111US Additional Information Dolby Surround Pro Logic As one pair of Dolby Surround Pro Logic, you to the all scanning lines (525 lines for the NTSC system). DTS Digital audio compression technology developed by the age of high quality digital ...


