Sony DAVHDX576WF Support Question
Sony DAVHDX576WF Support Question
Find answers below for this question about Sony DAVHDX576WF - DAV Home Theater System.Need a Sony DAVHDX576WF manual? We have 1 online manual for this item!
Question posted by Arrisdiaz on September 1st, 2020
How Do I Pair My Sourround Apeakers To S Air Without The Remote Control..
The person who posted this question about this Sony product did not include a detailed explanation. Please use the "Request More Information" button to the right if more details would help you to answer this question.
Current Answers
Answer #1: Posted by Troubleshooter101 on September 1st, 2020 12:33 AM
Troubleshooter101

Member since:
September 30th, 2015 Points: 2,927,080

Member since:
September 30th, 2015 Points: 2,927,080
To pair this to your phone or other devices please check this link below:-
https://www.sony.com/electronics/support/articles/00008739
Thanks
Please respond to my effort to provide you with the best possible solution by using the "Acceptable Solution" and/or the "Helpful" buttons when the answer has proven to be helpful. Please feel free to submit further info for your question, if a solution was not provided. I appreciate the opportunity to serve you!
Troublshooter101

Answer #5: Posted by divakarkatta7946 on September 1st, 2020 1:07 AM
divakarkatta7946

Member since:
September 1st, 2020 Points: 280
Member since:
September 1st, 2020 Points: 280
Unable to establish the S-AIR wireless connection (pairing) on the Blu-ray Disc system.
IMPORTANT: This article applies only to specific products and/or operating systems. Check Applicable Products and Categories for details.
Follow this procedure to troubleshoot why the wireless connection is not being established:
IMPORTANT: If model-specific information is required to complete any of the steps in this solution, refer to the operating instructions supplied with the product.
NOTE: Because each of these steps represents a possible solution to this issue, check the wireless connection after completing each step.
- On the wireless amplifier, set the S-AIR® Channel to A.NOTE: If the red S-AIR indicator light on the back of the unit is lit, change the S-AIR ID switch to a different channel. Then, set the switch back to A and the red light should go off.
- Verify that the surround selector on the back of the unit is set to surround, not surround back.
- Perform a full reset on the Blu-ray Disc® system.IMPORTANT: After you click on RESETTING under the SETUP menu, scroll down and select the ALL SETTINGS option.
- Turn off both systems.
- Pull out both S-AIR transceiver cards and then push them firmly back in place until you hear a click.
- Turn on both of the units.
- On the Blu-ray Disc system, proceed through the EASY SETUP menu: however, skip the auto-calibration.
- Start playback on the movie contents (not the previews) of a Blu-ray disc or other HD content.NOTES:
- The units should now be paired and the green light on the surround amplifier lit solid.
- If the green light is not solid and the units are not paired, continue with the next step.
- On the Blu-ray Disc system, unplug the HDMI® cable from the HDMI port and then wait several seconds to determine if the units will pair.NOTES:
- If the units pair (the green light on the surround amplifier should be solid), the HDMI cable may be the issue. Replace the HDMI cable with a different brand and/or size HDMI cable and then check to verify the wireless connection is still working. If no cable is available, contact the Sony® Customer Support at (239) 768-7547 to speak with a customer service representative.
- If the pairing was not successful, reconnect the HDMI cable and continue with the next step.
- On the wireless amplifier, follow these steps to change the S-AIR Channel to B:
- On the main unit, access SYSTEM SETTINGS from within the SETUP menu and change the S-AIR ID switch to B.
- Set the S-AIR ID switch on the surround amplifier to B.
- The units should now be paired and the green light on the surround amplifier lit solid.
- If the green light is not solid and the units are not paired, continue with the next step.
- Again, unplug the HDMI cable from the HDMI port on the Blu-ray Disc system and then wait several seconds to determine if the units will pair.NOTES:
- If the units pair (the green light on the surround amplifier should be solid), the HDMI cable may be the issue. Replace the HDMI cable with a different brand and/or size HDMI cable and then check to verify the wireless connection is still working. If no cable is available, contact the Sony Customer Support at (239) 768-7547 to speak with a customer service representative.
- If the pairing was not successful, reconnect the HDMI cable and continue with the next step.
- On the wireless amplifier, follow these steps to change the S-AIR Channel to C:
- On the main unit, access SYSTEM SETTINGS from within the SETUP menu and change the S-AIR ID switch to C.
- Set the S-AIR ID switch on the surround amplifier to C.
- The units should now be paired and the green light on the surround amplifier lit solid.
- If the green light is not solid and the units are not paired, continue with the next step.
- Once more, unplug the HDMI cable from the HDMI port and then wait several seconds to determine if the units will pair.NOTES:
- If the units pair (the green light on the surround amplifier should be solid), the HDMI cable may be the issue. Replace the HDMI cable with a different brand and/or size HDMI cable and then check to verify the wireless connection is still working. If no cable is available, contact the Sony Customer Support at (239) 768-7547 to speak with a customer service representative.
- If the pairing was not successful, reconnect the HDMI cable and continue with the next step.
- Follow these steps to complete the one-to-one pairing procedure:
- On the main unit, within the SETUP menu, access SYSTEM SETTINGS, then select S-AIR Pairing.
- On the back of the surround amplifier, press the black PAIRING button using a sharp-pointed instrument, such as a paper clip or pen tip.
- Once the pairing is established, both the red light on the back of the unit and the green light on the front of the unit will be solid.
- Both units should now be paired and sound should be heard from the rear speakers.
Answer #6: Posted by sureshkumavat679 on September 1st, 2020 1:46 AM
sureshkumavat679

Member since:
September 1st, 2020 Points: 100
Member since:
September 1st, 2020 Points: 100
Follow these steps to complete the one-to-one pairing procedure:
- On the main unit, within the SETUP menu, access SYSTEM SETTINGS, then select S-AIR Pairing.
- On the back of the surround amplifier, press the black PAIRING button using a sharp-pointed instrument, such as a paper clip or pen tip.
Answer #8: Posted by nareshmahawar2001 on September 1st, 2020 12:11 AM
nareshmahawar2001

Member since:
August 31st, 2020 Points: 980
Member since:
August 31st, 2020 Points: 980
Related Sony DAVHDX576WF Manual Pages
Operating Instructions - Page 1

3-283-032-11(1)
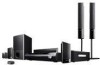
DVD Home Theatre System
Operating Instructions DAV-HDX277WC / HDX279W / HDX576WF
©2008 Sony Corporation
Operating Instructions - Page 2
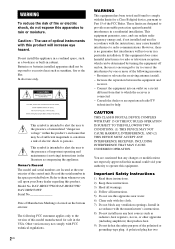
WARNING
To reduce the risk of the control unit.
Batteries or batteries installed apparatus shall not be exposed...correct the interference by turning the equipment off and on the bottom exterior. This symbol is connected. - DAV-HDX277WC/DAV-HDX279W/ DAV-HDX576WF Serial No
Date of important operating and maintenance (servicing) instructions in a residential installation. These limits are...
Operating Instructions - Page 4
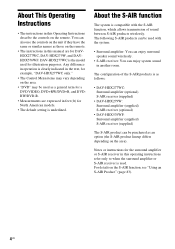
...DVD" may be purchased as follows:
• DAV-HDX277WC: Surround amplifier (optional) S-AIR receiver (supplied)
• DAV-HDX279W: Surround amplifier (supplied) S-AIR receiver (optional)
• DAV-HDX576WF: Surround amplifier (supplied) S-AIR receiver (supplied)
The S-AIR product can enjoy system sound in this Operating Instructions describe the controls on the unit if they have the same...
Operating Instructions - Page 11
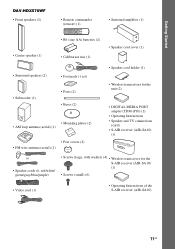
Getting Started
DAV-HDX576WF • Front speakers (2)
• Remote commander (remote) (1)
• Surround amplifier (1)
• Center speaker (1)
• R6 (size ...) (1)
• Operating Instructions • Speaker and TV connections
(card) • S-AIR receiver (AIR-SA10)
(1)
or
• Speaker cords (6, red/white/ green/gray/blue/purple)
• Screws (large, with washer)...
Operating Instructions - Page 13
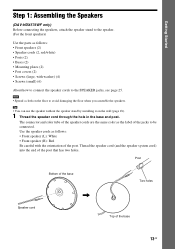
...the base
Speaker cord
,
Two holes Top of the post. Getting Started
Step 1: Assembling the Speakers
(DAV-HDX576WF only) Before connecting the speakers, attach the speaker stand to the speaker. (For the front speakers)
...avoid damaging the floor when you assemble the speakers. Thread the speaker cord (and the speaker system cord) into the end of the jacks to the SPEAKER jacks, see page 25. The ...
Operating Instructions - Page 27
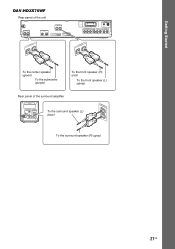
Getting Started
DAV-HDX576WF
Rear panel of the unit
SPEAKER CENTER SUBWOOFER
SPEAKER
TV DIGITAL IN
COAXIAL
OPTICAL
FRONT ... speaker (R) (red)
To the front speaker (L) (white)
Rear panel of the surround amplifier
EZW-RT10
S-AIR ID A B C
PAIRING
SPEAKER L
SURROUND SELECTOR
R
SURROUND
SURROUND BACK
To the surround speaker (L) (blue)
SPEAKER L R
To the surround speaker (R) (gray)
27US
Operating Instructions - Page 39
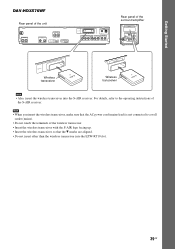
... to the operating instructions of the surround amplifier
EZW-RT10
S-AIR ID A B C
PAIRING
SPEAKER L
SURROUND SELECTOR
R
SURROUND
SURROUND BACK
EZW-RT10
Wireless transceiver
EZW-RT10
Wireless transceiver
Note
• Also, insert the wireless transceiver into the EZW-RT10 slot.
39US
Getting Started
DAV-HDX576WF
Rear panel of the unit
SPEAKER CENTER SUBWOOFER
SPEAKER
TV...
Operating Instructions - Page 40
...
AM
COAXIAL 75
TV/VIDEO
Y
PB/CB
PR/CR
R AUDIO IN L
Rear panel of the surround amplifier
EZW-RT10
S-AIR ID A B C
PAIRING
SPEAKER L
SURROUND SELECTOR
R
SURROUND
SURROUND BACK
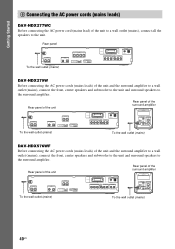
To the wall outlet (mains)
DAV-HDX576WF
Before connecting the AC power cords (mains leads) of the unit to a wall outlet (mains), connect all the speakers...
Operating Instructions - Page 42
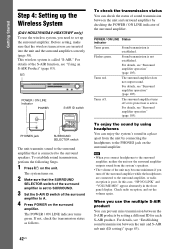
... speakers. Check radio reception, and set up the Wireless System
(DAV-HDX279W/DAV-HDX576WF only) To use the multiple S-AIR product You can enjoy the system's sound in the front panel display. "/1
POWER / ON LINE Indicator
POWER
POWER
POWER/ON LINE PHONES
S-AIR ID switch
EZW-RT10
S-AIR ID A B C
PAIRING
SPEAKER L
SURROUND SELECTOR
R
SURROUND
SURROUND BACK
PHONES jack
SURROUND...
Operating Instructions - Page 45
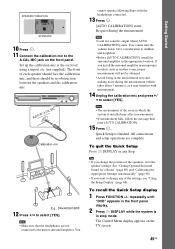
...A.CAL MIC
Calibration mic
E.g., DAV-HDX576WF
12 Press C/c to the...settings. Tip
• If you want to the unit or surround amplifier. The Control Menu display appears on the front panel. Note
• Make sure that the ... Quick Setup Press DISPLAY in the front panel display.
2 Press DISPLAY while the system is finished.
repeatedly until
"DVD" appears in any of each speaker should face ...
Operating Instructions - Page 79
... [/1 to the operating instructions of the system, see "Controlling the TV with the Supplied Remote" (page 91) and refer to the operating instructions supplied with the component.
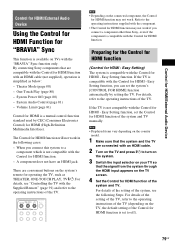
• The Control for HDMI function may not work. Control for HDMI/External Audio Device
Control for HDMI/External Audio Device
Using the Control for HDMI Function for "BRAVIA" Sync...
Operating Instructions - Page 81
... system by the remote of the TV. • If you turn the system off automatically.
* DAV-HDX576WF only ** DAV-HDX277WC/DAV-HDX279W only
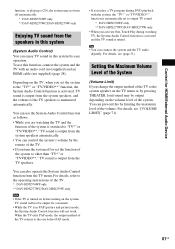
Enjoying TV sound from the speakers in this by pressing THEATER, loud sound may not turn off or set the function of the volume. Tip
• You can also operate the System Audio Control function from the system...
Operating Instructions - Page 86
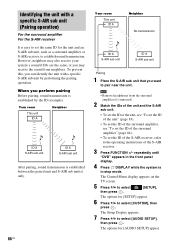
... while the system is established between the paired unit and S-AIR sub unit(s) only.
86US
Your room This unit ID A
Neighbor No transmission
ID A S-AIR sub unit
ID A S-AIR sub unit
Pairing
1 Place the S-AIR sub unit that you perform pairing Before pairing, sound transmission is easy to set the ID of the S-AIR receiver.
3 Press FUNCTION +/-
The Control Menu display...
Operating Instructions - Page 87
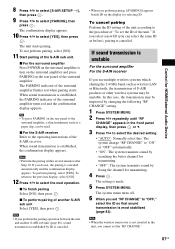
... sound by changing the following "RF CHANGE" setting.
1 Press SYSTEM MENU. 2 Press X/x repeatedly until "RF
CHANGE" appears in the unit, you perform the pairing operation between the unit and another S-AIR sub unit Select [YES], then press . Control for HDMI/External Audio Device
8 Press X/x to select [S-AIR SETUP t],
then press .
9 Press X/x to the procedure of...
Operating Instructions - Page 90
...mic
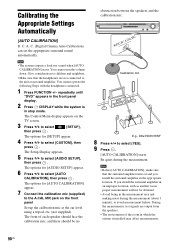
E.g., DAV-HDX576WF
8 Press C/c to select [AUTO
CALIBRATION], then press . A. repeatedly until
"DVD" appears in the front panel display.
2 Press DISPLAY while the system is
in which the system is ...turn the volume down. Calibrating the Appropriate Settings Automatically
[AUTO CALIBRATION]
D. C. The Control Menu display appears on the front panel
Set up the calibration mic at the ear...
Operating Instructions - Page 97

... displayed on the lenses inside the control unit. Projection televisions are removed
from the unit.
3 Press H and "/1 simultaneously. On placement
• Place the system in a horizontal position only.
&#...the speakers further away from components with strong magnets, such as radiators, or air ducts, or in the system.
• At high volume, over long periods of time. If color ...
Operating Instructions - Page 98

... environment. Wipe the disc from the center out.
• Do not use the system and the other wireless systems. -
About the surround amplifier
(DAV-HDX279W/DAV-HDX576WF only)
• The nameplate is located on the side exterior. • Date of radio waves and is most effective, and install the S-AIR main unit and sub unit there.
Operating Instructions - Page 104
... on them.
104US Cancel pairing. • Install the S-AIR main unit and S-AIR sub unit away from other wireless products.
• Stop using the • Make sure that the connected TV is compatible with the System Audio Control System Audio Control function. system and TV while using another S-AIR sub unit.
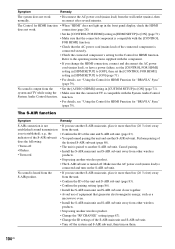
The S-AIR function
Symptom
Remedy
S-AIR connection is not established...
Operating Instructions - Page 105
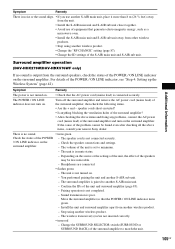
...SURROUND BACK) of the POWER / ON LINE indicator, see "Step 4: Setting up the Wireless System" (page 42). The POWER / ON LINE indicator does not turn on the surround amplifier....The surround amplifier is output from another S-AIR sub unit.
- You performed pairing the unit and another wireless product. - Surround amplifier operation
(DAV-HDX279W/DAV-HDX576WF only)
If no sound.
•...
Operating Instructions - Page 117

...(92) ONE-TOUCH PLAY eg (80)
PICTURE NAVI qg (63) PRESET +/- wj (77) S-AIR MODE 4 SLEEP qj (92) SOUND MODE 5 (51) SUBTITLE ws (54) SYSTEM MENU wf (41, 48, 92, 93, 83) THEATER qk (79) TOOLS wh (91) TUNING +/- 0 (76) TV wl (91) TV CH ... 1 (41, 44, 52) TV [/1 (on the DIGITAL MEDIA PORT adapter, this button may not work.
117US O
P - Additional Information
Remote control
ALPHABETICAL ORDER
A -
Similar Questions

How To Control Dav Hdx576wf With Ps3 Remote
(Posted by husalin 9 years ago)
Lost Remote Control
I lost the remote control for the above system, although I was able to use a universal remote contro...
I lost the remote control for the above system, although I was able to use a universal remote contro...
(Posted by jaymaxy 9 years ago)

How To Buy Remote Control Dav-dz120k In Sri Lanka
(Posted by adithyapraba 10 years ago)

Sony Davhdx576wf Without A Remote Control
Hi my name is Alex, I bought a sony DAVHDX576WF without a remote control and I canot change the radi...
Hi my name is Alex, I bought a sony DAVHDX576WF without a remote control and I canot change the radi...
(Posted by alexybessy 12 years ago)

Looking For Receiver Only Model Number Dav-hdx576wf
looking for receiver only model number dav-hdx576wf sony bravia
looking for receiver only model number dav-hdx576wf sony bravia
(Posted by msosa0816 12 years ago)