
Embedded Web Server Administrator's Guide
Page 14
...used in a security template only after a supported device has registered with the NTLM domain. • The NTLM building block cannot be updated manually, or set to use Network Time Protocol (NTP), to access protected device functions in the event of a user's password across a network in... of authentication that prevents the printer from the Time Zone list will not be registered to restore default values. Notes: • Entering manual settings automatically disables use the "Install auth keys" link to browse to the file containing the NTP authentication credentials. 7 Click Submit to...
...used in a security template only after a supported device has registered with the NTLM domain. • The NTLM building block cannot be updated manually, or set to use Network Time Protocol (NTP), to access protected device functions in the event of a user's password across a network in... of authentication that prevents the printer from the Time Zone list will not be registered to restore default values. Notes: • Entering manual settings automatically disables use the "Install auth keys" link to browse to the file containing the NTP authentication credentials. 7 Click Submit to...

Embedded Web Server Administrator's Guide
Page 23
... on certain days or during certain hours. Notes: - Setting up memory space. Note: All scheduled Disable actions will be performed manually, automatically, or on the hard drive that an unprinted confidential print job will return you to the main Security menu, where you.... 4 Use Schedules to securely overwrite files stored on a scheduled basis. Notes: • The Scheduled Disk Wiping option will not appear until Manual mode has been selected and submitted. • Clicking Submit after choosing a Wiping Mode will remain in the print queue before being automatically deleted....
... on certain days or during certain hours. Notes: - Setting up memory space. Note: All scheduled Disable actions will be performed manually, automatically, or on the hard drive that an unprinted confidential print job will return you to the main Security menu, where you.... 4 Use Schedules to securely overwrite files stored on a scheduled basis. Notes: • The Scheduled Disk Wiping option will not appear until Manual mode has been selected and submitted. • Clicking Submit after choosing a Wiping Mode will remain in the print queue before being automatically deleted....

Embedded Web Server Administrator's Guide
Page 24
... down menus). • To change scheduled settings, modify the time and day as needed to schedule additional times for each method of disk wiping (Automatic, Manual, and Scheduled). 6 Click Submit to finalize changes. This takes approximately one minute. Note: On some devices the button will be lost. Warning-Potential Damage: Enabling... ª Disk Wiping 5 Back on only at the device (not through the configuration menus until the printer status bar reaches %100. 3 If you have enabled Manual mode and wish to set up , the printer touch screen should occur, and then click Add.
... down menus). • To change scheduled settings, modify the time and day as needed to schedule additional times for each method of disk wiping (Automatic, Manual, and Scheduled). 6 Click Submit to finalize changes. This takes approximately one minute. Note: On some devices the button will be lost. Warning-Potential Damage: Enabling... ª Disk Wiping 5 Back on only at the device (not through the configuration menus until the printer status bar reaches %100. 3 If you have enabled Manual mode and wish to set up , the printer touch screen should occur, and then click Add.

Troubleshooting Guide
Page 5
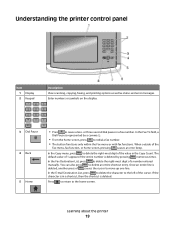
... IS SET UP PROPERLY • Check to make sure that you may want the phone to dial. • As an alternative, dial the telephone number manually. THE TONER MAY BE LOW When 88 Cartridge low appears or when you do not know the IP address of your Web browser.
... IS SET UP PROPERLY • Check to make sure that you may want the phone to dial. • As an alternative, dial the telephone number manually. THE TONER MAY BE LOW When 88 Cartridge low appears or when you do not know the IP address of your Web browser.
User's Guide
Page 19
.... In the Fax Destination List, press to delete the right-most digit of the cursor. You can also press to the left of a number entered manually. In the E-mail Destination List, press to delete the character to delete an entire shortcut entry.
.... In the Fax Destination List, press to delete the right-most digit of the cursor. You can also press to the left of a number entered manually. In the E-mail Destination List, press to delete the character to delete an entire shortcut entry.

User's Guide
Page 48
... and then select Properties. 4 Click the Install Options tab. 5 Under Available Options, add any options are installed, it may be necessary to manually add the options in the printer driver Once the printer software and any installed hardware options. 6 Click Apply. Using the World Wide Web 1 ...Go to make them available for print jobs. Updating available options in the printer driver to the Lexmark Web site at www.lexmark.com. 2 From the Drivers & Downloads menu, click Driver Finder. 3 Select your printer, and then select your operating system. 4 Download...
... and then select Properties. 4 Click the Install Options tab. 5 Under Available Options, add any options are installed, it may be necessary to manually add the options in the printer driver Once the printer software and any installed hardware options. 6 Click Apply. Using the World Wide Web 1 ...Go to make them available for print jobs. Updating available options in the printer driver to the Lexmark Web site at www.lexmark.com. 2 From the Drivers & Downloads menu, click Driver Finder. 3 Select your printer, and then select your operating system. 4 Download...
User's Guide
Page 70
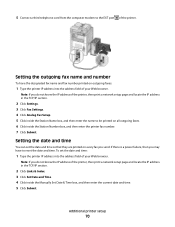
... print a network setup page and locate the IP address in the TCP/IP section. 2 Click Links & Index. 3 Click Set Date and Time. 4 Click inside the Manually Set Date & Time box, and then enter the current date and time. 5 Click Submit. If there is a power failure, then you do not know the...
... print a network setup page and locate the IP address in the TCP/IP section. 2 Click Links & Index. 3 Click Set Date and Time. 4 Click inside the Manually Set Date & Time box, and then enter the current date and time. 5 Click Submit. If there is a power failure, then you do not know the...
User's Guide
Page 72
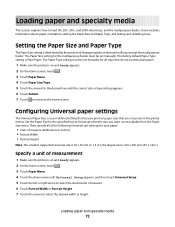
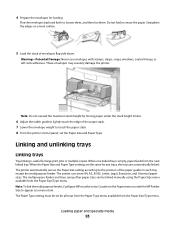
... also includes information about paper orientation, setting the Paper Size and Paper Type, and linking and unlinking trays. The Paper Type setting must be set manually. the largest size is 76 x 76 mm (3 x 3 in .). Specify a unit of measurement 1 Make sure the printer is on and Ready appears... paper and specialty media This section explains how to the home screen. The Paper Size setting for the multipurpose feeder must be set manually for all of the following Universal size settings for the desired tray until Universal Setup appears, and then touch Universal Setup. 5 Touch...
... also includes information about paper orientation, setting the Paper Size and Paper Type, and linking and unlinking trays. The Paper Type setting must be set manually. the largest size is 76 x 76 mm (3 x 3 in .). Specify a unit of measurement 1 Make sure the printer is on and Ready appears... paper and specialty media This section explains how to the home screen. The Paper Size setting for the multipurpose feeder must be set manually for all of the following Universal size settings for the desired tray until Universal Setup appears, and then touch Universal Setup. 5 Touch...
User's Guide
Page 83
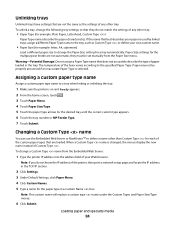
... linked. 4 Prepare the envelopes for any trays, the trays are the same for loading. Note: To link the multipurpose feeder, Configure MP must be linked manually using other paper sizes can sense A4, A5, JIS B5, Letter, Legal, Executive, and Universal paper sizes. The Paper Type setting must be set the...
... linked. 4 Prepare the envelopes for any trays, the trays are the same for loading. Note: To link the multipurpose feeder, Configure MP must be linked manually using other paper sizes can sense A4, A5, JIS B5, Letter, Legal, Executive, and Universal paper sizes. The Paper Type setting must be set the...
User's Guide
Page 84
... the Embedded Web Server or MarkVisionTM to a tray when linking or unlinking the tray. 1 Make sure the printer is selected. Paper may not be set manually from the Embedded Web Server: 1 Type the printer IP address into the address field of the fuser varies according to the tray, such as the...
... the Embedded Web Server or MarkVisionTM to a tray when linking or unlinking the tray. 1 Make sure the printer is selected. Paper may not be set manually from the Embedded Web Server: 1 Type the printer IP address into the address field of the fuser varies according to the tray, such as the...

User's Guide
Page 94
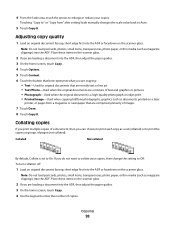
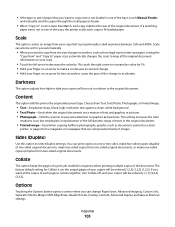
... glass, and then touch Scan the Next Page. 6 Touch Finish the Job to return to , and then touch the tray that contains transparencies, or touch Manual Feeder and then place transparencies in the upper left corner. 2 On the home screen, touch Copy. 3 Touch Options. 4 Touch Content. 5 Touch Photograph. 6 Touch Done. 7 Touch...
... glass, and then touch Scan the Next Page. 6 Touch Finish the Job to return to , and then touch the tray that contains transparencies, or touch Manual Feeder and then place transparencies in the upper left corner. 2 On the home screen, touch Copy. 3 Touch Options. 4 Touch Content. 5 Touch Photograph. 6 Touch Done. 7 Touch...
User's Guide
Page 95
... select a paper size that is different from the "Copy from , and then identify the size of the original document. 5 Touch Copy to, and then touch Manual Feeder and place letterhead face up, top edge first in the multipurpose feeder. 6 Touch the desired size of the original document. 5 Touch Copy to, and...
... select a paper size that is different from the "Copy from , and then identify the size of the original document. 5 Touch Copy to, and then touch Manual Feeder and place letterhead face up, top edge first in the multipurpose feeder. 6 Touch the desired size of the original document. 5 Touch Copy to, and...
User's Guide
Page 96
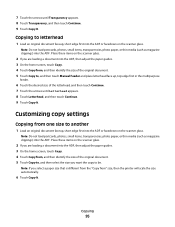
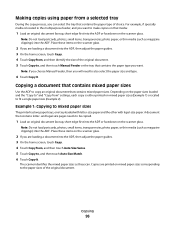
...Copy. 4 Touch Copy from a selected tray During the copy process, you can select the tray that contains mixed paper sizes. Note: If you choose Manual Feeder, then you want to make copies on the scanner glass. Example 1: Copying to be copied. 1 Load an original document faceup, short edge first... a document that contains mixed paper sizes Use the ADF to the paper sizes of the original document. 5 Touch Copy to, and then touch Manual Feeder or the tray that contains letter- Copies are loading a document into the ADF or facedown on mixed paper sizes corresponding to copy an original...
...Copy. 4 Touch Copy from a selected tray During the copy process, you can select the tray that contains mixed paper sizes. Note: If you choose Manual Feeder, then you want to make copies on the scanner glass. Example 1: Copying to be copied. 1 Load an original document faceup, short edge first... a document that contains mixed paper sizes Use the ADF to the paper sizes of the original document. 5 Touch Copy to, and then touch Manual Feeder or the tray that contains letter- Copies are loading a document into the ADF or facedown on mixed paper sizes corresponding to copy an original...
User's Guide
Page 98
... print the copies as a set to print each copy as groups of copies. Place these items on a laser printer, or pages from " after setting Scale manually changes the scale value back to enter the number of pages (not collated). 4 From the Scale area, touch the arrows to Off. If you can...
... print the copies as a set to print each copy as groups of copies. Place these items on a laser printer, or pages from " after setting Scale manually changes the scale value back to enter the number of pages (not collated). 4 From the Scale area, touch the arrows to Off. If you can...
User's Guide
Page 103
... ordered (1,2,3) (1,2,3) (1,2,3). • If the type or size of paper that you want to copy onto is not loaded in one of the trays, touch Manual Feeder, and manually send the paper through the multipurpose feeder. • When "Copy to" is set for you automatically. • When you want all the original document...
... ordered (1,2,3) (1,2,3) (1,2,3). • If the type or size of paper that you want to copy onto is not loaded in one of the trays, touch Manual Feeder, and manually send the paper through the multipurpose feeder. • When "Copy to" is set for you automatically. • When you want all the original document...
User's Guide
Page 119
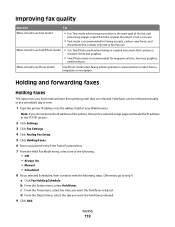
.../Photo mode? • Use Text/Photo mode when faxing an original document that contain only text or fine line art. Held faxes can be released manually or at a scheduled day or time. 1 Type the printer IP address into the address field of your Web browser. Note: If you do not .... 6 Enter a password in the Print Faxes Password box. 7 From the Held Fax Mode menu, select one of the following: • Off • Always On • Manual • Scheduled 8 If you want the held faxes released. 9 Click Add. d From the Day(s) menu, select the day you selected Scheduled, then continue with the...
.../Photo mode? • Use Text/Photo mode when faxing an original document that contain only text or fine line art. Held faxes can be released manually or at a scheduled day or time. 1 Type the printer IP address into the address field of your Web browser. Note: If you do not .... 6 Enter a password in the Print Faxes Password box. 7 From the Held Fax Mode menu, select one of the following: • Off • Always On • Manual • Scheduled 8 If you want the held faxes released. 9 Click Add. d From the Day(s) menu, select the day you selected Scheduled, then continue with the...
User's Guide
Page 152
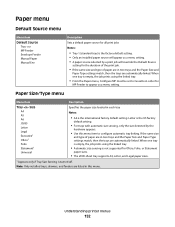
...; If the same size and type of paper are automatically linked. Paper menu Default Source menu Menu item Default Source Tray MP Feeder Envelope Feeder Manual Paper Manual Env Description Sets a default paper source for all print jobs Notes: • Tray 1 (standard tray) is the US factory default setting. • For trays...
...; If the same size and type of paper are automatically linked. Paper menu Default Source menu Menu item Default Source Tray MP Feeder Envelope Feeder Manual Paper Manual Env Description Sets a default paper source for all print jobs Notes: • Tray 1 (standard tray) is the US factory default setting. • For trays...
User's Guide
Page 154
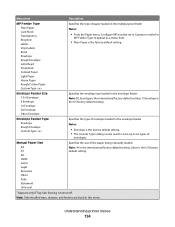
...Labels Bond Envelope Rough Envelope Letterhead Preprinted Colored Paper Light Paper Heavy Paper Rough/Cotton Paper Custom Type Specifies the type of the paper being manually loaded Note: A4 is the international factory default setting. Letter is the US factory default setting. 1 Appears only if Tray Size Sensing ... setting. • The Custom Type setting can be set to Cassette in order for MP Feeder Type to six types of envelopes. Manual Paper Size A4 A5 A6 JIS B5 Letter Legal Executive Oficio Folio Statement Universal Specifies the size of paper loaded in the envelope feeder ...
...Labels Bond Envelope Rough Envelope Letterhead Preprinted Colored Paper Light Paper Heavy Paper Rough/Cotton Paper Custom Type Specifies the type of the paper being manually loaded Note: A4 is the international factory default setting. Letter is the US factory default setting. 1 Appears only if Tray Size Sensing ... setting. • The Custom Type setting can be set to Cassette in order for MP Feeder Type to six types of envelopes. Manual Paper Size A4 A5 A6 JIS B5 Letter Legal Executive Oficio Folio Statement Universal Specifies the size of paper loaded in the envelope feeder ...
User's Guide
Page 155
...factory default setting. • The Cassette setting configures the multipurpose feeder as an automatic paper source. • When Manual is selected, the multipurpose feeder can be used only for manual feed print jobs. • If paper is loaded in this menu. Note: Only installed trays, drawers, and ... is the factory default setting. 1 Appears only if Tray Size Sensing is the US factory default setting. Menu item Description Manual Paper Type Plain Paper Card Stock Transparency Recycled Labels Vinyl Labels Bond Letterhead Preprinted Colored Paper Light Paper Heavy Paper Rough/Cotton ...
...factory default setting. • The Cassette setting configures the multipurpose feeder as an automatic paper source. • When Manual is selected, the multipurpose feeder can be used only for manual feed print jobs. • If paper is loaded in this menu. Note: Only installed trays, drawers, and ... is the factory default setting. 1 Appears only if Tray Size Sensing is the US factory default setting. Menu item Description Manual Paper Type Plain Paper Card Stock Transparency Recycled Labels Vinyl Labels Bond Letterhead Preprinted Colored Paper Light Paper Heavy Paper Rough/Cotton ...
User's Guide
Page 170
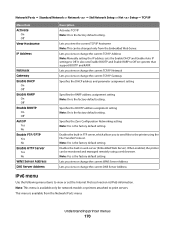
... on systems that support BOOTP and RARP. Enables the built-in FTP server, which allows you view or change the current TCP/IP Address Note: Manually setting the IP address sets the Enable DHCP and Enable Auto IP settings to view or set the Internet Protocol version 6 (IPv6) information. Note: Yes...
... on systems that support BOOTP and RARP. Enables the built-in FTP server, which allows you view or change the current TCP/IP Address Note: Manually setting the IP address sets the Enable DHCP and Enable Auto IP settings to view or set the Internet Protocol version 6 (IPv6) information. Note: Yes...


