Enhanced Number Pad Mode User's Guide
Page 9
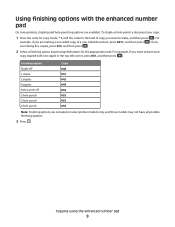
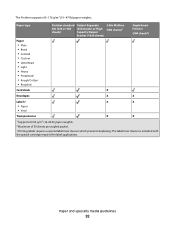
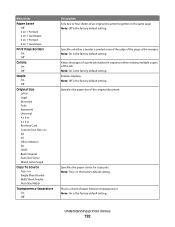
..., press 015, and then press . 2 Select a finishing option by pressing the buttons for the kind of copy you are available. Finishing option Staple off 1 staple 2 staples 4 staples Hole punch off 2 hole punch 3 hole punch 4 hole punch Code 040 041 042 044 050 052 053 054 Note: Finishing options are included...then press . For example, if you want to have all possible finishing options. 3 Press . If you want to make, and then press . To staple or hole-punch a document you copy: 1 Press the code for copy mode, * 1, and the code for the appropriate code. Copying using the enhanced ...
..., press 015, and then press . 2 Select a finishing option by pressing the buttons for the kind of copy you are available. Finishing option Staple off 1 staple 2 staples 4 staples Hole punch off 2 hole punch 3 hole punch 4 hole punch Code 040 041 042 044 050 052 053 054 Note: Finishing options are included...then press . For example, if you want to have all possible finishing options. 3 Press . If you want to make, and then press . To staple or hole-punch a document you copy: 1 Press the code for copy mode, * 1, and the code for the appropriate code. Copying using the enhanced ...
Enhanced Number Pad Mode User's Guide
Page 12
Index C copying using the enhanced number pad 8 D display messages Enhanced Number Pad mode 6 E Enhanced Number Pad mode 5 display messages 6 printer control panel buttons 5 F faxing using shortcuts 11 using the enhanced number pad 10 H hole-punching using the enhanced number pad 9 N notices 2 number pad enhanced 5 P printer control panel buttons for Enhanced Number Pad mode 5 S stapling using the enhanced number pad 9 Index 12
Index C copying using the enhanced number pad 8 D display messages Enhanced Number Pad mode 6 E Enhanced Number Pad mode 5 display messages 6 printer control panel buttons 5 F faxing using shortcuts 11 using the enhanced number pad 10 H hole-punching using the enhanced number pad 9 N notices 2 number pad enhanced 5 P printer control panel buttons for Enhanced Number Pad mode 5 S stapling using the enhanced number pad 9 Index 12
Clearing Jams Guide
Page 4
... to identify the location of the jam. 2 Pull down the StapleSmartTM finisher door. 3 Remove the jammed paper. 4 Close the StapleSmart finisher door. 5 Touch Continue. 283 staple jams 1 Touch Status/Supplies to identify the location of the jam. 2 Press the latch to identify the location of the jam. For more information, see...
... to identify the location of the jam. 2 Pull down the StapleSmartTM finisher door. 3 Remove the jammed paper. 4 Close the StapleSmart finisher door. 5 Touch Continue. 283 staple jams 1 Touch Status/Supplies to identify the location of the jam. 2 Press the latch to identify the location of the jam. For more information, see...
Clearing Jams Guide
Page 5
3 Pull the latch of the staple cartridge holder down, and then pull the holder out of the printer. 5 Close the staple guard. 290-294 paper jams 1 Remove all original documents from the ADF. 2 Open the ADF cover, and then remove any jammed paper. 4 Use the metal tab to lift the staple guard, and then remove any loose staples. 6 Press down on the staple guard until it snaps into place. 3 Close the ADF cover. 7 Push the cartridge holder firmly back into the stapler unit until the cartridge holder clicks into place. 8 Close the stapler door. 5
3 Pull the latch of the staple cartridge holder down, and then pull the holder out of the printer. 5 Close the staple guard. 290-294 paper jams 1 Remove all original documents from the ADF. 2 Open the ADF cover, and then remove any jammed paper. 4 Use the metal tab to lift the staple guard, and then remove any loose staples. 6 Press down on the staple guard until it snaps into place. 3 Close the ADF cover. 7 Push the cartridge holder firmly back into the stapler unit until the cartridge holder clicks into place. 8 Close the stapler door. 5

User's Guide
Page 7
......143 240-249 paper jams...144 250 paper jam...145 260 paper jam...146 270-279 paper jams...146 280-282 paper jams...146 283 staple jams...147 290-294 paper jams...149 Understanding printer menus 151 Menus list...151 Paper menu...152 Default Source menu...152 Paper Size/Type menu...
......143 240-249 paper jams...144 250 paper jam...145 260 paper jam...146 270-279 paper jams...146 280-282 paper jams...146 283 staple jams...147 290-294 paper jams...149 Understanding printer menus 151 Menus list...151 Paper menu...152 Default Source menu...152 Paper Size/Type menu...
User's Guide
Page 9
... an ADF maintenance kit...255 Ordering a transfer roller...255 Ordering charge rolls...255 Ordering pick rollers ...255 Ordering ADF replacement parts...256 Ordering staple cartridges...256 Recycling Lexmark products...256 Moving the printer...256 Before moving the printer ...256 Moving the printer to another location...257 Setting the printer up in a new...
... an ADF maintenance kit...255 Ordering a transfer roller...255 Ordering charge rolls...255 Ordering pick rollers ...255 Ordering ADF replacement parts...256 Ordering staple cartridges...256 Recycling Lexmark products...256 Moving the printer...256 Before moving the printer ...256 Moving the printer to another location...257 Setting the printer up in a new...
User's Guide
Page 92
...)1 StapleSmart Finisher (500 sheets2) X Envelopes X X Labels 3 • Paper • Vinyl Transparencies X X X X 1 Supports 60-90 g/m2 (16-24 lb) paper weights. 2 Maximum of 50 sheets per stapled packet. 3 Printing labels requires a special label fuser cleaner which prevents duplexing. Paper and specialty media guidelines 92 The label fuser cleaner is included with the...
...)1 StapleSmart Finisher (500 sheets2) X Envelopes X X Labels 3 • Paper • Vinyl Transparencies X X X X 1 Supports 60-90 g/m2 (16-24 lb) paper weights. 2 Maximum of 50 sheets per stapled packet. 3 Printing labels requires a special label fuser cleaner which prevents duplexing. Paper and specialty media guidelines 92 The label fuser cleaner is included with the...
User's Guide
Page 147
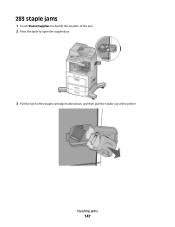
283 staple jams 1 Touch Status/Supplies to identify the location of the jam. 2 Press the latch to open the stapler door. 3 Pull the latch of the staple cartridge holder down, and then pull the holder out of the printer. Clearing jams 147
283 staple jams 1 Touch Status/Supplies to identify the location of the jam. 2 Press the latch to open the stapler door. 3 Pull the latch of the staple cartridge holder down, and then pull the holder out of the printer. Clearing jams 147
User's Guide
Page 148
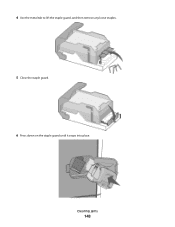
4 Use the metal tab to lift the staple guard, and then remove any loose staples. 5 Close the staple guard. 6 Press down on the staple guard until it snaps into place. Clearing jams 148
4 Use the metal tab to lift the staple guard, and then remove any loose staples. 5 Close the staple guard. 6 Press down on the staple guard until it snaps into place. Clearing jams 148
User's Guide
Page 189
...minutes of inactivity before returning the printer display to a Ready state Note: 30 seconds is the factory default setting for Toner Alarm and Staple Alarm. Notes: • 60 minutes is installed. Understanding printer menus 189 Sets the amount of time in the print queue Notes: &#... type are: Off Single Continuous Notes: • Single is the factory default setting. Menu item Location Alarms Alarm Control Cartridge Alarm Staple Alarm Timeouts Job Hold Timeout Disabled 5-255 Timeouts Standby Mode Disabled 2-240 Timeouts Power Saver Mode Disabled 2-240 Timeouts Screen Timeout 15-...
...minutes of inactivity before returning the printer display to a Ready state Note: 30 seconds is the factory default setting for Toner Alarm and Staple Alarm. Notes: • 60 minutes is installed. Understanding printer menus 189 Sets the amount of time in the print queue Notes: &#... type are: Off Single Continuous Notes: • Single is the factory default setting. Menu item Location Alarms Alarm Control Cartridge Alarm Staple Alarm Timeouts Job Hold Timeout Disabled 5-255 Timeouts Standby Mode Disabled 2-240 Timeouts Power Saver Mode Disabled 2-240 Timeouts Screen Timeout 15-...
User's Guide
Page 192
... Saver Off 2 on 1 Portrait 2 on 1 Landscape 4 on 1 Portrait 4 on the same page Note: Off is the factory default setting. Enables stapling Note: Off is the factory default setting. Business Card Custom Scan Size A4 A5 Oficio (Mexico) A6 JIS B5 Book Original Auto Size Sense Mixed... setting. Specifies whether a border is printed around the edge of an original document together on 1 Landscape Print Page Borders On Off Collate On Off Staple On Off Original Size Letter Legal Executive Folio Statement Universal 4 x 6 in. 3 x 5 in sequence when making multiple copies of the job Note...
... Saver Off 2 on 1 Portrait 2 on 1 Landscape 4 on 1 Portrait 4 on the same page Note: Off is the factory default setting. Enables stapling Note: Off is the factory default setting. Business Card Custom Scan Size A4 A5 Oficio (Mexico) A6 JIS B5 Book Original Auto Size Sense Mixed... setting. Specifies whether a border is printed around the edge of an original document together on 1 Landscape Print Page Borders On Off Collate On Off Staple On Off Original Size Letter Legal Executive Folio Statement Universal 4 x 6 in. 3 x 5 in sequence when making multiple copies of the job Note...
User's Guide
Page 202
... to Shortcut Block No Name Fax On Off Banned Fax List Holding Faxes Held Fax Mode Off Always On Manual Scheduled Fax Holding Schedule Staple On Off Fax Log Settings Menu item Transmission Log Print log Do not print log Print only for the attached finisher Note: Only the... of received faxes to another recipient Specifies the type of a receive error log following a receive error Understanding printer menus 202 Specifies the default staple setting for error Receive Error Log Print Never Print on Error Description Specifies the maximum speed in the printer Enables fax holding all of the...
... to Shortcut Block No Name Fax On Off Banned Fax List Holding Faxes Held Fax Mode Off Always On Manual Scheduled Fax Holding Schedule Staple On Off Fax Log Settings Menu item Transmission Log Print log Do not print log Print only for the attached finisher Note: Only the... of received faxes to another recipient Specifies the type of a receive error log following a receive error Understanding printer menus 202 Specifies the default staple setting for error Receive Error Log Print Never Print on Error Description Specifies the maximum speed in the printer Enables fax holding all of the...
User's Guide
Page 217
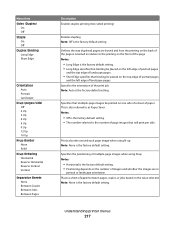
Menu item Sides (Duplex) On Off Staple On Off Duplex Binding Long Edge Short Edge Orientation Auto Portrait Landscape N-up (pages/side) Off 2 Up 3 Up 4 Up 6 Up 9 Up 12 Up 16 Up N-... N-up Ordering Horizontal Reverse Horizontal Reverse Vertical Vertical Separator Sheets None Between Copies Between Jobs Between Pages Description Enables duplex printing (two-sided printing) Enables stapling Note: Off is the factory default setting. Defines the way duplexed pages are in portrait or landscape orientation. Specifies the positioning of multiple-page images...
Menu item Sides (Duplex) On Off Staple On Off Duplex Binding Long Edge Short Edge Orientation Auto Portrait Landscape N-up (pages/side) Off 2 Up 3 Up 4 Up 6 Up 9 Up 12 Up 16 Up N-... N-up Ordering Horizontal Reverse Horizontal Reverse Vertical Vertical Separator Sheets None Between Copies Between Jobs Between Pages Description Enables duplex printing (two-sided printing) Enables stapling Note: Off is the factory default setting. Defines the way duplexed pages are in portrait or landscape orientation. Specifies the positioning of multiple-page images...
User's Guide
Page 222
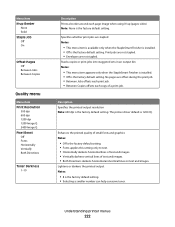
... horizontal lines of text and images. • Vertically darkens vertical lines of a print job. Understanding printer menus 222 No pages are stapled Notes: • This menu item is available only when the StapleSmart Finisher is installed. • Off is the factory default setting.... Print jobs are not stapled. • Envelopes are not stapled. Lightens or darkens the printed output Notes: • 8 is the factory default setting. Description Specifies the printed output...
... horizontal lines of text and images. • Vertically darkens vertical lines of a print job. Understanding printer menus 222 No pages are stapled Notes: • This menu item is available only when the StapleSmart Finisher is installed. • Off is the factory default setting.... Print jobs are not stapled. • Envelopes are not stapled. Lightens or darkens the printed output Notes: • 8 is the factory default setting. Description Specifies the printed output...
User's Guide
Page 233
...contact your system support person. Try one or more of the following: • Insert a staple cartridge to clear the message. • Touch Continue to clear the message and print without using the staple feature. Insert Tray Insert the specified tray into the printer. Understanding printer messages 233 If the ... set up The Fax Station Number has not been entered. Fax Station Number not set up The Fax Station Name has not been entered. Insert staple cartridge Try one or more of the following : • Touch Continue to clear the message. • Complete the Analog Fax Setup. Try...
...contact your system support person. Try one or more of the following: • Insert a staple cartridge to clear the message. • Touch Continue to clear the message and print without using the staple feature. Insert Tray Insert the specified tray into the printer. Understanding printer messages 233 If the ... set up The Fax Station Number has not been entered. Fax Station Number not set up The Fax Station Name has not been entered. Insert staple cartridge Try one or more of the following : • Touch Continue to clear the message. • Complete the Analog Fax Setup. Try...

User's Guide
Page 235
... If the printer finds a tray that has the correct paper type and size, then it prints from that tray. Load staples Try one or more of the following : • Replace the specified staple cartridge in the tray. • Touch Continue to cancel the print job. Network/Network The printer is connected to...
... If the printer finds a tray that has the correct paper type and size, then it prints from that tray. Load staples Try one or more of the following : • Replace the specified staple cartridge in the tray. • Touch Continue to cancel the print job. Network/Network The printer is connected to...
User's Guide
Page 246
... documents from the specified stapler area(s). 2 Touch Continue to continue printing. 290-294.yy scanner jam Clear all the items necessary to continue printing. 283 Staple jam 1 Clear the jam from the scanner. Understanding printer messages 246 Replace the print cartridge, and then touch Continue to clear the message and continue...
... documents from the specified stapler area(s). 2 Touch Continue to continue printing. 290-294.yy scanner jam Clear all the items necessary to continue printing. 283 Staple jam 1 Clear the jam from the scanner. Understanding printer messages 246 Replace the print cartridge, and then touch Continue to clear the message and continue...
User's Guide
Page 256
... pick assembly ADF separator roll Part number 3017345 3017348 Ordering staple cartridges When Staples Low or Staples Empty appears, order the specified staple cartridge. Part name Staple Cartridges-3 pack Part number 25A0013 Recycling Lexmark products To return Lexmark products to Lexmark for recycling: 1 Visit our Web site at www.lexmark.com/recycle. 2 Find the product type you experience problems...
... pick assembly ADF separator roll Part number 3017345 3017348 Ordering staple cartridges When Staples Low or Staples Empty appears, order the specified staple cartridge. Part name Staple Cartridges-3 pack Part number 25A0013 Recycling Lexmark products To return Lexmark products to Lexmark for recycling: 1 Visit our Web site at www.lexmark.com/recycle. 2 Find the product type you experience problems...
User's Guide
Page 308
... error, load emulation option 248 2000-sheet tray loading 76 200-282.yy paper jam 246 250-sheet tray (standard or optional) loading 73 283 Staple jam 246 290-294.yy scanner jam 246 293 Replace all originals if restarting job 247 293.02 Flatbed Cover Open 247 30 Invalid refill...
... error, load emulation option 248 2000-sheet tray loading 76 200-282.yy paper jam 246 250-sheet tray (standard or optional) loading 73 283 Staple jam 246 290-294.yy scanner jam 246 293 Replace all originals if restarting job 247 293.02 Flatbed Cover Open 247 30 Invalid refill...
User's Guide
Page 310
... Help menu 229 holding faxes 119 home screen buttons 20 HTML menu 228 I Image menu 229 Insert staple cartridge 233 Insert Tray 233 Install bin 234 Install envelope feeder 234 Install tray 234 installation wireless network 50...-239 143 240-249 144 250 145 260 146 270-279 146 280-289 paper jams 146 283 staple jams 147 290-294 149 stapler 147 job interrupt 101 Job stored for delayed transmission 234 L labels ... Line busy 234 linking trays 83 Load with 235 Load manual feeder with 235 Load staples 235 loading 2000-sheet tray 76 fax screen advanced options 118 options 117, 118 Fax server 'To Format' ...
... Help menu 229 holding faxes 119 home screen buttons 20 HTML menu 228 I Image menu 229 Insert staple cartridge 233 Insert Tray 233 Install bin 234 Install envelope feeder 234 Install tray 234 installation wireless network 50...-239 143 240-249 144 250 145 260 146 270-279 146 280-289 paper jams 146 283 staple jams 147 290-294 149 stapler 147 job interrupt 101 Job stored for delayed transmission 234 L labels ... Line busy 234 linking trays 83 Load with 235 Load manual feeder with 235 Load staples 235 loading 2000-sheet tray 76 fax screen advanced options 118 options 117, 118 Fax server 'To Format' ...


