
Embedded Web Server Administrator's Guide
Page 24
...until you see the Disk Encryption menu selection. 5 Select Disk Encryption. 6 From the Disk Encryption menu, select Enable to the Enable/Disable screen. 8 To finish, press Back, and then Exit Configuration (or Exit Config Menu). Continue? • Select Yes to finalize changes. After the disk has been encrypted, you to... lower right corner of standard home screen icons such as needed to schedule additional times for each method of the encryption task. When finished, use the browser Back button to return to the Disk Wiping setup screen, or use the menu on the left to browse back...
...until you see the Disk Encryption menu selection. 5 Select Disk Encryption. 6 From the Disk Encryption menu, select Enable to the Enable/Disable screen. 8 To finish, press Back, and then Exit Configuration (or Exit Config Menu). Continue? • Select Yes to finalize changes. After the disk has been encrypted, you to... lower right corner of standard home screen icons such as needed to schedule additional times for each method of the encryption task. When finished, use the browser Back button to return to the Disk Wiping setup screen, or use the menu on the left to browse back...

Enhanced Number Pad Mode User's Guide
Page 3
Contents Edition notice 2 Overview 5 Enhanced Number Pad mode...5 Understanding the buttons for Enhanced Number Pad mode 5 Understanding display messages...6 Copying using the enhanced number pad 8 Copying using the enhanced number pad...8 Using finishing options with the enhanced number pad 9 Faxing using the enhanced number pad 10 Faxing using the enhanced number pad...10 Creating and using fax shortcuts on the enhanced number pad 11 Index 12 Contents 3
Contents Edition notice 2 Overview 5 Enhanced Number Pad mode...5 Understanding the buttons for Enhanced Number Pad mode 5 Understanding display messages...6 Copying using the enhanced number pad 8 Copying using the enhanced number pad...8 Using finishing options with the enhanced number pad 9 Faxing using the enhanced number pad 10 Faxing using the enhanced number pad...10 Creating and using fax shortcuts on the enhanced number pad 11 Index 12 Contents 3
Enhanced Number Pad Mode User's Guide
Page 9
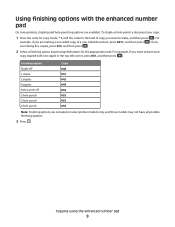
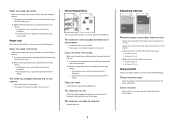
... pressing the buttons for the kind of copy you are available. If you want to make, and then press . Using finishing options with one -sided document, press 0211, and then press . Finishing option Staple off 1 staple 2 staples 4 staples Hole punch off 2 hole punch 3 hole punch 4 hole punch Code 040 041... 042 044 050 052 053 054 Note: Finishing options are included on select printer models only, and those models may not have each copy stapled with the enhanced number pad On some printers, ...
... pressing the buttons for the kind of copy you are available. If you want to make, and then press . Using finishing options with one -sided document, press 0211, and then press . Finishing option Staple off 1 staple 2 staples 4 staples Hole punch off 2 hole punch 3 hole punch 4 hole punch Code 040 041... 042 044 050 052 053 054 Note: Finishing options are included on select printer models only, and those models may not have each copy stapled with the enhanced number pad On some printers, ...
Clearing Jams Guide
Page 1
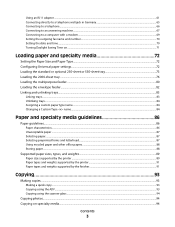
... 2 230-239 Duplex unit 3 240-249 Paper tray 4 250 Multipurpose feeder 5 260 Envelope feeder 6 270-279 Optional output bin 7 280-282 Finisher 8 283 Stapler 9 290-294 ADF cover 200 and 201 paper jams 1 Touch Status/Supplies to access jam locations. To resolve any way Understanding jam... numbers and locations When a jam occurs, a message indicating the jam location appears. Lexmark™ X65x Clearing Jams Guide Clearing jams Avoiding jams The following table lists the jams that can help you must clear all trays in...
... 2 230-239 Duplex unit 3 240-249 Paper tray 4 250 Multipurpose feeder 5 260 Envelope feeder 6 270-279 Optional output bin 7 280-282 Finisher 8 283 Stapler 9 290-294 ADF cover 200 and 201 paper jams 1 Touch Status/Supplies to access jam locations. To resolve any way Understanding jam... numbers and locations When a jam occurs, a message indicating the jam location appears. Lexmark™ X65x Clearing Jams Guide Clearing jams Avoiding jams The following table lists the jams that can help you must clear all trays in...
Clearing Jams Guide
Page 4
... doors. 6 Touch Continue. 280-282 paper jams 1 Touch Status/Supplies to identify the location of the jam. 2 Pull down the StapleSmartTM finisher door. 3 Remove the jammed paper. 4 Close the StapleSmart finisher door. 5 Touch Continue. 283 staple jams 1 Touch Status/Supplies to identify the location of the stack; the bottom envelope will have...
... doors. 6 Touch Continue. 280-282 paper jams 1 Touch Status/Supplies to identify the location of the jam. 2 Pull down the StapleSmartTM finisher door. 3 Remove the jammed paper. 4 Close the StapleSmart finisher door. 5 Touch Continue. 283 staple jams 1 Touch Status/Supplies to identify the location of the stack; the bottom envelope will have...
Troubleshooting Guide
Page 2
... and size of fonts, the number and complexity of images, and the number of the following : MAKE SURE COLLATE IS SET TO ON From the Finishing menu or Print Properties, set the size from the Paper Size/Type menu. Unexpected page breaks occur INCREASE THE PRINT TIMEOUT VALUE 1 Make sure the... one or more of the following : LOAD THE SAME SIZE AND TYPE OF PAPER • Load the same size and type of pages in the Finishing menu.
... and size of fonts, the number and complexity of images, and the number of the following : MAKE SURE COLLATE IS SET TO ON From the Finishing menu or Print Properties, set the size from the Paper Size/Type menu. Unexpected page breaks occur INCREASE THE PRINT TIMEOUT VALUE 1 Make sure the... one or more of the following : LOAD THE SAME SIZE AND TYPE OF PAPER • Load the same size and type of pages in the Finishing menu.
Troubleshooting Guide
Page 4
... document or photo scans These are possible solutions. Try one or more of these settings by another device, then wait until the other device is finished before sending a fax. • If you are using DSL, then connect to use . The availability of the following: CHECK THE DOCUMENT PLACEMENT Make sure the...
... document or photo scans These are possible solutions. Try one or more of these settings by another device, then wait until the other device is finished before sending a fax. • If you are using DSL, then connect to use . The availability of the following: CHECK THE DOCUMENT PLACEMENT Make sure the...
Troubleshooting Guide
Page 6
... or exits the feeder, then it may not be properly installed. Output options If the high capacity output expander, 4-bin mailbox, or StapleSmartTM finisher is listed on the menu settings page, but paper jams when it exits the printer or enters the output option, then it may not be... then turn the printer on . Try one or more information, see the hardware setup documentation that came with the envelope feeder, or go to www.lexmark.com/publications to print, specify the correct settings from the computer: • For Windows users, specify the settings from Print Properties. • For...
... or exits the feeder, then it may not be properly installed. Output options If the high capacity output expander, 4-bin mailbox, or StapleSmartTM finisher is listed on the menu settings page, but paper jams when it exits the printer or enters the output option, then it may not be... then turn the printer on . Try one or more information, see the hardware setup documentation that came with the envelope feeder, or go to www.lexmark.com/publications to print, specify the correct settings from the computer: • For Windows users, specify the settings from Print Properties. • For...
Troubleshooting Guide
Page 9
...: • 88.0 mm (3.46 in.) • 95.2 mm (3.75 in its original wrapper until you use it . CHECK THE PAPER Avoid textured paper with rough finishes. THE FUSER MAY BE WORN OR DEFECTIVE Replace the fuser. Paper curl These are using paper that meets the printer specifications. 9 Try one or more...
...: • 88.0 mm (3.46 in.) • 95.2 mm (3.75 in its original wrapper until you use it . CHECK THE PAPER Avoid textured paper with rough finishes. THE FUSER MAY BE WORN OR DEFECTIVE Replace the fuser. Paper curl These are using paper that meets the printer specifications. 9 Try one or more...

Troubleshooting Guide
Page 10
THE PRINT CARTRIDGE MAY BE DEFECTIVE OR LOW ON TONER Replace the used print cartridge with rough finishes. Try one or more of the following : CHECK THE DARKNESS, BRIGHTNESS, AND CONTRAST SETTINGS The Toner Darkness setting is too dark, the Brightness setting is ...
THE PRINT CARTRIDGE MAY BE DEFECTIVE OR LOW ON TONER Replace the used print cartridge with rough finishes. Try one or more of the following : CHECK THE DARKNESS, BRIGHTNESS, AND CONTRAST SETTINGS The Toner Darkness setting is too dark, the Brightness setting is ...

Troubleshooting Guide
Page 11
... a hot component, allow the surface to be hot. THE PRINT CARTRIDGE MAY BE DEFECTIVE OR LOW ON TONER Replace the used print cartridge with rough finishes. Try one or more of injury from the Print dialog. THE CHARGE ROLLS MAY BE DEFECTIVE Replace the charge rolls. THE PRINT CARTRIDGE MAY BE...
... a hot component, allow the surface to be hot. THE PRINT CARTRIDGE MAY BE DEFECTIVE OR LOW ON TONER Replace the used print cartridge with rough finishes. Try one or more of injury from the Print dialog. THE CHARGE ROLLS MAY BE DEFECTIVE Replace the charge rolls. THE PRINT CARTRIDGE MAY BE...
User's Guide
Page 3
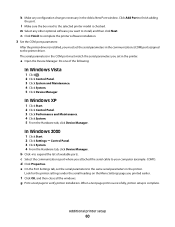
... weights...89 Paper sizes supported by the printer ...89 Paper types and weights supported by the printer ...91 Paper types and weights supported by the finisher...91 Copying 93 Making copies...93 Making a quick copy...93 Copying using the ADF...93 Copying using the scanner glass ...94 Copying photos...94 Copying...
... weights...89 Paper sizes supported by the printer ...89 Paper types and weights supported by the printer ...91 Paper types and weights supported by the finisher...91 Copying 93 Making copies...93 Making a quick copy...93 Copying using the ADF...93 Copying using the scanner glass ...94 Copying photos...94 Copying...

User's Guide
Page 55
..., and then click Agree to configure printers using scripts, select Custom and follow the on-screen instructions. 9 Follow the on the network, and then click Finish. In Windows XP and earlier a Click Start. Note: If your configured printer does not appear in the list of discovered printers, click Add Port and...
..., and then click Agree to configure printers using scripts, select Custom and follow the on-screen instructions. 9 Follow the on the network, and then click Finish. In Windows XP and earlier a Click Start. Note: If your configured printer does not appear in the list of discovered printers, click Add Port and...
User's Guide
Page 60
... checked. m Select any configuration changes necessary in the Add a New Port window. g Print a test page to the printer driver. n Click Finish to complete the printer software installation. 3 Set the COM port parameters: After the printer driver is installed, you must match the serial parameters you ... click Device Manager. f Click OK, and then close all the windows. Additional printer setup 60 l Make sure the box next to finish adding the port. Look for the printer settings under the serial heading on the Menu Settings page you attached the serial cable to expand ...
... checked. m Select any configuration changes necessary in the Add a New Port window. g Print a test page to the printer driver. n Click Finish to complete the printer software installation. 3 Set the COM port parameters: After the printer driver is installed, you must match the serial parameters you ... click Device Manager. f Click OK, and then close all the windows. Additional printer setup 60 l Make sure the box next to finish adding the port. Look for the printer settings under the serial heading on the Menu Settings page you attached the serial cable to expand ...

User's Guide
Page 74
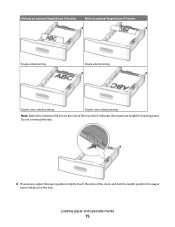
... sheets back and forth to the correct position for duplex printing Note: Paper must be loaded differently in the trays if an optional StapleSmartTM II Finisher is installed. Loading paper and specialty media 74 3 Unlock the length guide, squeeze the length guide tab inward as shown, and slide the guide to...
... sheets back and forth to the correct position for duplex printing Note: Paper must be loaded differently in the trays if an optional StapleSmartTM II Finisher is installed. Loading paper and specialty media 74 3 Unlock the length guide, squeeze the length guide tab inward as shown, and slide the guide to...
User's Guide
Page 75
Loading paper and specialty media 75 Do not overload the tray. 6 If necessary, adjust the paper guides to lightly touch the sides of the stack, and lock the length guide for the paper sizes indicated on the side of the tray which indicates the maximum height for loading paper. Without an optional StapleSmart II Finisher With an optional StapleSmart II Finisher Single-sided printing Single-sided printing Duplex (two-sided) printing Duplex (two-sided) printing Note: Notice the maximum fill line on the tray.
Loading paper and specialty media 75 Do not overload the tray. 6 If necessary, adjust the paper guides to lightly touch the sides of the stack, and lock the length guide for the paper sizes indicated on the side of the tray which indicates the maximum height for loading paper. Without an optional StapleSmart II Finisher With an optional StapleSmart II Finisher Single-sided printing Single-sided printing Duplex (two-sided) printing Duplex (two-sided) printing Note: Notice the maximum fill line on the tray.
User's Guide
Page 78
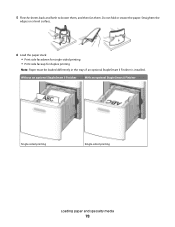
Straighten the edges on a level surface. 6 Load the paper stack: • Print side facedown for single-sided printing • Print side faceup for duplex printing Note: Paper must be loaded differently in the trays if an optional StapleSmart II Finisher is installed. Do not fold or crease the paper. Without an optional StapleSmart II Finisher With an optional StapleSmart II Finisher Single-sided printing Single-sided printing Loading paper and specialty media 78 5 Flex the sheets back and forth to loosen them, and then fan them.
Straighten the edges on a level surface. 6 Load the paper stack: • Print side facedown for single-sided printing • Print side faceup for duplex printing Note: Paper must be loaded differently in the trays if an optional StapleSmart II Finisher is installed. Do not fold or crease the paper. Without an optional StapleSmart II Finisher With an optional StapleSmart II Finisher Single-sided printing Single-sided printing Loading paper and specialty media 78 5 Flex the sheets back and forth to loosen them, and then fan them.
User's Guide
Page 79
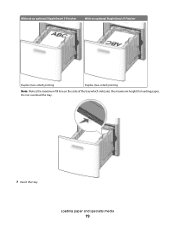
Without an optional StapleSmart II Finisher With an optional StapleSmart II Finisher Duplex (two-sided) printing Duplex (two-sided) printing Note: Notice the maximum fill line on the side of the tray which indicates the maximum height for loading paper. Loading paper and specialty media 79 Do not overload the tray. 7 Insert the tray.
Without an optional StapleSmart II Finisher With an optional StapleSmart II Finisher Duplex (two-sided) printing Duplex (two-sided) printing Note: Notice the maximum fill line on the side of the tray which indicates the maximum height for loading paper. Loading paper and specialty media 79 Do not overload the tray. 7 Insert the tray.
User's Guide
Page 81
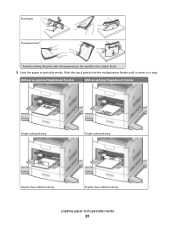
Slide the stack gently into the multipurpose feeder until it comes to scratch them. 5 Load the paper or specialty media. Envelopes Transparencies* * Avoid touching the print side of transparencies. Without an optional StapleSmart Finisher With an optional StapleSmart Finisher Single-sided printing Single-sided printing Duplex (two-sided) printing Duplex (two-sided) printing Loading paper and specialty media 81 Be careful not to a stop.
Slide the stack gently into the multipurpose feeder until it comes to scratch them. 5 Load the paper or specialty media. Envelopes Transparencies* * Avoid touching the print side of transparencies. Without an optional StapleSmart Finisher With an optional StapleSmart Finisher Single-sided printing Single-sided printing Duplex (two-sided) printing Duplex (two-sided) printing Loading paper and specialty media 81 Be careful not to a stop.

User's Guide
Page 91
... engine supports 60-176 g/m2 (16-47 lb) paper weights. The label fuser cleaner is listed in parentheses. Paper types and weights supported by the finisher Use this table to determine the possible output destinations of each output bin is included with the special cartridge required for label applications. The duplex...
... engine supports 60-176 g/m2 (16-47 lb) paper weights. The label fuser cleaner is listed in parentheses. Paper types and weights supported by the finisher Use this table to determine the possible output destinations of each output bin is included with the special cartridge required for label applications. The duplex...


