Network Setup Guide
Page 6
... appears, click Continue. z If the Select Your Place of Residence screen appears, select your place of each application. This screen will not appear in Asia z Scan Soft OmniPage SE can be installed only on the right appears, click Easy Install. The MP Drivers, On-screen Manuals, and application software are installed...
... appears, click Continue. z If the Select Your Place of Residence screen appears, select your place of each application. This screen will not appear in Asia z Scan Soft OmniPage SE can be installed only on the right appears, click Easy Install. The MP Drivers, On-screen Manuals, and application software are installed...
Network Setup Guide
Page 23
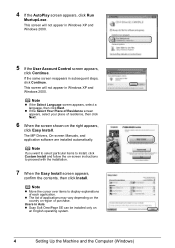
... on the machine to save scanned originals to the computer, it back in the User's Guide on-screen manual. Setting Up the Machine and the Computer (Macintosh) 21 To resolve this, either unplug the USB cable then plug it is complete. When the computer restarts, the Canon IJ Network Tool will start... to be detected. Proceed with the network setup from following step 12. Note Keep the CD-ROM in a safe place in case you need to "Scanning Images" in again, or turn the machine off then back on Image Capture under Applications. Note When using Mac OS X v.10.3.9, before using Mac OS...
... on the machine to save scanned originals to the computer, it back in the User's Guide on-screen manual. Setting Up the Machine and the Computer (Macintosh) 21 To resolve this, either unplug the USB cable then plug it is complete. When the computer restarts, the Canon IJ Network Tool will start... to be detected. Proceed with the network setup from following step 12. Note Keep the CD-ROM in a safe place in case you need to "Scanning Images" in again, or turn the machine off then back on Image Capture under Applications. Note When using Mac OS X v.10.3.9, before using Mac OS...
Network Setup Guide
Page 28
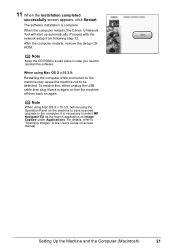
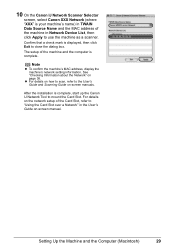
... as a scanner. The setup of the machine in Network Device List, then click Apply to the User's Guide and Scanning Guide on page 38. 9 On the Canon IJ Network Scanner Selector screen, select Canon XXX Network (where "XXX" is your machine's name) in TWAIN Data Source Name and the MAC address of the... machine and the computer is complete. Confirm that a check mark is complete, start up the Canon IJ Network Tool to "Using the Card Slot over a Network" in the User's Guide on-screen manual. 26 Setting Up the Machine and the Computer...
... as a scanner. The setup of the machine in Network Device List, then click Apply to the User's Guide and Scanning Guide on page 38. 9 On the Canon IJ Network Scanner Selector screen, select Canon XXX Network (where "XXX" is your machine's name) in TWAIN Data Source Name and the MAC address of the... machine and the computer is complete. Confirm that a check mark is complete, start up the Canon IJ Network Tool to "Using the Card Slot over a Network" in the User's Guide on-screen manual. 26 Setting Up the Machine and the Computer...
Network Setup Guide
Page 31
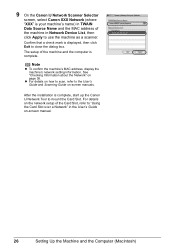
...Note z To confirm the machine's MAC address, display the machine's network setting information. For details on -screen manual. 10 On the Canon IJ Network Scanner Selector screen, select Canon XXX Network (where "XXX" is your machine's name) in TWAIN Data Source Name and the MAC address of the machine in the... User's Guide on the network setup of the machine and the computer is complete. z For details on how to scan, refer to close ...
...Note z To confirm the machine's MAC address, display the machine's network setting information. For details on -screen manual. 10 On the Canon IJ Network Scanner Selector screen, select Canon XXX Network (where "XXX" is your machine's name) in TWAIN Data Source Name and the MAC address of the machine in the... User's Guide on the network setup of the machine and the computer is complete. z For details on how to scan, refer to close ...
Quick Start Guide
Page 5
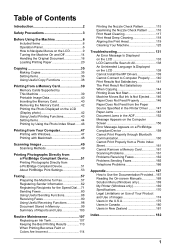
...Printing by Using the Photo Index Sheet ......46 Printing from Your Computer 47 Printing with Windows 47 Printing with Macintosh 48 Scanning Images 49 Scanning Methods 49 Printing Photographs Directly from a PictBridge Compliant Device 51 Printing Photographs Directly from a PictBridge Compliant Device 51 About ... Lists 103 Routine Maintenance 107 Replacing an Ink Tank 107 Keeping the Best Printing Results 113 When Printing Becomes Faint or Colors Are Incorrect 114 Printing the Nozzle Check Pattern 115 Examining the Nozzle Check Pattern ......... 116 Print Head Cleaning 117 Print ...
...Printing by Using the Photo Index Sheet ......46 Printing from Your Computer 47 Printing with Windows 47 Printing with Macintosh 48 Scanning Images 49 Scanning Methods 49 Printing Photographs Directly from a PictBridge Compliant Device 51 Printing Photographs Directly from a PictBridge Compliant Device 51 About ... Lists 103 Routine Maintenance 107 Replacing an Ink Tank 107 Keeping the Best Printing Results 113 When Printing Becomes Faint or Colors Are Incorrect 114 Printing the Nozzle Check Pattern 115 Examining the Nozzle Check Pattern ......... 116 Print Head Cleaning 117 Print ...
Quick Start Guide
Page 11
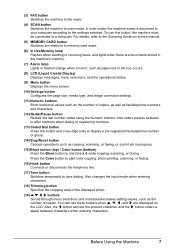
... button Connects or disconnects the telephone line. (17) Tone button Switches temporarily to scan mode. Press the Color button to start black & white copying, scanning, or faxing. Before Using the Machine 7 (3) FAX button Switches the machine to fax mode. (4) SCAN button Switches the machine to tone dialing. Also changes the input mode when entering...
... button Connects or disconnects the telephone line. (17) Tone button Switches temporarily to scan mode. Press the Color button to start black & white copying, scanning, or faxing. Before Using the Machine 7 (3) FAX button Switches the machine to fax mode. (4) SCAN button Switches the machine to tone dialing. Also changes the input mode when entering...
Quick Start Guide
Page 12
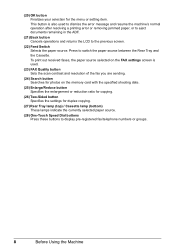
... the Cassette. To print out received faxes, the paper source selected on the FAX settings screen is also used . (23) FAX Quality button Sets the scan contrast and resolution of the fax you are sending. (24) Search button Searches for photos on the memory card with the specified shooting date. (25...
... the Cassette. To print out received faxes, the paper source selected on the FAX settings screen is also used . (23) FAX Quality button Sets the scan contrast and resolution of the fax you are sending. (24) Search button Searches for photos on the memory card with the specified shooting date. (25...
Quick Start Guide
Page 13
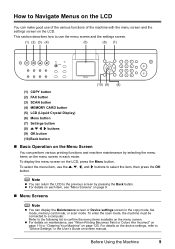
...Screens Note z You can return the LCD to use the menu screen and the settings screen. (1) (2) (3) (4) (5) (6) (7) (10) (9) (8) (1) COPY button (2) FAX button (3) SCAN button (4) MEMORY CARD button (5) LCD (Liquid Crystal Display) (6) Menu button (7) Settings button (8) { } [ ] buttons (9) OK button (10) Back button „ Basic Operation on...how to the previous screen by selecting the menu items on the menu screen in each item, see "When Printing Becomes Faint or Colors Are Incorrect" on page 114 or "Cleaning Your Machine" on -screen manual. z For details on the Menu Screen You can...
...Screens Note z You can return the LCD to use the menu screen and the settings screen. (1) (2) (3) (4) (5) (6) (7) (10) (9) (8) (1) COPY button (2) FAX button (3) SCAN button (4) MEMORY CARD button (5) LCD (Liquid Crystal Display) (6) Menu button (7) Settings button (8) { } [ ] buttons (9) OK button (10) Back button „ Basic Operation on...how to the previous screen by selecting the menu items on the menu screen in each item, see "When Printing Becomes Faint or Colors Are Incorrect" on page 114 or "Cleaning Your Machine" on -screen manual. z For details on the Menu Screen You can...

Quick Start Guide
Page 14
... DPOF print Captured info Photo Index Sheet (page 46) Photo Index Sheet print Scan sheet and print Maintenance/settings (page 11) 10 Before Using the Machine For details on the scan mode, see "Scanning Images" on -1 copy Borderless copy Image repeat Collated copy Fade-restored copy Frame...FAX priority mode FAX only mode DRPD* TEL priority mode Memory reference (page 99) Print memory list Print specified document Delete specified doc. Scan mode The Maintenance/settings screen will be displayed by pressing the Menu button. Print reports/lists (page 103) Activity report Telephone number list ...
... DPOF print Captured info Photo Index Sheet (page 46) Photo Index Sheet print Scan sheet and print Maintenance/settings (page 11) 10 Before Using the Machine For details on the scan mode, see "Scanning Images" on -1 copy Borderless copy Image repeat Collated copy Fade-restored copy Frame...FAX priority mode FAX only mode DRPD* TEL priority mode Memory reference (page 99) Print memory list Print specified document Delete specified doc. Scan mode The Maintenance/settings screen will be displayed by pressing the Menu button. Print reports/lists (page 103) Activity report Telephone number list ...

Quick Start Guide
Page 17
z For the settings in the memory card mode, see "Setting Items" on page 55. You can set the image quality and scan contrast of the fax to 4" x 6" (101 x 152) here. 5 Complete setting. (1) Press the Settings button. z For the settings when printing directly from a PictBridge compliant device, see "...
z For the settings in the memory card mode, see "Setting Items" on page 55. You can set the image quality and scan contrast of the fax to 4" x 6" (101 x 152) here. 5 Complete setting. (1) Press the Settings button. z For the settings when printing directly from a PictBridge compliant device, see "...

Quick Start Guide
Page 19
Note When you press the ON/OFF button while the machine is not operated for the ON/OFF button. When you want to restore the display, perform any operation such as copying, faxing, or scanning, or press any button except for about five minutes*. * You cannot change the wait time before the LCD goes out. Before Using the Machine 15 z Screen-saver Mode The LCD goes out if the machine is in Screen-saver mode, the machine turns off.
Note When you press the ON/OFF button while the machine is not operated for the ON/OFF button. When you want to restore the display, perform any operation such as copying, faxing, or scanning, or press any button except for about five minutes*. * You cannot change the wait time before the LCD goes out. Before Using the Machine 15 z Screen-saver Mode The LCD goes out if the machine is in Screen-saver mode, the machine turns off.
Quick Start Guide
Page 20
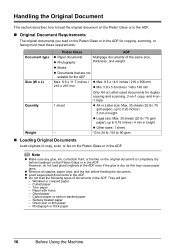
... Glass or in the ADF. „ Original Document Requirements The original documents you load on the Platen Glass or in the ADF for copying, scanning, or faxing must meet these requirements: Document type Size (W x L) Quantity Weight Platen Glass ADF z Paper documents z Photographs Multipage documents of ...paper - Photograph or thick paper 16 Before Using the Machine Surface treated paper - Handling the Original Document This section describes how to copy, scan, or fax on the Platen Glass or in the ADF. Wrinkled or creased paper - Carbon paper or carbon-backed paper - z Load...
... Glass or in the ADF. „ Original Document Requirements The original documents you load on the Platen Glass or in the ADF for copying, scanning, or faxing must meet these requirements: Document type Size (W x L) Quantity Weight Platen Glass ADF z Paper documents z Photographs Multipage documents of ...paper - Photograph or thick paper 16 Before Using the Machine Surface treated paper - Handling the Original Document This section describes how to copy, scan, or fax on the Platen Glass or in the ADF. Wrinkled or creased paper - Carbon paper or carbon-backed paper - z Load...
Quick Start Guide
Page 21
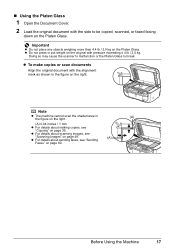
... z Do not place any objects weighing more than 4.4 lb / 2.0 kg on the right. Before Using the Machine 17 z To make copies or scan documents Align the original document with the alignment mark as shown in the figure on the right. (A) (A) 0.04 inches / 1 mm z For details... about making copies, see "Copying" on page 35. z For details about scanning images, see "Sending (A) Faxes" on page 49. z For details about sending faxes, see "Scanning Images" on page 80. Doing so may cause the scanner to malfunction or the Platen Glass to be copied...
... z Do not place any objects weighing more than 4.4 lb / 2.0 kg on the right. Before Using the Machine 17 z To make copies or scan documents Align the original document with the alignment mark as shown in the figure on the right. (A) (A) 0.04 inches / 1 mm z For details... about making copies, see "Copying" on page 35. z For details about scanning images, see "Sending (A) Faxes" on page 49. z For details about sending faxes, see "Scanning Images" on page 80. Doing so may cause the scanner to malfunction or the Platen Glass to be copied...
Quick Start Guide
Page 22
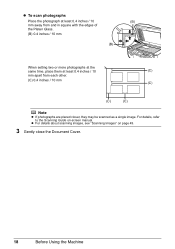
... on page 49. 3 Gently close the Document Cover. 18 Before Using the Machine z For details about scanning images, see "Scanning Images" on -screen manual. z To scan photographs Place the photograph at least 0.4 inches / 10 (B) mm away from and in square with the edges of the Platen Glass. (B) 0.4 inches / 10 mm (B) When ... same time, place them at least 0.4 inches / 10 (C) mm apart from each other. (C) 0.4 inches / 10 mm (C) (C) (C) Note z If photographs are placed closer, they may be scanned as a single image.
... on page 49. 3 Gently close the Document Cover. 18 Before Using the Machine z For details about scanning images, see "Scanning Images" on -screen manual. z To scan photographs Place the photograph at least 0.4 inches / 10 (B) mm away from and in square with the edges of the Platen Glass. (B) 0.4 inches / 10 mm (B) When ... same time, place them at least 0.4 inches / 10 (C) mm apart from each other. (C) 0.4 inches / 10 mm (C) (C) (C) Note z If photographs are placed closer, they may be scanned as a single image.
Quick Start Guide
Page 23
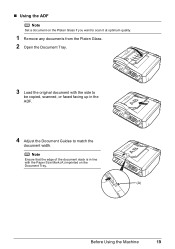
„ Using the ADF Note Set a document on the Document Tray. (A) Before Using the Machine 19 Note Ensure that the edge of the document stack is in line with the Paper Size Mark (A) imprinted on the Platen Glass if you want to scan it at optimum quality. 1 Remove any documents from the Platen Glass. 2 Open the Document Tray. 3 Load the original document with the side to be copied, scanned, or faxed facing up in the ADF. 4 Adjust the Document Guides to match the document width.
„ Using the ADF Note Set a document on the Document Tray. (A) Before Using the Machine 19 Note Ensure that the edge of the document stack is in line with the Paper Size Mark (A) imprinted on the Platen Glass if you want to scan it at optimum quality. 1 Remove any documents from the Platen Glass. 2 Open the Document Tray. 3 Load the original document with the side to be copied, scanned, or faxed facing up in the ADF. 4 Adjust the Document Guides to match the document width.
Quick Start Guide
Page 50
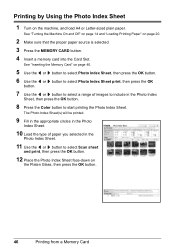
.... 7 Use the [ or ] button to select a range of paper you selected in the Photo Index Sheet, then press the OK button. 8 Press the Color button to select Scan sheet and print, then press the OK button. 12 Place the Photo Index Sheet face-down on page 20. 2 Make sure that the proper...
.... 7 Use the [ or ] button to select a range of paper you selected in the Photo Index Sheet, then press the OK button. 8 Press the Color button to select Scan sheet and print, then press the OK button. 12 Place the Photo Index Sheet face-down on page 20. 2 Make sure that the proper...
Quick Start Guide
Page 53
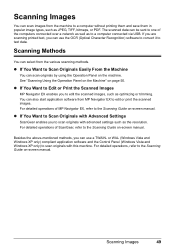
... over a network as well as JPEG, TIFF, bitmaps, or PDF. You can be sent to the Scanning Guide on page 50. z If You Want to Scan Originals with this machine. The scanned data can also start application software from the machine to a computer without printing them and save them in... popular image types, such as to edit the scanned images, such as the resolution. If you are scanning printed text, you can use a TWAIN- Besides the above-mentioned methods, you can use the OCR (Optical Character Recognition...
... over a network as well as JPEG, TIFF, bitmaps, or PDF. You can be sent to the Scanning Guide on page 50. z If You Want to Scan Originals with this machine. The scanned data can also start application software from the machine to a computer without printing them and save them in... popular image types, such as to edit the scanned images, such as the resolution. If you are scanning printed text, you can use a TWAIN- Besides the above-mentioned methods, you can use the OCR (Optical Character Recognition...
Quick Start Guide
Page 54
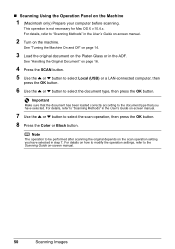
... } button to select Local (USB) or a LAN-connected computer, then press the OK button. 6 Use the { or } button to select the scan operation, then press the OK button. 8 Press the Color or Black button. See "Handling the Original Document" on -screen manual. 7 Use the { or } button to select the document type, then...
... } button to select Local (USB) or a LAN-connected computer, then press the OK button. 6 Use the { or } button to select the scan operation, then press the OK button. 8 Press the Color or Black button. See "Handling the Original Document" on -screen manual. 7 Use the { or } button to select the document type, then...
Quick Start Guide
Page 84
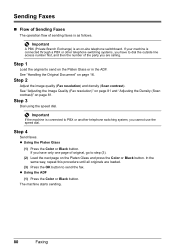
... quality (Fax resolution) and density (Scan contrast). If you are loaded. (3) Press the OK button to dial the outside line access number first, and then the number of the party you have to send the fax. z Using the ADF (1) Press the Color or Black button. Step 1 Load ... telephone switching system, you have only one page of sending faxes is an on-site telephone switchboard. z Using the Platen Glass (1) Press the Color or Black button. Important A PBX (Private Branch Exchange) is as follows. Sending Faxes „ Flow of Sending Faxes The operation flow of original...
... quality (Fax resolution) and density (Scan contrast). If you are loaded. (3) Press the OK button to dial the outside line access number first, and then the number of the party you have to send the fax. z Using the ADF (1) Press the Color or Black button. Step 1 Load ... telephone switching system, you have only one page of sending faxes is an on-site telephone switchboard. z Using the Platen Glass (1) Press the Color or Black button. Important A PBX (Private Branch Exchange) is as follows. Sending Faxes „ Flow of Sending Faxes The operation flow of original...
Quick Start Guide
Page 85
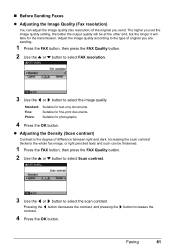
... documents. Pressing the [ button decreases the contrast, and pressing the ] button increases the contrast. 4 Press the OK button. Increasing the scan contrast thickens the whole fax image, or light penciled texts and such can adjust the image quality (fax resolution) of the original you send... FAX button, then press the FAX Quality button. 2 Use the { or } button to select Scan contrast. 3 Use the [ or ] button to select the scan contrast. z Adjusting the Density (Scan contrast) Contrast is the degree of original you set the image quality setting, the better the output quality...
... documents. Pressing the [ button decreases the contrast, and pressing the ] button increases the contrast. 4 Press the OK button. Increasing the scan contrast thickens the whole fax image, or light penciled texts and such can adjust the image quality (fax resolution) of the original you send... FAX button, then press the FAX Quality button. 2 Use the { or } button to select Scan contrast. 3 Use the [ or ] button to select the scan contrast. z Adjusting the Density (Scan contrast) Contrast is the degree of original you set the image quality setting, the better the output quality...


