
Quick Start Guide
Page 7
... of dust, smoke, or high humidity, the dust collected on the power cord. If the machine is placed at the power supply and call for service. Do not attempt to use a dry cloth to wipe off any dust or dirt collected on the thunder storm. Safety Precautions 3 Leaving the machine ... may cause insulation failure and fire. Always push the plug all the way into a power socket that you ignore any way not described in this manual. or 3-way adapter, etc.). Choosing a location Power supply Do not place the machine close to flammable solvents such as alcohol or thinners. Do not ...
... of dust, smoke, or high humidity, the dust collected on the power cord. If the machine is placed at the power supply and call for service. Do not attempt to use a dry cloth to wipe off any dust or dirt collected on the thunder storm. Safety Precautions 3 Leaving the machine ... may cause insulation failure and fire. Always push the plug all the way into a power socket that you ignore any way not described in this manual. or 3-way adapter, etc.). Choosing a location Power supply Do not place the machine close to flammable solvents such as alcohol or thinners. Do not ...

Quick Start Guide
Page 63
..., remove the Telephone connector cap. For details, refer to this machine. z Connecting to an ISDN Line For details on ISDN (Integrated Service Digital Network) connection and settings, refer to the manuals supplied with the network device (control devices such as you are subscribing in parallel. „ Methods of Connecting to the Various... to the xDSL line, select the same line type as an xDSL (Digital Subscriber Line) modem or terminal adapter) you are connecting to the instruction manual supplied with your terminal adapter or dial-up router.
..., remove the Telephone connector cap. For details, refer to this machine. z Connecting to an ISDN Line For details on ISDN (Integrated Service Digital Network) connection and settings, refer to the manuals supplied with the network device (control devices such as you are subscribing in parallel. „ Methods of Connecting to the Various... to the xDSL line, select the same line type as an xDSL (Digital Subscriber Line) modem or terminal adapter) you are connecting to the instruction manual supplied with your terminal adapter or dial-up router.

Quick Start Guide
Page 93
...to press the number by following the message. 6 Press the Hook button to tone dialing. For details, refer to the FAX Driver Guide onscreen manual. „ Sending/Receiving Using ECM This machine is not compatible with ECM, the fax will be sent/ received in ECM (Error Correction Mode).... telephone to press the number by following the message. 6 Hang up the handset to finish using the service. „ Sending from any application software that has a printing function. For details on -screen manual. If the recipient's fax machine is enabled. Faxing 89 Refer to "ECM TX" and "ECM RX...
...to press the number by following the message. 6 Press the Hook button to tone dialing. For details, refer to the FAX Driver Guide onscreen manual. „ Sending/Receiving Using ECM This machine is not compatible with ECM, the fax will be sent/ received in ECM (Error Correction Mode).... telephone to press the number by following the message. 6 Hang up the handset to finish using the service. „ Sending from any application software that has a printing function. For details on -screen manual. If the recipient's fax machine is enabled. Faxing 89 Refer to "ECM TX" and "ECM RX...

Quick Start Guide
Page 96
...Remote RX" in Hong Kong, the machine will ring. If it as follows: - z If you have subscribed to Duplex Ringing service in "Device Settings" of the User's Guide on-screen manual. (D) When the answering machine responds: If it is located away from the machine, pick up the handset and hear the fax... tone, press the FAX button, then press the Color or Black button to ON, and then specify the automatic reception ...
...Remote RX" in Hong Kong, the machine will ring. If it as follows: - z If you have subscribed to Duplex Ringing service in "Device Settings" of the User's Guide on-screen manual. (D) When the answering machine responds: If it is located away from the machine, pick up the handset and hear the fax... tone, press the FAX button, then press the Color or Black button to ON, and then specify the automatic reception ...
Quick Start Guide
Page 118
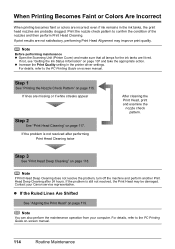
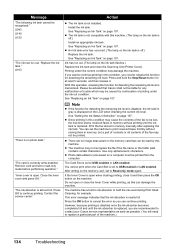
... are missing or if white streaks appear Step 2 See "Print Head Cleaning" on -screen manual. 114 Routine Maintenance For details, refer to the PC Printing Guide on page 117. If print... Print Head may improve print quality. Note You can also perform the maintenance operation from your Canon service representative. For details, refer to confirm the condition of the nozzles and then perform Print Head...the Print Head" on page 119. When Printing Becomes Faint or Colors Are Incorrect When printing becomes faint or colors are incorrect even if ink remains in the printer driver settings. Print...
... are missing or if white streaks appear Step 2 See "Print Head Cleaning" on -screen manual. 114 Routine Maintenance For details, refer to the PC Printing Guide on page 117. If print... Print Head may improve print quality. Note You can also perform the maintenance operation from your Canon service representative. For details, refer to confirm the condition of the nozzles and then perform Print Head...the Print Head" on page 119. When Printing Becomes Faint or Colors Are Incorrect When printing becomes faint or colors are incorrect even if ink remains in the printer driver settings. Print...
Quick Start Guide
Page 132
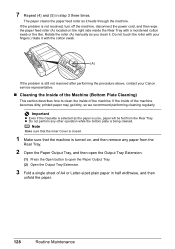
... with a moistened cotton swab or the like. Important z Even if the Cassette is turned on the right side inside the Rear Tray with your Canon service representative. „ Cleaning the Inside of the Machine (Bottom Plate Cleaning) This section describes how to open the Output Tray Extension. (1) Press the...; rotate it feeds through the machine. 7 Repeat (4) and (5) in half widthwise, and then unfold the paper. 128 Routine Maintenance Rotate the roller (A) manually as it with the cotton swab. (A) If the problem is being cleaned. z Do not perform any paper from the Rear Tray.
... with a moistened cotton swab or the like. Important z Even if the Cassette is turned on the right side inside the Rear Tray with your Canon service representative. „ Cleaning the Inside of the Machine (Bottom Plate Cleaning) This section describes how to open the Output Tray Extension. (1) Press the...; rotate it feeds through the machine. 7 Repeat (4) and (5) in half widthwise, and then unfold the paper. 128 Routine Maintenance Rotate the roller (A) manually as it with the cotton swab. (A) If the problem is being cleaned. z Do not perform any paper from the Rear Tray.
Quick Start Guide
Page 137
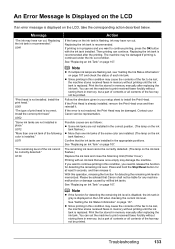
... machine may have run out. "Print head is incorrect. U051 "The type of the following color is recommended after the printing. Possible causes are as follows: z Some ink tanks are installed....not be lost , the machine stores received faxes in memory without storing them in memory manually after replacing the ink tank. See "Getting the Ink Status Information" on the LCD when... to be lost , the machine stores received faxes in memory without storing them in your Canon service representative. Follow the directions given in memory, but a part of contents or all contents ...
... machine may have run out. "Print head is incorrect. U051 "The type of the following color is recommended after the printing. Possible causes are as follows: z Some ink tanks are installed....not be lost , the machine stores received faxes in memory without storing them in memory manually after replacing the ink tank. See "Getting the Ink Status Information" on the LCD when... to be lost , the machine stores received faxes in memory without storing them in your Canon service representative. Follow the directions given in memory, but a part of contents or all contents ...
Quick Start Guide
Page 138
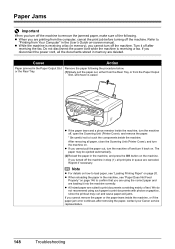
...built-in ink absorber to print received faxes forcibly without printing until the ink tank is memorized. z There are recommended to contact your Canon service representative as early as this condition may not be caused by this machine. Do not open or close the Inner Cover while printing, as... possible. (You will need to continue printing in memory manually after replacing the ink tank. However, because printing is disabled once the ink absorber becomes completely full and until the ink absorber is ...
...built-in ink absorber to print received faxes forcibly without printing until the ink tank is memorized. z There are recommended to contact your Canon service representative as early as this condition may not be caused by this machine. Do not open or close the Inner Cover while printing, as... possible. (You will need to continue printing in memory manually after replacing the ink tank. However, because printing is disabled once the ink absorber becomes completely full and until the ink absorber is ...
Quick Start Guide
Page 139
... not operating correctly." If the same error occurs, contact your Canon service representative. If the same error occurs, contact your Canon service representative. When printing from the power supply. If a PictBridge...Nozzle Check Pattern" on page 115 and "Printing Does Not Start/Printing Is Blurred/ Colors Are Wrong/Straight Lines Are Misaligned" on page 120. For Automatic Print Head Alignment,... is connected. Press the OK button to strong light. For details on Manual Print Head Alignment, see "Manual Print Head Alignment" on page 142. "****" is not exposed directly to dismiss...
... not operating correctly." If the same error occurs, contact your Canon service representative. If the same error occurs, contact your Canon service representative. When printing from the power supply. If a PictBridge...Nozzle Check Pattern" on page 115 and "Printing Does Not Start/Printing Is Blurred/ Colors Are Wrong/Straight Lines Are Misaligned" on page 120. For Automatic Print Head Alignment,... is connected. Press the OK button to strong light. For details on Manual Print Head Alignment, see "Manual Print Head Alignment" on page 142. "****" is not exposed directly to dismiss...
Quick Start Guide
Page 152
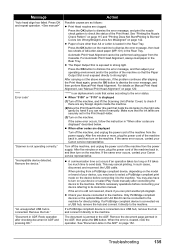
..., and press the OK button on . z When reloading the paper in queue are loading it off after removing the paper, contact your Canon service representative. 148 Troubleshooting Note z For details on how to touch the components inside the machine, or if the paper jam error continues after ... Scanning Unit (Printer Cover), and remove the paper. * Be careful not to load paper, see "Paper Does Not Feed Properly" on -screen manual. z While the machine is receiving a fax (in the Paper Output Slot Remove the paper following . Reprint if necessary. After removing all print jobs...
..., and press the OK button on . z When reloading the paper in queue are loading it off after removing the paper, contact your Canon service representative. 148 Troubleshooting Note z For details on how to touch the components inside the machine, or if the paper jam error continues after ... Scanning Unit (Printer Cover), and remove the paper. * Be careful not to load paper, see "Paper Does Not Feed Properly" on -screen manual. z While the machine is receiving a fax (in the Paper Output Slot Remove the paper following . Reprint if necessary. After removing all print jobs...
Quick Start Guide
Page 164
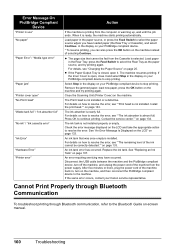
...the machine, and unplug the power cord of the machine back in the display on your Canon service representative. Select Stop in the Rear Tray, press the Feed Switch to select the Rear ... compliant device to the machine. The machine resumes printing. The ink absorber is defective. An error requiring servicing may have loaded paper (the Rear Tray or Cassette), and select Continue* in use" "No paper"...The ink tank is not installed. For details on page 133. For details on -screen manual. 160 Troubleshooting An ink tank error has occurred. For details on how to the Bluetooth ...
...the machine, and unplug the power cord of the machine back in the display on your Canon service representative. Select Stop in the Rear Tray, press the Feed Switch to select the Rear ... compliant device to the machine. The machine resumes printing. The ink absorber is defective. An error requiring servicing may have loaded paper (the Rear Tray or Cassette), and select Continue* in use" "No paper"...The ink tank is not installed. For details on page 133. For details on -screen manual. 160 Troubleshooting An ink tank error has occurred. For details on how to the Bluetooth ...
Quick Start Guide
Page 165
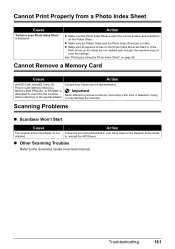
... Sheet are not marked dark enough, the machine may damage the machine. Action Follow the procedure described in . z Make sure all required circles on -screen manual. Contact your setup sheet or the Network Setup Guide to reinstall the MP Drivers. „ Other Scanning Troubles Refer to remove a memory card using a thin... a Photo Index Sheet Cause "Failed to the special adapter. Important Never attempt to the Scanning Guide on the Photo Index Sheet are filled in your Canon service representative. Doing so may not scan the settings. Troubleshooting 161 is not installed.
... Sheet are not marked dark enough, the machine may damage the machine. Action Follow the procedure described in . z Make sure all required circles on -screen manual. Contact your setup sheet or the Network Setup Guide to reinstall the MP Drivers. „ Other Scanning Troubles Refer to remove a memory card using a thin... a Photo Index Sheet Cause "Failed to the special adapter. Important Never attempt to the Scanning Guide on the Photo Index Sheet are filled in your Canon service representative. Doing so may not scan the settings. Troubleshooting 161 is not installed.

Quick Start Guide
Page 167
... Faxes Automatically with Your Telephone Company (US and Canada only):" on page 91. DRPD*1 See "If You Subscribe to a Distinctive Ring Pattern Detection (DRPD) Service with Your Machine, or Have a Dedicated Telephone Line for Fax Use Only:" on page 93. Set the receive mode to ON. Action Set ECM RX... "If You Want the Machine to Receive Faxes Automatically:" on the country or region of purchase. „ Quality of the User's Guide on-screen manual. If ECM RX is dirty. TEL priority mode See "If You Are Using a Single Telephone Line for Faxes and Voice Calls and Want to Automatically...
... Faxes Automatically with Your Telephone Company (US and Canada only):" on page 91. DRPD*1 See "If You Subscribe to a Distinctive Ring Pattern Detection (DRPD) Service with Your Machine, or Have a Dedicated Telephone Line for Fax Use Only:" on page 93. Set the receive mode to ON. Action Set ECM RX... "If You Want the Machine to Receive Faxes Automatically:" on the country or region of purchase. „ Quality of the User's Guide on-screen manual. If ECM RX is dirty. TEL priority mode See "If You Are Using a Single Telephone Line for Faxes and Voice Calls and Want to Automatically...
Quick Start Guide
Page 181
... or dating defaced, altered or removed. Product returned to a Canon USA repair facility or a Canon USA Authorized Service Facility ("ASF"), and proven to the Product or cause abnormally frequent service calls or service problems. (c) If the Product has had its original container or..., and abrasions will satisfy this limited warranty, when purchased and used in the user's manual or other documentation for a refurbished Product, as is warranted against defects in , Canon USA's user's manual or other documentation, or services performed by a separate warranty ("Separate Warranty").
... or dating defaced, altered or removed. Product returned to a Canon USA repair facility or a Canon USA Authorized Service Facility ("ASF"), and proven to the Product or cause abnormally frequent service calls or service problems. (c) If the Product has had its original container or..., and abrasions will satisfy this limited warranty, when purchased and used in the user's manual or other documentation for a refurbished Product, as is warranted against defects in , Canon USA's user's manual or other documentation, or services performed by a separate warranty ("Separate Warranty").


