Quick Start Guide
Page 5
... of Reports and Lists 103 Routine Maintenance 107 Replacing an Ink Tank 107 Keeping the Best Printing Results 113 When Printing Becomes Faint or Colors Are Incorrect 114 Printing the Nozzle Check Pattern 115 Examining the Nozzle Check Pattern ......... 116 Print Head Cleaning 117 Print Head Deep Cleaning 118 Aligning the Print Head 119 Cleaning Your Machine 125 Troubleshooting 131 An...
... of Reports and Lists 103 Routine Maintenance 107 Replacing an Ink Tank 107 Keeping the Best Printing Results 113 When Printing Becomes Faint or Colors Are Incorrect 114 Printing the Nozzle Check Pattern 115 Examining the Nozzle Check Pattern ......... 116 Print Head Cleaning 117 Print Head Deep Cleaning 118 Aligning the Print Head 119 Cleaning Your Machine 125 Troubleshooting 131 An...
Quick Start Guide
Page 111
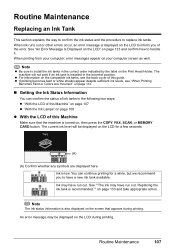
...the back cover of this guide. Replacing the ink tank is recommended."" on the LCD during printing. Routine Maintenance 107 Ink may have run out. Note The ink status information is also displayed on the Print Head Holder. The current ink level will not print if an ink tank is installed ...FAX, SCAN, or MEMORY CARD button. z For information on your computer, error messages appear on the compatible ink tanks, see "When Printing Becomes Faint or Colors Are Incorrect" on the LCD for a while, but we recommend you of ink tanks in the incorrect position. See ""The ink may ...
...the back cover of this guide. Replacing the ink tank is recommended."" on the LCD during printing. Routine Maintenance 107 Ink may have run out. Note The ink status information is also displayed on the Print Head Holder. The current ink level will not print if an ink tank is installed ...FAX, SCAN, or MEMORY CARD button. z For information on your computer, error messages appear on the compatible ink tanks, see "When Printing Becomes Faint or Colors Are Incorrect" on the LCD for a while, but we recommend you of ink tanks in the incorrect position. See ""The ink may ...

Quick Start Guide
Page 112
z With the Ink Lamps You can continue printing for detecting the remaining ink level is disabled, replace the ink tank with a new one . Open the Scanning Unit (Printer Cover) of each ink tank by the label on the Print Head Holder. z Ink lamp is flashing Flashing slowly (at around 3-second intervals) ......Repeats Ink is enough...
z With the Ink Lamps You can continue printing for detecting the remaining ink level is disabled, replace the ink tank with a new one . Open the Scanning Unit (Printer Cover) of each ink tank by the label on the Print Head Holder. z Ink lamp is flashing Flashing slowly (at around 3-second intervals) ......Repeats Ink is enough...
Quick Start Guide
Page 113
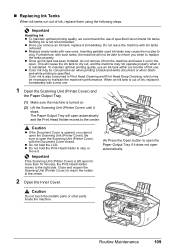
... not leave the machine with new ones. z Replace empty tanks with ink tanks removed. Inserting partially used ink tanks may be necessary to maintain the machine's performance. Color ink is also consumed in the open for more than 10 minutes, the Print Head Holder moves to the right side. z Do not... hold the LCD. Refilling ink is left open . To maintain optimal printing quality, use an ink tank within six months of first use of specified Canon brand...
... not leave the machine with new ones. z Replace empty tanks with ink tanks removed. Inserting partially used ink tanks may be necessary to maintain the machine's performance. Color ink is also consumed in the open for more than 10 minutes, the Print Head Holder moves to the right side. z Do not... hold the LCD. Refilling ink is left open . To maintain optimal printing quality, use an ink tank within six months of first use of specified Canon brand...
Quick Start Guide
Page 114
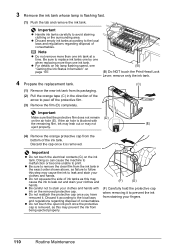
Important Make sure that the protective film does not remain (D) on page 107. (B) (B) Do NOT touch the Print Head Lock Lever; z Be careful not to stain your clothes and hands with the remaining film, ink may leak out or may cause the ink to ... the ink tank whose lamp is blocked with (F) Carefully hold the protective cap ink on the ink tank. remove only the ink tank. 4 Prepare the replacement tank. (C) (1) Remove the new ink tank from its packaging. (2) Pull the orange tape (C) in the exact order shown above, as failure to follow this step...
Important Make sure that the protective film does not remain (D) on page 107. (B) (B) Do NOT touch the Print Head Lock Lever; z Be careful not to stain your clothes and hands with the remaining film, ink may leak out or may cause the ink to ... the ink tank whose lamp is blocked with (F) Carefully hold the protective cap ink on the ink tank. remove only the ink tank. 4 Prepare the replacement tank. (C) (1) Remove the new ink tank from its packaging. (2) Pull the orange tape (C) in the exact order shown above, as failure to follow this step...
Quick Start Guide
Page 116
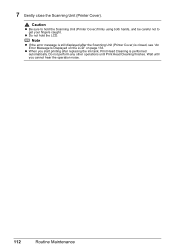
...displayed after replacing the ink tank, Print Head Cleaning is closed, see "An Error Message Is Displayed on the LCD" on page 133. z Do not hold the Scanning Unit (Printer Cover) firmly using both hands, and be careful not to hold the LCD. Wait until Print Head Cleaning finishes.... 7 Gently close the Scanning Unit (Printer Cover). z When you cannot hear the operation noise. 112 Routine Maintenance Caution z Be sure to get your fingers caught. Do not perform any other operations until you start printing after the Scanning Unit...
...displayed after replacing the ink tank, Print Head Cleaning is closed, see "An Error Message Is Displayed on the LCD" on page 133. z Do not hold the Scanning Unit (Printer Cover) firmly using both hands, and be careful not to hold the LCD. Wait until Print Head Cleaning finishes.... 7 Gently close the Scanning Unit (Printer Cover). z When you cannot hear the operation noise. 112 Routine Maintenance Caution z Be sure to get your fingers caught. Do not perform any other operations until you start printing after the Scanning Unit...
Quick Start Guide
Page 123
... other operations until Print Head Deep Cleaning finishes. Contact your Canon service representative. Note z Make sure that color. Routine Maintenance 119 z The print head alignment pattern is not resolved, turn off the machine and perform another Print Head Deep Cleaning after 24 hours. (3) If this does not solve the problem, the Print Head may be damaged. See "Replacing an Ink Tank...
... other operations until Print Head Deep Cleaning finishes. Contact your Canon service representative. Note z Make sure that color. Routine Maintenance 119 z The print head alignment pattern is not resolved, turn off the machine and perform another Print Head Deep Cleaning after 24 hours. (3) If this does not solve the problem, the Print Head may be damaged. See "Replacing an Ink Tank...
Quick Start Guide
Page 137
... recommended. Replacing the ink tank is recommended." The machine may cause the contents of print head is already installed, remove the Print Head once and then reinstall it . "Print head is memorized. Install the correct print head." U052 "Some ink tanks are not installed in the appropriate positions. U072 "More than one ink tank of the same color are installed...
... recommended. Replacing the ink tank is recommended." The machine may cause the contents of print head is already installed, remove the Print Head once and then reinstall it . "Print head is memorized. Install the correct print head." U052 "Some ink tanks are not installed in the appropriate positions. U072 "More than one ink tank of the same color are installed...
Quick Start Guide
Page 138
... contact your Canon service representative as early as this machine. (The lamp on the ink tank is off .) Install an appropriate ink tank. Press OK to USB enabled or LAN enabled. Install the ink tank. See "Replacing an Ink Tank" on page 107. Press and hold the ink used during Print Head Cleaning, for...
... contact your Canon service representative as early as this machine. (The lamp on the ink tank is off .) Install an appropriate ink tank. Press OK to USB enabled or LAN enabled. Install the ink tank. See "Replacing an Ink Tank" on page 107. Press and hold the ink used during Print Head Cleaning, for...
Quick Start Guide
Page 161
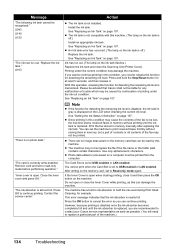
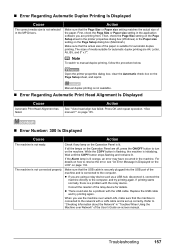
... until the COPY button stops flashing and remains lit. The machine is not available. „ Error Regarding Automatic Print Head Alignment Is Displayed Cause Automatic Print Head Alignment has failed. Make sure that the USB cable is securely plugged into the USB port of media suitable for... not connected properly. Make sure that the actual size of the User's Guide on-screen manual. Troubleshooting 157 Replace the USB cable and try printing again. If printing starts normally, there is a problem with the USB cable. When you are using a relay device such as a USB...
... until the COPY button stops flashing and remains lit. The machine is not available. „ Error Regarding Automatic Print Head Alignment Is Displayed Cause Automatic Print Head Alignment has failed. Make sure that the USB cable is securely plugged into the USB port of media suitable for... not connected properly. Make sure that the actual size of the User's Guide on-screen manual. Troubleshooting 157 Replace the USB cable and try printing again. If printing starts normally, there is a problem with the USB cable. When you are using a relay device such as a USB...
Quick Start Guide
Page 163
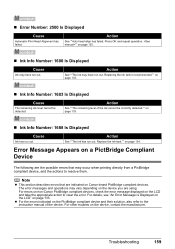
...Canon PictBridge compliant devices, check the error message displayed on the LCD and take the appropriate action to resolve them. For other troubles on page 135. „ Ink Info Number: 1600 Is Displayed Cause Ink may have run out. Action See ""The ink may have run out. Replace...manual of the ink cannot be detected. Action See ""The remaining level of the device. „ Error Number: 2500 Is Displayed Cause Automatic Print Head Alignment has failed. Note z This section describes errors that may vary depending on page 134. For details, see "An Error Message Is ...
...Canon PictBridge compliant devices, check the error message displayed on the LCD and take the appropriate action to resolve them. For other troubles on page 135. „ Ink Info Number: 1600 Is Displayed Cause Ink may have run out. Action See ""The ink may have run out. Replace...manual of the ink cannot be detected. Action See ""The remaining level of the device. „ Error Number: 2500 Is Displayed Cause Automatic Print Head Alignment has failed. Note z This section describes errors that may vary depending on page 134. For details, see "An Error Message Is ...
Quick Start Guide
Page 164
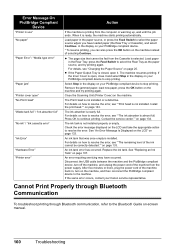
... compliant device to resolve the error. After five minutes or more, plug the power cord of selecting Continue. If the Inner Cover is open " "No Print Head" "Waste tank full" / "Ink absorber full" "No ink" / "Ink cassette error" "Ink Error" "Hardware Error" "Printer error" Action If the machine is...details on how to stop printing. See "Replacing an Ink Tank" on page 133. Load paper in the Rear Tray, press the Feed Switch to stop printing. Select Stop in the display on page 133. See "An Error Message Is Displayed on the LCD" on your Canon service representative. An error ...
... compliant device to resolve the error. After five minutes or more, plug the power cord of selecting Continue. If the Inner Cover is open " "No Print Head" "Waste tank full" / "Ink absorber full" "No ink" / "Ink cassette error" "Ink Error" "Hardware Error" "Printer error" Action If the machine is...details on how to stop printing. See "Replacing an Ink Tank" on page 133. Load paper in the Rear Tray, press the Feed Switch to stop printing. Select Stop in the display on page 133. See "An Error Message Is Displayed on the LCD" on your Canon service representative. An error ...
Quick Start Guide
Page 186
... O Operation Panel 6 P Paper Sources changing 25 Print Head aligning 119 cleaning 117 deep cleaning 118 Printing from a Memory Card photo displayed on the LCD 42 Photo Index Sheet 46 Printing from Your Computer Macintosh 48 Windows 47 Printing Photographs Directly from a PictBridge Compliant Device 51 PictBridge print settings 53 R Replacing an Ink Tank 107 ink status information...
... O Operation Panel 6 P Paper Sources changing 25 Print Head aligning 119 cleaning 117 deep cleaning 118 Printing from a Memory Card photo displayed on the LCD 42 Photo Index Sheet 46 Printing from Your Computer Macintosh 48 Windows 47 Printing Photographs Directly from a PictBridge Compliant Device 51 PictBridge print settings 53 R Replacing an Ink Tank 107 ink status information...


