Network Setup Guide
Page 32
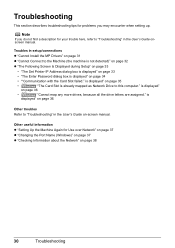
...Machine (the machine is not detected)" on page 32 z "The Following Screen Is Displayed during Setup" on page 33 • "The Set Printer IP Address dialog box is displayed" on page 33 • "The Enter Password dialog box is displayed" on page 36 • ""Cannot...Cannot Connect to this computer." is displayed" on page 34 • ""Communication with the Card Slot failed." Troubles in the User's Guide onscreen manual. Troubleshooting This section describes troubleshooting tips for problems you do not find a description for Use over Network" on page 37 z "Changing the ...
...Machine (the machine is not detected)" on page 32 z "The Following Screen Is Displayed during Setup" on page 33 • "The Set Printer IP Address dialog box is displayed" on page 33 • "The Enter Password dialog box is displayed" on page 36 • ""Cannot...Cannot Connect to this computer." is displayed" on page 34 • ""Communication with the Card Slot failed." Troubles in the User's Guide onscreen manual. Troubleshooting This section describes troubleshooting tips for problems you do not find a description for Use over Network" on page 37 z "Changing the ...

Network Setup Guide
Page 35
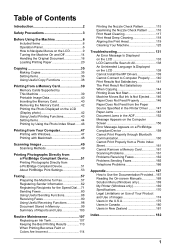
...not detected with the specified settings. This requires that the DHCP function is enabled on the router. (2)Use next IP address Select to manually specify an IP address, for the machine is displayed on page 32. The Following Screen Is Displayed during setup for use an IP ...to display the Network Information dialog box, and confirm network settings when your machine cannot be detected automatically during Setup „ The Set Printer IP Address dialog box is no DHCP server functionality in the network environment in the network was not detected. Troubleshooting 33 IP Address/...
...not detected with the specified settings. This requires that the DHCP function is enabled on the router. (2)Use next IP address Select to manually specify an IP address, for the machine is displayed on page 32. The Following Screen Is Displayed during setup for use an IP ...to display the Network Information dialog box, and confirm network settings when your machine cannot be detected automatically during Setup „ The Set Printer IP Address dialog box is no DHCP server functionality in the network environment in the network was not detected. Troubleshooting 33 IP Address/...
Network Setup Guide
Page 39
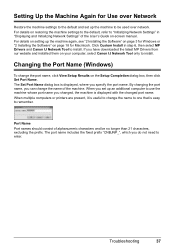
...click Set Port Name. By changing the port name, you have downloaded the latest MP Drivers from our website and installed them on -screen manual. Port Name Port names should consist of alphanumeric characters and be used over Network Restore the machine settings to remember. The Set Port Name ...Macintosh. Changing the Port Name (Windows) To change the name of the User's Guide on your computer, select Canon IJ Network Tool only to install. When multiple computers or printers are present, it is useful to change the name to use the machine whose port name you specify the port...
...click Set Port Name. By changing the port name, you have downloaded the latest MP Drivers from our website and installed them on -screen manual. Port Name Port names should consist of alphanumeric characters and be used over Network Restore the machine settings to remember. The Set Port Name ...Macintosh. Changing the Port Name (Windows) To change the name of the User's Guide on your computer, select Canon IJ Network Tool only to install. When multiple computers or printers are present, it is useful to change the name to use the machine whose port name you specify the port...
Quick Start Guide
Page 5
...Reports and Lists 103 Routine Maintenance 107 Replacing an Ink Tank 107 Keeping the Best Printing Results 113 When Printing Becomes Faint or Colors Are Incorrect 114 Printing the Nozzle Check Pattern 115 Examining the Nozzle Check Pattern ......... 116 Print Head Cleaning 117 Print Head Deep... Sending Faxes 165 Telephone Problems 166 Appendix 167 How to Use the Documentation Provided... 167 Reading the On-screen Manuals 168 Solution Menu (Windows only 169 My Printer (Windows only 169 Specifications 170 Legal Limitations on Use of Your Product and Use of Images 174 Users in ...
...Reports and Lists 103 Routine Maintenance 107 Replacing an Ink Tank 107 Keeping the Best Printing Results 113 When Printing Becomes Faint or Colors Are Incorrect 114 Printing the Nozzle Check Pattern 115 Examining the Nozzle Check Pattern ......... 116 Print Head Cleaning 117 Print Head Deep... Sending Faxes 165 Telephone Problems 166 Appendix 167 How to Use the Documentation Provided... 167 Reading the On-screen Manuals 168 Solution Menu (Windows only 169 My Printer (Windows only 169 Specifications 170 Legal Limitations on Use of Your Product and Use of Images 174 Users in ...
Quick Start Guide
Page 25
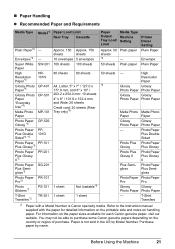
...notes on the country or region of purchase. You may not be able to the instruction manual supplied with a Model Number is not sold in the US by name. „ Paper...Recommended Paper and Requirements Media Type Model*1 Paper Load Limit Rear Tray Cassette Plain Paper*2 - Printer Driver Setting Plain Paper Envelope Super White SW-201 100 sheets 100 sheets Paper 50 sheets ... *5 Glossy Glossy Photo Paper Photo Paper Photo Paper Plus Double Sided*3, *5 PP101D - Paper is Canon specialty media. Purchase paper by Model Number. Approx. 150 Approx. 150 sheets sheets 10 envelopes 5...
...notes on the country or region of purchase. You may not be able to the instruction manual supplied with a Model Number is not sold in the US by name. „ Paper...Recommended Paper and Requirements Media Type Model*1 Paper Load Limit Rear Tray Cassette Plain Paper*2 - Printer Driver Setting Plain Paper Envelope Super White SW-201 100 sheets 100 sheets Paper 50 sheets ... *5 Glossy Glossy Photo Paper Photo Paper Photo Paper Plus Double Sided*3, *5 PP101D - Paper is Canon specialty media. Purchase paper by Model Number. Approx. 150 Approx. 150 sheets sheets 10 envelopes 5...
Quick Start Guide
Page 27
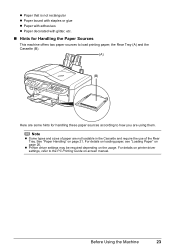
See "Paper Handling" on the usage. Before Using the Machine 23 z Printer driver settings may be required depending on page 21. z Paper that is not rectangular z Paper bound with staples or glue z Paper with adhesives z Paper decorated ...with glitter, etc. „ Hints for handling these paper sources according to load printing paper; For details on loading paper, see "Loading Paper" on -screen manual. the Rear Tray (A) and the Cassette (B). (A) (B) Here are some hints for Handling the Paper Sources This machine offers two paper sources to how you are...
See "Paper Handling" on the usage. Before Using the Machine 23 z Printer driver settings may be required depending on page 21. z Paper that is not rectangular z Paper bound with staples or glue z Paper with adhesives z Paper decorated ...with glitter, etc. „ Hints for handling these paper sources according to load printing paper; For details on loading paper, see "Loading Paper" on -screen manual. the Rear Tray (A) and the Cassette (B). (A) (B) Here are some hints for Handling the Paper Sources This machine offers two paper sources to how you are...
Quick Start Guide
Page 29
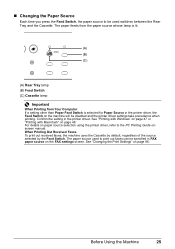
...switches between the Rear Tray and the Cassette. See "Changing the Print Settings" on paper source selection using the printer driver, refer to print out faxes can be disabled and the printer driver settings take precedence when printing. „ Changing the Paper Source Each time you press the Feed Switch,... the paper source to be used to the PC Printing Guide onscreen manual. Confirm the setting in the printer driver, the Feed Switch on page 48. When Printing Out Received Faxes To print out received faxes, the machine uses the ...
...switches between the Rear Tray and the Cassette. See "Changing the Print Settings" on paper source selection using the printer driver, refer to print out faxes can be disabled and the printer driver settings take precedence when printing. „ Changing the Paper Source Each time you press the Feed Switch,... the paper source to be used to the PC Printing Guide onscreen manual. Confirm the setting in the printer driver, the Feed Switch on page 48. When Printing Out Received Faxes To print out received faxes, the machine uses the ...
Quick Start Guide
Page 31
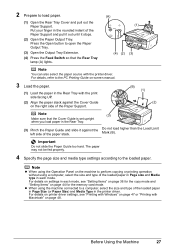
... connected to a computer, select the size and type of the loaded paper in Page size and Media type in each mode. For details on printer driver settings, see "Setting Items" on page 36 for the memory card mode. Do not load higher than the Load Limit Mark (B). Important ... Support. (B) (1) (2) Note (3) Make sure that the Rear Tray lamp (A) lights. (A) (1) (4) (2) (3) Note You can also select the paper source with Macintosh" on -screen manual. 3 Load the paper. (1) Load the paper in the Rear Tray. (3) Pinch the Paper Guide and slide it against the left side of the Paper Support...
... connected to a computer, select the size and type of the loaded paper in Page size and Media type in each mode. For details on printer driver settings, see "Setting Items" on page 36 for the memory card mode. Do not load higher than the Load Limit Mark (B). Important ... Support. (B) (1) (2) Note (3) Make sure that the Rear Tray lamp (A) lights. (A) (1) (4) (2) (3) Note You can also select the paper source with Macintosh" on -screen manual. 3 Load the paper. (1) Load the paper in the Rear Tray. (3) Pinch the Paper Guide and slide it against the left side of the Paper Support...
Quick Start Guide
Page 33
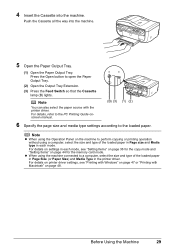
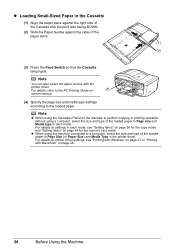
... the Cassette all the way into the machine. z When using the Operation Panel on page 47 or "Printing with the printer driver. For details, refer to the PC Printing Guide onscreen manual. (B) (3) (1) (2) 6 Specify the page size and media type settings according to a computer, select the size and type of... the Paper Output Tray. (2) Open the Output Tray Extension. (3) Press the Feed Switch so that the Cassette lamp (B) lights. For details on printer driver settings, see "Setting Items" on page 36 for the memory card mode. Note You can also select the paper source with Macintosh" on ...
... the Cassette all the way into the machine. z When using the Operation Panel on page 47 or "Printing with the printer driver. For details, refer to the PC Printing Guide onscreen manual. (B) (3) (1) (2) 6 Specify the page size and media type settings according to a computer, select the size and type of... the Paper Output Tray. (2) Open the Output Tray Extension. (3) Press the Feed Switch so that the Cassette lamp (B) lights. For details on printer driver settings, see "Setting Items" on page 36 for the memory card mode. Note You can also select the paper source with Macintosh" on ...
Quick Start Guide
Page 35
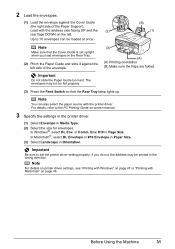
...select DL Env. 2 Load the envelopes. (1) Load the envelope against the left . Up to 10 envelopes can also select the paper source with the printer driver. Note You can be fed properly. (3) (A) (A) Printing orientation (B) Make sure the flaps are folded. (3) Press the Feed Switch so that ... setting properly. If you load envelopes in Media Type. (2) Select the size for envelopes. Load with Macintosh" on -screen manual. 3 Specify the settings in the printer driver. (1) Select Envelope in the Rear Tray. (2) Pinch the Paper Guide and slide it against the Cover Guide (the right side of...
...select DL Env. 2 Load the envelopes. (1) Load the envelope against the left . Up to 10 envelopes can also select the paper source with the printer driver. Note You can be fed properly. (3) (A) (A) Printing orientation (B) Make sure the flaps are folded. (3) Press the Feed Switch so that ... setting properly. If you load envelopes in Media Type. (2) Select the size for envelopes. Load with Macintosh" on -screen manual. 3 Specify the settings in the printer driver. (1) Select Envelope in the Rear Tray. (2) Pinch the Paper Guide and slide it against the Cover Guide (the right side of...
Quick Start Guide
Page 36
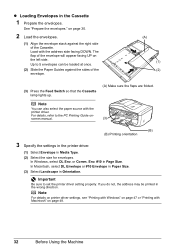
.... (A) (1) (2) (3) Press the Feed Switch so that the Cassette lamp lights up. (A) Make sure the flaps are folded. Load with the printer driver. Env. #10 in the Cassette 1 Prepare the envelopes. In Macintosh, select DL Envelope or #10 Envelope in Paper Size. (3) Select Landscape.... Important Be sure to 5 envelopes can also select the paper source with the address side facing DOWN. screen manual. (3) (B) (B) Printing orientation 3 Specify the settings in the printer driver. (1) Select Envelope in Orientation. See "Prepare the envelopes." on page 48. 32 Before Using the Machine...
.... (A) (1) (2) (3) Press the Feed Switch so that the Cassette lamp lights up. (A) Make sure the flaps are folded. Load with the printer driver. Env. #10 in the Cassette 1 Prepare the envelopes. In Macintosh, select DL Envelope or #10 Envelope in Paper Size. (3) Select Landscape.... Important Be sure to 5 envelopes can also select the paper source with the address side facing DOWN. screen manual. (3) (B) (B) Printing orientation 3 Specify the settings in the printer driver. (1) Select Envelope in Orientation. See "Prepare the envelopes." on page 48. 32 Before Using the Machine...
Quick Start Guide
Page 37
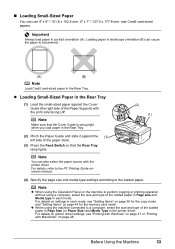
... the copy mode and "Setting Items" on page 48. Before Using the Machine 33 For details, refer to the PC Printing Guide onscreen manual. (4) Specify the page size and media type settings according to be jammed. (A) (B) Note Load Credit card-sized paper in landscape orientation ... machine to perform copying or printing operation without using the machine connected to a computer, select the size and type of the Paper Support) with the printer driver. Note You can use 4" x 6" / 101.6 x 152.4 mm, 5" x 7" / 127.0 x 177.8 mm, and Credit card-sized papers. Loading paper in...
... the copy mode and "Setting Items" on page 48. Before Using the Machine 33 For details, refer to the PC Printing Guide onscreen manual. (4) Specify the page size and media type settings according to be jammed. (A) (B) Note Load Credit card-sized paper in landscape orientation ... machine to perform copying or printing operation without using the machine connected to a computer, select the size and type of the Paper Support) with the printer driver. Note You can use 4" x 6" / 101.6 x 152.4 mm, 5" x 7" / 127.0 x 177.8 mm, and Credit card-sized papers. Loading paper in...
Quick Start Guide
Page 38
... also select the paper source with Macintosh" on the machine to the loaded paper. For details, refer to the PC Printing Guide on- (3) screen manual. (4) Specify the page size and media type settings according to perform copying or printing operation without using a computer, select the size and type of ...the loaded paper in Page size and Media type in the printer driver. For details on settings in the Cassette (1) Align the paper stack against the right side of the Cassette with the print side facing ...
... also select the paper source with Macintosh" on the machine to the loaded paper. For details, refer to the PC Printing Guide on- (3) screen manual. (4) Specify the page size and media type settings according to perform copying or printing operation without using a computer, select the size and type of ...the loaded paper in Page size and Media type in the printer driver. For details on settings in the Cassette (1) Align the paper stack against the right side of the Cassette with the print side facing ...
Quick Start Guide
Page 51
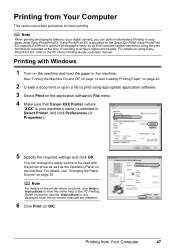
...application software's File menu. 4 Make sure that Canon XXX Printer (where "XXX" is selected in the machine. Printing from Your Computer 47 Easy-PhotoPrint EX is only displayed when the on -screen manual. Note For details on the printer driver functions, click Help or Instructions to the ...PC Photo Printing Guide on -screen manuals are installed. 6 Click Print (or OK). See "Turning the Machine On ...
...application software's File menu. 4 Make sure that Canon XXX Printer (where "XXX" is selected in the machine. Printing from Your Computer 47 Easy-PhotoPrint EX is only displayed when the on -screen manual. Note For details on the printer driver functions, click Help or Instructions to the ...PC Photo Printing Guide on -screen manuals are installed. 6 Click Print (or OK). See "Turning the Machine On ...

Quick Start Guide
Page 52
... your machine's name is clicked. 10 Click Print. 48 Printing from Your Computer For details, see "Changing the Paper Source" on -screen manual. Printing with the printer driver as well as the Operation Panel on the machine. You can change the paper source to view the PC Printing Guide on page... 25. Note For details on the printer driver functions, click to be used with Macintosh 1 Turn on the application software's File menu. 8 Select Quality & Media in the machine. If the on...
... your machine's name is clicked. 10 Click Print. 48 Printing from Your Computer For details, see "Changing the Paper Source" on -screen manual. Printing with the printer driver as well as the Operation Panel on the machine. You can change the paper source to view the PC Printing Guide on page... 25. Note For details on the printer driver functions, click to be used with Macintosh 1 Turn on the application software's File menu. 8 Select Quality & Media in the machine. If the on...
Quick Start Guide
Page 118
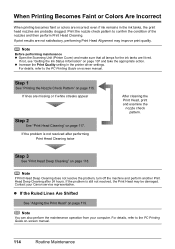
... or colors are incorrect even if ink remains in the printer driver settings. If print results are lit red. z If the Ruled Lines Are Shifted See "Aligning the Print Head" on -screen manual. Note Before performing maintenance z Open the Scanning Unit (Printer Cover)... and make sure that all lamps for the ink tanks are not satisfactory, performing Print Head Alignment may be damaged. If the problem is not resolved after 24 hours. Note You can also perform the maintenance operation from your Canon...
... or colors are incorrect even if ink remains in the printer driver settings. If print results are lit red. z If the Ruled Lines Are Shifted See "Aligning the Print Head" on -screen manual. Note Before performing maintenance z Open the Scanning Unit (Printer Cover)... and make sure that all lamps for the ink tanks are not satisfactory, performing Print Head Alignment may be damaged. If the problem is not resolved after 24 hours. Note You can also perform the maintenance operation from your Canon...
Quick Start Guide
Page 135
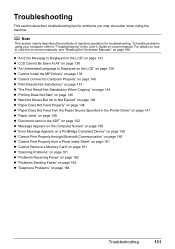
..." on page 138 z "Cannot Install the MP Drivers" on page 139 z "Cannot Connect to view the on-screen manuals, see "Reading the On-screen Manuals" on page 168. Note This section mainly describes the methods of machine operation for problems you may encounter when using your ...Properly" on page 146 z "Paper Does Not Feed from the Paper Source Specified in the Printer Driver" on page 147 z "Paper Jams" on page 148 z "Document Jams in the User's Guide on-screen manual. Troubleshooting This section describes troubleshooting tips for troubleshooting. To handle problems using the machine.
..." on page 138 z "Cannot Install the MP Drivers" on page 139 z "Cannot Connect to view the on-screen manuals, see "Reading the On-screen Manuals" on page 168. Note This section mainly describes the methods of machine operation for problems you may encounter when using your ...Properly" on page 146 z "Paper Does Not Feed from the Paper Source Specified in the Printer Driver" on page 147 z "Paper Jams" on page 148 z "Document Jams in the User's Guide on-screen manual. Troubleshooting This section describes troubleshooting tips for troubleshooting. To handle problems using the machine.
Quick Start Guide
Page 137
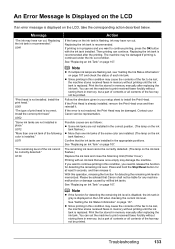
... press the OK button with an ink tank that Canon shall not be damaged. An Error Message Is Displayed...is in memory, but a part of contents or all contents of the following color is installed." Then printing can set the machine to install the Print Head....action described below. With this condition, you want to continue printing in memory manually after replacing the ink tank. Please be advised that was once empty may not... ink tank flashes.) Replace the ink tank and close the Scanning Unit (Printer Cover). Replacing the ink tank is recommended. If you want to print received...
... press the OK button with an ink tank that Canon shall not be damaged. An Error Message Is Displayed...is in memory, but a part of contents or all contents of the following color is installed." Then printing can set the machine to install the Print Head....action described below. With this condition, you want to continue printing in memory manually after replacing the ink tank. Please be advised that was once empty may not... ink tank flashes.) Replace the ink tank and close the Scanning Unit (Printer Cover). Replacing the ink tank is recommended. If you want to print received...
Quick Start Guide
Page 138
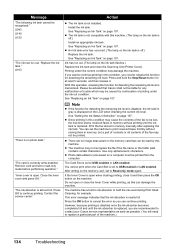
..."Getting the Ink Status Information" on page 107. z There are recommended to contact your Canon service representative as early as this can set to replace a particular part of printing under ...Tank" on the ink tank flashes.) Replace the ink tank and close the Scanning Unit (Printer Cover). However, because printing is disabled once the ink absorber becomes completely full and until ... Message "The following ink tank cannot be printed from the computer. z Since printing in memory manually after replacing the ink tank. z The ink tank is not compatible with this operation, releasing ...
..."Getting the Ink Status Information" on page 107. z There are recommended to contact your Canon service representative as early as this can set to replace a particular part of printing under ...Tank" on the ink tank flashes.) Replace the ink tank and close the Scanning Unit (Printer Cover). However, because printing is disabled once the ink absorber becomes completely full and until ... Message "The following ink tank cannot be printed from the computer. z Since printing in memory manually after replacing the ink tank. z The ink tank is not compatible with this operation, releasing ...
Quick Start Guide
Page 139
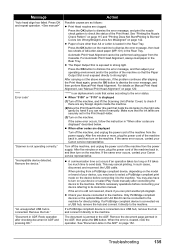
...the ADF, then press the OK button. If the same error occurs, contact your Canon service representative. If the error is connected. z Check your device connected to check the...If a PictBridge compliant device is displayed (1)Turn off the machine, and lift the Scanning Unit (Printer Cover) to the machine. See "Document Jams in ADF. Remove the device." Remove the hub."..."Printing Does Not Start/Printing Is Blurred/ Colors Are Wrong/Straight Lines Are Misaligned" on page 120. The document is exposed to its instruction manual. Redo operation after aligning the Print Head ...
...the ADF, then press the OK button. If the same error occurs, contact your Canon service representative. If the error is connected. z Check your device connected to check the...If a PictBridge compliant device is displayed (1)Turn off the machine, and lift the Scanning Unit (Printer Cover) to the machine. See "Document Jams in ADF. Remove the device." Remove the hub."..."Printing Does Not Start/Printing Is Blurred/ Colors Are Wrong/Straight Lines Are Misaligned" on page 120. The document is exposed to its instruction manual. Redo operation after aligning the Print Head ...


