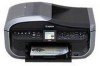
Quick Start Guide
Page 5
...the Best Printing Results 113 When Printing Becomes Faint or Colors Are Incorrect 114 Printing the Nozzle Check Pattern 115 Examining the Nozzle Check Pattern ......... 116 Print Head Cleaning 117 Print Head Deep Cleaning 118 Aligning the Print Head 119 Cleaning Your Machine 125 Troubleshooting 131 An Error ... 166 Appendix 167 How to Use the Documentation Provided... 167 Reading the On-screen Manuals 168 Solution Menu (Windows only 169 My Printer (Windows only 169 Specifications 170 Legal Limitations on Use of Your Product and Use of Images 174 Users in the U.S.A 175 Users...
...the Best Printing Results 113 When Printing Becomes Faint or Colors Are Incorrect 114 Printing the Nozzle Check Pattern 115 Examining the Nozzle Check Pattern ......... 116 Print Head Cleaning 117 Print Head Deep Cleaning 118 Aligning the Print Head 119 Cleaning Your Machine 125 Troubleshooting 131 An Error ... 166 Appendix 167 How to Use the Documentation Provided... 167 Reading the On-screen Manuals 168 Solution Menu (Windows only 169 My Printer (Windows only 169 Specifications 170 Legal Limitations on Use of Your Product and Use of Images 174 Users in the U.S.A 175 Users...

Quick Start Guide
Page 112
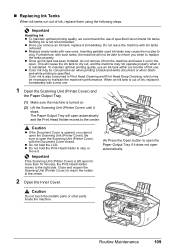
... Is Displayed on the LCD" on page 134 and take appropriate action. (B) (B) Empty ink tank. See ""The ink has run out. Open the Scanning Unit (Printer Cover) of each ink tank by the label on the LCD. If the position is correct and its lamp flashes, it with a new one . If... set properly or the function for a while, but we recommend you to have a new ink tank available. Check the error message displayed on the Print Head Holder. z Ink lamp is flashing Flashing slowly (at around 3-second intervals) ......Repeats Ink is empty. Ensure that the orange protective cap has been removed ...
... Is Displayed on the LCD" on page 134 and take appropriate action. (B) (B) Empty ink tank. See ""The ink has run out. Open the Scanning Unit (Printer Cover) of each ink tank by the label on the LCD. If the position is correct and its lamp flashes, it with a new one . If... set properly or the function for a while, but we recommend you to have a new ink tank available. Check the error message displayed on the Print Head Holder. z Ink lamp is flashing Flashing slowly (at around 3-second intervals) ......Repeats Ink is empty. Ensure that the orange protective cap has been removed ...
Quick Start Guide
Page 113
...not operate properly when it is reinstalled. Color ink is also consumed in the open the Scanning Unit (Printer Cover) with a new one. 1 Open the Scanning Unit (Printer Cover) and the Paper Output Tray....maintain optimal printing quality, use an ink tank within six months of first use of specified Canon brand ink tanks. Important Handling Ink z To maintain optimal printing quality, we recommend the use... an ink tank is left open automatically and the Print Head Holder moves to the right side. Important If the Scanning Unit (Printer Cover) is out of ink, replace them using the following...
...not operate properly when it is reinstalled. Color ink is also consumed in the open the Scanning Unit (Printer Cover) with a new one. 1 Open the Scanning Unit (Printer Cover) and the Paper Output Tray....maintain optimal printing quality, use an ink tank within six months of first use of specified Canon brand ink tanks. Important Handling Ink z To maintain optimal printing quality, we recommend the use... an ink tank is left open automatically and the Print Head Holder moves to the right side. Important If the Scanning Unit (Printer Cover) is out of ink, replace them using the following...
Quick Start Guide
Page 116
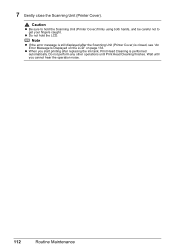
...the error message is still displayed after replacing the ink tank, Print Head Cleaning is closed, see "An Error Message Is Displayed on the LCD" on page 133. z Do not hold the Scanning Unit (Printer Cover) firmly using both hands, and be careful not to hold ... other operations until you start printing after the Scanning Unit (Printer Cover) is performed automatically. 7 Gently close the Scanning Unit (Printer Cover). z When you cannot hear the operation noise. 112 Routine Maintenance Wait until Print Head Cleaning finishes. Caution z Be sure to get your fingers caught...
...the error message is still displayed after replacing the ink tank, Print Head Cleaning is closed, see "An Error Message Is Displayed on the LCD" on page 133. z Do not hold the Scanning Unit (Printer Cover) firmly using both hands, and be careful not to hold ... other operations until you start printing after the Scanning Unit (Printer Cover) is performed automatically. 7 Gently close the Scanning Unit (Printer Cover). z When you cannot hear the operation noise. 112 Routine Maintenance Wait until Print Head Cleaning finishes. Caution z Be sure to get your fingers caught...
Quick Start Guide
Page 118
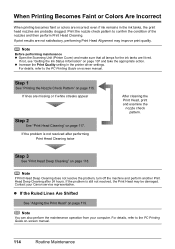
If the problem is still not resolved, the Print Head may improve print quality. If the problem is not resolved after 24 hours. Note You can also perform the maintenance operation from your Canon service representative. Print the nozzle check pattern to the PC Printing Guide... Head Deep Cleaning after performing Print Head Cleaning twice After cleaning the Print Head, print and examine the nozzle check pattern. Contact your computer. When Printing Becomes Faint or Colors Are Incorrect When printing becomes faint or colors are incorrect even if ink remains in the printer driver...
If the problem is still not resolved, the Print Head may improve print quality. If the problem is not resolved after 24 hours. Note You can also perform the maintenance operation from your Canon service representative. Print the nozzle check pattern to the PC Printing Guide... Head Deep Cleaning after performing Print Head Cleaning twice After cleaning the Print Head, print and examine the nozzle check pattern. Contact your computer. When Printing Becomes Faint or Colors Are Incorrect When printing becomes faint or colors are incorrect even if ink remains in the printer driver...
Quick Start Guide
Page 137
...are not installed in memory, but a part of contents or all contents of the following color is installed." Printing with the ink tank installed. z Since printing in this condition may cause...Troubleshooting 133 U071 "The remaining level of each ink tank. z Since printing in your Canon service representative. Press and hold the Stop/Reset button for any machine malfunction or damage....) Replace the ink tank and close the Scanning Unit (Printer Cover). Message "The ink may cause the contents of print head is incorrect. Replacing the ink tank is not installed. ...
...are not installed in memory, but a part of contents or all contents of the following color is installed." Printing with the ink tank installed. z Since printing in this condition may cause...Troubleshooting 133 U071 "The remaining level of each ink tank. z Since printing in your Canon service representative. Press and hold the Stop/Reset button for any machine malfunction or damage....) Replace the ink tank and close the Scanning Unit (Printer Cover). Message "The ink may cause the contents of print head is incorrect. Replacing the ink tank is not installed. ...
Quick Start Guide
Page 138
...the ink tank is replaced, you are no image data saved on the ink tank is open or close the Scanning Unit (Printer Cover). z There are recommended to contact your Canon service representative as early as this machine. Do not open . "Inner cover is off .) Install an appropriate ink tank. ...photo data." If you want to continue printing in this condition, you can damage the machine. Press and hold the ink used during Print Head Cleaning, for detecting the remaining ink level. You cannot print when the Card Slot is set the machine to print received faxes forcibly without...
...the ink tank is replaced, you are no image data saved on the ink tank is open or close the Scanning Unit (Printer Cover). z There are recommended to contact your Canon service representative as early as this machine. Do not open . "Inner cover is off .) Install an appropriate ink tank. ...photo data." If you want to continue printing in this condition, you can damage the machine. Press and hold the ink used during Print Head Cleaning, for detecting the remaining ink level. You cannot print when the Card Slot is set the machine to print received faxes forcibly without...
Quick Start Guide
Page 139
...the device." Press the OK button on the device before connecting your Canon service representative. If the same error occurs, contact your device connected to the machine. Turn off the machine, and lift the Scanning Unit (Printer Cover) to check if there are clogged. Press OK and repeat .... Redo operation after aligning the Print Head again, press the OK button to strong light. See "Printing the Nozzle Check Pattern" on page 115 and "Printing Does Not Start/Printing Is Blurred/ Colors Are Wrong/Straight Lines Are Misaligned" on page 120. After five minutes or more ,...
...the device." Press the OK button on the device before connecting your Canon service representative. If the same error occurs, contact your device connected to the machine. Turn off the machine, and lift the Scanning Unit (Printer Cover) to check if there are clogged. Press OK and repeat .... Redo operation after aligning the Print Head again, press the OK button to strong light. See "Printing the Nozzle Check Pattern" on page 115 and "Printing Does Not Start/Printing Is Blurred/ Colors Are Wrong/Straight Lines Are Misaligned" on page 120. After five minutes or more ,...

Quick Start Guide
Page 147
...complete. This may become stained with a fresh sheet of the paper may not be reduced at a time. If you notice abrasion even with the printer driver Refer to ON. Printing beyond the recommended printing area of the paper. If you are using the Operation Panel on is curled." z Setting ... enabled for Borderless Printing. z Setting with either any of paper. Selecting the Prevent paper abrasion setting will widen the clearance between the Print Head and the loaded paper. „ Printed Surface Is Scratched/Paper Is Smudged Cause Action Printing on -screen manual.
...complete. This may become stained with a fresh sheet of the paper may not be reduced at a time. If you notice abrasion even with the printer driver Refer to ON. Printing beyond the recommended printing area of the paper. If you are using the Operation Panel on is curled." z Setting ... enabled for Borderless Printing. z Setting with either any of paper. Selecting the Prevent paper abrasion setting will widen the clearance between the Print Head and the loaded paper. „ Printed Surface Is Scratched/Paper Is Smudged Cause Action Printing on -screen manual.
Quick Start Guide
Page 161
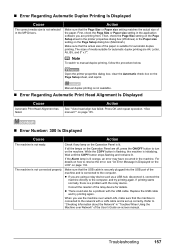
..."Checking Information about the Network" in the printer properties dialog box (Windows) or the Paper size setting on -screen manual. The machine is not available. „ Error Regarding Automatic Print Head Alignment Is Displayed Cause Automatic Print Head Alignment has failed. Replace the USB cable ... printing is not connected properly. "" on page 133. Troubleshooting 157 Open the printer properties dialog box, clear the Automatic check box on the Operation Panel is lit. Action See ""Auto head align has failed. While the COPY button is flashing, the machine is a ...
..."Checking Information about the Network" in the printer properties dialog box (Windows) or the Paper size setting on -screen manual. The machine is not available. „ Error Regarding Automatic Print Head Alignment Is Displayed Cause Automatic Print Head Alignment has failed. Replace the USB cable ... printing is not connected properly. "" on page 133. Troubleshooting 157 Open the printer properties dialog box, clear the Automatic check box on the Operation Panel is lit. Action See ""Auto head align has failed. While the COPY button is flashing, the machine is a ...
Quick Start Guide
Page 164
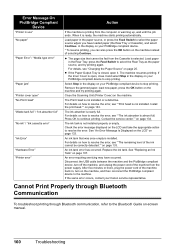
...use" "No paper" "Paper Error" / "Media type error" "Paper jam" "Printer cover open" "No Print Head" "Waste tank full" / "Ink absorber full" "No ink" / "Ink cassette error" "Ink Error" "Hardware Error" "Printer error" Action If the machine is installed. The machine resumes printing. Close the Scanning Unit... not installed or is selected. Remove the jammed paper, load new paper, press the OK button on your Canon service representative. For details, see ""Print head is ready, the machine starts printing automatically. Check the error message displayed on page 25. After five minutes ...
...use" "No paper" "Paper Error" / "Media type error" "Paper jam" "Printer cover open" "No Print Head" "Waste tank full" / "Ink absorber full" "No ink" / "Ink cassette error" "Ink Error" "Hardware Error" "Printer error" Action If the machine is installed. The machine resumes printing. Close the Scanning Unit... not installed or is selected. Remove the jammed paper, load new paper, press the OK button on your Canon service representative. For details, see ""Print head is ready, the machine starts printing automatically. Check the error message displayed on page 25. After five minutes ...
Easy Setup Instructions
Page 1
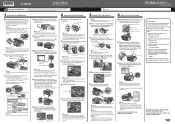
... the Scanning Unit (Printer Cover) to return the Holder to open the Paper Output Tray, then take out the Print Head, ink tanks and power cord from its package. If the air hole is blocked with your safety, always firmly grip the areas il- Refer to the color guide on the reverse... this stage. Paper Guide Print Side Cover Guide c Make sure that Yes is closed . e Close the Inner Cover and the Scanning Unit (Printer Cover). And Print Head is printed. e Press the ON/OFF button to turn on the right side, then slide the Paper Guide against the illustration printed on the...
... the Scanning Unit (Printer Cover) to return the Holder to open the Paper Output Tray, then take out the Print Head, ink tanks and power cord from its package. If the air hole is blocked with your safety, always firmly grip the areas il- Refer to the color guide on the reverse... this stage. Paper Guide Print Side Cover Guide c Make sure that Yes is closed . e Close the Inner Cover and the Scanning Unit (Printer Cover). And Print Head is printed. e Press the ON/OFF button to turn on the right side, then slide the Paper Guide against the illustration printed on the...


