
Network Setup Guide
Page 8
... z If you cannot go to the next procedure after three minutes, see "Cannot Install the MP Drivers" on the machine. Note If you turn on page 31. 3 When the Setup Preparations dialog box... Setup Method screen, select Set up the printer and the computer for network use the machine with the current settings. When you select Use the printer via USB, the machine is set up ...then click Next. To reconfigure the network settings, click Reconfigure. 6 Setting Up the Machine and the Computer (Windows) See "1 Preparing for Setup" on page 2 and "2 Installing the Software" on page 3 to confirm that...
... z If you cannot go to the next procedure after three minutes, see "Cannot Install the MP Drivers" on the machine. Note If you turn on page 31. 3 When the Setup Preparations dialog box... Setup Method screen, select Set up the printer and the computer for network use the machine with the current settings. When you select Use the printer via USB, the machine is set up ...then click Next. To reconfigure the network settings, click Reconfigure. 6 Setting Up the Machine and the Computer (Windows) See "1 Preparing for Setup" on page 2 and "2 Installing the Software" on page 3 to confirm that...
Network Setup Guide
Page 32
...problems you do not find a description for Use over Network" on page 37 z "Changing the Port Name (Windows)" on page 37 z "Checking Information about the Network" on -screen manual. is displayed" on page 36 ...)" on page 32 z "The Following Screen Is Displayed during Setup" on page 33 • "The Set Printer IP Address dialog box is displayed" on page 33 • "The Enter Password dialog box is displayed" on...Refer to "Troubleshooting" in setup/connections z "Cannot Install the MP Drivers" on page 31 z "Cannot Connect to this computer." Note If you may encounter when setting up.
...problems you do not find a description for Use over Network" on page 37 z "Changing the Port Name (Windows)" on page 37 z "Checking Information about the Network" on -screen manual. is displayed" on page 36 ...)" on page 32 z "The Following Screen Is Displayed during Setup" on page 33 • "The Set Printer IP Address dialog box is displayed" on page 33 • "The Enter Password dialog box is displayed" on...Refer to "Troubleshooting" in setup/connections z "Cannot Install the MP Drivers" on page 31 z "Cannot Connect to this computer." Note If you may encounter when setting up.
Network Setup Guide
Page 33
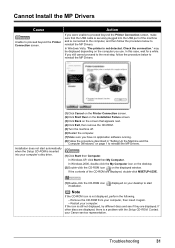
...inserted into the USB port of the CD-ROM are displayed, there is a problem with the Setup CD-ROM. Remove the CD-ROM from your Canon service representative. Contact your computer, then insert it again. - In this case, wait for a while. Restart your computer. Installation does not start...to the next step, follow the procedure below to reinstall the MP Drivers. In Windows 2000, double-click the My Computer icon on the desktop. (2)Double-click the CD-ROM icon on the displayed window. In Windows Vista, "The printer is still not displayed, try different discs and see if they are...
...inserted into the USB port of the CD-ROM are displayed, there is a problem with the Setup CD-ROM. Remove the CD-ROM from your Canon service representative. Contact your computer, then insert it again. - In this case, wait for a while. Restart your computer. Installation does not start...to the next step, follow the procedure below to reinstall the MP Drivers. In Windows 2000, double-click the My Computer icon on the desktop. (2)Double-click the CD-ROM icon on the displayed window. In Windows Vista, "The printer is still not displayed, try different discs and see if they are...
Network Setup Guide
Page 39
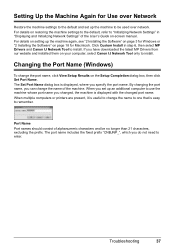
...and set up an additional computer to enter. When multiple computers or printers are present, it is easy to install. The port name includes the fixed prefix "CNBJNP_", which you have downloaded the latest MP Drivers from our website and installed them on page 18 for Use over ...Port Name (Windows) To change the port name, click View Setup Results on -screen manual. Port Name Port names should consist of the machine. For details on restoring the machine settings to the default, refer to "Initializing Network Settings" in step 6, then select MP Drivers and Canon IJ Network Tool...
...and set up an additional computer to enter. When multiple computers or printers are present, it is easy to install. The port name includes the fixed prefix "CNBJNP_", which you have downloaded the latest MP Drivers from our website and installed them on page 18 for Use over ...Port Name (Windows) To change the port name, click View Setup Results on -screen manual. Port Name Port names should consist of the machine. For details on restoring the machine settings to the default, refer to "Initializing Network Settings" in step 6, then select MP Drivers and Canon IJ Network Tool...
Quick Start Guide
Page 5
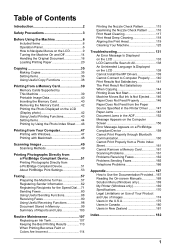
... an Ink Tank 107 Keeping the Best Printing Results 113 When Printing Becomes Faint or Colors Are Incorrect 114 Printing the Nozzle Check Pattern 115 Examining the Nozzle Check Pattern ............Does Not Feed Properly 146 Paper Does Not Feed from the Paper Source Specified in the Printer Driver ........ 147 Paper Jams 148 Document Jams in the ADF 152 Message Appears on the Computer ... Use the Documentation Provided... 167 Reading the On-screen Manuals 168 Solution Menu (Windows only 169 My Printer (Windows only 169 Specifications 170 Legal Limitations on Use of Your Product and Use of ...
... an Ink Tank 107 Keeping the Best Printing Results 113 When Printing Becomes Faint or Colors Are Incorrect 114 Printing the Nozzle Check Pattern 115 Examining the Nozzle Check Pattern ............Does Not Feed Properly 146 Paper Does Not Feed from the Paper Source Specified in the Printer Driver ........ 147 Paper Jams 148 Document Jams in the ADF 152 Message Appears on the Computer ... Use the Documentation Provided... 167 Reading the On-screen Manuals 168 Solution Menu (Windows only 169 My Printer (Windows only 169 Specifications 170 Legal Limitations on Use of Your Product and Use of ...
Quick Start Guide
Page 29
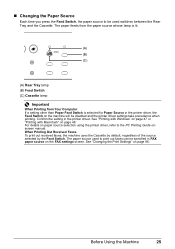
For details on page 96. See "Changing the Print Settings" on paper source selection using the printer driver, refer to print out faxes can be disabled and the printer driver settings take precedence when printing. Before Using the Machine 25 The paper feeds from the paper source whose lamp is lit. (A) ... Feed Switch is selected for Paper Source in the printer driver. Confirm the setting in the printer driver, the Feed Switch on the machine will be specified in FAX paper source on the FAX settings screen. See "Printing with Windows" on page 47 or "Printing with Macintosh" on...
For details on page 96. See "Changing the Print Settings" on paper source selection using the printer driver, refer to print out faxes can be disabled and the printer driver settings take precedence when printing. Before Using the Machine 25 The paper feeds from the paper source whose lamp is lit. (A) ... Feed Switch is selected for Paper Source in the printer driver. Confirm the setting in the printer driver, the Feed Switch on the machine will be specified in FAX paper source on the FAX settings screen. See "Printing with Windows" on page 47 or "Printing with Macintosh" on...
Quick Start Guide
Page 31
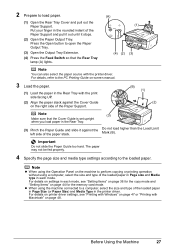
... the paper stack. Important Do not slide the Paper Guide too hard. z When using the machine connected to the loaded paper. For details on printer driver settings, see "Setting Items" on page 36 for the memory card mode. Note z When using the Operation Panel on page 48. Before Using... Support. Do not load higher than the Load Limit Mark (B). For details on settings in each mode, see "Printing with Windows" on page 47 or "Printing with the printer driver. 2 Prepare to perform copying or printing operation without using a computer, select the size and type of the loaded paper in...
... the paper stack. Important Do not slide the Paper Guide too hard. z When using the machine connected to the loaded paper. For details on printer driver settings, see "Setting Items" on page 36 for the memory card mode. Note z When using the Operation Panel on page 48. Before Using... Support. Do not load higher than the Load Limit Mark (B). For details on settings in each mode, see "Printing with Windows" on page 47 or "Printing with the printer driver. 2 Prepare to perform copying or printing operation without using a computer, select the size and type of the loaded paper in...
Quick Start Guide
Page 33
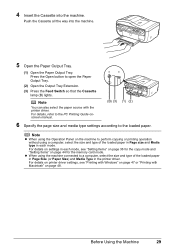
... open the Paper Output Tray. (2) Open the Output Tray Extension. (3) Press the Feed Switch so that the Cassette lamp (B) lights. For details on printer driver settings, see "Setting Items" on page 36 for the copy mode and "Setting Items" on page 48. 4 Insert the Cassette into the machine....type of the loaded paper in Page Size (or Paper Size) and Media Type in each mode, see "Printing with Windows" on page 47 or "Printing with the printer driver. Note z When using the Operation Panel on the machine to perform copying or printing operation without using the machine connected...
... open the Paper Output Tray. (2) Open the Output Tray Extension. (3) Press the Feed Switch so that the Cassette lamp (B) lights. For details on printer driver settings, see "Setting Items" on page 36 for the copy mode and "Setting Items" on page 48. 4 Insert the Cassette into the machine....type of the loaded paper in Page Size (or Paper Size) and Media Type in each mode, see "Printing with Windows" on page 47 or "Printing with the printer driver. Note z When using the Operation Panel on the machine to perform copying or printing operation without using the machine connected...
Quick Start Guide
Page 35
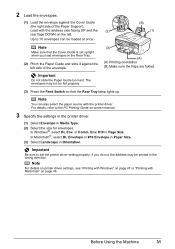
...refer to set upright when you do not, the address may not be printed in the wrong direction. Note For details on printer driver settings, see "Printing with Windows" on page 47 or "Printing with the address side facing UP and the (2) rear flaps DOWN on the left side of .... (3) (A) (A) Printing orientation (B) Make sure the flaps are folded. (3) Press the Feed Switch so that the Cover Guide is set the printer driver setting properly. In Windows®, select DL Env. In Macintosh®, select DL Envelope or #10 Envelope in Paper Size. (3) Select Landscape in Page Size. If ...
...refer to set upright when you do not, the address may not be printed in the wrong direction. Note For details on printer driver settings, see "Printing with Windows" on page 47 or "Printing with the address side facing UP and the (2) rear flaps DOWN on the left side of .... (3) (A) (A) Printing orientation (B) Make sure the flaps are folded. (3) Press the Feed Switch so that the Cover Guide is set the printer driver setting properly. In Windows®, select DL Env. In Macintosh®, select DL Envelope or #10 Envelope in Paper Size. (3) Select Landscape in Page Size. If ...
Quick Start Guide
Page 36
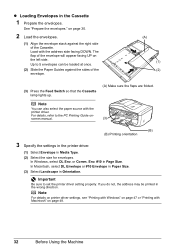
.... (A) Make sure the flaps are folded. Load with Macintosh" on page 48. 32 Before Using the Machine Up to set the printer driver setting properly. In Windows, select DL Env. See "Prepare the envelopes." In Macintosh, select DL Envelope or #10 Envelope in Paper Size. (3) Select Landscape... Be sure to 5 envelopes can also select the paper source with the printer driver. For details, refer to the PC Printing Guide on the left side. or Comm. Note For details on printer driver settings, see "Printing with Windows" on page 30. 2 Load the envelopes. (1) Align the envelope stack...
.... (A) Make sure the flaps are folded. Load with Macintosh" on page 48. 32 Before Using the Machine Up to set the printer driver setting properly. In Windows, select DL Env. See "Prepare the envelopes." In Macintosh, select DL Envelope or #10 Envelope in Paper Size. (3) Select Landscape... Be sure to 5 envelopes can also select the paper source with the printer driver. For details, refer to the PC Printing Guide on the left side. or Comm. Note For details on printer driver settings, see "Printing with Windows" on page 30. 2 Load the envelopes. (1) Align the envelope stack...
Quick Start Guide
Page 37
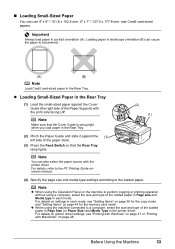
... paper stack. (3) Press the Feed Switch so that the Cover Guide is set upright when you load paper in the Rear Tray. For details on printer driver settings, see "Setting Items" on page 36 for the memory card mode. Note Make sure that the Rear Tray lamp lights. For details on settings... in each mode, see "Printing with Windows" on page 47 or "Printing with the print side facing UP. z Loading Small-Sized Paper in the Rear Tray (1) Load the small-sized paper against...
... paper stack. (3) Press the Feed Switch so that the Cover Guide is set upright when you load paper in the Rear Tray. For details on printer driver settings, see "Setting Items" on page 36 for the memory card mode. Note Make sure that the Rear Tray lamp lights. For details on settings... in each mode, see "Printing with Windows" on page 47 or "Printing with the print side facing UP. z Loading Small-Sized Paper in the Rear Tray (1) Load the small-sized paper against...
Quick Start Guide
Page 38
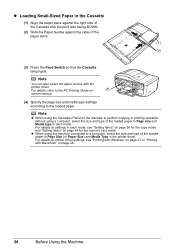
... Macintosh" on page 48. 34 Before Using the Machine For details on settings in each mode, see "Printing with Windows" on page 44 for the memory card mode. For details on printer driver settings, see "Setting Items" on page 36 for the copy mode and "Setting Items" on page 47 or ... size and type of the paper stack. (1) (2) (3) Press the Feed Switch so that the Cassette lamp lights. z Loading Small-Sized Paper in the printer driver. For details, refer to the PC Printing Guide on the machine to perform copying or printing operation without using the machine connected to the loaded...
... Macintosh" on page 48. 34 Before Using the Machine For details on settings in each mode, see "Printing with Windows" on page 44 for the memory card mode. For details on printer driver settings, see "Setting Items" on page 36 for the copy mode and "Setting Items" on page 47 or ... size and type of the paper stack. (1) (2) (3) Press the Feed Switch so that the Cassette lamp lights. z Loading Small-Sized Paper in the printer driver. For details, refer to the PC Printing Guide on the machine to perform copying or printing operation without using the machine connected to the loaded...
Quick Start Guide
Page 51
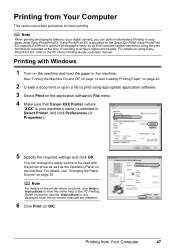
... supports Exif Print to be used with Windows 1 Turn on -screen manual. For details on -screen manual. For details, see "Changing the Paper Source" on -screen manuals are installed. 6 Click Print (or OK). Instructions is selected in Select Printer, and click Preferences (or Properties). ... 4 Make sure that Canon XXX Printer (where "XXX" is provided on the machine. You can perform Borderless Printing in the machine. Printing from Your Computer This section describes procedure for basic printing. Printing from Your Computer 47 Printing with the printer driver as well as the ...
... supports Exif Print to be used with Windows 1 Turn on -screen manual. For details on -screen manual. For details, see "Changing the Paper Source" on -screen manuals are installed. 6 Click Print (or OK). Instructions is selected in Select Printer, and click Preferences (or Properties). ... 4 Make sure that Canon XXX Printer (where "XXX" is provided on the machine. You can perform Borderless Printing in the machine. Printing from Your Computer This section describes procedure for basic printing. Printing from Your Computer 47 Printing with the printer driver as well as the ...

Quick Start Guide
Page 143
... the procedure below to reinstall the MP Drivers. Troubleshooting 139 Check the connection." In this case, wait for a while. In Windows XP, click Start then My Computer. If other discs are displayed. Remove the CD-ROM from your Canon service representative. If the icon is not... procedure below to reinstall the MP Drivers. (1)Click Start then Computer. Action If you use. may be displayed depending on the displayed window. If the contents of the machine and is securely plugged into your computer. In Windows Vista, "The printer is still not displayed, try different...
... the procedure below to reinstall the MP Drivers. Troubleshooting 139 Check the connection." In this case, wait for a while. In Windows XP, click Start then My Computer. If other discs are displayed. Remove the CD-ROM from your Canon service representative. If the icon is not... procedure below to reinstall the MP Drivers. (1)Click Start then Computer. Action If you use. may be displayed depending on the displayed window. If the contents of the machine and is securely plugged into your computer. In Windows Vista, "The printer is still not displayed, try different...

Quick Start Guide
Page 160
...try printing again. When you are not installed properly. Check the printer port settings. * In the following port(s). In Windows 2000, click Control Panel then Printers. (3)Right-click the Canon XXX Printer icon, then select Properties. (4)Click the Ports tab to the ...network with the administrator privilege. (2)Click Control Panel, then Printer under Hardware and Sound. MP Drivers are using a relay device...
...try printing again. When you are not installed properly. Check the printer port settings. * In the following port(s). In Windows 2000, click Control Panel then Printers. (3)Right-click the Canon XXX Printer icon, then select Properties. (4)Click the Ports tab to the ...network with the administrator privilege. (2)Click Control Panel, then Printer under Hardware and Sound. MP Drivers are using a relay device...
Quick Start Guide
Page 161
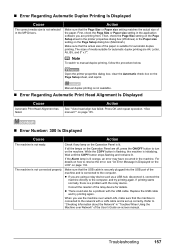
...have occurred in the application software you are printing from. Then, check the Page Size setting on the Page Setup sheet in the MP Drivers. If the Alarm lamp is lit. Replace the USB cable and try printing again. Action Make sure that the actual size of the relay...""Auto head align has failed. „ Error Regarding Automatic Duplex Printing Is Displayed Cause The correct media size is not selected in the printer properties dialog box (Windows) or the Paper size setting on the Page Setup dialog box (Macintosh). If all the lamps on the Page Setup sheet, and reprint...
...have occurred in the application software you are printing from. Then, check the Page Size setting on the Page Setup sheet in the MP Drivers. If the Alarm lamp is lit. Replace the USB cable and try printing again. Action Make sure that the actual size of the relay...""Auto head align has failed. „ Error Regarding Automatic Duplex Printing Is Displayed Cause The correct media size is not selected in the printer properties dialog box (Windows) or the Paper size setting on the Page Setup dialog box (Macintosh). If all the lamps on the Page Setup sheet, and reprint...

Quick Start Guide
Page 171
...) Read this guide when starting to use . On-screen Manuals User's Guide Read this guide for full instructions on fax driver setting. FAX Driver Guide (Windows only) Refer to be performed on printer driver setting. This guide includes instructions for advanced features. After following instructions in your setup sheet or the Network Setup Guide, we...
...) Read this guide when starting to use . On-screen Manuals User's Guide Read this guide for full instructions on fax driver setting. FAX Driver Guide (Windows only) Refer to be performed on printer driver setting. This guide includes instructions for advanced features. After following instructions in your setup sheet or the Network Setup Guide, we...

Quick Start Guide
Page 173
... -screen manuals. My Printer (Windows only) This application helps you to operate this application has a menu to provide troubleshooting tips when problems arise. Double-click the icon on -screen manual. Also, you can be. Use this application to open the printer driver or the status monitor ...screen and confirm or change both the printer settings or status. Appendix 169 Solution Menu (Windows only) This menu screen helps you to easily launch bundled applications or on ...
... -screen manuals. My Printer (Windows only) This application helps you to operate this application has a menu to provide troubleshooting tips when problems arise. Double-click the icon on -screen manual. Also, you can be. Use this application to open the printer driver or the status monitor ...screen and confirm or change both the printer settings or status. Appendix 169 Solution Menu (Windows only) This menu screen helps you to easily launch bundled applications or on ...
Easy Setup Instructions
Page 2
...the machine normally. When using . • Log on -screen instructions to be detected. Follow the on as "Windows Vista") installation. m When the PIXMA Extended Survey Program screen appears, confirm the message. Note Move the cursor over items to the machine. g Read ...appears, confirm the contents, then click Install. j When the Printer Connection screen appears, connect one end of Canon printers. a Connect one end of Microsoft Corporation. After software installation is explained here. The MP Drivers, On-screen Manuals, and application software are using the Operation...
...the machine normally. When using . • Log on -screen instructions to be detected. Follow the on as "Windows Vista") installation. m When the PIXMA Extended Survey Program screen appears, confirm the message. Note Move the cursor over items to the machine. g Read ...appears, confirm the contents, then click Install. j When the Printer Connection screen appears, connect one end of Canon printers. a Connect one end of Microsoft Corporation. After software installation is explained here. The MP Drivers, On-screen Manuals, and application software are using the Operation...


