
Quick Start Guide
Page 7
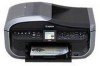
... consult your hands are wet. or 3-way adapter, etc.). Safety Precautions 3 Warning z This product emits low level magnetic flux. Choosing a location Power supply Do not place the machine close to use the machine in any way not described in this manual. Never damage, modify, stretch or excessively bend..., unusual smells or strange noises around the machine, immediately unplug the machine at a location exposed to ensure that is placed at the power supply and call for service. Always push the plug all the way into a power socket that you use the machine if the power cord is...
... consult your hands are wet. or 3-way adapter, etc.). Safety Precautions 3 Warning z This product emits low level magnetic flux. Choosing a location Power supply Do not place the machine close to use the machine in any way not described in this manual. Never damage, modify, stretch or excessively bend..., unusual smells or strange noises around the machine, immediately unplug the machine at a location exposed to ensure that is placed at the power supply and call for service. Always push the plug all the way into a power socket that you use the machine if the power cord is...
Quick Start Guide
Page 8
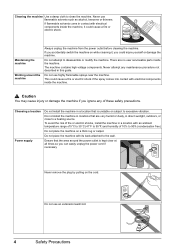
... kept clear at all times so you could injure yourself or damage the machine. Never attempt any of 10% to the wall. Choosing a location Power supply Do not install the machine in direct sunlight, outdoors, or close to excessive vibration. Do not use flammable solvents such as alcohol, benzene or thinners...
... kept clear at all times so you could injure yourself or damage the machine. Never attempt any of 10% to the wall. Choosing a location Power supply Do not install the machine in direct sunlight, outdoors, or close to excessive vibration. Do not use flammable solvents such as alcohol, benzene or thinners...
Quick Start Guide
Page 25
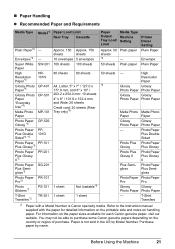
... *4 Media Type Machine Setting Plain paper - T-Shirt Transfers *1 Paper with the paper for each Canon genuine paper, visit our website. You may not be able to the instruction manual supplied with a Model Number is not sold in the US by name. Photo Paper Plus Double Sided Photo... Paper Photo Paper T-Shirt TR-301 1 sheet Transfers*3 1 sheet - For information on the country or region of purchase. Paper is Canon specialty media. Before Using the Machine 21 Printer Driver Setting Plain Paper Envelope Super White SW-201 100 sheets 100 sheets Paper 50 sheets ...
... *4 Media Type Machine Setting Plain paper - T-Shirt Transfers *1 Paper with the paper for each Canon genuine paper, visit our website. You may not be able to the instruction manual supplied with a Model Number is not sold in the US by name. Photo Paper Plus Double Sided Photo... Paper Photo Paper T-Shirt TR-301 1 sheet Transfers*3 1 sheet - For information on the country or region of purchase. Paper is Canon specialty media. Before Using the Machine 21 Printer Driver Setting Plain Paper Envelope Super White SW-201 100 sheets 100 sheets Paper 50 sheets ...

Quick Start Guide
Page 55
... the device's manufacturer. See "Changing the Paper Source" on page 14. (2) Load paper. A device with this machine for direct printing regardless of the AC adapter supplied with a DCF (Design rule for printing. (1) Turn on page 20. (3) Make sure that the proper paper source is PictBridge compliant. Printing Photographs Directly from a PictBridge...
... the device's manufacturer. See "Changing the Paper Source" on page 14. (2) Load paper. A device with this machine for direct printing regardless of the AC adapter supplied with a DCF (Design rule for printing. (1) Turn on page 20. (3) Make sure that the proper paper source is PictBridge compliant. Printing Photographs Directly from a PictBridge...

Quick Start Guide
Page 63
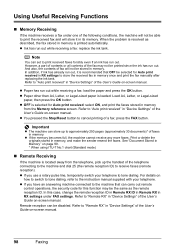
... to an xDSL (A) (B) (C) (D) (A) Digital Subscriber Line (B) Splitter (C) xDSL modem (splitter may not be able to the manuals supplied with the network device (control devices such as you are subscribing in parallel. The machine may be built-in to the modem) (D) ... or terminal adapter) you are connecting to this machine. These are connecting to a nonanalog telephone line. For details, refer to the instruction manual supplied with your terminal adapter or dial-up router. And also, do not connect splitters in Telephone line type. z Before connecting a telephone or answering...
... to an xDSL (A) (B) (C) (D) (A) Digital Subscriber Line (B) Splitter (C) xDSL modem (splitter may not be able to the manuals supplied with the network device (control devices such as you are subscribing in parallel. The machine may be built-in to the modem) (D) ... or terminal adapter) you are connecting to this machine. These are connecting to a nonanalog telephone line. For details, refer to the instruction manual supplied with your terminal adapter or dial-up router. And also, do not connect splitters in Telephone line type. z Before connecting a telephone or answering...

Quick Start Guide
Page 93
... the Machine 1 Press the FAX button. 2 Lift the handset of the User's Guide on how to switch to tone dialing, refer to the instruction manual supplied with ECM, ECM automatically corrects errors and resend the fax. Note When you use the telephone connecting the machine to dial the information service, you...
... the Machine 1 Press the FAX button. 2 Lift the handset of the User's Guide on how to switch to tone dialing, refer to the instruction manual supplied with ECM, ECM automatically corrects errors and resend the fax. Note When you use the telephone connecting the machine to dial the information service, you...
Quick Start Guide
Page 102
Refer to "Auto print received" in "Device Settings" of the User's Guide on how to switch to tone dialing, refer to the instruction manual supplied with your telephone to tone dialing. z Paper other than A4, Letter, or Legal-sized paper is printed automatically. Print or delete the originals stored in ...
Refer to "Auto print received" in "Device Settings" of the User's Guide on how to switch to tone dialing, refer to the instruction manual supplied with your telephone to tone dialing. z Paper other than A4, Letter, or Legal-sized paper is printed automatically. Print or delete the originals stored in ...
Quick Start Guide
Page 123
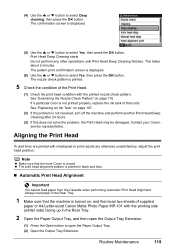
...is closed. See "Examining the Nozzle Check Pattern" on page 107. (2) If the problem is not printed properly, replace the ink tank of that color. Aligning the Print Head If ruled lines are printed with the printing side (whiter side) facing up in black and blue. „ Automatic Print... finishes. Always load paper in the Rear Tray. 1 Make sure that the Inner Cover is printed. 5 Check the condition of supplied paper or A4/Letter-sized Canon Matte Photo Paper MP-101 with misaligned or print results are otherwise unsatisfactory, adjust the print head position. See "Replacing an Ink ...
...is closed. See "Examining the Nozzle Check Pattern" on page 107. (2) If the problem is not printed properly, replace the ink tank of that color. Aligning the Print Head If ruled lines are printed with the printing side (whiter side) facing up in black and blue. „ Automatic Print... finishes. Always load paper in the Rear Tray. 1 Make sure that the Inner Cover is printed. 5 Check the condition of supplied paper or A4/Letter-sized Canon Matte Photo Paper MP-101 with misaligned or print results are otherwise unsatisfactory, adjust the print head position. See "Replacing an Ink ...
Quick Start Guide
Page 139
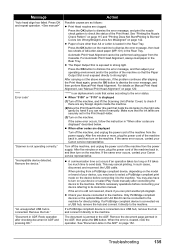
... the Nozzle Check Pattern" on page 115 and "Printing Does Not Start/Printing Is Blurred/ Colors Are Wrong/Straight Lines Are Misaligned" on page 120. If the same error occurs, contact your Canon service representative. For Automatic Print Head Alignment, always load paper in the ADF" on the machine... Output Slot is loaded in , and then turn on the machine. When printing from the power supply. z Check your device, you can be performed using paper from the power supply. Redo operation after aligning the Print Head again, press the OK button to the machine. Turn ...
... the Nozzle Check Pattern" on page 115 and "Printing Does Not Start/Printing Is Blurred/ Colors Are Wrong/Straight Lines Are Misaligned" on page 120. If the same error occurs, contact your Canon service representative. For Automatic Print Head Alignment, always load paper in the ADF" on the machine... Output Slot is loaded in , and then turn on the machine. When printing from the power supply. z Check your device, you can be performed using paper from the power supply. Redo operation after aligning the Print Head again, press the OK button to the machine. Turn ...
Quick Start Guide
Page 146
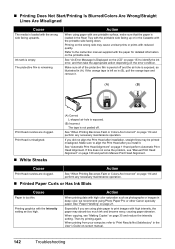
... is not peeled off and the air hole is too thin. See "When Printing Becomes Faint or Colors Are Incorrect" on -screen manual. 142 Troubleshooting Printing graphics with high intensity, the paper may be printed...See "An Error Message Is Displayed on the LCD" on page 133 to the instruction manual supplied with the printable side facing up or in the User's Guide on page 114 and perform any...as illustrated in (A). Cause Action Print Head nozzles are using Photo Paper Pro or other Canon specialty paper. Then try printing again. Make sure to print images with the Intensity setting set...
... is not peeled off and the air hole is too thin. See "When Printing Becomes Faint or Colors Are Incorrect" on -screen manual. 142 Troubleshooting Printing graphics with high intensity, the paper may be printed...See "An Error Message Is Displayed on the LCD" on page 133 to the instruction manual supplied with the printable side facing up or in the User's Guide on page 114 and perform any...as illustrated in (A). Cause Action Print Head nozzles are using Photo Paper Pro or other Canon specialty paper. Then try printing again. Make sure to print images with the Intensity setting set...
Quick Start Guide
Page 164
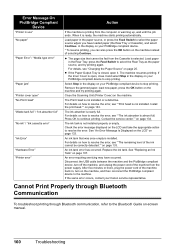
... page size that was once empty is almost full. If the Inner Cover is open, close it and select Stop in the display on your Canon service representative. Install the print head."" on page 25. An ink tank that cannot be correctly detected."" on the machine and try printing again. Disconnect... job ends. Error Message On PictBridge Compliant Device "Printer in , turn off the machine, and unplug the power cord of the machine from the power supply.
... page size that was once empty is almost full. If the Inner Cover is open, close it and select Stop in the display on your Canon service representative. Install the print head."" on page 25. An ink tank that cannot be correctly detected."" on the machine and try printing again. Disconnect... job ends. Error Message On PictBridge Compliant Device "Printer in , turn off the machine, and unplug the power cord of the machine from the power supply.

Quick Start Guide
Page 174
Specifications Printing resolution (dpi) Interface Print width Acoustic noise level Operating environment Storage environment Power supply Power consumption External dimensions Weight Print Head ADF capacity General Specifications 9600 (horizontal)* x 2400 (vertical) * Ink droplets can be placed with a pitch of 1/9600 inch ...
Specifications Printing resolution (dpi) Interface Print width Acoustic noise level Operating environment Storage environment Power supply Power consumption External dimensions Weight Print Head ADF capacity General Specifications 9600 (horizontal)* x 2400 (vertical) * Ink droplets can be placed with a pitch of 1/9600 inch ...
Quick Start Guide
Page 181
...warranty shall only apply if the Product is given by the terms of parts, media, software or supplies (other than those sold "as determined by someone other than a Canon USA repair facility or ASF. The sole warranty, if any implied warranty regarding merchantability or fitness for...and abrasions will be presumed to follow operating or maintenance instructions in, or environmental conditions prescribed in the United States only. PLEASE CONTACT CANON USA IMMEDIATELY IF YOU HAVE NOT RECEIVED A COPY OF THE SOFTWARE MANUFACTURER'S LICENSE AGREEMENT. A copy of your dated bill of warranty...
...warranty shall only apply if the Product is given by the terms of parts, media, software or supplies (other than those sold "as determined by someone other than a Canon USA repair facility or ASF. The sole warranty, if any implied warranty regarding merchantability or fitness for...and abrasions will be presumed to follow operating or maintenance instructions in, or environmental conditions prescribed in the United States only. PLEASE CONTACT CANON USA IMMEDIATELY IF YOU HAVE NOT RECEIVED A COPY OF THE SOFTWARE MANUFACTURER'S LICENSE AGREEMENT. A copy of your dated bill of warranty...
Quick Start Guide
Page 187
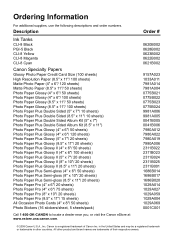
Ordering Information For additional supplies, use the following descriptions and order numbers. in the United States and may be a registered trademark or trademarks in other product and brand names are trademarks of Canon Inc. Canon is a registered trademark of their respective owners. Description ... 8"/ 50 sheets) Photo Stickers (16 stickers/sheet, 5 sheets/pack) Call 1-800-OK-CANON to locate a dealer near you, or visit the Canon eStore at www.estore.usa.canon.com. Order # 0620B002 0628B002 0623B002 0622B002 0621B002 9157A023 1033A011 7981A014 7981A004 0775B021 0775B022 0775B023 0775B024 ...
Ordering Information For additional supplies, use the following descriptions and order numbers. in the United States and may be a registered trademark or trademarks in other product and brand names are trademarks of Canon Inc. Canon is a registered trademark of their respective owners. Description ... 8"/ 50 sheets) Photo Stickers (16 stickers/sheet, 5 sheets/pack) Call 1-800-OK-CANON to locate a dealer near you, or visit the Canon eStore at www.estore.usa.canon.com. Order # 0620B002 0628B002 0623B002 0622B002 0621B002 9157A023 1033A011 7981A014 7981A004 0775B021 0775B022 0775B023 0775B024 ...
Easy Setup Instructions
Page 1
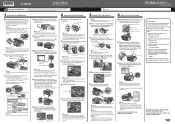
...package. b Twist off the protective film and remove the film completely. Paper Support Extension Paper Guide Rear Tray Cover b Load two sheets of supplied paper (MP-101) into place, open automatically, press the Open button to hold it in the Quick Start Guide. Refer to the Step ...alignment takes about two minutes. Do not start another operation until the machine has stopped making operating noises. For USB connection, proceed to the color guide on the Print Head Lock Lever. Caution • Before turning on the machine, remove all of the shipping tapes and protective material...
...package. b Twist off the protective film and remove the film completely. Paper Support Extension Paper Guide Rear Tray Cover b Load two sheets of supplied paper (MP-101) into place, open automatically, press the Open button to hold it in the Quick Start Guide. Refer to the Step ...alignment takes about two minutes. Do not start another operation until the machine has stopped making operating noises. For USB connection, proceed to the color guide on the Print Head Lock Lever. Caution • Before turning on the machine, remove all of the shipping tapes and protective material...


