Quick Start Guide
Page 5
... and Lists 103 Routine Maintenance 107 Replacing an Ink Tank 107 Keeping the Best Printing Results 113 When Printing Becomes Faint or Colors Are Incorrect 114 Printing the Nozzle Check Pattern 115 Examining the Nozzle Check Pattern ......... 116 Print Head Cleaning 117 Print Head ... Print Properly from a Photo Index Sheet 161 Cannot Remove a Memory Card 161 Scanning Problems 161 Problems Receiving Faxes 162 Problems Sending Faxes 165 Telephone Problems 166 Appendix 167 How to Use the Documentation Provided... 167 Reading the On-screen Manuals 168 Solution Menu (Windows only 169 ...
... and Lists 103 Routine Maintenance 107 Replacing an Ink Tank 107 Keeping the Best Printing Results 113 When Printing Becomes Faint or Colors Are Incorrect 114 Printing the Nozzle Check Pattern 115 Examining the Nozzle Check Pattern ......... 116 Print Head Cleaning 117 Print Head ... Print Properly from a Photo Index Sheet 161 Cannot Remove a Memory Card 161 Scanning Problems 161 Problems Receiving Faxes 162 Problems Sending Faxes 165 Telephone Problems 166 Appendix 167 How to Use the Documentation Provided... 167 Reading the On-screen Manuals 168 Solution Menu (Windows only 169 ...
Quick Start Guide
Page 11
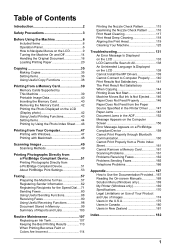
...Memory lamp Flashes when sending or receiving faxes, and lights when there are documents stored in progress. (15) Black button (top) / Color button (bottom) Press the Black button to start color copying, photo printing, scanning, or faxing. (16) Hook button Connects or disconnects the telephone line... machine must be connected to the Scanning Guide on the LCD. (3) FAX button Switches the machine to fax mode. (4) SCAN button Switches the machine to the settings selected. For details, refer to a computer. In scan mode, the machine scans a document to your computer according to...
...Memory lamp Flashes when sending or receiving faxes, and lights when there are documents stored in progress. (15) Black button (top) / Color button (bottom) Press the Black button to start color copying, photo printing, scanning, or faxing. (16) Hook button Connects or disconnects the telephone line... machine must be connected to the Scanning Guide on the LCD. (3) FAX button Switches the machine to fax mode. (4) SCAN button Switches the machine to the settings selected. For details, refer to a computer. In scan mode, the machine scans a document to your computer according to...
Quick Start Guide
Page 12
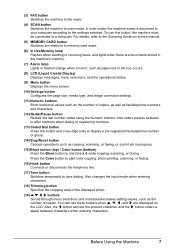
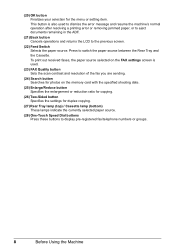
...the Machine To print out received faxes, the paper source selected on the FAX settings screen is also used . (23) FAX Quality button Sets the scan contrast and resolution of the fax you are sending. (24) Search button Searches for photos on the memory card with the specified shooting date. (... is used to dismiss the error message and resume the machine's normal operation after resolving a printing error or removing jammed paper, or to eject documents remaining in the ADF. (21) Back button Cancels operations and returns the LCD to switch the paper source between the Rear Tray and the Cassette...
...the Machine To print out received faxes, the paper source selected on the FAX settings screen is also used . (23) FAX Quality button Sets the scan contrast and resolution of the fax you are sending. (24) Search button Searches for photos on the memory card with the specified shooting date. (... is used to dismiss the error message and resume the machine's normal operation after resolving a printing error or removing jammed paper, or to eject documents remaining in the ADF. (21) Back button Cancels operations and returns the LCD to switch the paper source between the Rear Tray and the Cassette...

Quick Start Guide
Page 14
...Group dial Maintenance/settings (page 11) * This setting is only available in US and Canada. For details on the scan mode, see "Scanning Images" on -1 copy Borderless copy Image repeat Collated copy Fade-restored copy Frame erase Sticker copy Maintenance/settings (page 11...) Fax mode FAX menu screen Receive mode settings (page 90) FAX priority mode FAX only mode DRPD* TEL priority mode Memory reference (page 99) Print memory list Print specified document...
...Group dial Maintenance/settings (page 11) * This setting is only available in US and Canada. For details on the scan mode, see "Scanning Images" on -1 copy Borderless copy Image repeat Collated copy Fade-restored copy Frame erase Sticker copy Maintenance/settings (page 11...) Fax mode FAX menu screen Receive mode settings (page 90) FAX priority mode FAX only mode DRPD* TEL priority mode Memory reference (page 99) Print memory list Print specified document...
Quick Start Guide
Page 20
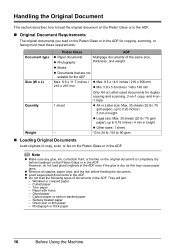
...Max. 8.5 x 14.0 inches / 216 x 356 mm 216 x 297 mm z Min. 5.8 x 5.8 inches / 148 x 148 mm Only A4 or Letter-sized documents for duplex copying and scanning, 2-on-1 copy, and 4-on1 copy 1 sheet z A4 or Letter size: Max. 35 sheets (20 lb / 75 gsm paper), up to 0.20 inches /... ADF. „ Original Document Requirements The original documents you load on the Platen Glass or in the ADF for copying, scanning, or faxing must meet these requirements: Document type Size (W x L) Quantity Weight Platen Glass ADF z Paper documents z Photographs Multipage documents of documents in the ADF. Onion...
...Max. 8.5 x 14.0 inches / 216 x 356 mm 216 x 297 mm z Min. 5.8 x 5.8 inches / 148 x 148 mm Only A4 or Letter-sized documents for duplex copying and scanning, 2-on-1 copy, and 4-on1 copy 1 sheet z A4 or Letter size: Max. 35 sheets (20 lb / 75 gsm paper), up to 0.20 inches /... ADF. „ Original Document Requirements The original documents you load on the Platen Glass or in the ADF for copying, scanning, or faxing must meet these requirements: Document type Size (W x L) Quantity Weight Platen Glass ADF z Paper documents z Photographs Multipage documents of documents in the ADF. Onion...
Quick Start Guide
Page 21
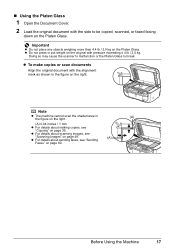
... the alignment mark as shown in the figure on the right. (A) (A) 0.04 inches / 1 mm z For details about sending faxes, see "Scanning Images" on the right. z To make copies or scan documents Align the original document with pressure exceeding 4.4 lb / 2.0 kg. Important z Do not place any objects weighing more than 4.4 lb / 2.0 kg on the Platen...
... the alignment mark as shown in the figure on the right. (A) (A) 0.04 inches / 1 mm z For details about sending faxes, see "Scanning Images" on the right. z To make copies or scan documents Align the original document with pressure exceeding 4.4 lb / 2.0 kg. Important z Do not place any objects weighing more than 4.4 lb / 2.0 kg on the Platen...
Quick Start Guide
Page 22
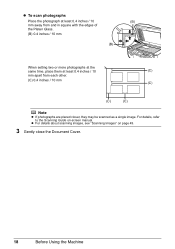
For details, refer to the Scanning Guide on page 49. 3 Gently close the Document Cover. 18 Before Using the Machine z To scan photographs Place the photograph at least 0.4 inches / 10 (B) mm away from and in square with the edges of the Platen Glass. (B) 0.4 inches / 10 mm (B) When ... same time, place them at least 0.4 inches / 10 (C) mm apart from each other. (C) 0.4 inches / 10 mm (C) (C) (C) Note z If photographs are placed closer, they may be scanned as a single image. z For details about scanning images, see "Scanning Images" on -screen manual.
For details, refer to the Scanning Guide on page 49. 3 Gently close the Document Cover. 18 Before Using the Machine z To scan photographs Place the photograph at least 0.4 inches / 10 (B) mm away from and in square with the edges of the Platen Glass. (B) 0.4 inches / 10 mm (B) When ... same time, place them at least 0.4 inches / 10 (C) mm apart from each other. (C) 0.4 inches / 10 mm (C) (C) (C) Note z If photographs are placed closer, they may be scanned as a single image. z For details about scanning images, see "Scanning Images" on -screen manual.
Quick Start Guide
Page 23
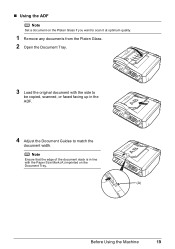
Note Ensure that the edge of the document stack is in the ADF. 4 Adjust the Document Guides to be copied, scanned, or faxed facing up in line with the Paper Size Mark (A) imprinted on the Platen Glass if you want to scan it at optimum quality. 1 Remove any documents from the Platen Glass. 2 Open the Document Tray. 3 Load the original document with the side to match the document width. „ Using the ADF Note Set a document on the Document Tray. (A) Before Using the Machine 19
Note Ensure that the edge of the document stack is in the ADF. 4 Adjust the Document Guides to be copied, scanned, or faxed facing up in line with the Paper Size Mark (A) imprinted on the Platen Glass if you want to scan it at optimum quality. 1 Remove any documents from the Platen Glass. 2 Open the Document Tray. 3 Load the original document with the side to match the document width. „ Using the ADF Note Set a document on the Document Tray. (A) Before Using the Machine 19
Quick Start Guide
Page 54
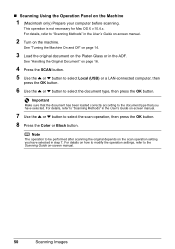
... the { or } button to select the scan operation, then press the OK button. 8 Press the Color or Black button. For details, refer to "Scanning Methods" in the User's Guide on the Machine 1 (Macintosh only) Prepare your computer before scanning. See "Handling the Original Document" on -screen manual. 50 Scanning Images For details on how to modify...
... the { or } button to select the scan operation, then press the OK button. 8 Press the Color or Black button. For details, refer to "Scanning Methods" in the User's Guide on the Machine 1 (Macintosh only) Prepare your computer before scanning. See "Handling the Original Document" on -screen manual. 50 Scanning Images For details on how to modify...
Quick Start Guide
Page 84
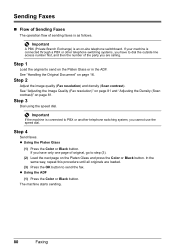
...). See "Adjusting the Image Quality (Fax resolution)" on page 81 and "Adjusting the Density (Scan contrast)" on page 16. Important If the machine is connected through a PBX or other telephone switching systems, you have only one page of original, go ... the ADF (1) Press the Color or Black button. Step 1 Load the original to send the fax. Step 3 Dial using the speed dial. In the same way, repeat this procedure until all originals are calling. Step 4 Send faxes. The machine starts sending. 80 Faxing See "Handling the Original Document" on page 81. If...
...). See "Adjusting the Image Quality (Fax resolution)" on page 81 and "Adjusting the Density (Scan contrast)" on page 16. Important If the machine is connected through a PBX or other telephone switching systems, you have only one page of original, go ... the ADF (1) Press the Color or Black button. Step 1 Load the original to send the fax. Step 3 Dial using the speed dial. In the same way, repeat this procedure until all originals are calling. Step 4 Send faxes. The machine starts sending. 80 Faxing See "Handling the Original Document" on page 81. If...
Quick Start Guide
Page 85
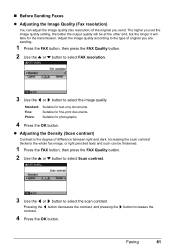
... 4 Press the OK button. Suitable for fine-print documents. The higher you set the image quality setting, the better the output quality will be thickened. 1 Press the FAX button, then press the FAX Quality button. 2 Use the { or } button to select Scan contrast. 3 Use the [ or ] button to .... 2 Use the { or } button to select FAX resolution. 3 Use the [ or ] button to select the image quality. z Adjusting the Density (Scan contrast) Contrast is the degree of original you send. Adjust the image quality according to the type of difference between light and dark. Standard: Fine...
... 4 Press the OK button. Suitable for fine-print documents. The higher you set the image quality setting, the better the output quality will be thickened. 1 Press the FAX button, then press the FAX Quality button. 2 Use the { or } button to select Scan contrast. 3 Use the [ or ] button to .... 2 Use the { or } button to select FAX resolution. 3 Use the [ or ] button to select the image quality. z Adjusting the Density (Scan contrast) Contrast is the degree of original you send. Adjust the image quality according to the type of difference between light and dark. Standard: Fine...
Quick Start Guide
Page 86
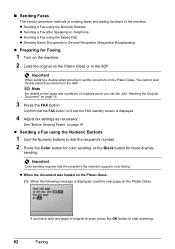
... a Fax using the Numeric Buttons 1 Use the Numeric buttons to start scanning. 82 Faxing Confirm that the recipient's fax machine supports color faxing. Note For details on the Platen Glass. See "Before Sending Faxes" on the Platen Glass. You cannot scan double-sided documents from the ADF. „ Sending Faxes This section describes methods...
... a Fax using the Numeric Buttons 1 Use the Numeric buttons to start scanning. 82 Faxing Confirm that the recipient's fax machine supports color faxing. Note For details on the Platen Glass. See "Before Sending Faxes" on the Platen Glass. You cannot scan double-sided documents from the ADF. „ Sending Faxes This section describes methods...
Quick Start Guide
Page 87
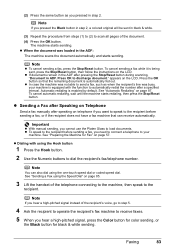
... in the ADF after pressing the Stop/Reset button during scanning, "Document in step 2. z In case the machine was not able to send a fax, such as you hear a high-pitched signal, press the Color button for color sending, or the Black button for Fax" on the LCD. See "Automatic ... cannot use the Platen Glass to the recipient before sending a fax, you pressed the Black button in step 2, a colored original will be sent in the ADF: The machine scans the document automatically and starts sending. z Sending a Fax after Speaking on Telephone Send a fax manually after a specified interval. z...
... in the ADF after pressing the Stop/Reset button during scanning, "Document in step 2. z In case the machine was not able to send a fax, such as you hear a high-pitched signal, press the Color button for color sending, or the Black button for Fax" on the LCD. See "Automatic ... cannot use the Platen Glass to the recipient before sending a fax, you pressed the Black button in step 2, a colored original will be sent in the ADF: The machine scans the document automatically and starts sending. z Sending a Fax after Speaking on Telephone Send a fax manually after a specified interval. z...
Quick Start Guide
Page 88
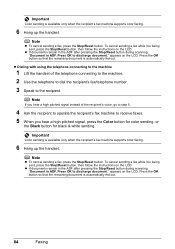
... black & white sending. appears on the LCD. appears on the LCD. z If documents remain in the ADF after pressing the Stop/Reset button during scanning, "Document in ADF. z If documents remain in the ADF after pressing the Stop/Reset button during scanning, "Document in ADF. Important Color sending is available only when the recipient's fax machine supports...
... black & white sending. appears on the LCD. appears on the LCD. z If documents remain in the ADF after pressing the Stop/Reset button during scanning, "Document in ADF. z If documents remain in the ADF after pressing the Stop/Reset button during scanning, "Document in ADF. Important Color sending is available only when the recipient's fax machine supports...
Quick Start Guide
Page 89
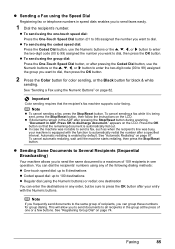
...after pressing the Stop/Reset button during scanning, "Document in any of recipients, you to send documents to send faxes easily. 1 Dial the recipient's number. z Sending Same Documents to Several Recipients (Sequential Broadcasting) Your machine allows you want to discharge document." To cancel sending a fax while ...touch speed dial: up to 8 destinations z Coded speed dial: up to dial, then press the OK button. 2 Press the Color button for color sending, or the Black button for group dialing. To cancel automatic redialing, wait until the machine starts redialing, then press the Stop...
...after pressing the Stop/Reset button during scanning, "Document in any of recipients, you to send documents to send faxes easily. 1 Dial the recipient's number. z Sending Same Documents to Several Recipients (Sequential Broadcasting) Your machine allows you want to discharge document." To cancel sending a fax while ...touch speed dial: up to 8 destinations z Coded speed dial: up to dial, then press the OK button. 2 Press the Color button for color sending, or the Black button for group dialing. To cancel automatic redialing, wait until the machine starts redialing, then press the Stop...
Quick Start Guide
Page 90
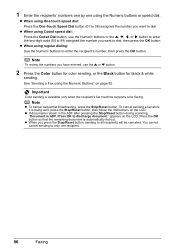
...color faxing. appears on the LCD. z When using Coded speed dial: Press the Coded Dial button, use the Numeric buttons or the {, }, [, or ] button to enter the two-digit code (00 to all recipients will be canceled. z If documents remain in the ADF after pressing the Stop/Reset button during scanning, "Document... in ADF. Press the OK button so that the remaining document is automatically fed out. z When you want to enter the recipient...
...color faxing. appears on the LCD. z When using Coded speed dial: Press the Coded Dial button, use the Numeric buttons or the {, }, [, or ] button to enter the two-digit code (00 to all recipients will be canceled. z If documents remain in the ADF after pressing the Stop/Reset button during scanning, "Document... in ADF. Press the OK button so that the remaining document is automatically fed out. z When you want to enter the recipient...
Quick Start Guide
Page 113
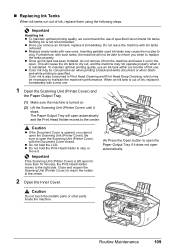
...Caution Do not touch the metallic parts or other parts inside the machine. Refilling ink is turned on. (2) Lift the Scanning Unit (Printer Cover) until it immediately. Color ink is opened, you remove an ink tank, replace it stops. Important Handling Ink z To maintain optimal printing quality,...Tanks When ink tanks run out of specified Canon brand ink tanks. z Do not hold the Print Head Holder to open the Scanning Unit (Printer Cover). Inserting partially used ink tanks may be consumed even when printing a black-and-white document or when blackand-white printing is reinstalled....
...Caution Do not touch the metallic parts or other parts inside the machine. Refilling ink is turned on. (2) Lift the Scanning Unit (Printer Cover) until it immediately. Color ink is opened, you remove an ink tank, replace it stops. Important Handling Ink z To maintain optimal printing quality,...Tanks When ink tanks run out of specified Canon brand ink tanks. z Do not hold the Print Head Holder to open the Scanning Unit (Printer Cover). Inserting partially used ink tanks may be consumed even when printing a black-and-white document or when blackand-white printing is reinstalled....
Quick Start Guide
Page 135
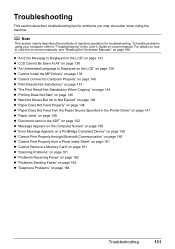
...146 z "Paper Does Not Feed from the Paper Source Specified in the Printer Driver" on page 147 z "Paper Jams" on page 148 z "Document Jams in the User's Guide on-screen manual. To handle problems using the machine. Troubleshooting This section describes troubleshooting tips for troubleshooting. z "An Error ..." on page 160 z "Cannot Print Properly from a Photo Index Sheet" on page 161 z "Cannot Remove a Memory Card" on page 161 z "Scanning Problems" on page 161 z "Problems Receiving Faxes" on page 162 z "Problems Sending Faxes" on page 165 z "Telephone Problems" on page 168.
...146 z "Paper Does Not Feed from the Paper Source Specified in the Printer Driver" on page 147 z "Paper Jams" on page 148 z "Document Jams in the User's Guide on-screen manual. To handle problems using the machine. Troubleshooting This section describes troubleshooting tips for troubleshooting. z "An Error ..." on page 160 z "Cannot Print Properly from a Photo Index Sheet" on page 161 z "Cannot Remove a Memory Card" on page 161 z "Scanning Problems" on page 161 z "Problems Receiving Faxes" on page 162 z "Problems Sending Faxes" on page 165 z "Telephone Problems" on page 168.
Quick Start Guide
Page 139
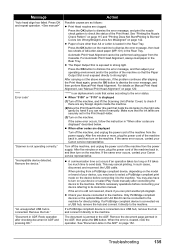
... the machine. If the same error occurs, contact your Canon service representative. If the same error occurs, contact your Canon service representative. Perform necessary operations before connecting it takes too...machine. See "Document Jams in the ADF" on page 142. See "Printing the Nozzle Check Pattern" on page 115 and "Printing Does Not Start/Printing Is Blurred/ Colors Are Wrong/...a USB hub, remove the hub and connect it manually. "Document in ADF and pressing OK." Turn off the machine, and lift the Scanning Unit (Printer Cover) to turn on the machine to the machine...
... the machine. If the same error occurs, contact your Canon service representative. If the same error occurs, contact your Canon service representative. Perform necessary operations before connecting it takes too...machine. See "Document Jams in the ADF" on page 142. See "Printing the Nozzle Check Pattern" on page 115 and "Printing Does Not Start/Printing Is Blurred/ Colors Are Wrong/...a USB hub, remove the hub and connect it manually. "Document in ADF and pressing OK." Turn off the machine, and lift the Scanning Unit (Printer Cover) to turn on the machine to the machine...
Quick Start Guide
Page 156
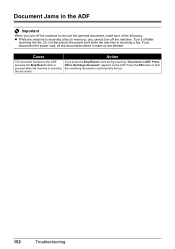
If you press the Stop/Reset button during scanning, "Document in ADF. If you disconnect the power cord, all the documents stored in memory are deleted. Press OK to remove the jammed document, make sure of the following. Cause Action The document remains in the ADF because the Stop/Reset button...machine is receiving a fax. Do not disconnect the power cord while the machine is scanning the document. appears on the LCD. Turn it off after receiving the fax. Press the OK button so that the remaining document is receiving a fax (in memory), you turn off the machine. z While ...
If you press the Stop/Reset button during scanning, "Document in ADF. If you disconnect the power cord, all the documents stored in memory are deleted. Press OK to remove the jammed document, make sure of the following. Cause Action The document remains in the ADF because the Stop/Reset button...machine is receiving a fax. Do not disconnect the power cord while the machine is scanning the document. appears on the LCD. Turn it off after receiving the fax. Press the OK button so that the remaining document is receiving a fax (in memory), you turn off the machine. z While ...


