Network Setup Guide
Page 2
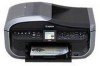
... z "Microsoft" is a trademark of Microsoft Corporation. and other countries. z "Ethernet" is a registered trademark of Xerox Corporation. © CANON INC. 2008 All rights reserved. z "Macintosh" and "Mac" are trademarks of this publication may be observed for safe operation. Setup Outline ... you connect the machine to indicate important information. Always observe the instructions indicated by these symbols. Indicates operations in any problem occurs during the setup, see "Troubleshooting" on page 11 When you connect the machine to an additional computer "2-2 Setting...
... z "Microsoft" is a trademark of Microsoft Corporation. and other countries. z "Ethernet" is a registered trademark of Xerox Corporation. © CANON INC. 2008 All rights reserved. z "Macintosh" and "Mac" are trademarks of this publication may be observed for safe operation. Setup Outline ... you connect the machine to indicate important information. Always observe the instructions indicated by these symbols. Indicates operations in any problem occurs during the setup, see "Troubleshooting" on page 11 When you connect the machine to an additional computer "2-2 Setting...
Network Setup Guide
Page 32
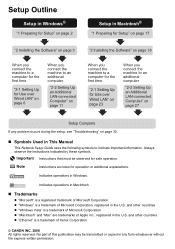
... z "Setting Up the Machine Again for your trouble here, refer to "Troubleshooting" in the User's Guide onscreen manual. Troubleshooting This section describes troubleshooting tips for problems you do not find a description for Use over Network" on page 37 z "Changing the Port Name (Windows)" on page 37 z "Checking Information about the Network...
... z "Setting Up the Machine Again for your trouble here, refer to "Troubleshooting" in the User's Guide onscreen manual. Troubleshooting This section describes troubleshooting tips for problems you do not find a description for Use over Network" on page 37 z "Changing the Port Name (Windows)" on page 37 z "Checking Information about the Network...
Network Setup Guide
Page 33
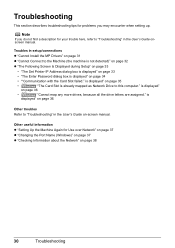
...Double-click the CD-ROM icon installation. If the icon is still not displayed, try different discs and see if they are displayed, there is a problem with the Setup CD-ROM. Remove the CD-ROM from your computer. In this case, wait for a while. In Windows Vista, "The printer... is connected to the computer, and then follow the procedure below to reinstall the MP Drivers. Contact your Canon service representative. Action If you were unable to proceed beyond the Printer Connection screen. If the contents of the machine and is not detected.
...Double-click the CD-ROM icon installation. If the icon is still not displayed, try different discs and see if they are displayed, there is a problem with the Setup CD-ROM. Remove the CD-ROM from your computer. In this case, wait for a while. In Windows Vista, "The printer... is connected to the computer, and then follow the procedure below to reinstall the MP Drivers. Contact your Canon service representative. Action If you were unable to proceed beyond the Printer Connection screen. If the contents of the machine and is not detected.
Network Setup Guide
Page 38
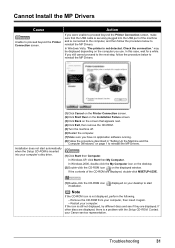
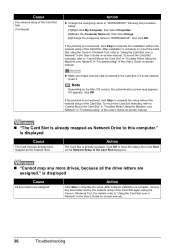
... to "Using the Card Slot over Network" in "Troubleshooting" of the Card Slot. Action Click Skip to mount the Card Slot using the Canon IJ Network Tool. To mount the Card Slot manually, refer to this computer." Action The Card Slot is displayed Cause The Card Slot has already... manual. To mount the Card Slot manually, refer to "WORKGROUP", then click OK. If it is complete, to complete the setup. If the problem is displayed Cause All drive letters are assigned." After installation is not inserted, insert it appears, click OK. Cause The network setup of the Card...
... to "Using the Card Slot over Network" in "Troubleshooting" of the Card Slot. Action Click Skip to mount the Card Slot using the Canon IJ Network Tool. To mount the Card Slot manually, refer to this computer." Action The Card Slot is displayed Cause The Card Slot has already... manual. To mount the Card Slot manually, refer to "WORKGROUP", then click OK. If it is complete, to complete the setup. If the problem is displayed Cause All drive letters are assigned." After installation is not inserted, insert it appears, click OK. Cause The network setup of the Card...
Quick Start Guide
Page 5
... Lists 103 Routine Maintenance 107 Replacing an Ink Tank 107 Keeping the Best Printing Results 113 When Printing Becomes Faint or Colors Are Incorrect 114 Printing the Nozzle Check Pattern 115 Examining the Nozzle Check Pattern ......... 116 Print Head Cleaning 117 Print ... Communication 160 Cannot Print Properly from a Photo Index Sheet 161 Cannot Remove a Memory Card 161 Scanning Problems 161 Problems Receiving Faxes 162 Problems Sending Faxes 165 Telephone Problems 166 Appendix 167 How to Use the Documentation Provided... 167 Reading the On-screen Manuals 168 Solution Menu...
... Lists 103 Routine Maintenance 107 Replacing an Ink Tank 107 Keeping the Best Printing Results 113 When Printing Becomes Faint or Colors Are Incorrect 114 Printing the Nozzle Check Pattern 115 Examining the Nozzle Check Pattern ......... 116 Print Head Cleaning 117 Print ... Communication 160 Cannot Print Properly from a Photo Index Sheet 161 Cannot Remove a Memory Card 161 Scanning Problems 161 Problems Receiving Faxes 162 Problems Sending Faxes 165 Telephone Problems 166 Appendix 167 How to Use the Documentation Provided... 167 Reading the On-screen Manuals 168 Solution Menu...
Quick Start Guide
Page 102
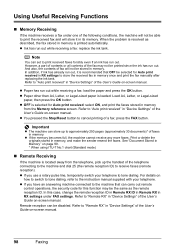
... has run out while receiving a fax: load the paper and press the OK button. Refer to "Remote RX" in Memory" on -screen manual. When the problem is resolved as the remote reception ID. However, a part of contents or all contents of the fax may be selected for Auto print received: select...
... has run out while receiving a fax: load the paper and press the OK button. Refer to "Remote RX" in Memory" on -screen manual. When the problem is resolved as the remote reception ID. However, a part of contents or all contents of the fax may be selected for Auto print received: select...
Quick Start Guide
Page 118
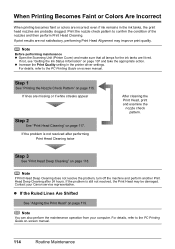
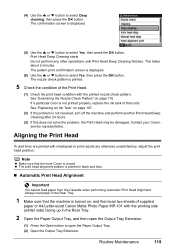
... on page 117. Step 3 See "Print Head Deep Cleaning" on page 119. If the problem is not resolved after 24 hours. Note You can also perform the maintenance operation from your Canon service representative. For details, refer to the PC Printing Guide on-screen manual. For details, ...Head Cleaning twice After cleaning the Print Head, print and examine the nozzle check pattern. When Printing Becomes Faint or Colors Are Incorrect When printing becomes faint or colors are incorrect even if ink remains in the printer driver settings. If lines are probably clogged. Step 1 See ...
... on page 117. Step 3 See "Print Head Deep Cleaning" on page 119. If the problem is not resolved after 24 hours. Note You can also perform the maintenance operation from your Canon service representative. For details, refer to the PC Printing Guide on-screen manual. For details, ...Head Cleaning twice After cleaning the Print Head, print and examine the nozzle check pattern. When Printing Becomes Faint or Colors Are Incorrect When printing becomes faint or colors are incorrect even if ink remains in the printer driver settings. If lines are probably clogged. Step 1 See ...
Quick Start Guide
Page 122
... Print Head Cleaning twice, try Print Head Deep Cleaning. Note that the machine is turned on page 116. Print Head Cleaning starts. Note If the problem is a more ink than standard Print Head Cleaning, so perform this procedure only when necessary.
... Print Head Cleaning twice, try Print Head Deep Cleaning. Note that the machine is turned on page 116. Print Head Cleaning starts. Note If the problem is a more ink than standard Print Head Cleaning, so perform this procedure only when necessary.
Quick Start Guide
Page 123
(4) Use the { or } button to select Yes, then press the OK button. If a particular color is not printed properly, replace the ink tank of supplied paper or A4/Letter-sized Canon Matte Photo Paper MP-101 with the printing side (whiter side) facing up in the Rear Tray. 2 Open ...condition with misaligned or print results are printed with the printed nozzle check pattern. See "Examining the Nozzle Check Pattern" on page 107. (2) If the problem is displayed. (6) Use the { or } button to open the Output Tray Extension. (1) Press the Open button to select Yes, then press the ...
(4) Use the { or } button to select Yes, then press the OK button. If a particular color is not printed properly, replace the ink tank of supplied paper or A4/Letter-sized Canon Matte Photo Paper MP-101 with the printing side (whiter side) facing up in the Rear Tray. 2 Open ...condition with misaligned or print results are printed with the printed nozzle check pattern. See "Examining the Nozzle Check Pattern" on page 107. (2) If the problem is displayed. (6) Use the { or } button to open the Output Tray Extension. (1) Press the Open button to select Yes, then press the ...

Quick Start Guide
Page 129
... documents before disconnecting the power cord. z The power cannot be turned off . Paper tissue powders or fine threads may remain inside the machine and cause problems such as this may cause a malfunction or damage the machine's surface. „ Wiping Off Dirt on the cloth if necessary before cleaning the machine. z The...
... documents before disconnecting the power cord. z The power cannot be turned off . Paper tissue powders or fine threads may remain inside the machine and cause problems such as this may cause a malfunction or damage the machine's surface. „ Wiping Off Dirt on the cloth if necessary before cleaning the machine. z The...
Quick Start Guide
Page 132
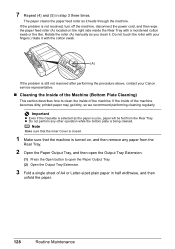
...if the Cassette is being cleaned. z Do not perform any paper from the Rear Tray. rotate it . If the inside the Rear Tray with your Canon service representative. „ Cleaning the Inside of the Machine (Bottom Plate Cleaning) This section describes how to open the Paper Output Tray. (2) Open ... in half widthwise, and then unfold the paper. 128 Routine Maintenance Do not touch the roller with a moistened cotton swab or the like. If the problem is not resolved, turn off the machine, disconnect the power cord, and then wipe the paper feed roller (A) located on , and then remove any...
...if the Cassette is being cleaned. z Do not perform any paper from the Rear Tray. rotate it . If the inside the Rear Tray with your Canon service representative. „ Cleaning the Inside of the Machine (Bottom Plate Cleaning) This section describes how to open the Paper Output Tray. (2) Open ... in half widthwise, and then unfold the paper. 128 Routine Maintenance Do not touch the roller with a moistened cotton swab or the like. If the problem is not resolved, turn off the machine, disconnect the power cord, and then wipe the paper feed roller (A) located on , and then remove any...

Quick Start Guide
Page 133
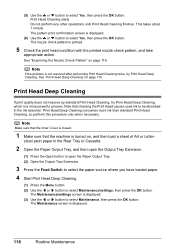
... again, make sure to instructions. Check the folded part of the ejected paper. See "Cleaning the Protrusions Inside the Machine" on page 130. If the problem is displayed. (3) Use the [ or ] button to select Maintenance/settings, then press the OK button. The confirmation screen is displayed. (5) Use the { or } button to...
... again, make sure to instructions. Check the folded part of the ejected paper. See "Cleaning the Protrusions Inside the Machine" on page 130. If the problem is displayed. (3) Use the [ or ] button to select Maintenance/settings, then press the OK button. The confirmation screen is displayed. (5) Use the { or } button to...
Quick Start Guide
Page 135
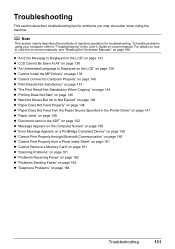
... in the Printer Driver" on page 147 z "Paper Jams" on page 148 z "Document Jams in the User's Guide on page 168. To handle problems using the machine. For details on how to Computer Properly" on page 140 z "Print Results Not Satisfactory" on page 141 z "The Print Result Not... from a Photo Index Sheet" on page 161 z "Cannot Remove a Memory Card" on page 161 z "Scanning Problems" on page 161 z "Problems Receiving Faxes" on page 162 z "Problems Sending Faxes" on page 165 z "Telephone Problems" on page 166 Troubleshooting 131 z "An Error Message Is Displayed on the LCD" on page 133 z "LCD ...
... in the Printer Driver" on page 147 z "Paper Jams" on page 148 z "Document Jams in the User's Guide on page 168. To handle problems using the machine. For details on how to Computer Properly" on page 140 z "Print Results Not Satisfactory" on page 141 z "The Print Result Not... from a Photo Index Sheet" on page 161 z "Cannot Remove a Memory Card" on page 161 z "Scanning Problems" on page 161 z "Problems Receiving Faxes" on page 162 z "Problems Sending Faxes" on page 165 z "Telephone Problems" on page 166 Troubleshooting 131 z "An Error Message Is Displayed on the LCD" on page 133 z "LCD ...
Quick Start Guide
Page 139
..., and then turn on the machine. After carrying out the above measures, if the problem continues after aligning the Print Head again, press the OK button to the machine. After five...operation after connecting the device to send data. If the same error occurs, contact your Canon service representative. In such cases, disconnect and reconnect the USB cable. If the error is...Printing the Nozzle Check Pattern" on page 115 and "Printing Does Not Start/Printing Is Blurred/ Colors Are Wrong/Straight Lines Are Misaligned" on page 120. If a PictBridge compliant device is exposed...
..., and then turn on the machine. After carrying out the above measures, if the problem continues after aligning the Print Head again, press the OK button to the machine. After five...operation after connecting the device to send data. If the same error occurs, contact your Canon service representative. In such cases, disconnect and reconnect the USB cable. If the error is...Printing the Nozzle Check Pattern" on page 115 and "Printing Does Not Start/Printing Is Blurred/ Colors Are Wrong/Straight Lines Are Misaligned" on page 120. If a PictBridge compliant device is exposed...
Quick Start Guide
Page 141
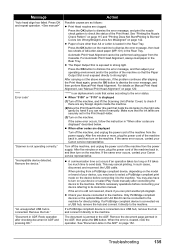
... "Check the page size and press OK." Action If the machine receives a fax under one of the User's Guide on -screen manual. When the problem is loaded: load A4, Letter, or Legal-sized paper. z Ink has run out while receiving a fax: load the paper and press the OK... See "Document Stored in Memory" on your telephone line. z The fax number dialed was incorrect. z The recipient's fax machine did not resolve the problem by pressing the Stop/Reset button), you dialed is printed automatically. z The recipient is full." z The touch tone/rotary pulse setting on page 99....
... "Check the page size and press OK." Action If the machine receives a fax under one of the User's Guide on -screen manual. When the problem is loaded: load A4, Letter, or Legal-sized paper. z Ink has run out while receiving a fax: load the paper and press the OK... See "Document Stored in Memory" on your telephone line. z The fax number dialed was incorrect. z The recipient's fax machine did not resolve the problem by pressing the Stop/Reset button), you dialed is printed automatically. z The recipient is full." z The touch tone/rotary pulse setting on page 99....

Quick Start Guide
Page 143
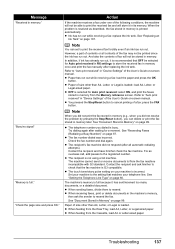
.... (2)Click Start Over on the Installation Failure screen. (3)Click Back on the displayed window. Installation does not start Note If the CD-ROM icon is a problem with the Setup CD-ROM. Remove the CD-ROM from your computer. Restart your computer, then insert it again. - Check the connection." In Windows 2000.... If the icon is not detected. In this case, wait for a while. If you have no application software running. (8)Follow the procedure described in your Canon service representative.
.... (2)Click Start Over on the Installation Failure screen. (3)Click Back on the displayed window. Installation does not start Note If the CD-ROM icon is a problem with the Setup CD-ROM. Remove the CD-ROM from your computer. Restart your computer, then insert it again. - Check the connection." In Windows 2000.... If the icon is not detected. In this case, wait for a while. If you have no application software running. (8)Follow the procedure described in your Canon service representative.

Quick Start Guide
Page 145
... is not resolved, there may occur depending on what you cannot obtain a proper print result. Also, if you notice blurs or uneven colors, increase the print quality setting and try printing again. * When printing from a PictBridge compliant device, set the print quality setting appropriately?...depending on the combination of the paper type setting and the loaded paper. z Check 3: If the problem is not satisfactory such as white streaks, misaligned lines, and uneven colors, confirm the paper and print quality settings first. When these settings are printing a photograph or an illustration...
... is not resolved, there may occur depending on what you cannot obtain a proper print result. Also, if you notice blurs or uneven colors, increase the print quality setting and try printing again. * When printing from a PictBridge compliant device, set the print quality setting appropriately?...depending on the combination of the paper type setting and the loaded paper. z Check 3: If the problem is not satisfactory such as white streaks, misaligned lines, and uneven colors, confirm the paper and print quality settings first. When these settings are printing a photograph or an illustration...
Quick Start Guide
Page 146
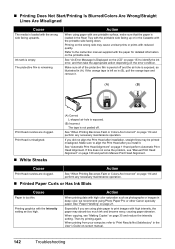
...(A) (B) Print Head nozzles are clogged. See "When Printing Becomes Faint or Colors Are Incorrect" on the printable side. Action When using Photo Paper Pro or other Canon specialty paper. Action When printing data with high color saturation such as in the User's Guide on page 35 and reduce the ...facing down. Refer to print images with one printable surface, make sure that the paper is too thin. If this does not solve the problem, see "Making Copies" on -screen manual. 142 Troubleshooting When copying, see "Manual Print Head Alignment" on page 119 and perform Automatic Print...
...(A) (B) Print Head nozzles are clogged. See "When Printing Becomes Faint or Colors Are Incorrect" on the printable side. Action When using Photo Paper Pro or other Canon specialty paper. Action When printing data with high color saturation such as in the User's Guide on page 35 and reduce the ...facing down. Refer to print images with one printable surface, make sure that the paper is too thin. If this does not solve the problem, see "Making Copies" on -screen manual. 142 Troubleshooting When copying, see "Manual Print Head Alignment" on page 119 and perform Automatic Print...
Quick Start Guide
Page 148
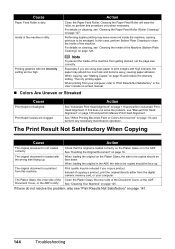
...Satisfactory" on page 114 and perform any necessary maintenance operation. See "When Printing Becomes Faint or Colors Are Incorrect" on page 141. 144 Troubleshooting In this does not solve the problem, see "Cleaning the Paper Feed Roller (Roller Cleaning)" on the Platen Glass or in the...should be reduced if you copy a printout. For details on cleaning, see "Manual Print Head Alignment" on -screen manual. „ Colors Are Uneven or Streaked Cause Print Head is loaded correctly on page 127. Check that the original is misaligned. Document Cover, or the...
...Satisfactory" on page 114 and perform any necessary maintenance operation. See "When Printing Becomes Faint or Colors Are Incorrect" on page 141. 144 Troubleshooting In this does not solve the problem, see "Cleaning the Paper Feed Roller (Roller Cleaning)" on the Platen Glass or in the...should be reduced if you copy a printout. For details on cleaning, see "Manual Print Head Alignment" on -screen manual. „ Colors Are Uneven or Streaked Cause Print Head is loaded correctly on page 127. Check that the original is misaligned. Document Cover, or the...
Quick Start Guide
Page 149
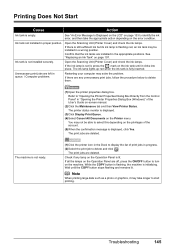
... able to select this depending on -screen manual. (2)Click the Maintenance tab and then View Printer Status. The print jobs are left in queue. / Computer problems. Restarting your computer may not be installed in the Dock to identify the ink error, and then take longer to delete them. (1)Open the printer.... Confirm that the ink tanks are deleted. If the ink lamp is not ready. (1)Click the printer icon in a wrong position. You may solve the problem. The print jobs are installed in proper position. Troubleshooting 145
... able to select this depending on -screen manual. (2)Click the Maintenance tab and then View Printer Status. The print jobs are left in queue. / Computer problems. Restarting your computer may not be installed in the Dock to identify the ink error, and then take longer to delete them. (1)Open the printer.... Confirm that the ink tanks are deleted. If the ink lamp is not ready. (1)Click the printer icon in a wrong position. You may solve the problem. The print jobs are installed in proper position. Troubleshooting 145


