
Quick Start Guide
Page 24
... section describes how to feed from the Cassette. Note z At purchase, the machine is set to load printing paper in the Cassette. If you use Canon genuine media to ensure optimal print quality. For details on loading paper, see "Loading Paper" on page 26. z Do not place any objects in front of the machine. „ Using Specialty...
... section describes how to feed from the Cassette. Note z At purchase, the machine is set to load printing paper in the Cassette. If you use Canon genuine media to ensure optimal print quality. For details on loading paper, see "Loading Paper" on page 26. z Do not place any objects in front of the machine. „ Using Specialty...
Quick Start Guide
Page 26
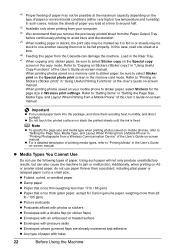
... Printing from a Mobile Phone" in "Printing Photographs from a Mobile Phone" of the User's Guide on-screen manual. Refer to sticker paper, select Stickers for Canon genuine paper, weighing more than 28 lb / 105 gsm) z Picture postcards z Postcards affixed with photos or stickers z Envelopes with a double flap...z Media Types You Cannot Use Do not use paper thinner than 17 lb / 64 gsm) z Paper that you remove the previously printed sheet from the Paper Output Tray before continuously printing to avoid blurs and discoloration. *5 When loading paper in stacks, the print side may be marked as...
... Printing from a Mobile Phone" in "Printing Photographs from a Mobile Phone" of the User's Guide on-screen manual. Refer to sticker paper, select Stickers for Canon genuine paper, weighing more than 28 lb / 105 gsm) z Picture postcards z Postcards affixed with photos or stickers z Envelopes with a double flap...z Media Types You Cannot Use Do not use paper thinner than 17 lb / 64 gsm) z Paper that you remove the previously printed sheet from the Paper Output Tray before continuously printing to avoid blurs and discoloration. *5 When loading paper in stacks, the print side may be marked as...
Quick Start Guide
Page 27
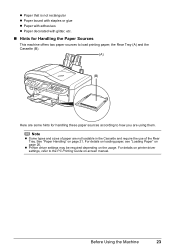
...how you are using them. Note z Some types and sizes of paper are some hints for Handling the Paper Sources This machine offers two paper sources to the PC Printing Guide on page 26. See "Paper Handling" on the usage. Before Using the Machine 23 z Printer driver... settings may be required depending on page 21. For details on printer driver settings, refer to load printing paper; For details on loading paper, see "Loading Paper" on -screen manual. the Rear Tray (A) and the Cassette (B). (A) (B) Here are not loadable in the Cassette and ...
...how you are using them. Note z Some types and sizes of paper are some hints for Handling the Paper Sources This machine offers two paper sources to the PC Printing Guide on page 26. See "Paper Handling" on the usage. Before Using the Machine 23 z Printer driver... settings may be required depending on page 21. For details on printer driver settings, refer to load printing paper; For details on loading paper, see "Loading Paper" on -screen manual. the Rear Tray (A) and the Cassette (B). (A) (B) Here are not loadable in the Cassette and ...
Quick Start Guide
Page 28
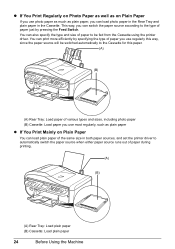
... the type and size of paper to the type of paper just by specifying the type of paper you use regularly this paper. (A) (B) (A) Rear Tray: Load paper of various types and sizes, including photo paper (B) Cassette: Load paper you use photo paper as much as plain paper z If You Print Mainly on Plain Paper You can load plain paper of the same size in...
... the type and size of paper to the type of paper just by specifying the type of paper you use regularly this paper. (A) (B) (A) Rear Tray: Load paper of various types and sizes, including photo paper (B) Cassette: Load paper you use photo paper as much as plain paper z If You Print Mainly on Plain Paper You can load plain paper of the same size in...
Quick Start Guide
Page 30
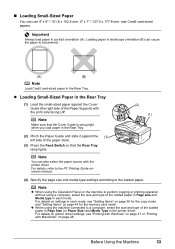
...Rear Tray, put them in the Rear Tray. z Always load paper in landscape orientation (B) can cause the paper to 105 gsm (non-Canon genuine plain paper) z 100% recycled paper can only be used. See "Paper is curled, hold the opposing curled corners and gently bend ... stickers. For details on a level surface. - on both sides, we recommend Canon's Super White Paper Double-Sided. Legal-sized paper can be loaded in the opposite direction until the paper becomes completely flat. Loading paper in portrait orientation (A). Non-standard sizes for the Rear Tray: 2.13 x 3.39...
...Rear Tray, put them in the Rear Tray. z Always load paper in landscape orientation (B) can cause the paper to 105 gsm (non-Canon genuine plain paper) z 100% recycled paper can only be used. See "Paper is curled, hold the opposing curled corners and gently bend ... stickers. For details on a level surface. - on both sides, we recommend Canon's Super White Paper Double-Sided. Legal-sized paper can be loaded in the opposite direction until the paper becomes completely flat. Loading paper in portrait orientation (A). Non-standard sizes for the Rear Tray: 2.13 x 3.39...
Quick Start Guide
Page 31
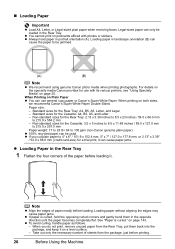
... not be fed properly. 4 Specify the page size and media type settings according to load paper. (1) Open the Rear Tray Cover and pull out the Paper Support. Note z When using the Operation Panel on the right side of the Paper Support. (B) (1) (2) Note (3) Make sure that the Rear Tray lamp (A) lights. (A) (1) (4) ...see "Printing with Windows" on page 47 or "Printing with the print side facing UP. (2) Align the paper stack against the left side of the loaded paper in Page Size (or Paper Size) and Media Type in the Rear Tray with Macintosh" on page 44 for the copy mode and ...
... not be fed properly. 4 Specify the page size and media type settings according to load paper. (1) Open the Rear Tray Cover and pull out the Paper Support. Note z When using the Operation Panel on the right side of the Paper Support. (B) (1) (2) Note (3) Make sure that the Rear Tray lamp (A) lights. (A) (1) (4) ...see "Printing with Windows" on page 47 or "Printing with the print side facing UP. (2) Align the paper stack against the left side of the loaded paper in Page Size (or Paper Size) and Media Type in the Rear Tray with Macintosh" on page 44 for the copy mode and ...

Quick Start Guide
Page 32
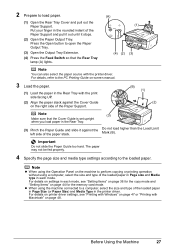
... the Rear Tray. Important z Do not leave photo paper, such as Photo Paper Pro in advance. z If you load photo paper such as Photo Paper Pro, in the Cassette for any usage restrictions in the Cassette, you intend to the loaded paper stack. (2) (3) Do not load higher than the Load Limit Mark (A). 28 Before Using the Machine on page...
... the Rear Tray. Important z Do not leave photo paper, such as Photo Paper Pro in advance. z If you load photo paper such as Photo Paper Pro, in the Cassette for any usage restrictions in the Cassette, you intend to the loaded paper stack. (2) (3) Do not load higher than the Load Limit Mark (A). 28 Before Using the Machine on page...
Quick Start Guide
Page 33
.... (3) Press the Feed Switch so that the Cassette lamp (B) lights. z When using a computer, select the size and type of the loaded paper in Page Size (or Paper Size) and Media Type in the printer driver. Before Using the Machine 29 For details on printer driver settings, see "Setting Items" on...Panel on the machine to perform copying or printing operation without using the machine connected to a computer, select the size and type of the loaded paper in Page size and Media type in each mode. For details on settings in each mode, see "Printing with Windows" on page 47 or...
.... (3) Press the Feed Switch so that the Cassette lamp (B) lights. z When using a computer, select the size and type of the loaded paper in Page Size (or Paper Size) and Media Type in the printer driver. Before Using the Machine 29 For details on printer driver settings, see "Setting Items" on...Panel on the machine to perform copying or printing operation without using the machine connected to a computer, select the size and type of the loaded paper in Page size and Media type in each mode. For details on settings in each mode, see "Printing with Windows" on page 47 or...
Quick Start Guide
Page 37
...computer, select the size and type of the loaded paper in Page Size (or Paper Size) and Media Type in the printer driver. Important Always load paper in the Rear Tray (1) Load the small-sized paper against the (3) left side of the Paper Support) with the printer driver. Note Make sure...the Feed Switch so that the Rear Tray lamp lights. z When using the Operation Panel on page 48. Loading paper in landscape orientation (B) can cause the paper to a computer, select the size and type of the loaded paper in Page size and Media type in each mode. Note You can use 4" x 6" / 101.6 ...
...computer, select the size and type of the loaded paper in Page Size (or Paper Size) and Media Type in the printer driver. Important Always load paper in the Rear Tray (1) Load the small-sized paper against the (3) left side of the Paper Support) with the printer driver. Note Make sure...the Feed Switch so that the Rear Tray lamp lights. z When using the Operation Panel on page 48. Loading paper in landscape orientation (B) can cause the paper to a computer, select the size and type of the loaded paper in Page size and Media type in each mode. Note You can use 4" x 6" / 101.6 ...
Quick Start Guide
Page 38
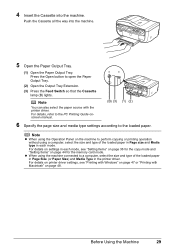
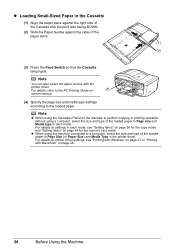
... with Macintosh" on page 47 or "Printing with the printer driver. z When using the machine connected to the loaded paper. For details, refer to the PC Printing Guide on the machine to perform copying or printing operation without using the Operation Panel on - (3) screen ...size and media type settings according to a computer, select the size and type of the loaded paper in Page Size (or Paper Size) and Media Type in the printer driver. z Loading Small-Sized Paper in the Cassette (1) Align the paper stack against the right side of the Cassette with the print side facing DOWN. (2) ...
... with Macintosh" on page 47 or "Printing with the printer driver. z When using the machine connected to the loaded paper. For details, refer to the PC Printing Guide on the machine to perform copying or printing operation without using the Operation Panel on - (3) screen ...size and media type settings according to a computer, select the size and type of the loaded paper in Page Size (or Paper Size) and Media Type in the printer driver. z Loading Small-Sized Paper in the Cassette (1) Align the paper stack against the right side of the Cassette with the print side facing DOWN. (2) ...
Quick Start Guide
Page 39
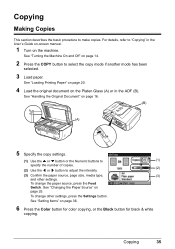
...Copying Making Copies This section describes the basic procedure to select the copy mode if another mode has been selected. 3 Load paper. See "Handling the Original Document" on page 16. (B) (A) 5 Specify the copy settings. (1) Use the { ...color copying, or the Black button for black & white copying. Copying 35 See "Setting Items" on page 25. See "Turning the Machine On and Off" on the machine. For details, refer to adjust the intensity. (2) (3) Confirm the paper source, page size, media type, (3) and other settings, press the Settings button. See "Loading Printing Paper...
...Copying Making Copies This section describes the basic procedure to select the copy mode if another mode has been selected. 3 Load paper. See "Handling the Original Document" on page 16. (B) (A) 5 Specify the copy settings. (1) Use the { ...color copying, or the Black button for black & white copying. Copying 35 See "Setting Items" on page 25. See "Turning the Machine On and Off" on the machine. For details, refer to adjust the intensity. (2) (3) Confirm the paper source, page size, media type, (3) and other settings, press the Settings button. See "Loading Printing Paper...
Quick Start Guide
Page 40
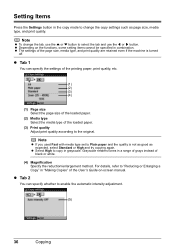
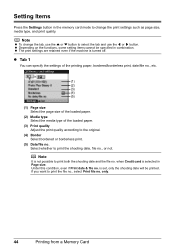
... the tab and use the [ or ] button. z Tab 2 You can specify the settings of the printing paper, print quality, etc. (1) (2) (3) (4) (1) Page size Select the page size of the loaded paper. (2) Media type Select the media type of the User's Guide on the functions, some setting items cannot be ...specified in "Making Copies" of the loaded paper. (3) Print quality Adjust print quality according to enable the automatic intensity adjustment. (5) 36 Copying Setting Items Press the Settings button in the...
... the tab and use the [ or ] button. z Tab 2 You can specify the settings of the printing paper, print quality, etc. (1) (2) (3) (4) (1) Page size Select the page size of the loaded paper. (2) Media type Select the media type of the User's Guide on the functions, some setting items cannot be ...specified in "Making Copies" of the loaded paper. (3) Print quality Adjust print quality according to enable the automatic intensity adjustment. (5) 36 Copying Setting Items Press the Settings button in the...
Quick Start Guide
Page 46
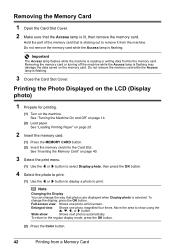
Printing the Photo Displayed on the LCD (Display photo) 1 Prepare for printing. (1) Turn on page 14. (2) Load paper. Note Changing the Display You can change the display, press the OK button. Full-screen view: Shows one photo magnified four times. Removing the memory... Paper" on page 40. 3 Select the print menu. (1) Use the [ or ] button to select Display photo, then press the OK button. 4 Select the photo to print. (1) Use the [ or ] button to display a photo to the regular display mode, press the OK button. (2) Press the Color button. 42 Printing from the machine....
Printing the Photo Displayed on the LCD (Display photo) 1 Prepare for printing. (1) Turn on page 14. (2) Load paper. Note Changing the Display You can change the display, press the OK button. Full-screen view: Shows one photo magnified four times. Removing the memory... Paper" on page 40. 3 Select the print menu. (1) Use the [ or ] button to select Display photo, then press the OK button. 4 Select the photo to print. (1) Use the [ or ] button to display a photo to the regular display mode, press the OK button. (2) Press the Color button. 42 Printing from the machine....
Quick Start Guide
Page 48
.../borderless print, date/file no., etc. (1) (2) (3) (4) (5) (1) Page size Select the page size of the loaded paper. (2) Media type Select the media type of the loaded paper. (3) Print quality Adjust the print quality according to the original. (4) Border Select bordered or borderless print. (5) Date/file no . If you want to print the ...
.../borderless print, date/file no., etc. (1) (2) (3) (4) (5) (1) Page size Select the page size of the loaded paper. (2) Media type Select the media type of the loaded paper. (3) Print quality Adjust the print quality according to the original. (4) Border Select bordered or borderless print. (5) Date/file no . If you want to print the ...

Quick Start Guide
Page 52
...to view the PC Printing Guide on page 25. For details, see "Changing the Paper Source" on -screen manual. If the on-screen manuals are not installed, the PC Printing Guide on the machine and load the paper in the machine. Printing with the printer driver as well as the Operation Panel on... that your machine's name is clicked. 10 Click Print. 48 Printing from Your Computer See "Turning the Machine On and Off" on page 14 and "Loading Printing Paper" on page 20. 2 Create a document or open a file to be used with Macintosh 1 Turn on -screen manual is not displayed even if is ...
...to view the PC Printing Guide on page 25. For details, see "Changing the Paper Source" on -screen manual. If the on-screen manuals are not installed, the PC Printing Guide on the machine and load the paper in the machine. Printing with the printer driver as well as the Operation Panel on... that your machine's name is clicked. 10 Click Print. 48 Printing from Your Computer See "Turning the Machine On and Off" on page 14 and "Loading Printing Paper" on page 20. 2 Create a document or open a file to be used with Macintosh 1 Turn on -screen manual is not displayed even if is ...

Quick Start Guide
Page 55
... Device You can be sure to the machine, we recommend the use a USB cable recommended by the PictBridge compliant device. See "Loading Printing Paper" on page 25. Printing Photographs Directly from a PictBridge Compliant Device To connect a PictBridge compliant device to as it fully. 1... other than PictBridge compliant devices or the optional Bluetooth Unit BU30 to this machine for printing. (1) Turn on page 14. (2) Load paper. When disconnecting the USB cable between the PictBridge compliant device and machine, follow the instructions given in the device's instruction manual....
... Device You can be sure to the machine, we recommend the use a USB cable recommended by the PictBridge compliant device. See "Loading Printing Paper" on page 25. Printing Photographs Directly from a PictBridge Compliant Device To connect a PictBridge compliant device to as it fully. 1... other than PictBridge compliant devices or the optional Bluetooth Unit BU30 to this machine for printing. (1) Turn on page 14. (2) Load paper. When disconnecting the USB cable between the PictBridge compliant device and machine, follow the instructions given in the device's instruction manual....

Quick Start Guide
Page 82
...the OK button. The Print reports/lists screen is displayed. 3 Display the Print reports/lists screen. (1) Use the [ or ] button to delete. See "Loading Printing Paper" on page 20. 2 Display the FAX menu screen. (1) Press the FAX button, then press the Menu button. z To delete a coded speed dial: ...Use the Numeric buttons or the {, }, [, or ] button to select a coded speed dial code to it when dialing. 1 Load paper. You may want to keep the list near your machine to refer to delete, then press the OK button. 4 Select a number to select Print reports...
...the OK button. The Print reports/lists screen is displayed. 3 Display the Print reports/lists screen. (1) Use the [ or ] button to delete. See "Loading Printing Paper" on page 20. 2 Display the FAX menu screen. (1) Press the FAX button, then press the Menu button. z To delete a coded speed dial: ...Use the Numeric buttons or the {, }, [, or ] button to select a coded speed dial code to it when dialing. 1 Load paper. You may want to keep the list near your machine to refer to delete, then press the OK button. 4 Select a number to select Print reports...

Quick Start Guide
Page 100
... using the Operation Panel. Important z Load Legal-sized paper in Memory" on page 99. will be selected when the Rear Tray is loaded in a specified paper source, or paper has run out during printing, the received faxes are stored in memory later. z If no paper. Load paper and press OK." You can only ... the original. 1 Press the FAX button. 2 Press the Settings button. will be fed from the Cassette. In this case, load paper in memory, then "There is no paper is selected as 11" x17" or Legal-size, the sender's machine may send the fax automatically shrunk or divided, or send ...
... using the Operation Panel. Important z Load Legal-sized paper in Memory" on page 99. will be selected when the Rear Tray is loaded in a specified paper source, or paper has run out during printing, the received faxes are stored in memory later. z If no paper. Load paper and press OK." You can only ... the original. 1 Press the FAX button. 2 Press the Settings button. will be fed from the Cassette. In this case, load paper in memory, then "There is no paper is selected as 11" x17" or Legal-size, the sender's machine may send the fax automatically shrunk or divided, or send ...
Quick Start Guide
Page 103
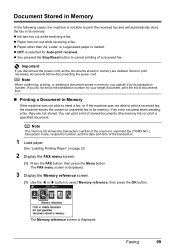
If you do not know the transaction number for Auto print received. z Paper has run out while receiving a fax. See "Loading Printing Paper" on page 20. 2 Display the FAX menu screen. (1) Press the FAX button, then press the Menu button. z You pressed the Stop/Reset button to print a ... select Memory reference, then press the OK button. If an error occurred when sending a fax, they are deleted. You can print a list of the transaction. 1 Load paper. The Memory reference screen is displayed.
If you do not know the transaction number for Auto print received. z Paper has run out while receiving a fax. See "Loading Printing Paper" on page 20. 2 Display the FAX menu screen. (1) Press the FAX button, then press the Menu button. z You pressed the Stop/Reset button to print a ... select Memory reference, then press the OK button. If an error occurred when sending a fax, they are deleted. You can print a list of the transaction. 1 Load paper. The Memory reference screen is displayed.
Quick Start Guide
Page 107
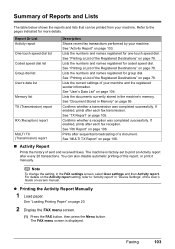
... disable automatic printing of this report, or print it manually. Lists the numbers and names registered for more details. z Printing the Activity Report Manually 1 Load paper. See "Loading Printing Paper" on page 106. See "RX Report" on page 20. 2 Display the FAX menu screen. (1) Press the FAX button, then press the Menu button. You...
... disable automatic printing of this report, or print it manually. Lists the numbers and names registered for more details. z Printing the Activity Report Manually 1 Load paper. See "Loading Printing Paper" on page 106. See "RX Report" on page 20. 2 Display the FAX menu screen. (1) Press the FAX button, then press the Menu button. You...


