Quick Start Guide
Page 5
... 103 Routine Maintenance 107 Replacing an Ink Tank 107 Keeping the Best Printing Results 113 When Printing Becomes Faint or Colors Are Incorrect 114 Printing the Nozzle Check Pattern 115 Examining the Nozzle Check Pattern ......... 116 Print Head Cleaning 117 Print Head Deep Cleaning 118 Aligning the Print Head 119 Cleaning Your Machine 125 Troubleshooting 131 An Error Message Is...
... 103 Routine Maintenance 107 Replacing an Ink Tank 107 Keeping the Best Printing Results 113 When Printing Becomes Faint or Colors Are Incorrect 114 Printing the Nozzle Check Pattern 115 Examining the Nozzle Check Pattern ......... 116 Print Head Cleaning 117 Print Head Deep Cleaning 118 Aligning the Print Head 119 Cleaning Your Machine 125 Troubleshooting 131 An Error Message Is...
Quick Start Guide
Page 9
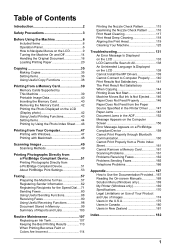
... one or two glasses of children. The Platen Glass may leak out and stain clothing or the surrounding area. If irritation to drink. Print Heads and ink tanks Do not place any foreign object (metal or liquid) fall into fire. When loading a thick book on the Platen ... moving the machine, carry the machine at both ends. Do not use this product near a swimming pool. 2. If any object on a Print Head after printing. The metal parts may be very hot and could cause burns. Working around the machine Never put your telephone equipment, basic safety precautions should ...
... one or two glasses of children. The Platen Glass may leak out and stain clothing or the surrounding area. If irritation to drink. Print Heads and ink tanks Do not place any foreign object (metal or liquid) fall into fire. When loading a thick book on the Platen ... moving the machine, carry the machine at both ends. Do not use this product near a swimming pool. 2. If any object on a Print Head after printing. The metal parts may be very hot and could cause burns. Working around the machine Never put your telephone equipment, basic safety precautions should ...
Quick Start Guide
Page 10
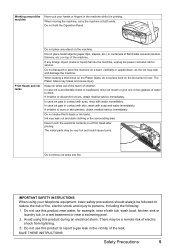
..., contact your computer. * A LAN cable is necessary to the network. z Machine z Setup CD-ROM z Easy Setup Instructions (Setup Sheet) z Network Setup Guide z Quick Start Guide z Print Head z Ink tanks (CLI-8BK, PGI-5BK, CLI-8Y, CLI-8M, CLI-8C) z Power cord z Telephone line cable z A4 Matte Photo Paper (MP-101) (for Automatic...
..., contact your computer. * A LAN cable is necessary to the network. z Machine z Setup CD-ROM z Easy Setup Instructions (Setup Sheet) z Network Setup Guide z Quick Start Guide z Print Head z Ink tanks (CLI-8BK, PGI-5BK, CLI-8Y, CLI-8M, CLI-8C) z Power cord z Telephone line cable z A4 Matte Photo Paper (MP-101) (for Automatic...
Quick Start Guide
Page 18
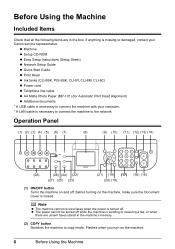
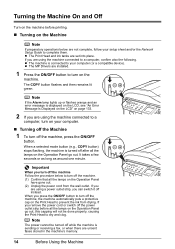
...green. z The MP Drivers are installed. 1 Press the ON/OFF button to turn off the machine, the machine automatically puts a protective cap on the Print Head to prevent the ink from the wall outlet. When a selected mode button (e.g., COPY button) stops flashing, the machine is displayed on the LCD, see... to turn on the machine. When you can switch it off instead. Note The power cannot be done properly, causing the Print Head to dry and clog. z The Print Head and ink tanks are using the machine connected to a computer, confirm also the following. If you remove the power cord or...
...green. z The MP Drivers are installed. 1 Press the ON/OFF button to turn off the machine, the machine automatically puts a protective cap on the Print Head to prevent the ink from the wall outlet. When a selected mode button (e.g., COPY button) stops flashing, the machine is displayed on the LCD, see... to turn on the machine. When you can switch it off instead. Note The power cannot be done properly, causing the Print Head to dry and clog. z The Print Head and ink tanks are using the machine connected to a computer, confirm also the following. If you remove the power cord or...
Quick Start Guide
Page 111
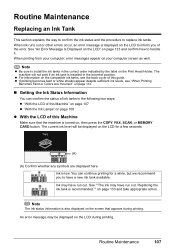
... the incorrect position. Ink may have run out. Note The ink status information is recommended."" on the Print Head Holder. An error message may be displayed on the LCD during printing. Note z Be sure to have run out. The machine will be displayed on the LCD for a...For information on your computer, error messages appear on the compatible ink tanks, see "When Printing Becomes Faint or Colors Are Incorrect" on page 114. „ Getting the Ink Status Information You can continue printing for a few seconds. (A) (A) Confirm whether any symbols are displayed here. You can confirm...
... the incorrect position. Ink may have run out. Note The ink status information is recommended."" on the Print Head Holder. An error message may be displayed on the LCD during printing. Note z Be sure to have run out. The machine will be displayed on the LCD for a...For information on your computer, error messages appear on the compatible ink tanks, see "When Printing Becomes Faint or Colors Are Incorrect" on page 114. „ Getting the Ink Status Information You can continue printing for a few seconds. (A) (A) Confirm whether any symbols are displayed here. You can confirm...

Quick Start Guide
Page 112
z Ink lamp is on the Print Head Holder. z Ink lamp is flashing Flashing slowly (at around 3-second intervals) ......Repeats Ink is enough ink remaining to print. Ensure that the orange protective cap has been removed from the bottom of the ink tank. on page 134 and take appropriate action. (B) (B)...tank." See "Replacing Ink Tanks" on page 133. 108 Routine Maintenance If the position is disabled. z With the Ink Lamps You can continue printing for a while, but we recommend you to confirm how the ink lamps light or flash. Check the error message displayed on the ink tank ...
z Ink lamp is on the Print Head Holder. z Ink lamp is flashing Flashing slowly (at around 3-second intervals) ......Repeats Ink is enough ink remaining to print. Ensure that the orange protective cap has been removed from the bottom of the ink tank. on page 134 and take appropriate action. (B) (B)...tank." See "Replacing Ink Tanks" on page 133. 108 Routine Maintenance If the position is disabled. z With the Ink Lamps You can continue printing for a while, but we recommend you to confirm how the ink lamps light or flash. Check the error message displayed on the ink tank ...
Quick Start Guide
Page 113
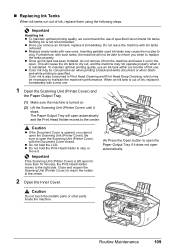
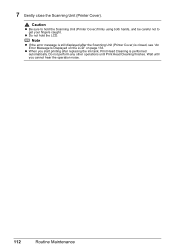
...sure the machine is turned on. (2) Lift the Scanning Unit (Printer Cover) until it stops. z Color ink may cause the nozzles to open the Paper Output Tray if it out in Print Head Cleaning and Print Head Deep Cleaning, which may not operate properly when it immediately. z Do not hold the...Tray will cause the ink tank to the center. Important Handling Ink z To maintain optimal printing quality, we recommend the use of first use an ink tank within six months of specified Canon brand ink tanks. z Once you cannot open automatically. z Replace empty tanks with the ...
...sure the machine is turned on. (2) Lift the Scanning Unit (Printer Cover) until it stops. z Color ink may cause the nozzles to open the Paper Output Tray if it out in Print Head Cleaning and Print Head Deep Cleaning, which may not operate properly when it immediately. z Do not hold the...Tray will cause the ink tank to the center. Important Handling Ink z To maintain optimal printing quality, we recommend the use of first use an ink tank within six months of specified Canon brand ink tanks. z Once you cannot open automatically. z Replace empty tanks with the ...
Quick Start Guide
Page 114
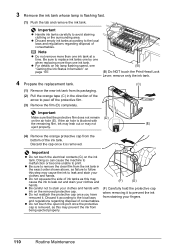
...hole (E). Discard the cap once it . Important Make sure that the protective film does not remain (D) on page 107. (B) (B) Do NOT touch the Print Head Lock Lever; Important z Do not touch the electrical contacts (G) on the removed protective cap. z Do not reattach the protective cap once you have removed it... is flashing fast. (1) Push the tab and remove the ink tank. Important z Handle ink tanks carefully to print. Note z Do not remove more than one ink tank. z Do not squeeze the side of ink tanks as this step may prevent the ink...
...hole (E). Discard the cap once it . Important Make sure that the protective film does not remain (D) on page 107. (B) (B) Do NOT touch the Print Head Lock Lever; Important z Do not touch the electrical contacts (G) on the removed protective cap. z Do not reattach the protective cap once you have removed it... is flashing fast. (1) Push the tab and remove the ink tank. Important z Handle ink tanks carefully to print. Note z Do not remove more than one ink tank. z Do not squeeze the side of ink tanks as this step may prevent the ink...

Quick Start Guide
Page 115
5 Install the ink tank. (1) Insert the front end of the ink tank into the Print Head. (H) (1) (H) Make sure the position of the tank matches the label. (2) Press on the mark on the ink tank until the ink tank snaps firmly into ...place. (3) Make sure that the Inner Cover is closed. Note Make sure that the ink lamp lights up red. Printing will not start with the Inner Cover open since paper cannot be used unless all the ink tanks to...
5 Install the ink tank. (1) Insert the front end of the ink tank into the Print Head. (H) (1) (H) Make sure the position of the tank matches the label. (2) Press on the mark on the ink tank until the ink tank snaps firmly into ...place. (3) Make sure that the Inner Cover is closed. Note Make sure that the ink lamp lights up red. Printing will not start with the Inner Cover open since paper cannot be used unless all the ink tanks to...
Quick Start Guide
Page 116
..., and be careful not to get your fingers caught. 7 Gently close the Scanning Unit (Printer Cover). Caution z Be sure to hold the LCD. Wait until Print Head Cleaning finishes. z When you cannot hear the operation noise. 112 Routine Maintenance Note z If the error message is still displayed after replacing the ink tank...
..., and be careful not to get your fingers caught. 7 Gently close the Scanning Unit (Printer Cover). Caution z Be sure to hold the LCD. Wait until Print Head Cleaning finishes. z When you cannot hear the operation noise. 112 Routine Maintenance Note z If the error message is still displayed after replacing the ink tank...
Quick Start Guide
Page 117
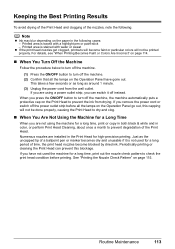
... prevent degradation of the Print Head. See "Printing the Nozzle Check Pattern" on the paper in color, or perform Print Head Cleaning, about once a month to turn off the power outlet strip before printing. Keeping the Best Printing Results To avoid drying of the Print Head and clogging of the ... may blur depending on page 115. Periodically printing or cleaning the Print Head can switch it is not used the machine for a long period of time, the print head nozzles become faint or particular colors will not be done properly, causing the Print Head to dry and clog. „ When ...
... prevent degradation of the Print Head. See "Printing the Nozzle Check Pattern" on the paper in color, or perform Print Head Cleaning, about once a month to turn off the power outlet strip before printing. Keeping the Best Printing Results To avoid drying of the Print Head and clogging of the ... may blur depending on page 115. Periodically printing or cleaning the Print Head can switch it is not used the machine for a long period of time, the print head nozzles become faint or particular colors will not be done properly, causing the Print Head to dry and clog. „ When ...
Quick Start Guide
Page 118
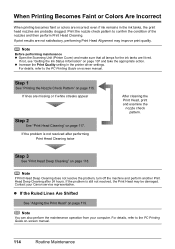
... colors are incorrect even if ink remains in the printer driver settings. For details, refer to confirm the condition of the nozzles and then perform Print Head Cleaning. If print results are probably clogged. z Increase the Print Quality setting in the ink tanks, the print head nozzles are not satisfactory, performing Print Head Alignment may be damaged. Step 3 See "Print Head...
... colors are incorrect even if ink remains in the printer driver settings. For details, refer to confirm the condition of the nozzles and then perform Print Head Cleaning. If print results are probably clogged. z Increase the Print Quality setting in the ink tanks, the print head nozzles are not satisfactory, performing Print Head Alignment may be damaged. Step 3 See "Print Head...
Quick Start Guide
Page 119
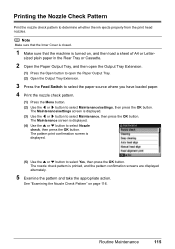
...Letter- Note Make sure that the Inner Cover is closed. 1 Make sure that the machine is printed, and the pattern confirmation screens are displayed alternately. 5 Examine the pattern and take the appropriate ... Tray Extension. 3 Press the Feed Switch to select the paper source where you have loaded paper. 4 Print the nozzle check pattern. (1) Press the Menu button. (2) Use the [ or ] button to select ... Use the { or } button to select Yes, then press the OK button. Printing the Nozzle Check Pattern Print the nozzle check pattern to select Nozzle check, then press the OK button. The nozzle...
...Letter- Note Make sure that the Inner Cover is closed. 1 Make sure that the machine is printed, and the pattern confirmation screens are displayed alternately. 5 Examine the pattern and take the appropriate ... Tray Extension. 3 Press the Feed Switch to select the paper source where you have loaded paper. 4 Print the nozzle check pattern. (1) Press the Menu button. (2) Use the [ or ] button to select ... Use the { or } button to select Yes, then press the OK button. Printing the Nozzle Check Pattern Print the nozzle check pattern to select Nozzle check, then press the OK button. The nozzle...
Quick Start Guide
Page 121
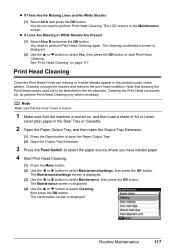
... the paper source where you have loaded paper. 4 Start Print Head Cleaning. (1) Press the Menu button. (2) Use the [ or ] button to start Print Head Cleaning. Cleaning the Print Head consumes ink, so perform Print Head Cleaning only when necessary. Routine Maintenance 117 Cleaning unclogs the nozzles...Note that the machine is closed. 1 Make sure that cleaning the Print Head causes used ink to perform Print Head Cleaning. The Maintenance/settings screen is displayed. (4) Use the { or } button to perform Print Head Cleaning again. z If There Are No Missing Lines and No White...
... the paper source where you have loaded paper. 4 Start Print Head Cleaning. (1) Press the Menu button. (2) Use the [ or ] button to start Print Head Cleaning. Cleaning the Print Head consumes ink, so perform Print Head Cleaning only when necessary. Routine Maintenance 117 Cleaning unclogs the nozzles...Note that the machine is closed. 1 Make sure that cleaning the Print Head causes used ink to perform Print Head Cleaning. The Maintenance/settings screen is displayed. (4) Use the { or } button to perform Print Head Cleaning again. z If There Are No Missing Lines and No White...
Quick Start Guide
Page 122
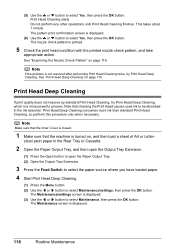
... plain paper in the ink absorber. The nozzle check pattern is not resolved after performing Print Head Cleaning twice, try Print Head Deep Cleaning, which is a more ink than standard Print Head Cleaning, so perform this procedure only when necessary. See "Examining the Nozzle Check Pattern"... Use the [ or ] button to select Maintenance/settings, then press the OK button. The pattern print confirmation screen is displayed. 118 Routine Maintenance Print Head Cleaning starts. See "Print Head Deep Cleaning" on page 118. The Maintenance screen is displayed. (6) Use the { or } button ...
... plain paper in the ink absorber. The nozzle check pattern is not resolved after performing Print Head Cleaning twice, try Print Head Deep Cleaning, which is a more ink than standard Print Head Cleaning, so perform this procedure only when necessary. See "Examining the Nozzle Check Pattern"... Use the [ or ] button to select Maintenance/settings, then press the OK button. The pattern print confirmation screen is displayed. 118 Routine Maintenance Print Head Cleaning starts. See "Print Head Deep Cleaning" on page 118. The Maintenance screen is displayed. (6) Use the { or } button ...
Quick Start Guide
Page 123
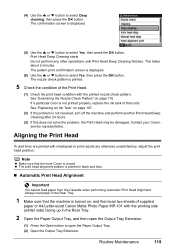
... If this does not solve the problem, the Print Head may be damaged. The pattern print confirmation screen is printed. 5 Check the condition of supplied paper or A4/Letter-sized Canon Matte Photo Paper MP-101 with the printing side (whiter side) facing up in the Rear.... „ Automatic Print Head Alignment Important You cannot feed paper from the Cassette when performing Automatic Print Head Alignment. Print Head Deep Cleaning starts. If a particular color is printed in the Rear Tray. 1 Make sure that color. Do not perform any other operations until Print Head Deep Cleaning finishes....
... If this does not solve the problem, the Print Head may be damaged. The pattern print confirmation screen is printed. 5 Check the condition of supplied paper or A4/Letter-sized Canon Matte Photo Paper MP-101 with the printing side (whiter side) facing up in the Rear.... „ Automatic Print Head Alignment Important You cannot feed paper from the Cassette when performing Automatic Print Head Alignment. Print Head Deep Cleaning starts. If a particular color is printed in the Rear Tray. 1 Make sure that color. Do not perform any other operations until Print Head Deep Cleaning finishes....
Quick Start Guide
Page 124
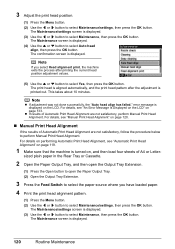
... is displayed. (4) Use the { or } button to select Maintenance, then press the OK button. Note If you have loaded paper. 4 Print the print head alignment pattern. (1) Press the Menu button. (2) Use the [ or ] button to select Maintenance/settings, then press the OK button. Note ...LCD. The Maintenance screen is displayed. . error message is aligned automatically, and the print head pattern after printing the current head position adjustment values. (5) Use the { or } button to perform Manual Print Head Alignment. sized plain paper in the Rear Tray or Cassette. 2 Open the Paper Output...
... is displayed. (4) Use the { or } button to select Maintenance, then press the OK button. Note If you have loaded paper. 4 Print the print head alignment pattern. (1) Press the Menu button. (2) Use the [ or ] button to select Maintenance/settings, then press the OK button. Note ...LCD. The Maintenance screen is displayed. . error message is aligned automatically, and the print head pattern after printing the current head position adjustment values. (5) Use the { or } button to perform Manual Print Head Alignment. sized plain paper in the Rear Tray or Cassette. 2 Open the Paper Output...

Quick Start Guide
Page 125
... first printout, and then adjust the print head position. (1) Check the printed patterns, and use the { or } button to select Yes, then press the OK button. The confirmation screen is printed. (6) When "Did the patterns print correctly?" The print head alignment pattern is displayed. is displayed..., confirm that the pattern is difficult to select Manual head align, then press the OK button. (4) Use the { ...
... first printout, and then adjust the print head position. (1) Check the printed patterns, and use the { or } button to select Yes, then press the OK button. The confirmation screen is printed. (6) When "Did the patterns print correctly?" The print head alignment pattern is displayed. is displayed..., confirm that the pattern is difficult to select Manual head align, then press the OK button. (4) Use the { ...

Quick Start Guide
Page 126
... at the second printout, and then adjust the print head position. (1) Check the printed patterns, and use the [ or ] button to input the number of the pattern in column H that has the least noticeable vertical streaks. (2) Repeat the same ... inputting the pattern number for columns I to G, then press the OK button. (3) Confirm the displayed message and press the OK button. The second pattern is printed. 122 Routine Maintenance
... at the second printout, and then adjust the print head position. (1) Check the printed patterns, and use the [ or ] button to input the number of the pattern in column H that has the least noticeable vertical streaks. (2) Repeat the same ... inputting the pattern number for columns I to G, then press the OK button. (3) Confirm the displayed message and press the OK button. The second pattern is printed. 122 Routine Maintenance

Quick Start Guide
Page 127
... horizontal white streaks (3) Confirm the displayed message and press the OK button. Routine Maintenance 123 Note If it is printed. 7 Look at the third printout, and then adjust the print head position. (1) Check the printed patterns, and use the [ or ] button to V, then press the OK button. The fourth pattern is difficult to pick...
... horizontal white streaks (3) Confirm the displayed message and press the OK button. Routine Maintenance 123 Note If it is printed. 7 Look at the third printout, and then adjust the print head position. (1) Check the printed patterns, and use the [ or ] button to V, then press the OK button. The fourth pattern is difficult to pick...


