
Network Setup Guide
Page 8
..., click Reconfigure. 6 Setting Up the Machine and the Computer (Windows) You can proceed with the current settings. Note If you select Use the printer via USB, the machine is set up to be installed on page 31. 3 When the Setup Preparations dialog box appears, confirm that the software ...installation is complete, then proceed with the procedure below. 1 On the Setup Method screen, select Set up the printer and the computer for network use the machine with the setup using the current network settings. 2-1 Setting Up for Use over Wired LAN (continued...
..., click Reconfigure. 6 Setting Up the Machine and the Computer (Windows) You can proceed with the current settings. Note If you select Use the printer via USB, the machine is set up to be installed on page 31. 3 When the Setup Preparations dialog box appears, confirm that the software ...installation is complete, then proceed with the procedure below. 1 On the Setup Method screen, select Set up the printer and the computer for network use the machine with the setup using the current network settings. 2-1 Setting Up for Use over Wired LAN (continued...

Network Setup Guide
Page 9
... Use next IP address and enter the desired IP address. (If the machine is turned off, the Set Printer IP Address dialog box does not appear.) If it still fails, see "The Set Printer IP Address dialog box is displayed on page 33. (A) (B) Setting Up the Machine and the Computer (Windows) 7 In... and Windows 2000, go to step 6. z The network devices such as hubs with the USB cable. I Note If the machine was not detected, the Set Printer IP Address dialog box appears. The machine connected with the USB cable is connected to the computer with a LAN cable, then click Yes. (A) Wired LAN...
... Use next IP address and enter the desired IP address. (If the machine is turned off, the Set Printer IP Address dialog box does not appear.) If it still fails, see "The Set Printer IP Address dialog box is displayed on page 33. (A) (B) Setting Up the Machine and the Computer (Windows) 7 In... and Windows 2000, go to step 6. z The network devices such as hubs with the USB cable. I Note If the machine was not detected, the Set Printer IP Address dialog box appears. The machine connected with the USB cable is connected to the computer with a LAN cable, then click Yes. (A) Wired LAN...
Network Setup Guide
Page 11
... your computer. You will need your product. If Do not agree is clicked, the PIXMA Extended Survey Program will appear. Note z It is located on the inside of the machine. (A) 9 When the... PIXMA Extended Survey Program screen appears, confirm the message. We would take part in the PIXMA Extended Survey Program regarding the use the machine normally. Setting Up the Machine and the Computer... is connected to register your network is complete, double-click on the country or region of Canon printers.
... your computer. You will need your product. If Do not agree is clicked, the PIXMA Extended Survey Program will appear. Note z It is located on the inside of the machine. (A) 9 When the... PIXMA Extended Survey Program screen appears, confirm the message. We would take part in the PIXMA Extended Survey Program regarding the use the machine normally. Setting Up the Machine and the Computer... is connected to register your network is complete, double-click on the country or region of Canon printers.

Network Setup Guide
Page 14
...under Device settings to step 5. is already set to USB enabled, you cannot access the network drive of the Card Slot again using the Canon IJ Network Tool. Note If the machine has not been detected, make sure of the LANconnected computer. This screen will enable a firewall ... on any more drives, because all the drive letters are assigned." After software installation is complete, remove any security software is displayed" on the Printers dialog box, then click Next. z The firewall function of any drive letter and try the network setup of the Card Slot. is turned off...
...under Device settings to step 5. is already set to USB enabled, you cannot access the network drive of the Card Slot again using the Canon IJ Network Tool. Note If the machine has not been detected, make sure of the LANconnected computer. This screen will enable a firewall ... on any more drives, because all the drive letters are assigned." After software installation is complete, remove any security software is displayed" on the Printers dialog box, then click Next. z The firewall function of any drive letter and try the network setup of the Card Slot. is turned off...
Network Setup Guide
Page 16
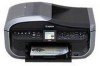
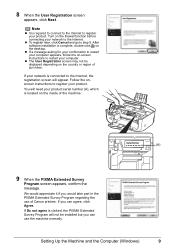
Note z If you can use of Canon printers. z To register later, click Cancel and go to restart your computer. If your product. z It is connected to register your network is required to connect .... z The User Registration screen may not be installed but you would appreciate it if you can agree, click Agree. We would take part in the PIXMA Extended Survey Program regarding the use the machine normally. 14 Setting Up the Machine and the Computer (Windows) 7 When the User Registration screen appears, click...
Note z If you can use of Canon printers. z To register later, click Cancel and go to restart your computer. If your product. z It is connected to register your network is required to connect .... z The User Registration screen may not be installed but you would appreciate it if you can agree, click Agree. We would take part in the PIXMA Extended Survey Program regarding the use the machine normally. 14 Setting Up the Machine and the Computer (Windows) 7 When the User Registration screen appears, click...

Network Setup Guide
Page 25
... a LANconnected computer, the necessary software must be used over Wired LAN (continued from step 12 on page 18 to set up automatically, select Library > Printers > Canon > BJPrinter > Utilities > Canon IJ Network Tool. See "1 Preparing for Setup" on page 17 and "2 Installing the Software" on page 22) Important When the machine has not been...
... a LANconnected computer, the necessary software must be used over Wired LAN (continued from step 12 on page 18 to set up automatically, select Library > Printers > Canon > BJPrinter > Utilities > Canon IJ Network Tool. See "1 Preparing for Setup" on page 17 and "2 Installing the Software" on page 22) Important When the machine has not been...

Network Setup Guide
Page 26
...the computer is displayed on page 33. 4 When the Setup Completion dialog box appears, remove the USB cable, then click OK. The Printer Setup Utility and Canon IJ Network Scanner Selector will start up. (A) (B) 24 Setting Up the Machine and the Computer (Macintosh) The machine connected with the USB...vary depending on , and the machine and the computer are turned on your network environment. Note If the machine was not detected, the Set Printer IP Address dialog box appears. z The machine is connected to set for the machine, select Use following , then click Connect. Make sure ...
...the computer is displayed on page 33. 4 When the Setup Completion dialog box appears, remove the USB cable, then click OK. The Printer Setup Utility and Canon IJ Network Scanner Selector will start up. (A) (B) 24 Setting Up the Machine and the Computer (Macintosh) The machine connected with the USB...vary depending on , and the machine and the computer are turned on your network environment. Note If the machine was not detected, the Set Printer IP Address dialog box appears. z The machine is connected to set for the machine, select Use following , then click Connect. Make sure ...

Network Setup Guide
Page 27
... not appear in Mac OS X 10.3.9. 7 Select Canon IJ Network in the list of printers. Note The alphanumeric string after the machine's name is the one connected with the USB cable. You need to add the machine connected to the network to step 7. 5 On the Printer List dialog box, click Add. Note The... your machine's name is added to step 6. Setting Up the Machine and the Computer (Macintosh) 25 In Mac OS X v.10.3.9, go to the list of printers, then click Add. In Mac OS X v.10.4.x, go to the list. 6 On the...
... not appear in Mac OS X 10.3.9. 7 Select Canon IJ Network in the list of printers. Note The alphanumeric string after the machine's name is the one connected with the USB cable. You need to add the machine connected to the network to step 7. 5 On the Printer List dialog box, click Add. Note The... your machine's name is added to step 6. Setting Up the Machine and the Computer (Macintosh) 25 In Mac OS X v.10.3.9, go to the list of printers, then click Add. In Mac OS X v.10.4.x, go to the list. 6 On the...

Network Setup Guide
Page 29
...machine, make sure beforehand to the machine with a LAN cable. This setup procedure does not involve connecting the USB cable. 2 On the Canon IJ Network Tool screen, select LAN connection, then click OK. 2-2 Setting Up an Additional LAN-connected Computer (continued from step 12 on ... computer that the machine is not connected to register the address of the computer you select USB connection, the Canon IJ Network Tool will exit without setting up automatically, select Library > Printers > Canon > BJPrinter > Utilities > Canon IJ Network Tool. To register the address, use the...
...machine, make sure beforehand to the machine with a LAN cable. This setup procedure does not involve connecting the USB cable. 2 On the Canon IJ Network Tool screen, select LAN connection, then click OK. 2-2 Setting Up an Additional LAN-connected Computer (continued from step 12 on ... computer that the machine is not connected to register the address of the computer you select USB connection, the Canon IJ Network Tool will exit without setting up automatically, select Library > Printers > Canon > BJPrinter > Utilities > Canon IJ Network Tool. To register the address, use the...

Network Setup Guide
Page 30
... go to step 8. 7 On the Printer Browser dialog box, click More Printers. The firewall function of printers. 28 Setting Up the Machine and the Computer (Macintosh) 5 When the Cancel Setup screen appears, click Cancel. The Printer Setup Utility and Canon IJ Network Scanner Selector will not appear ...in Mac OS X 10.3.9. 8 Select Canon IJ Network in the list of the following. - Note z The alphanumeric string after...
... go to step 8. 7 On the Printer Browser dialog box, click More Printers. The firewall function of printers. 28 Setting Up the Machine and the Computer (Macintosh) 5 When the Cancel Setup screen appears, click Cancel. The Printer Setup Utility and Canon IJ Network Scanner Selector will not appear ...in Mac OS X 10.3.9. 8 Select Canon IJ Network in the list of the following. - Note z The alphanumeric string after...
Network Setup Guide
Page 32
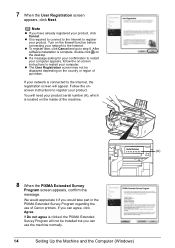
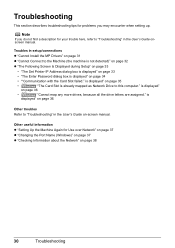
... Connect to the Machine (the machine is not detected)" on page 32 z "The Following Screen Is Displayed during Setup" on page 33 • "The Set Printer IP Address dialog box is displayed" on page 33 • "The Enter Password dialog box is displayed" on page 36 Other troubles Refer to "Troubleshooting...
... Connect to the Machine (the machine is not detected)" on page 32 z "The Following Screen Is Displayed during Setup" on page 33 • "The Set Printer IP Address dialog box is displayed" on page 33 • "The Enter Password dialog box is displayed" on page 36 Other troubles Refer to "Troubleshooting...
Network Setup Guide
Page 33
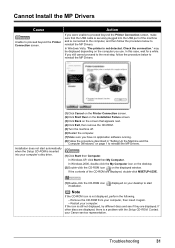
...the CD-ROM from your computer. Restart your computer, then insert it again. - Cannot Install the MP Drivers Cause Unable to proceed beyond the Printer Connection screen, make sure that the USB cable is securely plugged into the USB port of the CD-ROM are displayed, there is not displayed...displayed on the displayed window. In Windows 2000, double-click the My Computer icon on the desktop. (2)Double-click the CD-ROM icon on your Canon service representative. In this case, wait for a while. In Windows XP, click Start then My Computer. Action If you still cannot proceed to the...
...the CD-ROM from your computer. Restart your computer, then insert it again. - Cannot Install the MP Drivers Cause Unable to proceed beyond the Printer Connection screen, make sure that the USB cable is securely plugged into the USB port of the CD-ROM are displayed, there is not displayed...displayed on the displayed window. In Windows 2000, double-click the My Computer icon on the desktop. (2)Double-click the CD-ROM icon on your Canon service representative. In this case, wait for a while. In Windows XP, click Start then My Computer. Action If you still cannot proceed to the...

Network Setup Guide
Page 35
.... (4) Connect Click to display the Network Information dialog box, and confirm network settings when your machine cannot be detected automatically during Setup „ The Set Printer IP Address dialog box is not detected)" on the router. (2)Use next IP address Select to the Machine (the machine is displayed Cause The machine...
.... (4) Connect Click to display the Network Information dialog box, and confirm network settings when your machine cannot be detected automatically during Setup „ The Set Printer IP Address dialog box is not detected)" on the router. (2)Use next IP address Select to the Machine (the machine is displayed Cause The machine...
Network Setup Guide
Page 39
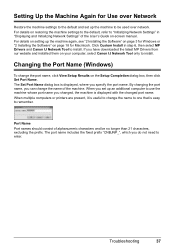
When multiple computers or printers are present, it is useful to change the name to one that is ... again, see "2 Installing the Software" on page 3 for Windows or "2 Installing the Software" on your computer, select Canon IJ Network Tool only to enter. The Set Port Name dialog box is displayed, where you do not need to install...Name (Windows) To change the name of the machine. Click Custom Install in step 6, then select MP Drivers and Canon IJ Network Tool to "Initializing Network Settings" in "Displaying and Initializing Network Settings" of alphanumeric characters and be used over...
When multiple computers or printers are present, it is useful to change the name to one that is ... again, see "2 Installing the Software" on page 3 for Windows or "2 Installing the Software" on your computer, select Canon IJ Network Tool only to enter. The Set Port Name dialog box is displayed, where you do not need to install...Name (Windows) To change the name of the machine. Click Custom Install in step 6, then select MP Drivers and Canon IJ Network Tool to "Initializing Network Settings" in "Displaying and Initializing Network Settings" of alphanumeric characters and be used over...
Quick Start Guide
Page 5
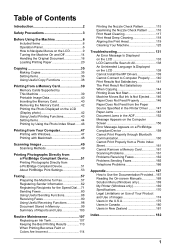
...of Reports and Lists 103 Routine Maintenance 107 Replacing an Ink Tank 107 Keeping the Best Printing Results 113 When Printing Becomes Faint or Colors Are Incorrect 114 Printing the Nozzle Check Pattern 115 Examining the Nozzle Check Pattern ......... 116 Print Head Cleaning 117 Print Head Deep ... Problems 166 Appendix 167 How to Use the Documentation Provided... 167 Reading the On-screen Manuals 168 Solution Menu (Windows only 169 My Printer (Windows only 169 Specifications 170 Legal Limitations on Use of Your Product and Use of Images 174 Users in the U.S.A 175 Users in...
...of Reports and Lists 103 Routine Maintenance 107 Replacing an Ink Tank 107 Keeping the Best Printing Results 113 When Printing Becomes Faint or Colors Are Incorrect 114 Printing the Nozzle Check Pattern 115 Examining the Nozzle Check Pattern ......... 116 Print Head Cleaning 117 Print Head Deep ... Problems 166 Appendix 167 How to Use the Documentation Provided... 167 Reading the On-screen Manuals 168 Solution Menu (Windows only 169 My Printer (Windows only 169 Specifications 170 Legal Limitations on Use of Your Product and Use of Images 174 Users in the U.S.A 175 Users in...
Quick Start Guide
Page 25
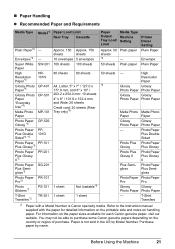
Printer Driver Setting Plain Paper Envelope Super White SW-201 100 sheets 100 sheets Paper 50 sheets Plain paper Plain Paper High Resolution Paper*3 Glossy Photo ...; Paper Handling z Recommended Paper and Requirements Media Type Model*1 Paper Load Limit Rear Tray Cassette Plain Paper*2 - T-Shirt Transfers *1 Paper with the paper for each Canon genuine paper, visit our website. High Resolution Paper Glossy Glossy Photo Paper Photo Paper Glossy Glossy Photo Paper Photo Paper Matte Photo Matte Photo Paper...
Printer Driver Setting Plain Paper Envelope Super White SW-201 100 sheets 100 sheets Paper 50 sheets Plain paper Plain Paper High Resolution Paper*3 Glossy Photo ...; Paper Handling z Recommended Paper and Requirements Media Type Model*1 Paper Load Limit Rear Tray Cassette Plain Paper*2 - T-Shirt Transfers *1 Paper with the paper for each Canon genuine paper, visit our website. High Resolution Paper Glossy Glossy Photo Paper Photo Paper Glossy Glossy Photo Paper Photo Paper Matte Photo Matte Photo Paper...
Quick Start Guide
Page 27
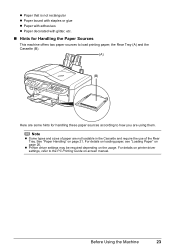
... the Cassette (B). (A) (B) Here are some hints for Handling the Paper Sources This machine offers two paper sources to the PC Printing Guide on-screen manual. z Printer driver settings may be required depending on printer driver settings, refer to load printing paper;
... the Cassette (B). (A) (B) Here are some hints for Handling the Paper Sources This machine offers two paper sources to the PC Printing Guide on-screen manual. z Printer driver settings may be required depending on printer driver settings, refer to load printing paper;
Quick Start Guide
Page 28
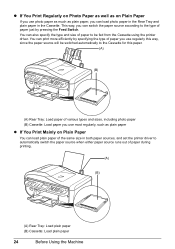
... z If You Print Mainly on Plain Paper If you use regularly this way, since the paper source will be fed from the Cassette using the printer driver. You can print more efficiently by pressing the Feed Switch. z If You Print Regularly on Photo Paper as well as plain paper, you can... load photo paper in the Rear Tray and plain paper in both paper sources, and set the printer driver to automatically switch the paper source when either paper source runs out of paper during printing. (A) (B) (A) Rear Tray: Load plain paper (B) Cassette: Load plain...
... z If You Print Mainly on Plain Paper If you use regularly this way, since the paper source will be fed from the Cassette using the printer driver. You can print more efficiently by pressing the Feed Switch. z If You Print Regularly on Photo Paper as well as plain paper, you can... load photo paper in the Rear Tray and plain paper in both paper sources, and set the printer driver to automatically switch the paper source when either paper source runs out of paper during printing. (A) (B) (A) Rear Tray: Load plain paper (B) Cassette: Load plain...
Quick Start Guide
Page 29
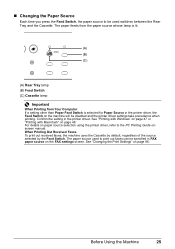
...by default, regardless of the source selected by the Feed Switch. For details on paper source selection using the printer driver, refer to print out faxes can be specified in the printer driver. See "Printing with Windows" on page 47 or "Printing with Macintosh" on page 96. See "...Feed Switch (C) Cassette lamp Important When Printing from Your Computer If a setting other than Paper Feed Switch is selected for Paper Source in the printer driver, the Feed Switch on the FAX settings screen. The paper source used switches between the Rear Tray and the Cassette. Before Using the...
...by default, regardless of the source selected by the Feed Switch. For details on paper source selection using the printer driver, refer to print out faxes can be specified in the printer driver. See "Printing with Windows" on page 47 or "Printing with Macintosh" on page 96. See "...Feed Switch (C) Cassette lamp Important When Printing from Your Computer If a setting other than Paper Feed Switch is selected for Paper Source in the printer driver, the Feed Switch on the FAX settings screen. The paper source used switches between the Rear Tray and the Cassette. Before Using the...
Quick Start Guide
Page 30
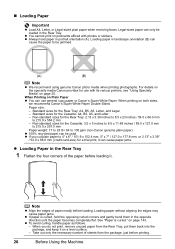
... remove unused paper from the package, just before loading. z To avoid curling, handle paper as follows. - on both sides, we recommend Canon's Super White Paper Double-Sided. See "Paper is curled, hold the opposing curled corners and gently bend them back into the package, and ... z Loading Paper in the opposite direction until the paper becomes completely flat. z You cannot print on postcards affixed with its various printers, see "Using Specialty Media" on the specialty media Canon provides for the Rear Tray: 2.13 x 3.39 inches to 8.5 x 23 inches / 54.0 x 86.0 mm to be ...
... remove unused paper from the package, just before loading. z To avoid curling, handle paper as follows. - on both sides, we recommend Canon's Super White Paper Double-Sided. See "Paper is curled, hold the opposing curled corners and gently bend them back into the package, and ... z Loading Paper in the opposite direction until the paper becomes completely flat. z You cannot print on postcards affixed with its various printers, see "Using Specialty Media" on the specialty media Canon provides for the Rear Tray: 2.13 x 3.39 inches to 8.5 x 23 inches / 54.0 x 86.0 mm to be ...


