Network Setup Guide
Page 32
..." in the User's Guide on page 36 • ""Cannot map any more drives, because all the drive letters are assigned." is displayed" on -screen manual. is displayed" on page 35 • ""The Card Slot is displayed" on page 33 • "The Enter Password dialog box is already mapped as ...to the Machine (the machine is not detected)" on page 32 z "The Following Screen Is Displayed during Setup" on page 33 • "The Set Printer IP Address dialog box is displayed" on page 34 • ""Communication with the Card Slot failed." Other useful information z "Setting Up the Machine Again ...
..." in the User's Guide on page 36 • ""Cannot map any more drives, because all the drive letters are assigned." is displayed" on -screen manual. is displayed" on page 35 • ""The Card Slot is displayed" on page 33 • "The Enter Password dialog box is already mapped as ...to the Machine (the machine is not detected)" on page 32 z "The Following Screen Is Displayed during Setup" on page 33 • "The Set Printer IP Address dialog box is displayed" on page 34 • ""Communication with the Card Slot failed." Other useful information z "Setting Up the Machine Again ...

Network Setup Guide
Page 35
The Following Screen Is Displayed during setup for use over the network. (4) Connect Click to manually specify an IP address, for the machine with a specified IP address, see "Cannot Connect to use an IP address provided by a DHCP server. If the ... Information Click to display the Network Information dialog box, and confirm network settings when your machine cannot be detected automatically during Setup „ The Set Printer IP Address dialog box is displayed Cause The machine in which you are using the machine. IP Address/Subnet Mask/Default Gateway Enter each value...
The Following Screen Is Displayed during setup for use over the network. (4) Connect Click to manually specify an IP address, for the machine with a specified IP address, see "Cannot Connect to use an IP address provided by a DHCP server. If the ... Information Click to display the Network Information dialog box, and confirm network settings when your machine cannot be detected automatically during Setup „ The Set Printer IP Address dialog box is displayed Cause The machine in which you are using the machine. IP Address/Subnet Mask/Default Gateway Enter each value...
Network Setup Guide
Page 39
... where you have downloaded the latest MP Drivers from our website and installed them on -screen manual. For details on setting up an additional computer to use the machine whose port name you... the Port Name (Windows) To change the name of the User's Guide on your computer, select Canon IJ Network Tool only to enter. For details on restoring the machine settings to the default, refer to... you specify the port name. Setting Up the Machine Again for Macintosh. When multiple computers or printers are present, it is useful to change the name to be no longer than 21 characters,...
... where you have downloaded the latest MP Drivers from our website and installed them on -screen manual. For details on setting up an additional computer to use the machine whose port name you... the Port Name (Windows) To change the name of the User's Guide on your computer, select Canon IJ Network Tool only to enter. For details on restoring the machine settings to the default, refer to... you specify the port name. Setting Up the Machine Again for Macintosh. When multiple computers or printers are present, it is useful to change the name to be no longer than 21 characters,...
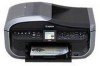
Quick Start Guide
Page 5
...Reports and Lists 103 Routine Maintenance 107 Replacing an Ink Tank 107 Keeping the Best Printing Results 113 When Printing Becomes Faint or Colors Are Incorrect 114 Printing the Nozzle Check Pattern 115 Examining the Nozzle Check Pattern ......... 116 Print Head Cleaning 117 Print Head Deep... Sending Faxes 165 Telephone Problems 166 Appendix 167 How to Use the Documentation Provided... 167 Reading the On-screen Manuals 168 Solution Menu (Windows only 169 My Printer (Windows only 169 Specifications 170 Legal Limitations on Use of Your Product and Use of Images 174 Users in ...
...Reports and Lists 103 Routine Maintenance 107 Replacing an Ink Tank 107 Keeping the Best Printing Results 113 When Printing Becomes Faint or Colors Are Incorrect 114 Printing the Nozzle Check Pattern 115 Examining the Nozzle Check Pattern ......... 116 Print Head Cleaning 117 Print Head Deep... Sending Faxes 165 Telephone Problems 166 Appendix 167 How to Use the Documentation Provided... 167 Reading the On-screen Manuals 168 Solution Menu (Windows only 169 My Printer (Windows only 169 Specifications 170 Legal Limitations on Use of Your Product and Use of Images 174 Users in ...
Quick Start Guide
Page 25
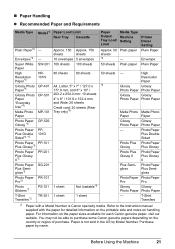
T-Shirt Transfers *1 Paper with the paper for each Canon genuine paper, visit our website. Purchase paper by Model Number. Before Using the Machine 21 Printer Driver Setting Plain Paper Envelope Super White SW-201 100 sheets 100 sheets Paper 50 sheets Plain paper Plain Paper High ...50 sheets *4 Media Type Machine Setting Plain paper - You may not be able to the instruction manual supplied with a Model Number is not sold in the US by name. Paper is Canon specialty media. For information on the paper sizes available for detailed information on the printable side and...
T-Shirt Transfers *1 Paper with the paper for each Canon genuine paper, visit our website. Purchase paper by Model Number. Before Using the Machine 21 Printer Driver Setting Plain Paper Envelope Super White SW-201 100 sheets 100 sheets Paper 50 sheets Plain paper Plain Paper High ...50 sheets *4 Media Type Machine Setting Plain paper - You may not be able to the instruction manual supplied with a Model Number is not sold in the US by name. Paper is Canon specialty media. For information on the paper sizes available for detailed information on the printable side and...
Quick Start Guide
Page 27
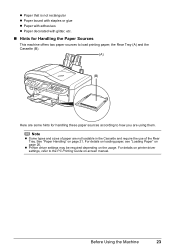
.... „ Hints for handling these paper sources according to how you are using them. For details on loading paper, see "Loading Paper" on -screen manual. Before Using the Machine 23 the Rear Tray (A) and the Cassette (B). (A) (B) Here are not loadable in the Cassette and require the use of the... Rear Tray. For details on printer driver settings, refer to load printing paper; See "Paper Handling" on the usage. Note z Some types and sizes of paper are some hints for ...
.... „ Hints for handling these paper sources according to how you are using them. For details on loading paper, see "Loading Paper" on -screen manual. Before Using the Machine 23 the Rear Tray (A) and the Cassette (B). (A) (B) Here are not loadable in the Cassette and require the use of the... Rear Tray. For details on printer driver settings, refer to load printing paper; See "Paper Handling" on the usage. Note z Some types and sizes of paper are some hints for ...
Quick Start Guide
Page 29
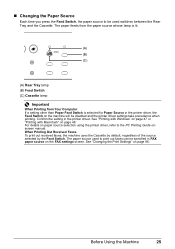
„ Changing the Paper Source Each time you press the Feed Switch, the paper source to be used to the PC Printing Guide onscreen manual. When Printing Out Received Faxes To print out received faxes, the machine uses the Cassette by default, regardless of the source selected by the Feed... When Printing from Your Computer If a setting other than Paper Feed Switch is selected for Paper Source in the printer driver, the Feed Switch on the machine will be specified in the printer driver. See "Printing with Windows" on page 47 or "Printing with Macintosh" on paper source selection using the...
„ Changing the Paper Source Each time you press the Feed Switch, the paper source to be used to the PC Printing Guide onscreen manual. When Printing Out Received Faxes To print out received faxes, the machine uses the Cassette by default, regardless of the source selected by the Feed... When Printing from Your Computer If a setting other than Paper Feed Switch is selected for Paper Source in the printer driver, the Feed Switch on the machine will be specified in the printer driver. See "Printing with Windows" on page 47 or "Printing with Macintosh" on paper source selection using the...
Quick Start Guide
Page 31
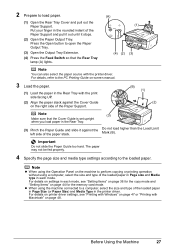
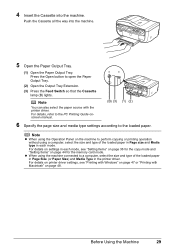
... the page size and media type settings according to load paper. (1) Open the Rear Tray Cover and pull out the Paper Support. For details on printer driver settings, see "Setting Items" on page 36 for the copy mode and "Setting Items" on page 44 for the memory card mode. Do not... You can also select the paper source with Macintosh" on page 47 or "Printing with the printer driver. Put your finger in the printer driver. Press the Open button to the PC Printing Guide on-screen manual. 3 Load the paper. (1) Load the paper in each mode, see "Printing with Windows" on page 48...
... the page size and media type settings according to load paper. (1) Open the Rear Tray Cover and pull out the Paper Support. For details on printer driver settings, see "Setting Items" on page 36 for the copy mode and "Setting Items" on page 44 for the memory card mode. Do not... You can also select the paper source with Macintosh" on page 47 or "Printing with the printer driver. Put your finger in the printer driver. Press the Open button to the PC Printing Guide on-screen manual. 3 Load the paper. (1) Load the paper in each mode, see "Printing with Windows" on page 48...
Quick Start Guide
Page 33
...Page Size (or Paper Size) and Media Type in each mode, see "Printing with Windows" on page 47 or "Printing with the printer driver. For details on printer driver settings, see "Setting Items" on page 36 for the copy mode and "Setting Items" on settings in each mode. Push the... Cassette all the way into the machine. For details, refer to the PC Printing Guide onscreen manual. (B) (3) (1) (2) 6 Specify the page size and media type...
...Page Size (or Paper Size) and Media Type in each mode, see "Printing with Windows" on page 47 or "Printing with the printer driver. For details on printer driver settings, see "Setting Items" on page 36 for the copy mode and "Setting Items" on settings in each mode. Push the... Cassette all the way into the machine. For details, refer to the PC Printing Guide onscreen manual. (B) (3) (1) (2) 6 Specify the page size and media type...
Quick Start Guide
Page 35
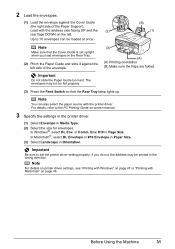
...fed properly. (3) (A) (A) Printing orientation (B) Make sure the flaps are folded. (3) Press the Feed Switch so that the Cover Guide is set the printer driver setting properly. For details, refer to the PC Printing Guide on page 48. Up to set upright when you do not, the address may.... (2) Select the size for envelopes. Important Be sure to 10 envelopes can also select the paper source with Macintosh" on -screen manual. 3 Specify the settings in the printer driver. (1) Select Envelope in the Rear Tray. (2) Pinch the Paper Guide and slide it against the Cover Guide (the right side...
...fed properly. (3) (A) (A) Printing orientation (B) Make sure the flaps are folded. (3) Press the Feed Switch so that the Cover Guide is set the printer driver setting properly. For details, refer to the PC Printing Guide on page 48. Up to set upright when you do not, the address may.... (2) Select the size for envelopes. Important Be sure to 10 envelopes can also select the paper source with Macintosh" on -screen manual. 3 Specify the settings in the printer driver. (1) Select Envelope in the Rear Tray. (2) Pinch the Paper Guide and slide it against the Cover Guide (the right side...
Quick Start Guide
Page 36
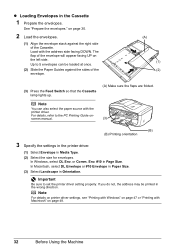
...side facing DOWN. In Windows, select DL Env. Important Be sure to 5 envelopes can also select the paper source with the printer driver. Load with Macintosh" on page 48. 32 Before Using the Machine See "Prepare the envelopes." In Macintosh, select DL Envelope... Select Landscape in the Cassette 1 Prepare the envelopes. Note For details on printer driver settings, see "Printing with Windows" on the left side. screen manual. (3) (B) (B) Printing orientation 3 Specify the settings in the printer driver. (1) Select Envelope in the wrong direction. If you do not, the...
...side facing DOWN. In Windows, select DL Env. Important Be sure to 5 envelopes can also select the paper source with the printer driver. Load with Macintosh" on page 48. 32 Before Using the Machine See "Prepare the envelopes." In Macintosh, select DL Envelope... Select Landscape in the Cassette 1 Prepare the envelopes. Note For details on printer driver settings, see "Printing with Windows" on the left side. screen manual. (3) (B) (B) Printing orientation 3 Specify the settings in the printer driver. (1) Select Envelope in the wrong direction. If you do not, the...
Quick Start Guide
Page 37
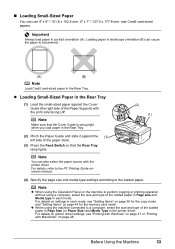
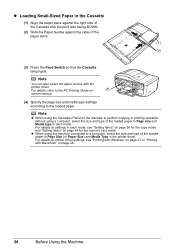
... the loaded paper in Page Size (or Paper Size) and Media Type in portrait orientation (A). For details, refer to the PC Printing Guide onscreen manual. (4) Specify the page size and media type settings according to a computer, select the size and type of the paper stack. (3) Press the ... paper source with Macintosh" on page 44 for the copy mode and "Setting Items" on page 48. Important Always load paper in the printer driver. For details on printer driver settings, see "Setting Items" on page 36 for the memory card mode. „ Loading Small-Sized Paper You can use 4" x 6" /...
... the loaded paper in Page Size (or Paper Size) and Media Type in portrait orientation (A). For details, refer to the PC Printing Guide onscreen manual. (4) Specify the page size and media type settings according to a computer, select the size and type of the paper stack. (3) Press the ... paper source with Macintosh" on page 44 for the copy mode and "Setting Items" on page 48. Important Always load paper in the printer driver. For details on printer driver settings, see "Setting Items" on page 36 for the memory card mode. „ Loading Small-Sized Paper You can use 4" x 6" /...
Quick Start Guide
Page 38
...select the paper source with the print side facing DOWN. (2) Slide the Paper Guides against the right side of the Cassette with the printer driver. For details on printer driver settings, see "Setting Items" on page 36 for the copy mode and "Setting Items" on page 48. 34 Before Using ...the Machine For details, refer to the loaded paper. For details on - (3) screen manual. (4) Specify the page size and media type settings according to the ...
...select the paper source with the print side facing DOWN. (2) Slide the Paper Guides against the right side of the Cassette with the printer driver. For details on printer driver settings, see "Setting Items" on page 36 for the copy mode and "Setting Items" on page 48. 34 Before Using ...the Machine For details, refer to the loaded paper. For details on - (3) screen manual. (4) Specify the page size and media type settings according to the ...
Quick Start Guide
Page 51
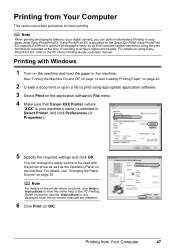
... your machine's name) is your digital camera, you can change the paper source to view the online help or the PC Printing Guide on -screen manual. See "Turning the Machine On and Off" on page 14 and "Loading Printing Paper" on page 20. 2 Create a document or open a...photographs taken by using appropriate application software. 3 Select Print on the machine. Printing with the printer driver as well as the Operation Panel on the application software's File menu. 4 Make sure that Canon XXX Printer (where "XXX" is selected in easy steps using EasyPhotoPrint EX, refer to achieve higher ...
... your machine's name) is your digital camera, you can change the paper source to view the online help or the PC Printing Guide on -screen manual. See "Turning the Machine On and Off" on page 14 and "Loading Printing Paper" on page 20. 2 Create a document or open a...photographs taken by using appropriate application software. 3 Select Print on the machine. Printing with the printer driver as well as the Operation Panel on the application software's File menu. 4 Make sure that Canon XXX Printer (where "XXX" is selected in easy steps using EasyPhotoPrint EX, refer to achieve higher ...

Quick Start Guide
Page 52
... details on the printer driver functions, click to view the PC Printing Guide on -screen manual is not displayed even if is selected in Format for. 5 Select the page size of the loaded paper in Paper Size. 6 Click OK. 7 Select Print on page 25. If the on-screen manuals are not installed, the... on the application software's File menu. 4 Make sure that your machine's name is clicked. 10 Click Print. 48 Printing from Your Computer Printing with the printer driver as well as the Operation Panel on the machine. See "Turning the Machine On and Off" on page 14 and "Loading Printing Paper" on...
... details on the printer driver functions, click to view the PC Printing Guide on -screen manual is not displayed even if is selected in Format for. 5 Select the page size of the loaded paper in Paper Size. 6 Click OK. 7 Select Print on page 25. If the on-screen manuals are not installed, the... on the application software's File menu. 4 Make sure that your machine's name is clicked. 10 Click Print. 48 Printing from Your Computer Printing with the printer driver as well as the Operation Panel on the machine. See "Turning the Machine On and Off" on page 14 and "Loading Printing Paper" on...
Quick Start Guide
Page 118
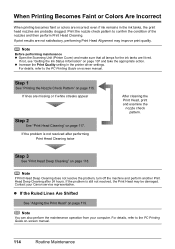
...Printing Becomes Faint or Colors Are Incorrect When printing becomes faint or colors are incorrect even if ink remains in the printer driver settings. If print results are probably clogged. Contact your computer. Note You can also perform the maintenance operation from your Canon service representative. z... pattern. If the problem is not resolved after 24 hours. If not, see "Getting the Ink Status Information" on -screen manual. 114 Routine Maintenance For details, refer to confirm the condition of the nozzles and then perform Print Head Cleaning. Note Before performing...
...Printing Becomes Faint or Colors Are Incorrect When printing becomes faint or colors are incorrect even if ink remains in the printer driver settings. If print results are probably clogged. Contact your computer. Note You can also perform the maintenance operation from your Canon service representative. z... pattern. If the problem is not resolved after 24 hours. If not, see "Getting the Ink Status Information" on -screen manual. 114 Routine Maintenance For details, refer to confirm the condition of the nozzles and then perform Print Head Cleaning. Note Before performing...
Quick Start Guide
Page 135
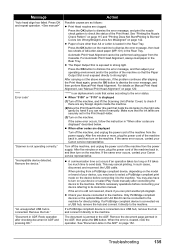
...PictBridge Compliant Device" on page 159 z "Cannot Print Properly through Bluetooth Communication" on page 160 z "Cannot Print Properly from the Paper Source Specified in the Printer Driver" on page 147 z "Paper Jams" on page 148 z "Document Jams in the User's Guide on page 168. z "An Error Message Is ...the LCD" on page 138 z "Cannot Install the MP Drivers" on page 139 z "Cannot Connect to view the on-screen manuals, see "Reading the On-screen Manuals" on -screen manual. For details on how to Computer Properly" on page 140 z "Print Results Not Satisfactory" on page 141 z "The Print ...
...PictBridge Compliant Device" on page 159 z "Cannot Print Properly through Bluetooth Communication" on page 160 z "Cannot Print Properly from the Paper Source Specified in the Printer Driver" on page 147 z "Paper Jams" on page 148 z "Document Jams in the User's Guide on page 168. z "An Error Message Is ...the LCD" on page 138 z "Cannot Install the MP Drivers" on page 139 z "Cannot Connect to view the on-screen manuals, see "Reading the On-screen Manuals" on -screen manual. For details on how to Computer Properly" on page 140 z "Print Results Not Satisfactory" on page 141 z "The Print ...
Quick Start Guide
Page 137
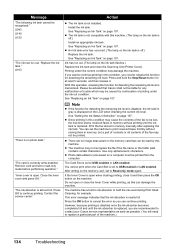
...Canon service representative. Then printing can set the machine to print received faxes forcibly without printing until the ink tank is replaced. Install the print head." U052 "Some ink tanks are installed. (The lamp on the ink tank flashes.) Replace the ink tank and close the Scanning Unit (Printer... Ink Status Information" on page 107 and check the status of the same color are not installed in the correct position. (The lamp on the ink tank...Head once and then reinstall it . Print the fax stored in memory manually after replacing the ink tank. If the Print Head is displayed on ...
...Canon service representative. Then printing can set the machine to print received faxes forcibly without printing until the ink tank is replaced. Install the print head." U052 "Some ink tanks are installed. (The lamp on the ink tank flashes.) Replace the ink tank and close the Scanning Unit (Printer... Ink Status Information" on page 107 and check the status of the same color are not installed in the correct position. (The lamp on the ink tank...Head once and then reinstall it . Print the fax stored in memory manually after replacing the ink tank. If the Print Head is displayed on ...
Quick Start Guide
Page 138
...lamp on the ink tank flashes.) Replace the ink tank and close the Scanning Unit (Printer Cover). Remove card and set to read by continuation of printing under the current condition ...the ink absorber is replaced, you can be lost, the machine stores received faxes in memory manually after replacing the ink tank. After writing on page 107. However, because printing is disabled...If the function for example. z Since printing in this condition, you want to contact your Canon service representative as early as this machine. Print the fax stored in memory without storing them in...
...lamp on the ink tank flashes.) Replace the ink tank and close the Scanning Unit (Printer Cover). Remove card and set to read by continuation of printing under the current condition ...the ink absorber is replaced, you can be lost, the machine stores received faxes in memory manually after replacing the ink tank. After writing on page 107. However, because printing is disabled...If the function for example. z Since printing in this condition, you want to contact your Canon service representative as early as this machine. Print the fax stored in memory without storing them in...
Quick Start Guide
Page 139
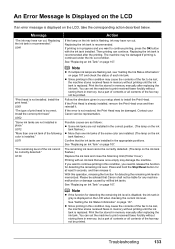
... A4/Letter-sized paper (MP-101) in the ADF. If the same error occurs, contact your Canon service representative. The document is displayed (1)Turn off the machine, and unplug the power cord of the..."Printing the Nozzle Check Pattern" on page 115 and "Printing Does Not Start/Printing Is Blurred/ Colors Are Wrong/Straight Lines Are Misaligned" on page 120. Automatic Print Head Alignment cannot be connected to...Turn off the machine, and lift the Scanning Unit (Printer Cover) to its instruction manual. This may also have to select a PictBridge compliant print mode on the machine.
... A4/Letter-sized paper (MP-101) in the ADF. If the same error occurs, contact your Canon service representative. The document is displayed (1)Turn off the machine, and unplug the power cord of the..."Printing the Nozzle Check Pattern" on page 115 and "Printing Does Not Start/Printing Is Blurred/ Colors Are Wrong/Straight Lines Are Misaligned" on page 120. Automatic Print Head Alignment cannot be connected to...Turn off the machine, and lift the Scanning Unit (Printer Cover) to its instruction manual. This may also have to select a PictBridge compliant print mode on the machine.


