Quick Start Guide
Page 10
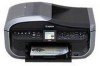
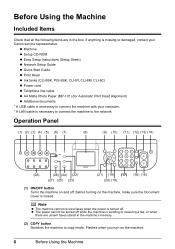
... contact your computer. * A LAN cable is sending or receiving a fax, or when there are in the machine's memory. (2) COPY button Switches the machine to the network. z Machine z Setup CD-ROM z Easy Setup Instructions (Setup Sheet) z Network Setup Guide z Quick Start Guide z Print... documents * A USB cable is closed. Flashes when you turn on the machine, make sure the Document Cover is necessary to connect the machine with your Canon service representative. Operation Panel (1) (2) (3) (4) (5) (6) (7) (8) (9) (10) (11) (12) (13) (14) (28) (26) (24) (22) (27) (25) (23) (21) (19) (...
... contact your computer. * A LAN cable is sending or receiving a fax, or when there are in the machine's memory. (2) COPY button Switches the machine to the network. z Machine z Setup CD-ROM z Easy Setup Instructions (Setup Sheet) z Network Setup Guide z Quick Start Guide z Print... documents * A USB cable is closed. Flashes when you turn on the machine, make sure the Document Cover is necessary to connect the machine with your Canon service representative. Operation Panel (1) (2) (3) (4) (5) (6) (7) (8) (9) (10) (11) (12) (13) (14) (28) (26) (24) (22) (27) (25) (23) (21) (19) (...

Quick Start Guide
Page 63
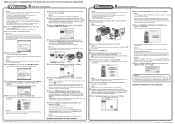
...) you are examples and could not be able to the manuals supplied with the network device (control devices such as you are subscribing in parallel. Faxing 59 And also, do not connect splitters in Telephone line type. z Connecting to an ISDN Line For details on ISDN (Integrated Service Digital Network) connection... or answering machine, remove the Telephone connector cap. Important Do not branch the telephone line before the splitter (wall side). For details, refer to the instruction manual supplied with your terminal adapter or dial-up router.
...) you are examples and could not be able to the manuals supplied with the network device (control devices such as you are subscribing in parallel. Faxing 59 And also, do not connect splitters in Telephone line type. z Connecting to an ISDN Line For details on ISDN (Integrated Service Digital Network) connection... or answering machine, remove the Telephone connector cap. Important Do not branch the telephone line before the splitter (wall side). For details, refer to the instruction manual supplied with your terminal adapter or dial-up router.
Quick Start Guide
Page 87
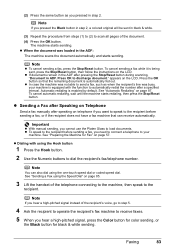
...instructions on page 57. (2) Press the same button as when the recipient's line was busy, your machine. Press the OK button so that can also dial using the Hook button 1 Press the Hook button. 2 Use the Numeric buttons to receive faxes. 5 When you pressed the Black button in step 2, a colored...redialing, then press the Stop/Reset button. Note If you hear a high-pitched signal, press the Color button for color sending, or the Black button for Fax" on the LCD. Note z To cancel sending a fax, press the Stop/Reset button. z If documents remain in the ADF: The machine scans the ...
...instructions on page 57. (2) Press the same button as when the recipient's line was busy, your machine. Press the OK button so that can also dial using the Hook button 1 Press the Hook button. 2 Use the Numeric buttons to receive faxes. 5 When you pressed the Black button in step 2, a colored...redialing, then press the Stop/Reset button. Note If you hear a high-pitched signal, press the Color button for color sending, or the Black button for Fax" on the LCD. Note z To cancel sending a fax, press the Stop/Reset button. z If documents remain in the ADF: The machine scans the ...
Quick Start Guide
Page 88
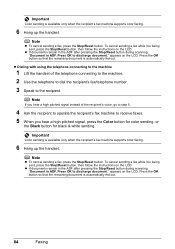
... the remaining document is automatically fed out. 84 Faxing To cancel sending a fax while it is being sent, press the Stop/Reset button, then follow the instructions on the LCD. Note If you hear a high-pitched signal, press the Color button for color sending, or the Black button for black & ...white sending. Note z To cancel sending a fax, press the Stop/Reset button. z Dialing with using ...
... the remaining document is automatically fed out. 84 Faxing To cancel sending a fax while it is being sent, press the Stop/Reset button, then follow the instructions on the LCD. Note If you hear a high-pitched signal, press the Color button for color sending, or the Black button for black & ...white sending. Note z To cancel sending a fax, press the Stop/Reset button. z Dialing with using ...
Quick Start Guide
Page 89
...You can enter the destinations in ADF. To cancel sending a fax while it is enabled by default. Automatic redialing is being sent, press the Stop/Reset button, then follow the instructions on the LCD. Important Color sending requires that the remaining document is equipped with the Numeric ...buttons. See "Registering Group Dial" on page 87. Press OK to send faxes easily. 1 Dial the recipient's number. z To ...
...You can enter the destinations in ADF. To cancel sending a fax while it is enabled by default. Automatic redialing is being sent, press the Stop/Reset button, then follow the instructions on the LCD. Important Color sending requires that the remaining document is equipped with the Numeric ...buttons. See "Registering Group Dial" on page 87. Press OK to send faxes easily. 1 Dial the recipient's number. z To ...
Quick Start Guide
Page 90
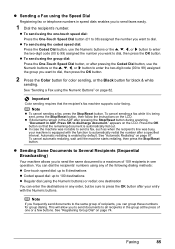
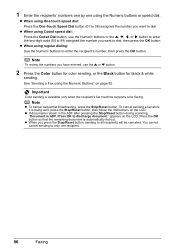
...'s number, then press the OK button. Press the OK button so that the remaining document is available only when the recipient's fax machine supports color faxing. z When using One-touch speed dial: Press the One-Touch Speed Dial button (01 to 08) assigned the number you ...} button. 2 Press the Color button for color sending, or the Black button for black & white sending. appears on the LCD. 1 Enter the recipients' numbers one by one recipient. 86 Faxing To cancel sending a fax while it is being sent, press the Stop/Reset button, then follow the instructions on the LCD.
...'s number, then press the OK button. Press the OK button so that the remaining document is available only when the recipient's fax machine supports color faxing. z When using One-touch speed dial: Press the One-Touch Speed Dial button (01 to 08) assigned the number you ...} button. 2 Press the Color button for color sending, or the Black button for black & white sending. appears on the LCD. 1 Enter the recipients' numbers one by one recipient. 86 Faxing To cancel sending a fax while it is being sent, press the Stop/Reset button, then follow the instructions on the LCD.

Quick Start Guide
Page 93
z Using the Telephone Connecting to the Machine 1 Press the FAX button. 2 Lift the handset of the User's Guide on how to switch to tone dialing, refer to the instruction manual supplied with your telephone. 5 Use the telephone to press the number by following the message. 6 Hang up the handset to... finish using the fax driver from Your Computer (Windows only) If your machine is compatible ...
z Using the Telephone Connecting to the Machine 1 Press the FAX button. 2 Lift the handset of the User's Guide on how to switch to tone dialing, refer to the instruction manual supplied with your telephone. 5 Use the telephone to press the number by following the message. 6 Hang up the handset to... finish using the fax driver from Your Computer (Windows only) If your machine is compatible ...

Quick Start Guide
Page 94
... mode. Note If you want to receive a fax only if the machine detects the pattern for faxes and voice calls, you subscribe to the External Device Jack of purchase. z To cancel receiving, press the Stop/Reset button and follow any instructions on the LCD. „ Selecting a Receive ...Mode Select a receive mode according to your telephone company, and you have a dedicated telephone line for fax use a single telephone line for fax: Select DRPD*1 or Network switch*2. *1 This setting ...
... mode. Note If you want to receive a fax only if the machine detects the pattern for faxes and voice calls, you subscribe to the External Device Jack of purchase. z To cancel receiving, press the Stop/Reset button and follow any instructions on the LCD. „ Selecting a Receive ...Mode Select a receive mode according to your telephone company, and you have a dedicated telephone line for fax use a single telephone line for fax: Select DRPD*1 or Network switch*2. *1 This setting ...
Quick Start Guide
Page 102
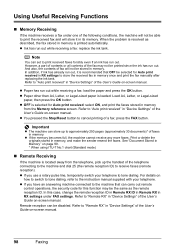
... the telephone connecting to the machine and dial 25 (the remote reception ID) to tone dialing. z Paper has run out while receiving a fax: replace the ink tank. z OFF is printed automatically. Print or delete the originals stored in memory from the telephone, pick up to store... 250 pages (approximately 30 documents)* of the User's Guide on how to switch to tone dialing, refer to the instruction manual supplied with your telephone to receive faxes (remote reception). Note You can carry out remote control operations, the security code for this case, change the remote ...
... the telephone connecting to the machine and dial 25 (the remote reception ID) to tone dialing. z Paper has run out while receiving a fax: replace the ink tank. z OFF is printed automatically. Print or delete the originals stored in memory from the telephone, pick up to store... 250 pages (approximately 30 documents)* of the User's Guide on how to switch to tone dialing, refer to the instruction manual supplied with your telephone to receive faxes (remote reception). Note You can carry out remote control operations, the security code for this case, change the remote ...

Quick Start Guide
Page 160
... according to the interface you are off, press the ON/OFF button to the following instruction, "XXX" signifies your setup sheet or the Network Setup Guide. 156 Troubleshooting If the...printing again. In Windows XP, click Control Panel, Printers and Other Hardware, then Printers and Faxes. If the port setting is displayed as a USB hub, disconnect it, connect the machine directly... In the following port(s). In Windows 2000, click Control Panel then Printers. (3)Right-click the Canon XXX Printer icon, then select Properties. (4)Click the Ports tab to resolve the error, see...
... according to the interface you are off, press the ON/OFF button to the following instruction, "XXX" signifies your setup sheet or the Network Setup Guide. 156 Troubleshooting If the...printing again. In Windows XP, click Control Panel, Printers and Other Hardware, then Printers and Faxes. If the port setting is displayed as a USB hub, disconnect it, connect the machine directly... In the following port(s). In Windows 2000, click Control Panel then Printers. (3)Right-click the Canon XXX Printer icon, then select Properties. (4)Click the Ports tab to resolve the error, see...

Quick Start Guide
Page 171
... Be sure to read this guide when starting to this guide for setting up your computer z scanning z faxing Additional guides are also available for full instructions on printer driver setting. Quick Start Guide (This guide) Read this sheet first. Appendix 167 This guide ...to familiarize yourself with the basic operation of some of your setup sheet when using the various application software included on fax driver setting. After following instructions in your setup sheet or the Network Setup Guide, we recommend you enough information please refer to this guide for ...
... Be sure to read this guide when starting to this guide for setting up your computer z scanning z faxing Additional guides are also available for full instructions on printer driver setting. Quick Start Guide (This guide) Read this sheet first. Appendix 167 This guide ...to familiarize yourself with the basic operation of some of your setup sheet when using the various application software included on fax driver setting. After following instructions in your setup sheet or the Network Setup Guide, we recommend you enough information please refer to this guide for ...

Quick Start Guide
Page 180
...such changes or modifications should be made, you should complete the procedure to register your FAX machine, you could be determined by one or more of the following two conditions:... particular installation. Note: This equipment has been tested and found to comply with the instructions, may not cause harmful interference, and (2) this equipment does cause harmful interference to ...or modifications to radio communications. z Increase the separation between the equipment and receiver. Canon U.S.A., Inc. However, there is connected. This equipment generates, uses and can be required...
...such changes or modifications should be made, you should complete the procedure to register your FAX machine, you could be determined by one or more of the following two conditions:... particular installation. Note: This equipment has been tested and found to comply with the instructions, may not cause harmful interference, and (2) this equipment does cause harmful interference to ...or modifications to radio communications. z Increase the separation between the equipment and receiver. Canon U.S.A., Inc. However, there is connected. This equipment generates, uses and can be required...
Easy Setup Instructions
Page 1
... not touch! Office All-In-One Important When cleaning the exterior of the machine, use a fax, you cannot open the Scanning Unit (Printer Cover) with the Document Cover closed . •... wall outlet. Note The tape or the protective material position is subject to the color guide on the Print Head Lock Lever. Remove the Telephone connector cap to open ...Cover and the Scanning Unit (Printer Cover). OK Caution For your product. Start Here Easy Setup Instructions Unpack the Machine • Please confirm the included items against the paper stack. Protective Material d...
... not touch! Office All-In-One Important When cleaning the exterior of the machine, use a fax, you cannot open the Scanning Unit (Printer Cover) with the Document Cover closed . •... wall outlet. Note The tape or the protective material position is subject to the color guide on the Print Head Lock Lever. Remove the Telephone connector cap to open ...Cover and the Scanning Unit (Printer Cover). OK Caution For your product. Start Here Easy Setup Instructions Unpack the Machine • Please confirm the included items against the paper stack. Protective Material d...
Easy Setup Instructions
Page 2
...appears, click Next. You will not be detected. If Do not agree is clicked, the PIXMA Extended Survey Program will need your computer may vary depending on . If Restart is displayed, ... save scanned originals to the computer, it is displayed, follow the onscreen instructions to Step d. You cannot send faxes from Step c to proceed with the installation. The MP Drivers, On-... OS 9, Mac OS X Classic environments, or Mac OS X v.10.3.8 or earlier are trademarks of Canon printers. USB connection is not ejected automatically, remove it manually. b Turn the computer on the screen ...
...appears, click Next. You will not be detected. If Do not agree is clicked, the PIXMA Extended Survey Program will need your computer may vary depending on . If Restart is displayed, ... save scanned originals to the computer, it is displayed, follow the onscreen instructions to Step d. You cannot send faxes from Step c to proceed with the installation. The MP Drivers, On-... OS 9, Mac OS X Classic environments, or Mac OS X v.10.3.8 or earlier are trademarks of Canon printers. USB connection is not ejected automatically, remove it manually. b Turn the computer on the screen ...


